blog
Performance Testing Using MySQLdump and the MySQL Shell Utility

In my previous post I explained how to take a logical backup using the mysql shell utilities. In this post, we shall compare the speed of the backup and restoration process.
MySQL Shell Speed Test
We are going to do a comparison of backup and recovery speed of mysqldump and MySQL shell utility tools.
Below tools are used for speed comparison:
- mysqldump
- util.dumpInstance
- util.loadDump
Hardware Configuration
Two standalone servers with identical configurations.
Server 1
* IP: 192.168.33.14
* CPU: 2 Cores
* RAM: 4 GB
* DISK: 200 GB SSD
Server 2
* IP: 192.168.33.15
* CPU: 2 Cores
* RAM: 4 GB
* DISK: 200 GB SSD
Workload Preparation
On Server 1 (192.168.33.14), We have loaded approx 10 GB data.
Now, We want to restore the data from Server 1 (192.168.33.14) to Server 2 (192.168.33.15).
MySQL Setup
MySQL Version: 8.0.22
InnoDB Buffer Pool Size: 1 GB
InnoDB Log File Size: 16 MB
Binary Logging: On
We loaded 50M records using sysbench.
[root@centos14 sysbench]# sysbench oltp_insert.lua --table-size=5000000 --num-threads=8 --rand-type=uniform --db-driver=mysql --mysql-db=sbtest --tables=10 --mysql-user=root --mysql-password=****** prepare
WARNING: --num-threads is deprecated, use --threads instead
sysbench 1.0.20 (using bundled LuaJIT 2.1.0-beta2)
Initializing worker threads...
Creating table 'sbtest3'...
Creating table 'sbtest4'...
Creating table 'sbtest7'...
Creating table 'sbtest1'...
Creating table 'sbtest2'...
Creating table 'sbtest8'...
Creating table 'sbtest5'...
Creating table 'sbtest6'...
Inserting 5000000 records into 'sbtest1'
Inserting 5000000 records into 'sbtest3'
Inserting 5000000 records into 'sbtest7
.
.
.
Creating a secondary index on 'sbtest9'...
Creating a secondary index on 'sbtest10'...Test Case One
In this case we are going to take a logical backup using mysqldump command.
Example
[root@centos14 vagrant]# time /usr/bin/mysqldump --defaults-file=/etc/my.cnf --flush-privileges --hex-blob --opt --master-data=2 --single-transaction --triggers --routines --events --set-gtid-purged=OFF --all-databases |gzip -6 -c > /home/vagrant/test/mysqldump_schemaanddata.sql.gzstart_time = 2020-11-09 17:40:02
end_time = 2020-11-09 37:19:08
It took nearly 20 minutes 19 seconds to take a dump of all databases with a total size of around 10GB.
Test Case Two
Now let’s try with MySQL shell utility. We are going to use dumpInstance to take a full backup.
Example
MySQL  localhost:33060+ ssl  JS > util.dumpInstance("/home/vagrant/production_backup", {threads: 2, ocimds: true,compatibility: ["strip_restricted_grants"]})

Acquiring global read lock

Global read lock acquired

All transactions have been started

Locking instance for backup

Global read lock has been released

Checking for compatibility with MySQL Database Service 8.0.22

NOTE: Progress information uses estimated values and may not be accurate.

Data dump for table `sbtest`.`sbtest1` will be written to 38 files

Data dump for table `sbtest`.`sbtest10` will be written to 38 files

Data dump for table `sbtest`.`sbtest3` will be written to 38 files

Data dump for table `sbtest`.`sbtest2` will be written to 38 files

Data dump for table `sbtest`.`sbtest4` will be written to 38 files

Data dump for table `sbtest`.`sbtest5` will be written to 38 files

Data dump for table `sbtest`.`sbtest6` will be written to 38 files

Data dump for table `sbtest`.`sbtest7` will be written to 38 files

Data dump for table `sbtest`.`sbtest8` will be written to 38 files

Data dump for table `sbtest`.`sbtest9` will be written to 38 files

2 thds dumping - 36% (17.74M rows / ~48.14M rows), 570.93K rows/s, 111.78 MB/s uncompressed, 50.32 MB/s compressed

1 thds dumping - 100% (50.00M rows / ~48.14M rows), 587.61K rows/s, 115.04 MB/s uncompressed, 51.79 MB/s compressed

Duration: 00:01:27s

Schemas dumped: 3

Tables dumped: 10

Uncompressed data size: 9.78 GB

Compressed data size: 4.41 GB

Compression ratio: 2.2

Rows written: 50000000

Bytes written: 4.41 GB

Average uncompressed throughput: 111.86 MB/s

Average compressed throughput: 50.44 MB/s
It took a total of 1 minute 27 seconds to take a dump of the entire database (same data as used for mysqldump) and also it shows its progress which will be really helpful to know how much of the backup has completed. It gives the time it took to perform the backup.
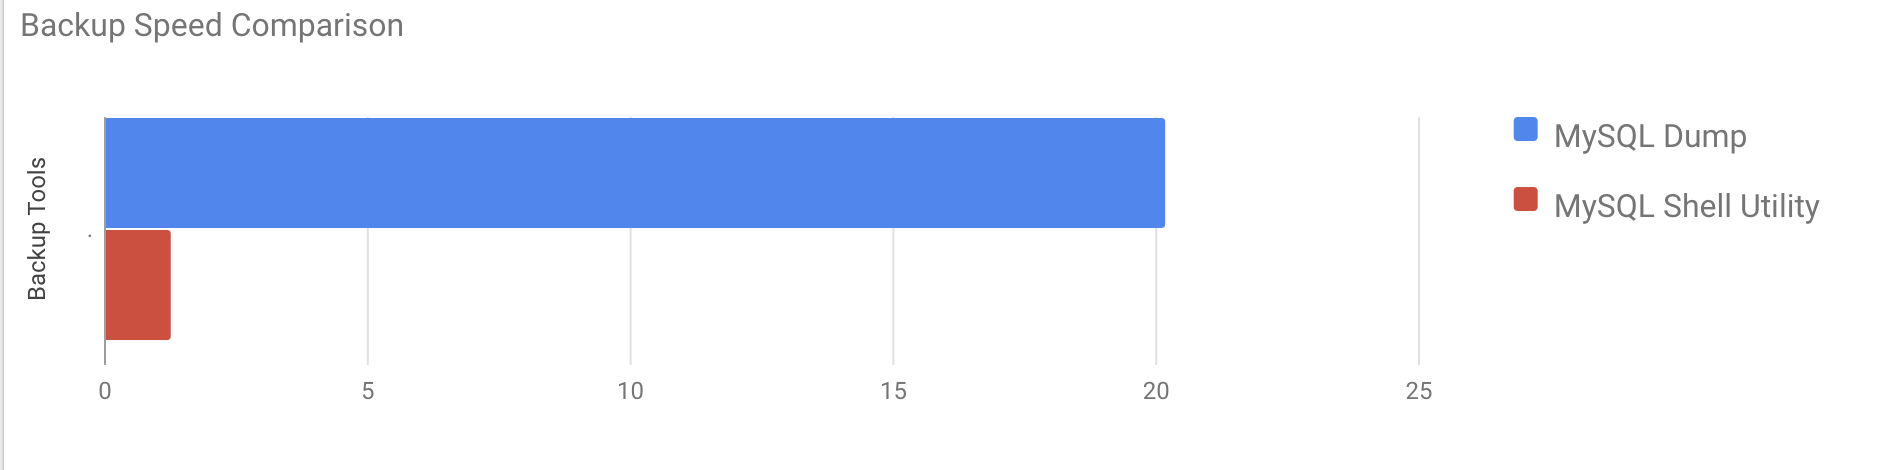
The parallelism depends on the number of cores in the server. Roughly increasing the value won’t be helpful in my case. (My machine has 2 cores).
Restoration Speed Test
In the restoration part, we are going to restore the mysqldump backup on another standalone server. The backup file was already moved to the destination server using rsync.
Test Case 1
Example
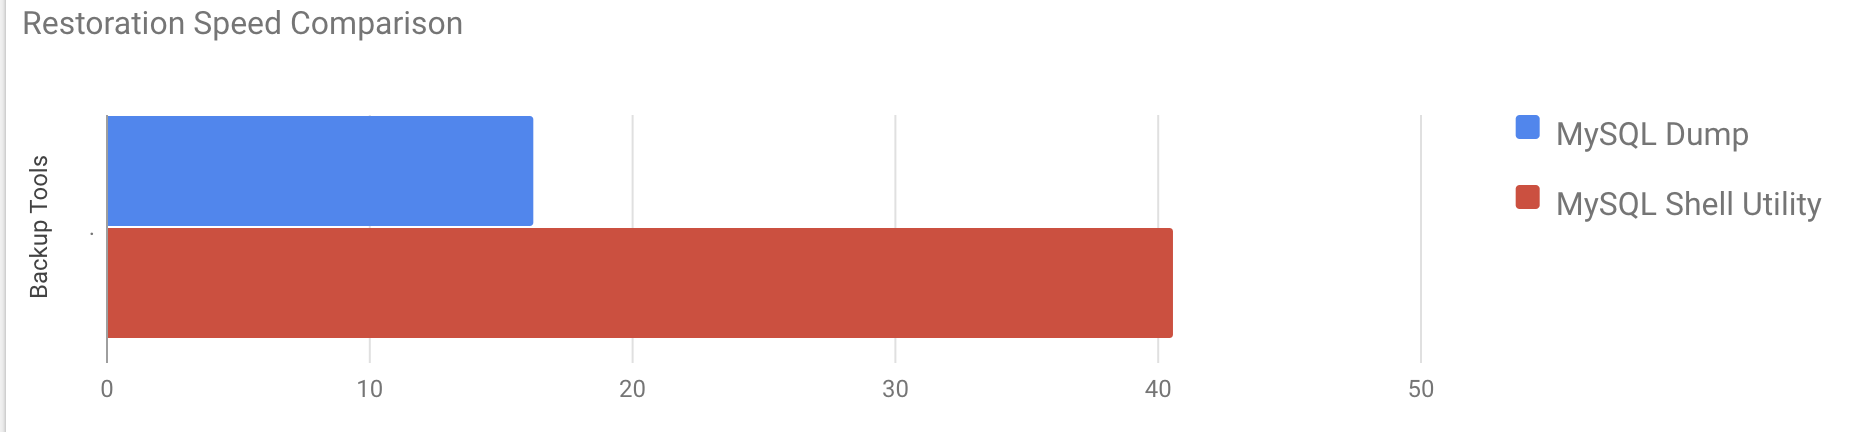
[root@centos15 vagrant]#time gunzip < /mnt/mysqldump_schemaanddata.sql.gz | mysql -u root -pIt took around 16 minutes 26 seconds to restore the 10GB of data.
Test Case 2
In this case we are using mysql shell utility to load the backup file on another standalone host. We already moved the backup file to the destination server. Let’s start the restoration process.
Example
MySQL localhost:33060+ ssl JS > util.loadDump("/home/vagrant/production_backup", {progressFile :"/home/vagrant/production_backup/log.json",threads :2})
Opening dump...
Target is MySQL 8.0.22. Dump was produced from MySQL 8.0.22
Checking for pre-existing objects...
Executing common preamble SQL
Executing DDL script for schema `cluster_control`
Executing DDL script for schema `proxydemo`
Executing DDL script for schema `sbtest`
.
.
.
2 thds loading 1% (150.66 MB / 9.78 GB), 6.74 MB/s, 4 / 10 tables done
2 thds loading / 100% (9.79 GB / 9.79 GB), 1.29 MB/s, 10 / 10 tables done
[Worker001] sbtest@sbtest8@@37.tsv.zst: Records: 131614 Deleted: 0 Skipped: 0 Warnings: 0
[Worker002] sbtest@sbtest10@@37.tsv.zst: Records: 131614 Deleted: 0 Skipped: 0 Warnings: 0
Executing common postamble SQL
380 chunks (50.00M rows, 9.79 GB) for 10 tables in 2 schemas were loaded in 40 min 6 sec (avg throughput 4.06 MB/s)It took around 40 minutes 6 seconds to restore the 10GB of data.
Now let's try to disable the redo log and start the data importing using mysql shell utility.
mysql> alter instance disable innodb redo_log;
Query OK, 0 rows affected (0.00 sec)
MySQL localhost:33060+ ssl JS >util.loadDump("/home/vagrant/production_backup", {progressFile :"/home/vagrant/production_backup/log.json",threads :2})
Opening dump...
Target is MySQL 8.0.22. Dump was produced from MySQL 8.0.22
Checking for pre-existing objects...
Executing common preamble SQL
.
.
.
380 chunks (50.00M rows, 9.79 GB) for 10 tables in 3 schemas were loaded in 19 min 56 sec (avg throughput 8.19 MB/s)
0 warnings were reported during the load.After disabling the redo log, the average throughput was increased up to 2x.
Note: Do not disable redo logging on a production system. It allows shutdown and restart of the server while redo logging is disabled, but an unexpected server stoppage while redo logging is disabled can cause data loss and instance corruption.
Physical Backups
As you may have noticed, the logical backup methods, even if multithreaded, are quite time consuming even for a small data set that we tested them against. This is one of the reasons why ClusterControl provides physical backup method that’s based on the copying of the files - in such case we are not limited by the SQL layer that processes logical backup but rather by hardware - how fast the disk can read the files and how fast the network can transfer data between the database node and backup server.
ClusterControl comes with different ways to implement physical backups, which method is available will depend on the cluster type and sometimes even the vendor. Let’s take a look at the Xtrabackup executed by ClusterControl that will create a full backup of the data on our test environment.
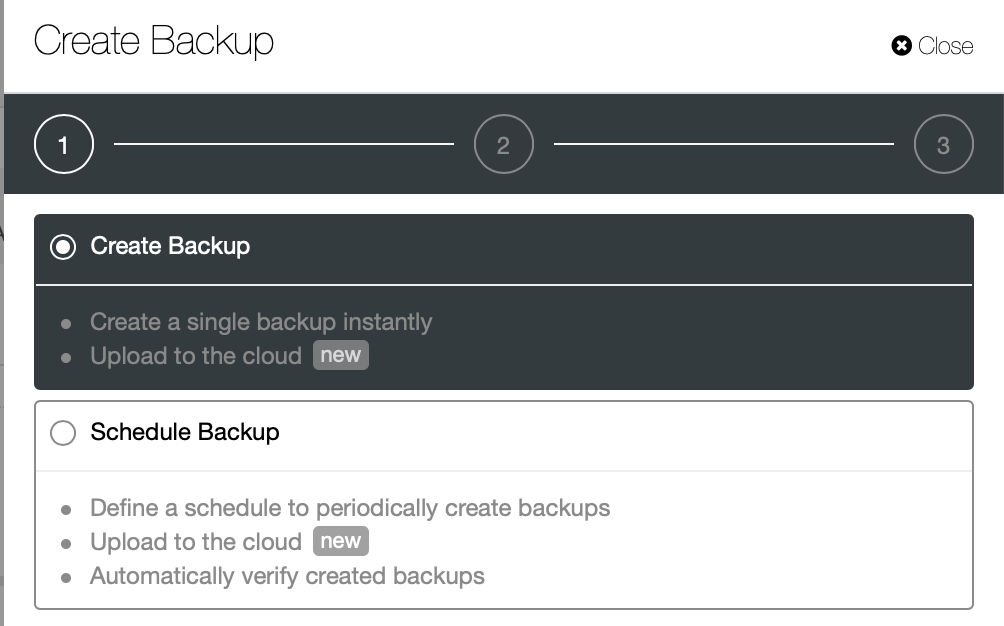
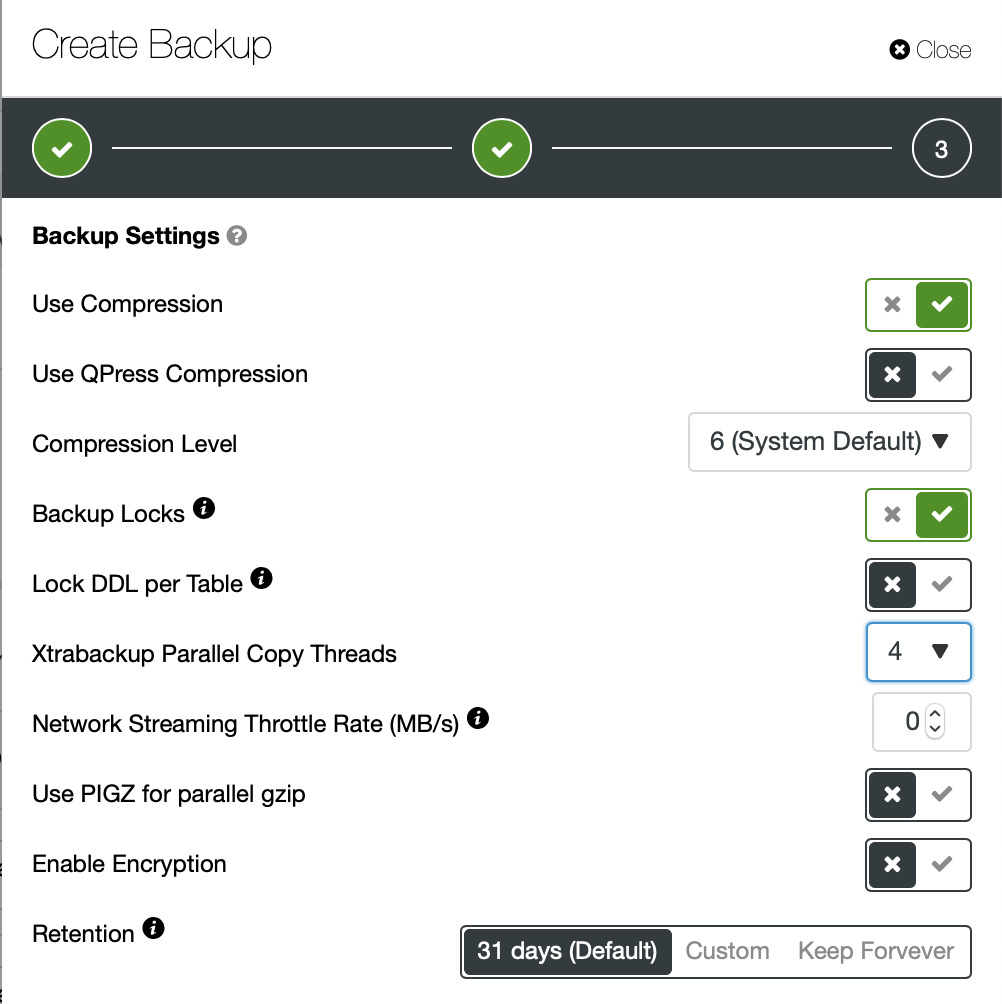
We are going to create an ad-hoc backup this time but ClusterControl lets you create a full backup schedule as well.
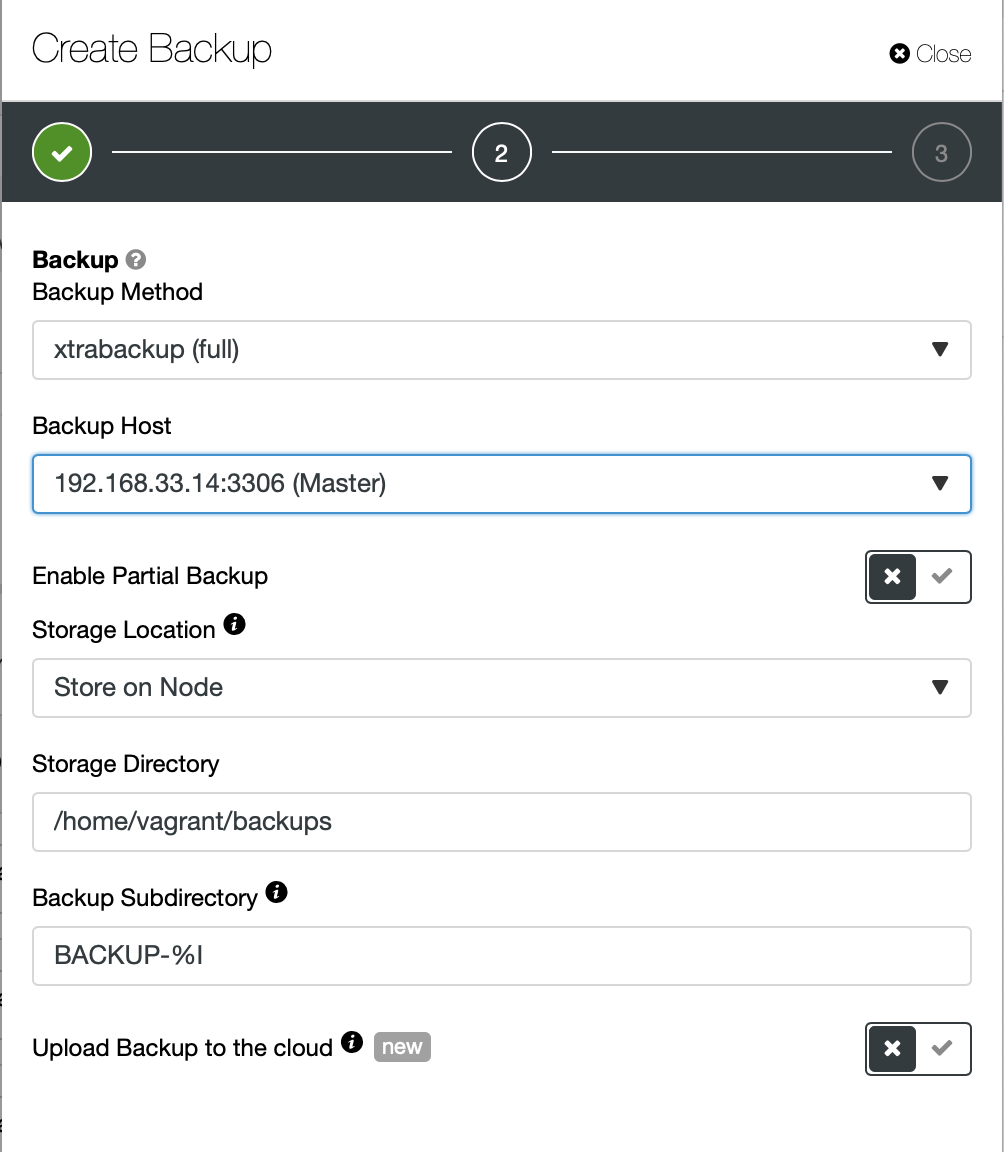
Here we pick the backup method (xtrabackup) as well as the host we are going to take the backup from. We can also store it locally on the node or it can be streamed to a ClusterControl instance. Additionally, you can upload the backup to the cloud (AWS, Google Cloud and Azure are supported).
The backup took around 10 mins to complete. Here the logs from cmon_backup.metadata file.
[root@centos14 BACKUP-9]# cat cmon_backup.metadata
{
"class_name": "CmonBackupRecord",
"backup_host": "192.168.33.14",
"backup_tool_version": "2.4.21",
"compressed": true,
"created": "2020-11-17T23:37:15.000Z",
"created_by": "",
"db_vendor": "oracle",
"description": "",
"encrypted": false,
"encryption_md5": "",
"finished": "2020-11-17T23:47:47.681Z"
}Now let's try the same to restore using ClusterControl. ClusterControl > Backup > Restore Backup
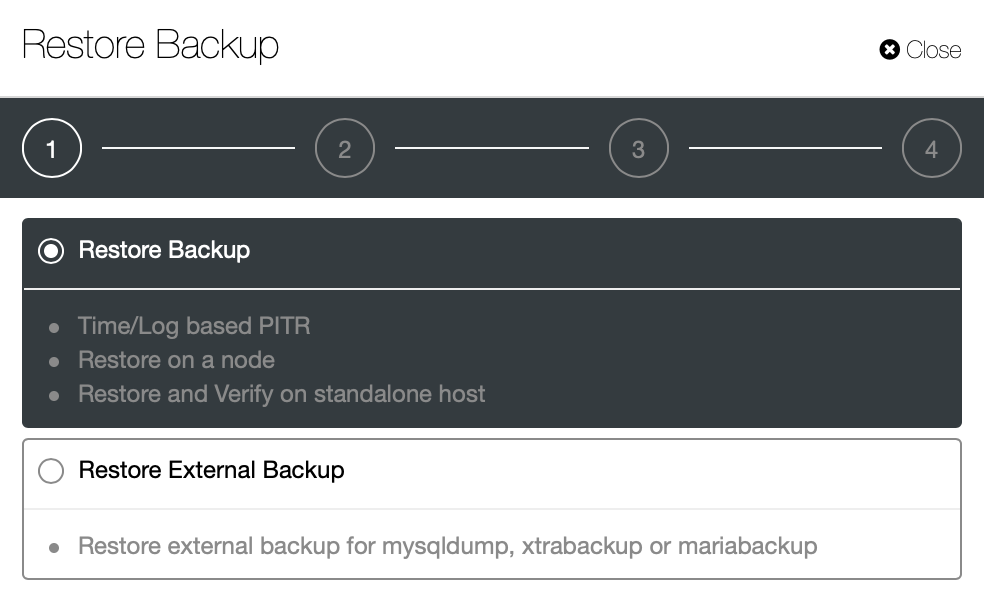
Here we pick the restore backup option, it will support time and log based recovery too.
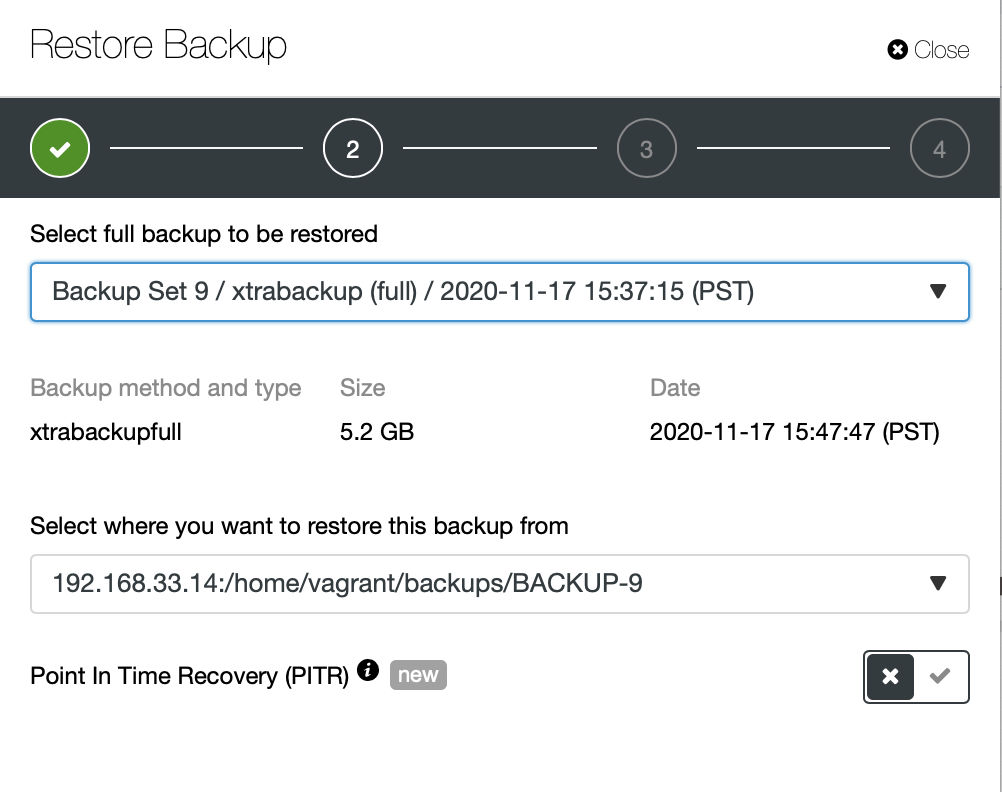
Here we choose the backup file source path and then destination server. You also have to make sure this host can be reached from ClusterControl node using SSH.
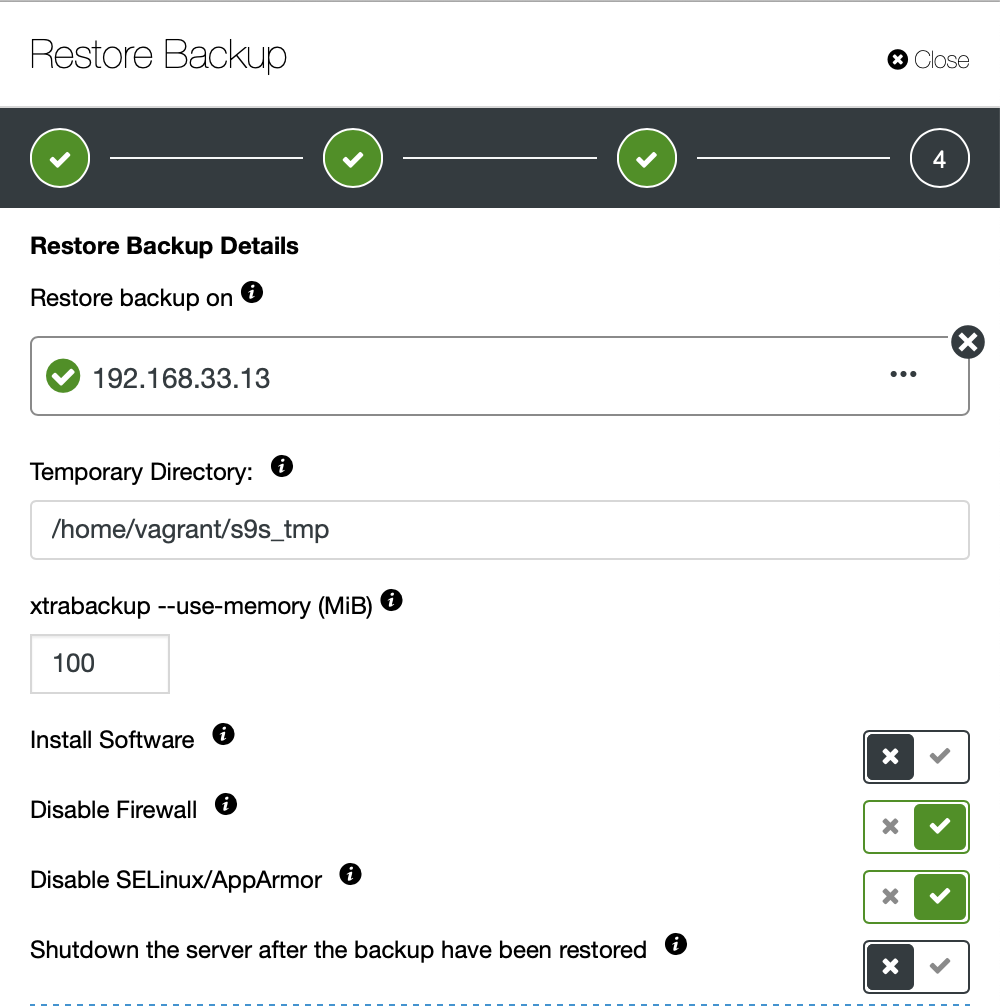
We don't want ClusterControl to set up software, so we disabled that option. After restoration it will keep the server running.
It took around 4 minutes 18 seconds to restore the 10GB of data. Xtrabackup does not lock your database during the backup process. For large databases (100+ GB), it provides much better restoration time as compared to mysqldump/shell utility. Also lusterControl supports partial backup and restoration as one of my colleagues explained in his blog: Partial backup and restore.
Conclusion
Each method has its own pros and cons. As we have seen, there is not one method that works best for everything that you need to do. We need to choose our tool based on our production environment and target time for recovery.


