blog
MySQL InnoDB Cluster 8.0 – A Complete Operation Walk-through: Part Two

In the first part of this blog, we covered a deployment walkthrough of MySQL InnoDB Cluster with an example on how the applications can connect to the cluster via a dedicated read/write port.
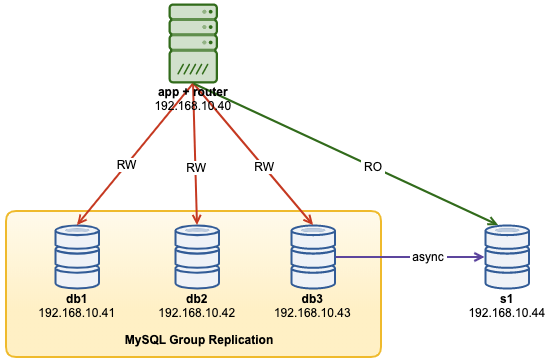
In this operation walkthrough, we are going to show examples on how to monitor, manage and scale the InnoDB Cluster as part of the ongoing cluster maintenance operations. We’ll use the same cluster what we deployed in the first part of the blog. The following diagram shows our architecture:
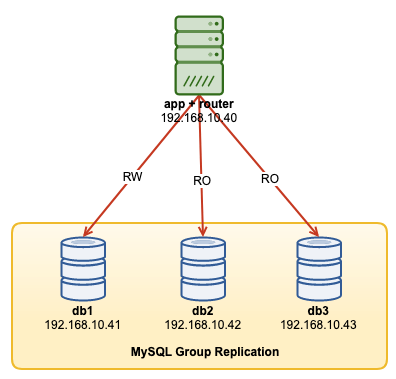
We have a three-node MySQL Group Replication and one application server running with MySQL router. All servers are running on Ubuntu 18.04 Bionic.
MySQL InnoDB Cluster Command Options
Before we move further with some examples and explanations, it’s good to know that you can get an explanation of each function in MySQL cluster for cluster component by using the help() function, as shown below:
$ mysqlsh
MySQL|localhost:3306 ssl|JS> shell.connect("clusteradmin@db1:3306");
MySQL|db1:3306 ssl|JS> cluster = dba.getCluster();

MySQL|db1:3306 ssl|JS> cluster.help()
The following list shows the available functions on MySQL Shell 8.0.18, for MySQL Community Server 8.0.18:
- addInstance(instance[, options])– Adds an Instance to the cluster.
- checkInstanceState(instance)– Verifies the instance gtid state in relation to the cluster.
- describe()– Describe the structure of the cluster.
- disconnect()– Disconnects all internal sessions used by the cluster object.
- dissolve([options])– Deactivates replication and unregisters the ReplicaSets from the cluster.
- forceQuorumUsingPartitionOf(instance[, password])– Restores the cluster from quorum loss.
- getName()– Retrieves the name of the cluster.
- help([member])– Provides help about this class and it’s members
- options([options])– Lists the cluster configuration options.
- rejoinInstance(instance[, options])– Rejoins an Instance to the cluster.
- removeInstance(instance[, options])– Removes an Instance from the cluster.
- rescan([options])– Rescans the cluster.
- resetRecoveryAccountsPassword(options)– Reset the password of the recovery accounts of the cluster.
- setInstanceOption(instance, option, value)– Changes the value of a configuration option in a Cluster member.
- setOption(option, value)– Changes the value of a configuration option for the whole cluster.
- setPrimaryInstance(instance)– Elects a specific cluster member as the new primary.
- status([options])– Describe the status of the cluster.
- switchToMultiPrimaryMode()– Switches the cluster to multi-primary mode.
- switchToSinglePrimaryMode([instance])– Switches the cluster to single-primary mode.
We are going to look into most of the functions available to help us monitor, manage and scale the cluster.
Monitoring MySQL InnoDB Cluster Operations
Cluster Status
To check the cluster status, firstly use the MySQL shell command line and then connect as clusteradmin@{one-of-the-db-nodes}:
$ mysqlsh
MySQL|localhost:3306 ssl|JS> shell.connect("clusteradmin@db1:3306");
Then, create an object called “cluster” and declare it as “dba” global object which provides access to InnoDB cluster administration functions using the AdminAPI (check out MySQL Shell API docs):
MySQL|db1:3306 ssl|JS> cluster = dba.getCluster();
Then, we can use the object name to call the API functions for “dba” object:
MySQL|db1:3306 ssl|JS> cluster.status(){
"clusterName": "my_innodb_cluster",
"defaultReplicaSet": {
"name": "default",
"primary": "db1:3306",
"ssl": "REQUIRED",
"status": "OK",
"statusText": "Cluster is ONLINE and can tolerate up to ONE failure.",
"topology": {
"db1:3306": {
"address": "db1:3306",
"mode": "R/W",
"readReplicas": {},
"replicationLag": null,
"role": "HA",
"status": "ONLINE",
"version": "8.0.18"
},
"db2:3306": {
"address": "db2:3306",
"mode": "R/O",
"readReplicas": {},
"replicationLag": "00:00:09.061918",
"role": "HA",
"status": "ONLINE",
"version": "8.0.18"
},
"db3:3306": {
"address": "db3:3306",
"mode": "R/O",
"readReplicas": {},
"replicationLag": "00:00:09.447804",
"role": "HA",
"status": "ONLINE",
"version": "8.0.18"
}
},
"topologyMode": "Single-Primary"
},
"groupInformationSourceMember": "db1:3306"
}The output is pretty long but we can filter it out by using the map structure. For example, if we would like to view the replication lag for db3 only, we could do like the following:
MySQL|db1:3306 ssl|JS> cluster.status().defaultReplicaSet.topology["db3:3306"].replicationLag
00:00:09.447804
Note that replication lag is something that will happen in group replication, depending on the write intensivity of the primary member in the replica set and the group_replication_flow_control_* variables. We are not going to cover this topic in detail here. Check out this blog post to understand further on the group replication performance and flow control.
Another similar function is the describe() function, but this one is a bit more simple. It describes the structure of the cluster including all its information, ReplicaSets and Instances:
MySQL|db1:3306 ssl|JS> cluster.describe(){
"clusterName": "my_innodb_cluster",
"defaultReplicaSet": {
"name": "default",
"topology": [
{
"address": "db1:3306",
"label": "db1:3306",
"role": "HA"
},
{
"address": "db2:3306",
"label": "db2:3306",
"role": "HA"
},
{
"address": "db3:3306",
"label": "db3:3306",
"role": "HA"
}
],
"topologyMode": "Single-Primary"
}
}Similarly, we can filter the JSON output using map structure:
MySQL|db1:3306 ssl|JS> cluster.describe().defaultReplicaSet.topologyMode
Single-Primary
When the primary node went down (in this case, is db1), the output returned the following:
MySQL|db1:3306 ssl|JS> cluster.status(){
"clusterName": "my_innodb_cluster",
"defaultReplicaSet": {
"name": "default",
"primary": "db2:3306",
"ssl": "REQUIRED",
"status": "OK_NO_TOLERANCE",
"statusText": "Cluster is NOT tolerant to any failures. 1 member is not active",
"topology": {
"db1:3306": {
"address": "db1:3306",
"mode": "n/a",
"readReplicas": {},
"role": "HA",
"shellConnectError": "MySQL Error 2013 (HY000): Lost connection to MySQL server at 'reading initial communication packet', system error: 104",
"status": "(MISSING)"
},
"db2:3306": {
"address": "db2:3306",
"mode": "R/W",
"readReplicas": {},
"replicationLag": null,
"role": "HA",
"status": "ONLINE",
"version": "8.0.18"
},
"db3:3306": {
"address": "db3:3306",
"mode": "R/O",
"readReplicas": {},
"replicationLag": null,
"role": "HA",
"status": "ONLINE",
"version": "8.0.18"
}
},
"topologyMode": "Single-Primary"
},
"groupInformationSourceMember": "db2:3306"
}Pay attention to the status OK_NO_TOLERANCE, where the cluster is still up and running but it can’t tolerate any more failure after one over three node is not available. The primary role has been taken over by db2 automatically, and the database connections from the application will be rerouted to the correct node if they connect through MySQL Router. Once db1 comes back online, we should see the following status:
MySQL|db1:3306 ssl|JS> cluster.status(){
"clusterName": "my_innodb_cluster",
"defaultReplicaSet": {
"name": "default",
"primary": "db2:3306",
"ssl": "REQUIRED",
"status": "OK",
"statusText": "Cluster is ONLINE and can tolerate up to ONE failure.",
"topology": {
"db1:3306": {
"address": "db1:3306",
"mode": "R/O",
"readReplicas": {},
"replicationLag": null,
"role": "HA",
"status": "ONLINE",
"version": "8.0.18"
},
"db2:3306": {
"address": "db2:3306",
"mode": "R/W",
"readReplicas": {},
"replicationLag": null,
"role": "HA",
"status": "ONLINE",
"version": "8.0.18"
},
"db3:3306": {
"address": "db3:3306",
"mode": "R/O",
"readReplicas": {},
"replicationLag": null,
"role": "HA",
"status": "ONLINE",
"version": "8.0.18"
}
},
"topologyMode": "Single-Primary"
},
"groupInformationSourceMember": "db2:3306"
}It shows that db1 is now available but served as secondary with read-only enabled. The primary role is still assigned to db2 until something goes wrong to the node, where it will be automatically failed over to the next available node.
Check Instance State
We can check the state of a MySQL node before planning to add it into the cluster by using the checkInstanceState() function. It analyzes the instance executed GTIDs with the executed/purged GTIDs on the cluster to determine if the instance is valid for the cluster.
The following shows instance state of db3 when it was in standalone mode, before part of the cluster:
MySQL|db1:3306 ssl|JS> cluster.checkInstanceState("db3:3306")
Cluster.checkInstanceState: The instance 'db3:3306' is a standalone instance but is part of a different InnoDB Cluster (metadata exists, instance does not belong to that metadata, and Group Replication is not active).
If the node is already part of the cluster, you should get the following:
MySQL|db1:3306 ssl|JS> cluster.checkInstanceState("db3:3306")
Cluster.checkInstanceState: The instance 'db3:3306' already belongs to the ReplicaSet: 'default'.
Monitor Any “Queryable” State
With MySQL Shell, we can now use the built-in show and watch command to monitor any administrative query in real-time. For example, we can get the real-time value of threads connected by using:
MySQL|db1:3306 ssl|JS> show query SHOW STATUS LIKE '%thread%';Or get the current MySQL processlist:
MySQL|db1:3306 ssl|JS> show query SHOW FULL PROCESSLISTWe can then use watch command to run a report in the same way as the show command, but it refreshes the results at regular intervals until you cancel the command using Ctrl + C. As shown in the following examples:
MySQL|db1:3306 ssl|JS> watch query SHOW STATUS LIKE '%thread%';
MySQL|db1:3306 ssl|JS> watch query --interval=1 SHOW FULL PROCESSLIST
The default refresh interval is 2 seconds. You can change the value by using the –interval flag and specified a value from 0.1 up to 86400.
MySQL InnoDB Cluster Management Operations
Primary Switchover
Primary instance is the node that can be considered as the leader in a replication group, that has the ability to perform read and write operations. Only one primary instance per cluster is allowed in single-primary topology mode. This topology is also known as replica set and is the recommended topology mode for Group Replication with protection against locking conflicts.
To perform primary instance switchover, login to one of the database nodes as the clusteradmin user and specify the database node that you want to promote by using the setPrimaryInstance() function:
MySQL|db1:3306 ssl|JS> shell.connect("clusteradmin@db1:3306");
MySQL|db1:3306 ssl|JS> cluster.setPrimaryInstance("db1:3306");
Setting instance 'db1:3306' as the primary instance of cluster 'my_innodb_cluster'...

Instance 'db2:3306' was switched from PRIMARY to SECONDARY.
Instance 'db3:3306' remains SECONDARY.
Instance 'db1:3306' was switched from SECONDARY to PRIMARY.

WARNING: The cluster internal session is not the primary member anymore. For cluster management operations please obtain a fresh cluster handle using .getCluster().

The instance 'db1:3306' was successfully elected as primary.
We just promoted db1 as the new primary component, replacing db2 while db3 remains as the secondary node.
Shutting Down the Cluster
The best way to shut down the cluster gracefully by stopping the MySQL Router service first (if it’s running) on the application server:
$ myrouter/stop.shThe above step provides cluster protection against accidental writes by the applications. Then shutdown one database node at a time using the standard MySQL stop command, or perform system shutdown as you wish:
$ systemctl stop mysqlStarting the Cluster After a Shutdown
If your cluster suffers from a complete outage or you want to start the cluster after a clean shutdown, you can ensure it is reconfigured correctly using dba.rebootClusterFromCompleteOutage() function. It simply brings a cluster back ONLINE when all members are OFFLINE. In the event that a cluster has completely stopped, the instances must be started and only then can the cluster be started.
Thus, ensure all MySQL servers are started and running. On every database node, see if the mysqld process is running:
$ ps -ef | grep -i mysqlThen, pick one database server to be the primary node and connect to it via MySQL shell:
MySQL|JS> shell.connect("clusteradmin@db1:3306");Run the following command from that host to start them up:
MySQL|db1:3306 ssl|JS> cluster = dba.rebootClusterFromCompleteOutage()You will be presented with the following questions:
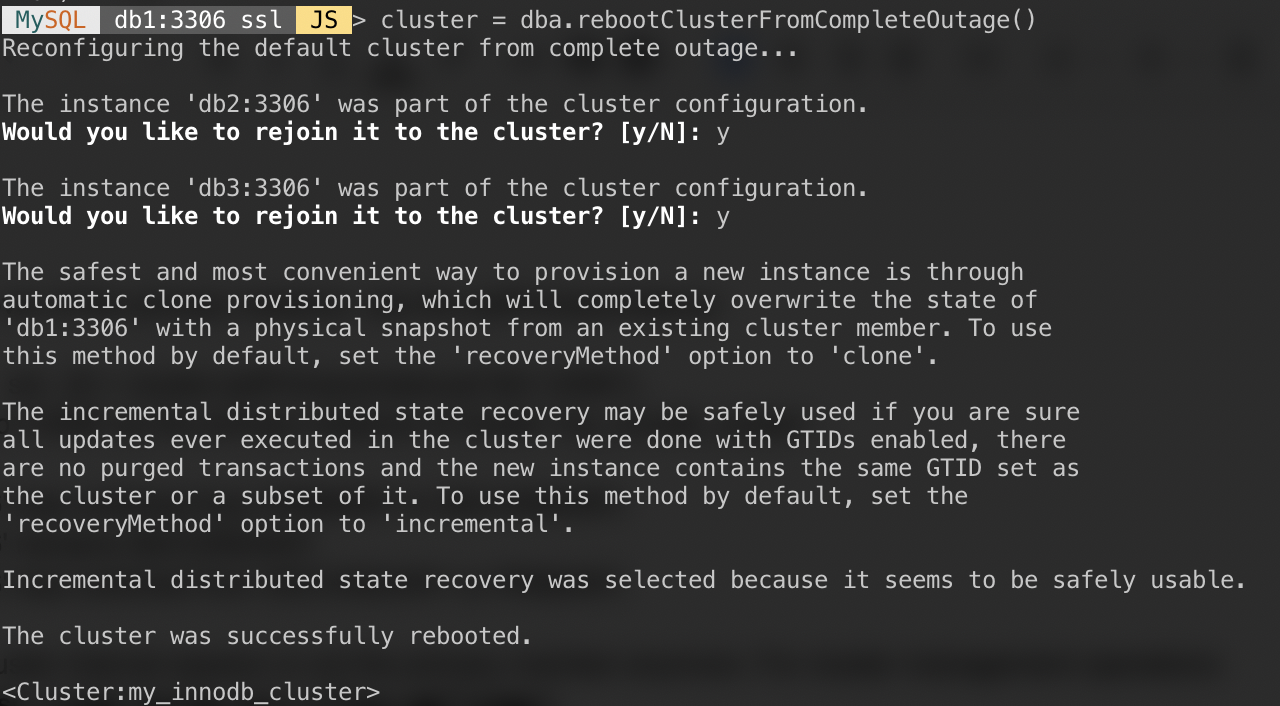
After the above completes, you can verify the cluster status:
MySQL|db1:3306 ssl|JS> cluster.status()At this point, db1 is the primary node and the writer. The rest will be the secondary members. If you would like to start the cluster with db2 or db3 as the primary, you could use the shell.connect() function to connect to the corresponding node and perform the rebootClusterFromCompleteOutage() from that particular node.
You can then start the MySQL Router service (if it’s not started) and let the application connect to the cluster again.
Setting Member and Cluster Options
To get the cluster-wide options, simply run:
MySQL|db1:3306 ssl|JS> cluster.options()The above will list out the global options for the replica set and also individual options per member in the cluster. This function changes an InnoDB Cluster configuration option in all members of the cluster. The supported options are:
- clusterName: string value to define the cluster name.
- exitStateAction: string value indicating the group replication exit state action.
- memberWeight: integer value with a percentage weight for automatic primary election on failover.
- failoverConsistency: string value indicating the consistency guarantees that the cluster provides.
- consistency: string value indicating the consistency guarantees that the cluster provides.
- expelTimeout: integer value to define the time period in seconds that cluster members should wait for a non-responding member before evicting it from the cluster.
- autoRejoinTries: integer value to define the number of times an instance will attempt to rejoin the cluster after being expelled.
- disableClone: boolean value used to disable the clone usage on the cluster.
Similar to other function, the output can be filtered in map structure. The following command will only list out the options for db2:
MySQL|db1:3306 ssl|JS> cluster.options().defaultReplicaSet.topology["db2:3306"]You can also get the above list by using the help() function:
MySQL|db1:3306 ssl|JS> cluster.help("setOption")The following command shows an example to set an option called memberWeight to 60 (from 50) on all members:
MySQL|db1:3306 ssl|JS> cluster.setOption("memberWeight", 60)
Setting the value of 'memberWeight' to '60' in all ReplicaSet members ...

Successfully set the value of 'memberWeight' to '60' in the 'default' ReplicaSet.
We can also perform configuration management automatically via MySQL Shell by using setInstanceOption() function and pass the database host, the option name and value accordingly:
MySQL|db1:3306 ssl|JS> cluster = dba.getCluster()
MySQL|db1:3306 ssl|JS> cluster.setInstanceOption("db1:3306", "memberWeight", 90)
The supported options are:
- exitStateAction: string value indicating the group replication exit state action.
- memberWeight: integer value with a percentage weight for automatic primary election on failover.
- autoRejoinTries: integer value to define the number of times an instance will attempt to rejoin the cluster after being expelled.
- label a string identifier of the instance.
Switching to Multi-Primary/Single-Primary Mode
By default, InnoDB Cluster is configured with single-primary, only one member capable of performing reads and writes at one given time. This is the safest and recommended way to run the cluster and suitable for most workloads.
However, if the application logic can handle distributed writes, it’s probably a good idea to switch to multi-primary mode, where all members in the cluster are able to process reads and writes at the same time. To switch from single-primary to multi-primary mode, simply use the switchToMultiPrimaryMode() function:
MySQL|db1:3306 ssl|JS> cluster.switchToMultiPrimaryMode()
Switching cluster 'my_innodb_cluster' to Multi-Primary mode...

Instance 'db2:3306' was switched from SECONDARY to PRIMARY.
Instance 'db3:3306' was switched from SECONDARY to PRIMARY.
Instance 'db1:3306' remains PRIMARY.

The cluster successfully switched to Multi-Primary mode.
Verify with:
MySQL|db1:3306 ssl|JS> cluster.status(){
"clusterName": "my_innodb_cluster",
"defaultReplicaSet": {
"name": "default",
"ssl": "REQUIRED",
"status": "OK",
"statusText": "Cluster is ONLINE and can tolerate up to ONE failure.",
"topology": {
"db1:3306": {
"address": "db1:3306",
"mode": "R/W",
"readReplicas": {},
"replicationLag": null,
"role": "HA",
"status": "ONLINE",
"version": "8.0.18"
},
"db2:3306": {
"address": "db2:3306",
"mode": "R/W",
"readReplicas": {},
"replicationLag": null,
"role": "HA",
"status": "ONLINE",
"version": "8.0.18"
},
"db3:3306": {
"address": "db3:3306",
"mode": "R/W",
"readReplicas": {},
"replicationLag": null,
"role": "HA",
"status": "ONLINE",
"version": "8.0.18"
}
},
"topologyMode": "Multi-Primary"
},
"groupInformationSourceMember": "db1:3306"
}In multi-primary mode, all nodes are primary and able to process reads and writes. When sending a new connection via MySQL Router on single-writer port (6446), the connection will be sent to only one node, as in this example, db1:
(app-server)$ for i in {1..3}; do mysql -usbtest -p -h192.168.10.40 -P6446 -e 'select @@hostname, @@read_only, @@super_read_only'; done

+------------+-------------+-------------------+
| @@hostname | @@read_only | @@super_read_only |
+------------+-------------+-------------------+
| db1        | 0           | 0                 |
+------------+-------------+-------------------+

+------------+-------------+-------------------+
| @@hostname | @@read_only | @@super_read_only |
+------------+-------------+-------------------+
| db1        | 0           | 0                 |
+------------+-------------+-------------------+

+------------+-------------+-------------------+
| @@hostname | @@read_only | @@super_read_only |
+------------+-------------+-------------------+
| db1        | 0           | 0                 |
+------------+-------------+-------------------+
If the application connects to the multi-writer port (6447), the connection will be load balanced via round robin algorithm to all members:
(app-server)$ for i in {1..3}; do mysql -usbtest -ppassword -h192.168.10.40 -P6447 -e 'select @@hostname, @@read_only, @@super_read_only'; done

+------------+-------------+-------------------+
| @@hostname | @@read_only | @@super_read_only |
+------------+-------------+-------------------+
| db2        | 0           | 0                 |
+------------+-------------+-------------------+

+------------+-------------+-------------------+
| @@hostname | @@read_only | @@super_read_only |
+------------+-------------+-------------------+
| db3        | 0           | 0                 |
+------------+-------------+-------------------+

+------------+-------------+-------------------+
| @@hostname | @@read_only | @@super_read_only |
+------------+-------------+-------------------+
| db1        | 0           | 0                 |
+------------+-------------+-------------------+
As you can see from the output above, all nodes are capable of processing reads and writes with read_only = OFF. You can distribute safe writes to all members by connecting to the multi-writer port (6447), and send the conflicting or heavy writes to the single-writer port (6446).
To switch back to the single-primary mode, use the switchToSinglePrimaryMode() function and specify one member as the primary node. In this example, we chose db1:
MySQL|db1:3306 ssl|JS> cluster.switchToSinglePrimaryMode("db1:3306");

Switching cluster 'my_innodb_cluster' to Single-Primary mode...

Instance 'db2:3306' was switched from PRIMARY to SECONDARY.
Instance 'db3:3306' was switched from PRIMARY to SECONDARY.
Instance 'db1:3306' remains PRIMARY.

WARNING: Existing connections that expected a R/W connection must be disconnected, i.e. instances that became SECONDARY.

The cluster successfully switched to Single-Primary mode.
At this point, db1 is now the primary node configured with read-only disabled and the rest will be configured as secondary with read-only enabled.
MySQL InnoDB Cluster Scaling Operations
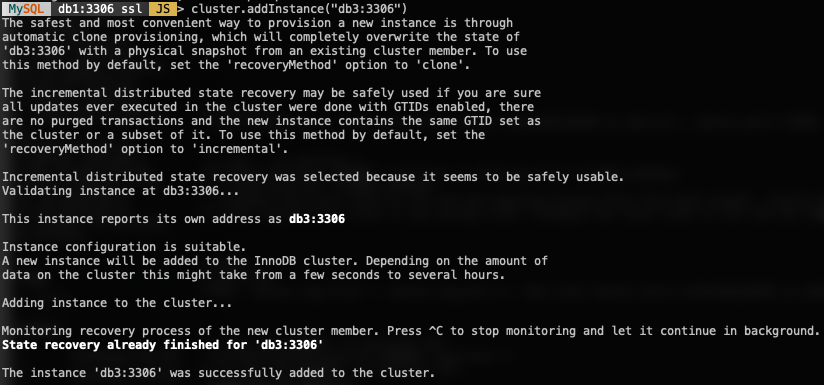
Scaling Up (Adding a New DB Node)
When adding a new instance, a node has to be provisioned first before it’s allowed to participate with the replication group. The provisioning process will be handled automatically by MySQL. Also, you can check the instance state first whether the node is valid to join the cluster by using checkInstanceState() function as previously explained.
To add a new DB node, use the addInstances() function and specify the host:
MySQL|db1:3306 ssl|JS> cluster.addInstance("db3:3306")The following is what you would get when adding a new instance:
Verify the new cluster size with:
MySQL|db1:3306 ssl|JS> cluster.status() //or cluster.describe()MySQL Router will automatically include the added node, db3 into the load balancing set.
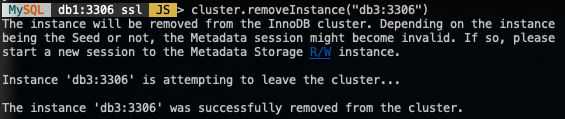
Scaling Down (Removing a Node)
To remove a node, connect to any of the DB nodes except the one that we are going to remove and use the removeInstance() function with the database instance name:
MySQL|db1:3306 ssl|JS> shell.connect("clusteradmin@db1:3306");
MySQL|db1:3306 ssl|JS> cluster = dba.getCluster()
MySQL|db1:3306 ssl|JS> cluster.removeInstance("db3:3306")
The following is what you would get when removing an instance:
Verify the new cluster size with:
MySQL|db1:3306 ssl|JS> cluster.status() //or cluster.describe()MySQL Router will automatically exclude the removed node, db3 from the load balancing set.
Adding a New Replication Slave
We can scale out the InnoDB Cluster with asynchronous replication slave replicates from any of the cluster nodes. A slave is loosely coupled to the cluster, and will be able to handle a heavy load without affecting the performance of the cluster. The slave can also be a live copy of the database for disaster recovery purposes. In multi-primary mode, you can use the slave as the dedicated MySQL read-only processor to scale out the reads workload, perform analytices operation, or as a dedicated backup server.
On the slave server, download the latest APT config package, install it (choose MySQL 8.0 in the configuration wizard), install the APT key, update repolist and install MySQL server.
$ wget https://repo.mysql.com/apt/ubuntu/pool/mysql-apt-config/m/mysql-apt-config/mysql-apt-config_0.8.14-1_all.deb
$ dpkg -i mysql-apt-config_0.8.14-1_all.deb
$ apt-key adv --recv-keys --keyserver ha.pool.sks-keyservers.net 5072E1F5
$ apt-get update
$ apt-get -y install mysql-server mysql-shell
Modify the MySQL configuration file to prepare the server for replication slave. Open the configuration file via text editor:
$ vim /etc/mysql/mysql.conf.d/mysqld.cnfAnd append the following lines:
server-id = 1044 # must be unique across all nodes
gtid-mode = ON
enforce-gtid-consistency = ON
log-slave-updates = OFF
read-only = ON
super-read-only = ON
expire-logs-days = 7
Restart MySQL server on the slave to apply the changes:
$ systemctl restart mysqlOn one of the InnoDB Cluster servers (we chose db3), create a replication slave user and followed by a full MySQL dump:
$ mysql -uroot -p
mysql> CREATE USER 'repl_user'@'192.168.0.44' IDENTIFIED BY 'password';
mysql> GRANT REPLICATION SLAVE ON *.* TO 'repl_user'@'192.168.0.44';
mysql> exit
$ mysqldump -uroot -p --single-transaction --master-data=1 --all-databases --triggers --routines --events > dump.sql
Transfer the dump file from db3 to the slave:
$ scp dump.sql root@slave:~And perform the restoration on the slave:
$ mysql -uroot -p < dump.sqlWith master-data=1, our MySQL dump file will automatically configure the GTID executed and purged value. We can verify it with the following statement on the slave server after the restoration:
$ mysql -uroot -p
mysql> show global variables like '%gtid_%';
+----------------------------------+----------------------------------------------+
| Variable_name                    | Value                                        |
+----------------------------------+----------------------------------------------+
| binlog_gtid_simple_recovery      | ON                                           |
| enforce_gtid_consistency         | ON                                           |
| gtid_executed                    | d4790339-0694-11ea-8fd5-02f67042125d:1-45886 |
| gtid_executed_compression_period | 1000                                         |
| gtid_mode                        | ON                                           |
| gtid_owned                       |                                              |
| gtid_purged                      | d4790339-0694-11ea-8fd5-02f67042125d:1-45886 |
+----------------------------------+----------------------------------------------+
Looks good. We can then configure the replication link and start the replication threads on the slave:
mysql> CHANGE MASTER TO MASTER_HOST = '192.168.10.43', MASTER_USER = 'repl_user', MASTER_PASSWORD = 'password', MASTER_AUTO_POSITION = 1;
mysql> START SLAVE;
Verify the replication state and ensure the following status return 'Yes':
mysql> show slave statusG
...
             Slave_IO_Running: Yes
            Slave_SQL_Running: Yes
...
At this point, our architecture is now looking like this:
Common Issues with MySQL InnoDB Clusters
Memory Exhaustion
When using MySQL Shell with MySQL 8.0, we were constantly getting the following error when the instances were configured with 1GB of RAM:
Can't create a new thread (errno 11); if you are not out of available memory, you can consult the manual for a possible OS-dependent bug (MySQL Error 1135)Upgrading each host's RAM to 2GB of RAM solved the problem. Apparently, MySQL 8.0 components require more RAM to operate efficiently.
Lost Connection to MySQL Server
In case the primary node goes down, you would probably see the "lost connection to MySQL server error" when trying to query something on the current session:
MySQL|db1:3306 ssl|JS> cluster.status()
Cluster.status: Lost connection to MySQL server during query (MySQL Error 2013)

MySQL|db1:3306 ssl|JS> cluster.status()
Cluster.status: MySQL server has gone away (MySQL Error 2006)
The solution is to re-declare the object once more:
MySQL|db1:3306 ssl|JS> cluster = dba.getCluster()

MySQL|db1:3306 ssl|JS> cluster.status()
At this point, it will connect to the newly promoted primary node to retrieve the cluster status.
Node Eviction and Expelled
In an event where communication between nodes is interrupted, the problematic node will be evicted from the cluster without any delay, which is not good if you are running on a non-stable network. This is what it looks like on db2 (the problematic node):
2019-11-14T07:07:59.344888Z 0 [ERROR] [MY-011505] [Repl] Plugin group_replication reported: 'Member was expelled from the group due to network failures, changing member status to ERROR.'
2019-11-14T07:07:59.371966Z 0 [ERROR] [MY-011712] [Repl] Plugin group_replication reported: 'The server was automatically set into read only mode after an error was detected.'
Meanwhile from db1, it saw db2 was offline:
2019-11-14T07:07:44.086021Z 0 [Warning] [MY-011493] [Repl] Plugin group_replication reported: 'Member with address db2:3306 has become unreachable.'
2019-11-14T07:07:46.087216Z 0 [Warning] [MY-011499] [Repl] Plugin group_replication reported: 'Members removed from the group: db2:3306'
To tolerate a bit of delay on node eviction, we can set a higher timeout value before a node is being expelled from the group. The default value is 0, which means expel immediately. Use the setOption() function to set the expelTimeout value:
Thanks to Frédéric Descamps from Oracle who pointed this out:
Instead of relying on expelTimeout, it's recommended to set the autoRejoinTries option instead. The value represents the number of times an instance will attempt to rejoin the cluster after being expelled. A good number to start is 3, which means, the expelled member will try to rejoin the cluster for 3 times, which after an unsuccessful auto-rejoin attempt, the member waits 5 minutes before the next try.
To set this value cluster-wide, we can use the setOption() function:
MySQL|db1:3306 ssl|JS> cluster.setOption("autoRejoinTries", 3)
WARNING: Each cluster member will only proceed according to its exitStateAction if auto-rejoin fails (i.e. all retry attempts are exhausted).

Setting the value of 'autoRejoinTries' to '3' in all ReplicaSet members ...

Successfully set the value of 'autoRejoinTries' to '3' in the 'default' ReplicaSet.
Conclusion
For MySQL InnoDB Cluster, most of the management and monitoring operations can be performed directly via MySQL Shell (only available from MySQL 5.7.21 and later).


