blog
MySQL InnoDB Cluster 8.0 – A Complete Deployment Walk-Through: Part One

MySQL InnoDB Cluster consists of 3 components:
- MySQL Group Replication (a group of database server which replicates to each other with fault tolerance).
- MySQL Router (query router to the healthy database nodes)
- MySQL Shell (helper, client, configuration tool)
In the first part of this walkthrough, we are going to deploy a MySQL InnoDB Cluster. There are a number of hands-on tutorial available online but this walkthrough covers all the necessary steps/commands to install and run the cluster in one place. We will be covering monitoring, management and scaling operations as well as some gotchas when dealing with MySQL InnoDB Cluster in the second part of this blog post.
The following diagram illustrates our post-deployment architecture:
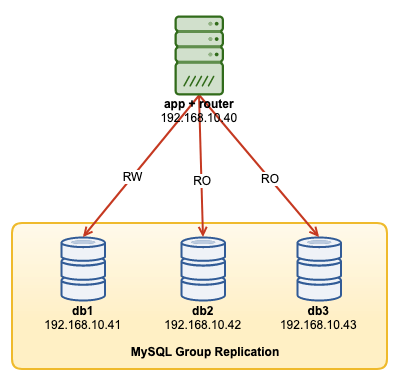
We are going to deploy a total of 4 nodes; A three-node MySQL Group Replication and one MySQL router node co-located within the application server. All servers are running on Ubuntu 18.04 Bionic.
Installing MySQL
The following steps should be performed on all database nodes db1, db2 and db3.
Firstly, we have to do some host mapping. This is crucial if you want to use hostname as the host identifier in InnoDB Cluster and this is the recommended way to do. Map all hosts as the following inside /etc/hosts:
$ vi /etc/hosts
192.168.10.40   router apps
192.168.10.41   db1 db1.local
192.168.10.42   db2 db2.local
192.168.10.43   db3 db3.local
127.0.0.1       localhost localhost.localdomain
Stop and disable AppArmor:
$ service apparmor stop
$ service apparmor teardown
$ systemctl disable apparmor
Download the latest APT config repository from MySQL Ubuntu repository website at https://repo.mysql.com/apt/ubuntu/pool/mysql-apt-config/m/mysql-apt-config/. At the time of this writing, the latest one is dated 15-Oct-2019 which is mysql-apt-config_0.8.14-1_all.deb:
$ wget https://repo.mysql.com/apt/ubuntu/pool/mysql-apt-config/m/mysql-apt-config/mysql-apt-config_0.8.14-1_all.debInstall the package and configure it for “mysql-8.0”:
$ dpkg -i mysql-apt-config_0.8.14-1_all.debInstall the GPG key:
$ apt-key adv --recv-keys --keyserver ha.pool.sks-keyservers.net 5072E1F5Update the repolist:
$ apt-get updateInstall Python and followed by MySQL server and MySQL shell:
$ apt-get -y install mysql-server mysql-shellYou will be presented with the following configuration wizards:
- Set a root password – Specify a strong password for the MySQL root user.
- Set the authentication method – Choose “Use Legacy Authentication Method (Retain MySQL 5.x Compatibility)”
MySQL should have been installed at this point. Verify with:
$ systemctl status mysqlEnsure you get an “active (running)” state.
Preparing the Server for InnoDB Cluster
The following steps should be performed on all database nodes db1, db2 and db3.
Configure the MySQL server to support Group Replication. The easiest and recommended way to do this is to use the new MySQL Shell:
$ mysqlshAuthenticate as the local root user and follow the configuration wizard accordingly as shown in the example below:
MySQL JS > dba.configureLocalInstance("root@localhost:3306");Once authenticated, you should get a number of questions like the following:
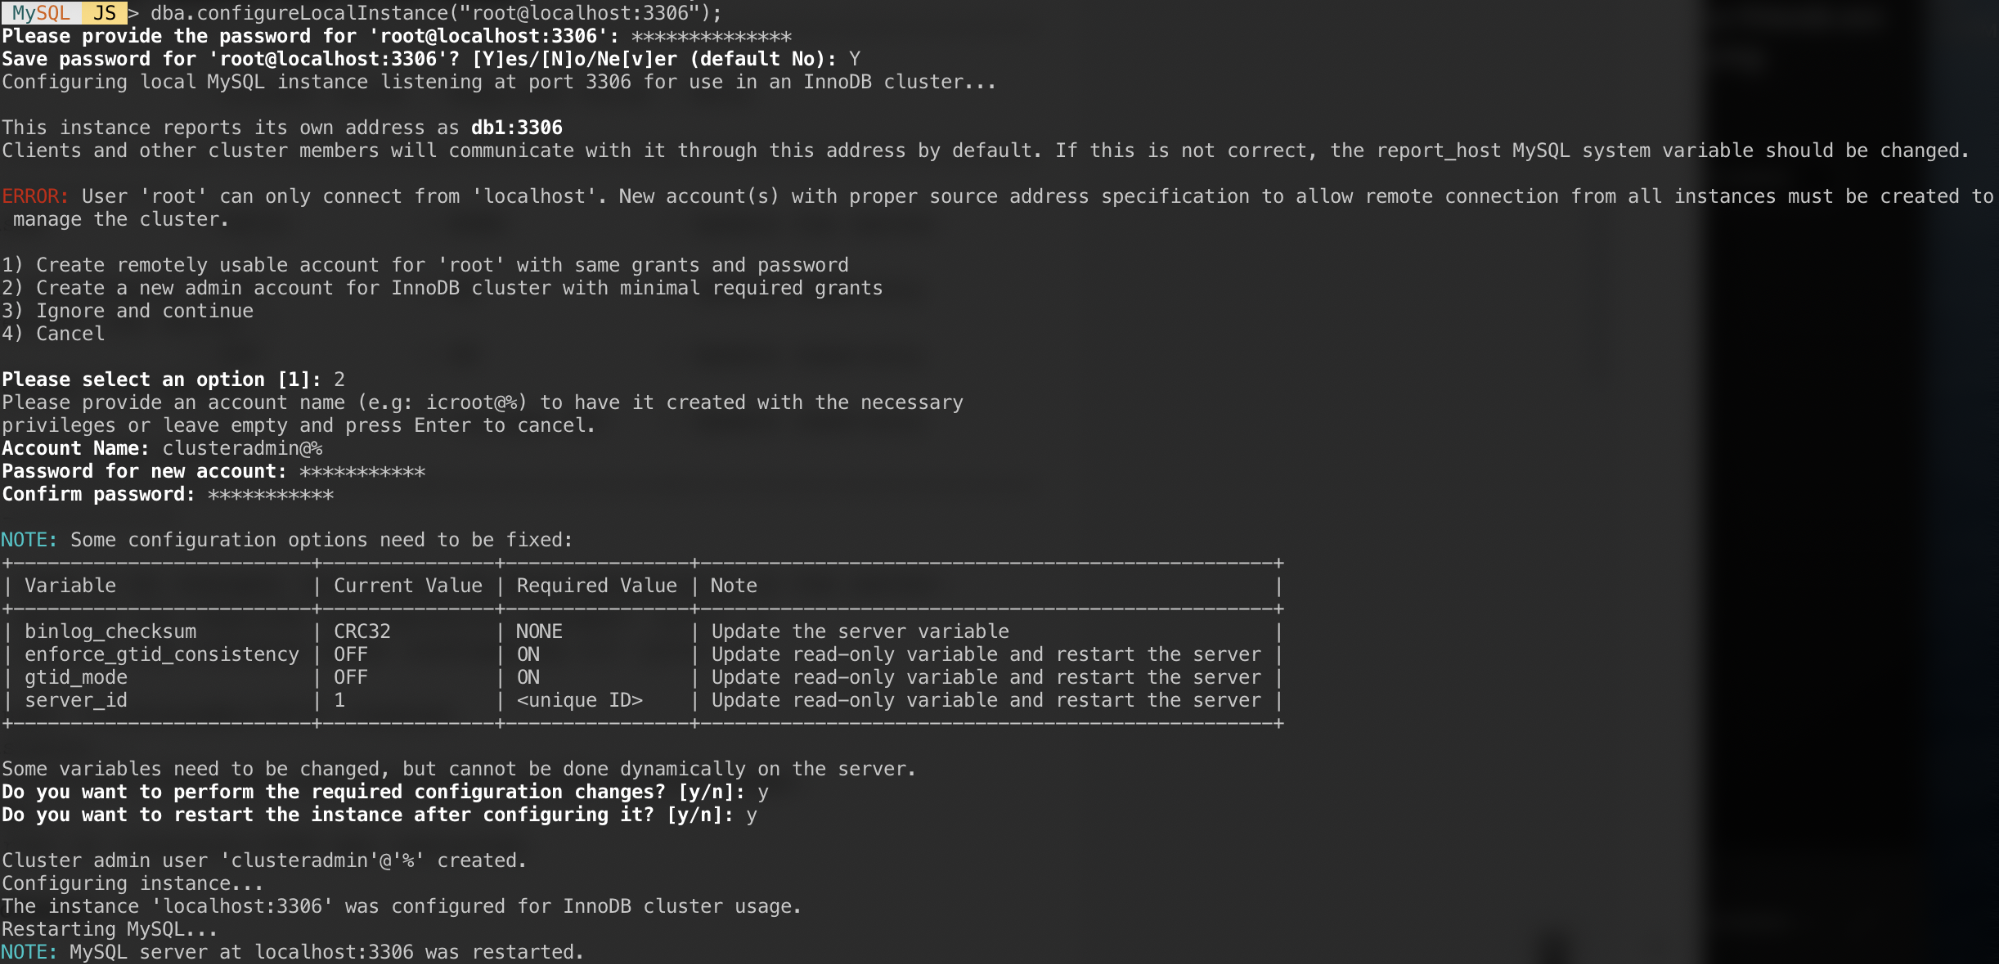
Responses to those questions with the following answers:
- Pick 2 – Create a new admin account for InnoDB cluster with minimal required grants
- Account Name: clusteradmin@%
- Password: mys3cret&&
- Confirm password: mys3cret&&
- Do you want to perform the required configuration changes?: y
- Do you want to restart the instance after configuring it?: y
Don’t forget to repeat the above on the all database nodes. At this point, the MySQL daemon should be listening to all IP addresses and Group Replication is enabled. We can now proceed to create the cluster.
Creating the Cluster
Now we are ready to create a cluster. On db1, connect as cluster admin from MySQL Shell:
MySQL|JS> shell.connect('clusteradmin@db1:3306');
Creating a session to 'clusteradmin@db1:3306'
Please provide the password for 'clusteradmin@db1:3306': ***********
Save password for 'clusteradmin@db1:3306'? [Y]es/[N]o/Ne[v]er (default No): Y
Fetching schema names for autocompletion... Press ^C to stop.
Your MySQL connection id is 9
Server version: 8.0.18 MySQL Community Server - GPL
No default schema selected; type use  to set one.
<ClassicSession:clusteradmin@db1:3306>
You should be connected as clusteradmin@db1 (you can tell by looking at the prompt string before ‘>’). We can now create a new cluster:
MySQL|db1:3306 ssl|JS> cluster = dba.createCluster('my_innodb_cluster');Check the cluster status:
MySQL|db1:3306 ssl|JS> cluster.status()
{
    "clusterName": "my_innodb_cluster",
    "defaultReplicaSet": {
        "name": "default",
        "primary": "db1:3306",
        "ssl": "REQUIRED",
        "status": "OK_NO_TOLERANCE",
        "statusText": "Cluster is NOT tolerant to any failures.",
        "topology": {
            "db1:3306": {
                "address": "db1:3306",
                "mode": "R/W",
                "readReplicas": {},
                "replicationLag": null,
                "role": "HA",
                "status": "ONLINE",
                "version": "8.0.18"
            }
        },
        "topologyMode": "Single-Primary"
    },
    "groupInformationSourceMember": "db1:3306"
}
At this point, only db1 is part of the cluster. The default topology mode is Single-Primary, similar to a replica set concept where only one node is a writer at a time. The remaining nodes in the cluster will be readers.
Pay attention on the cluster status which says OK_NO_TOLERANCE, and further explanation under statusText key. In a replica set concept, one node will provide no fault tolerance. Minimum of 3 nodes is required in order to automate the primary node failover. We are going to look into this later.
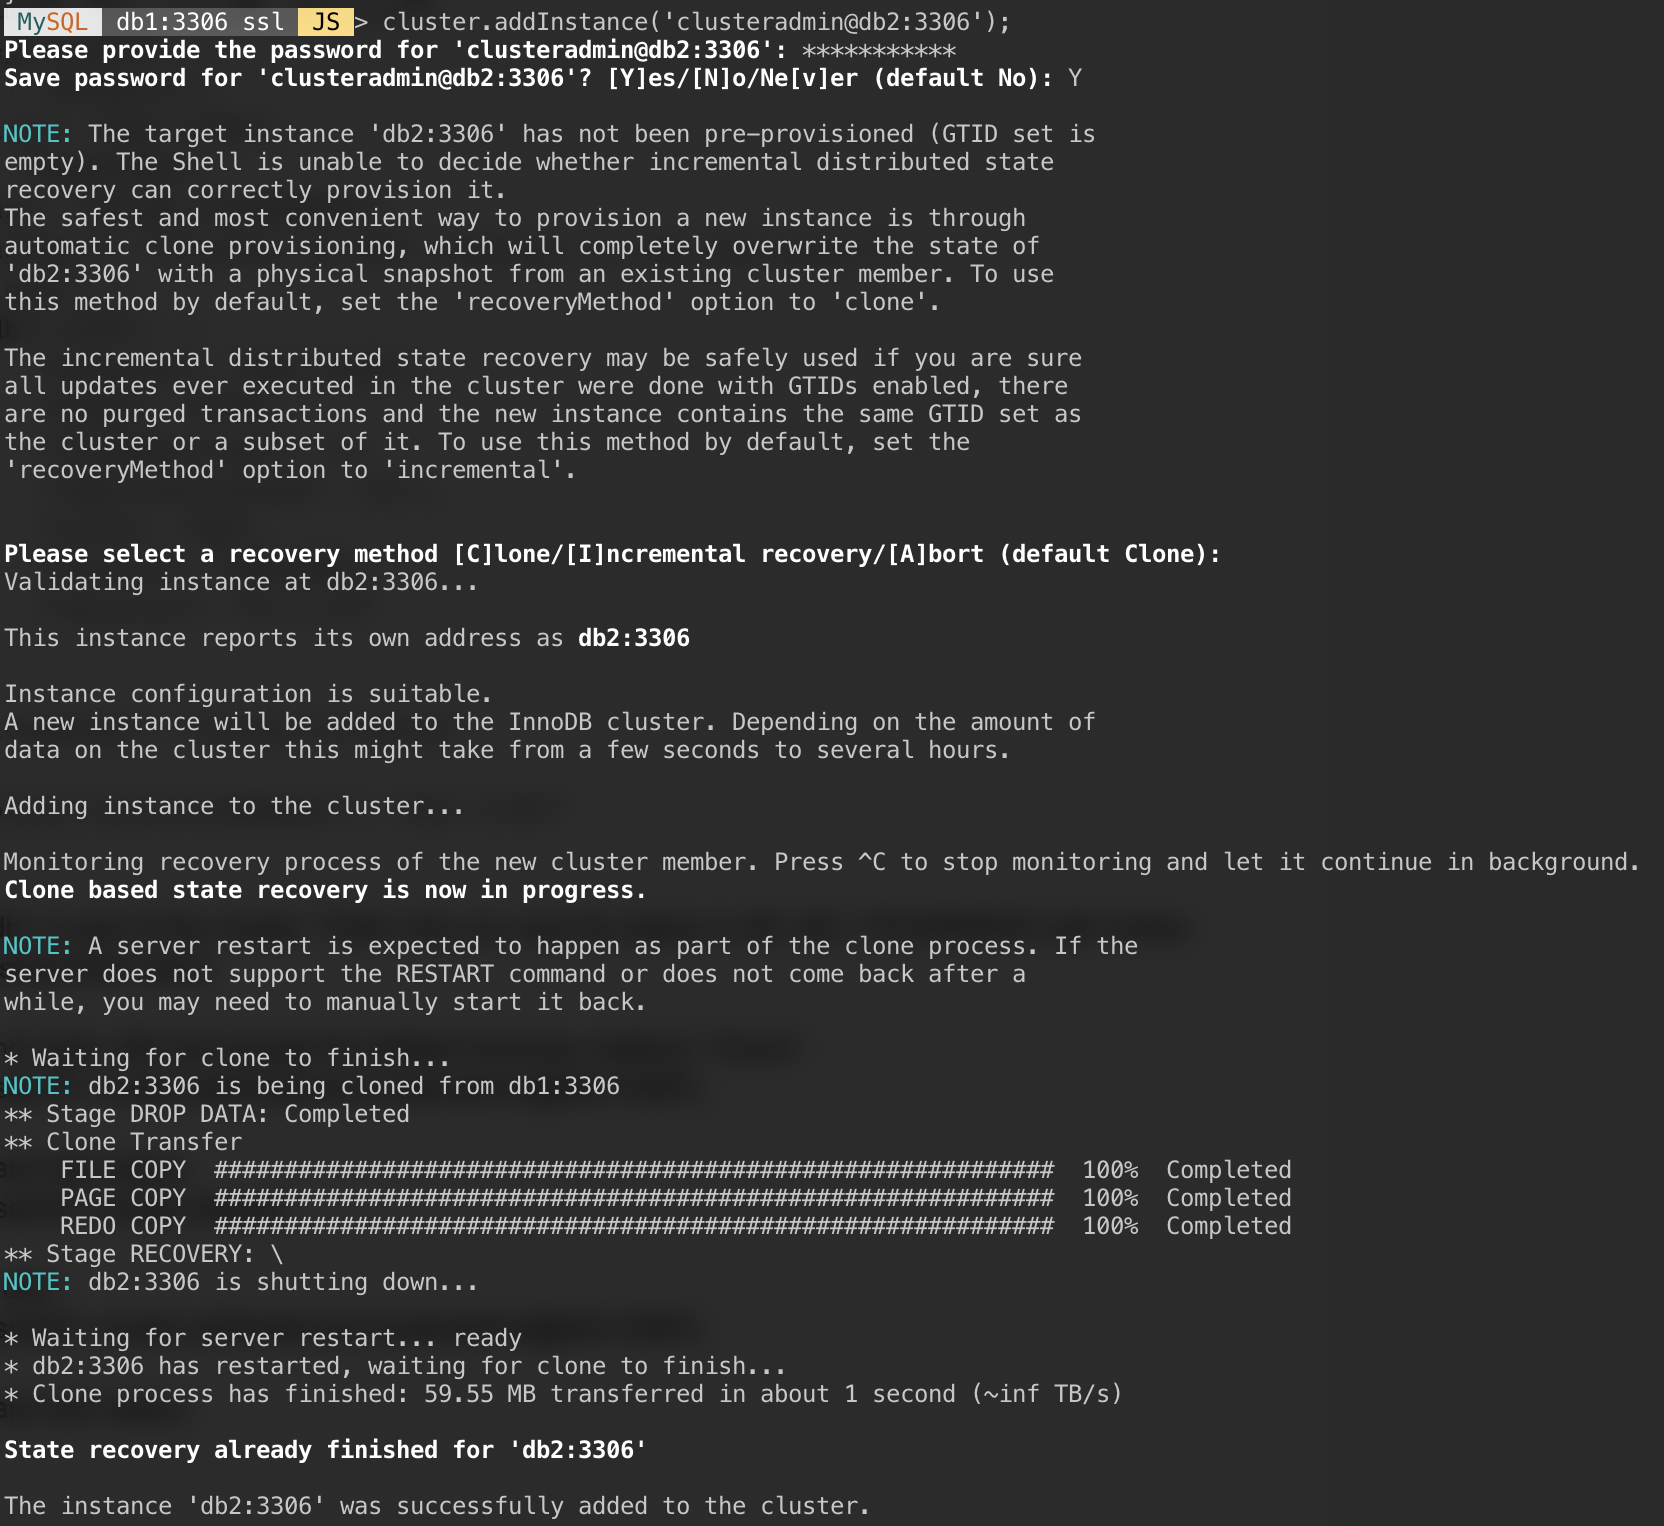
Now add the second node, db2 and accept the default recovery method, “Clone”:
MySQL|db1:3306 ssl|JS> cluster.addInstance('clusteradmin@db2:3306');The following screenshot shows the initialization progress of db2 after we executed the above command. The syncing operation is performed automatically by MySQL:
Check the cluster and db2 status:
MySQL|db1:3306 ssl|JS> cluster.status()
{
    "clusterName": "my_innodb_cluster",
    "defaultReplicaSet": {
        "name": "default",
        "primary": "db1:3306",
        "ssl": "REQUIRED",
        "status": "OK_NO_TOLERANCE",
        "statusText": "Cluster is NOT tolerant to any failures.",
        "topology": {
            "db1:3306": {
                "address": "db1:3306",
                "mode": "R/W",
                "readReplicas": {},
                "replicationLag": null,
                "role": "HA",
                "status": "ONLINE",
                "version": "8.0.18"
            },
            "db2:3306": {
                "address": "db2:3306",
                "mode": "R/O",
                "readReplicas": {},
                "replicationLag": null,
                "role": "HA",
                "status": "ONLINE",
                "version": "8.0.18"
            }
        },
        "topologyMode": "Single-Primary"
    },
    "groupInformationSourceMember": "db1:3306"
}
At this point, we have two nodes in the cluster, db1 and db2. The status is still showing OK_NO_TOLERANCE with further explanation under statusText value. As stated above, MySQL Group Replication requires at least 3 nodes in a cluster for fault tolerance. That’s why we have to add the third node as shown next.
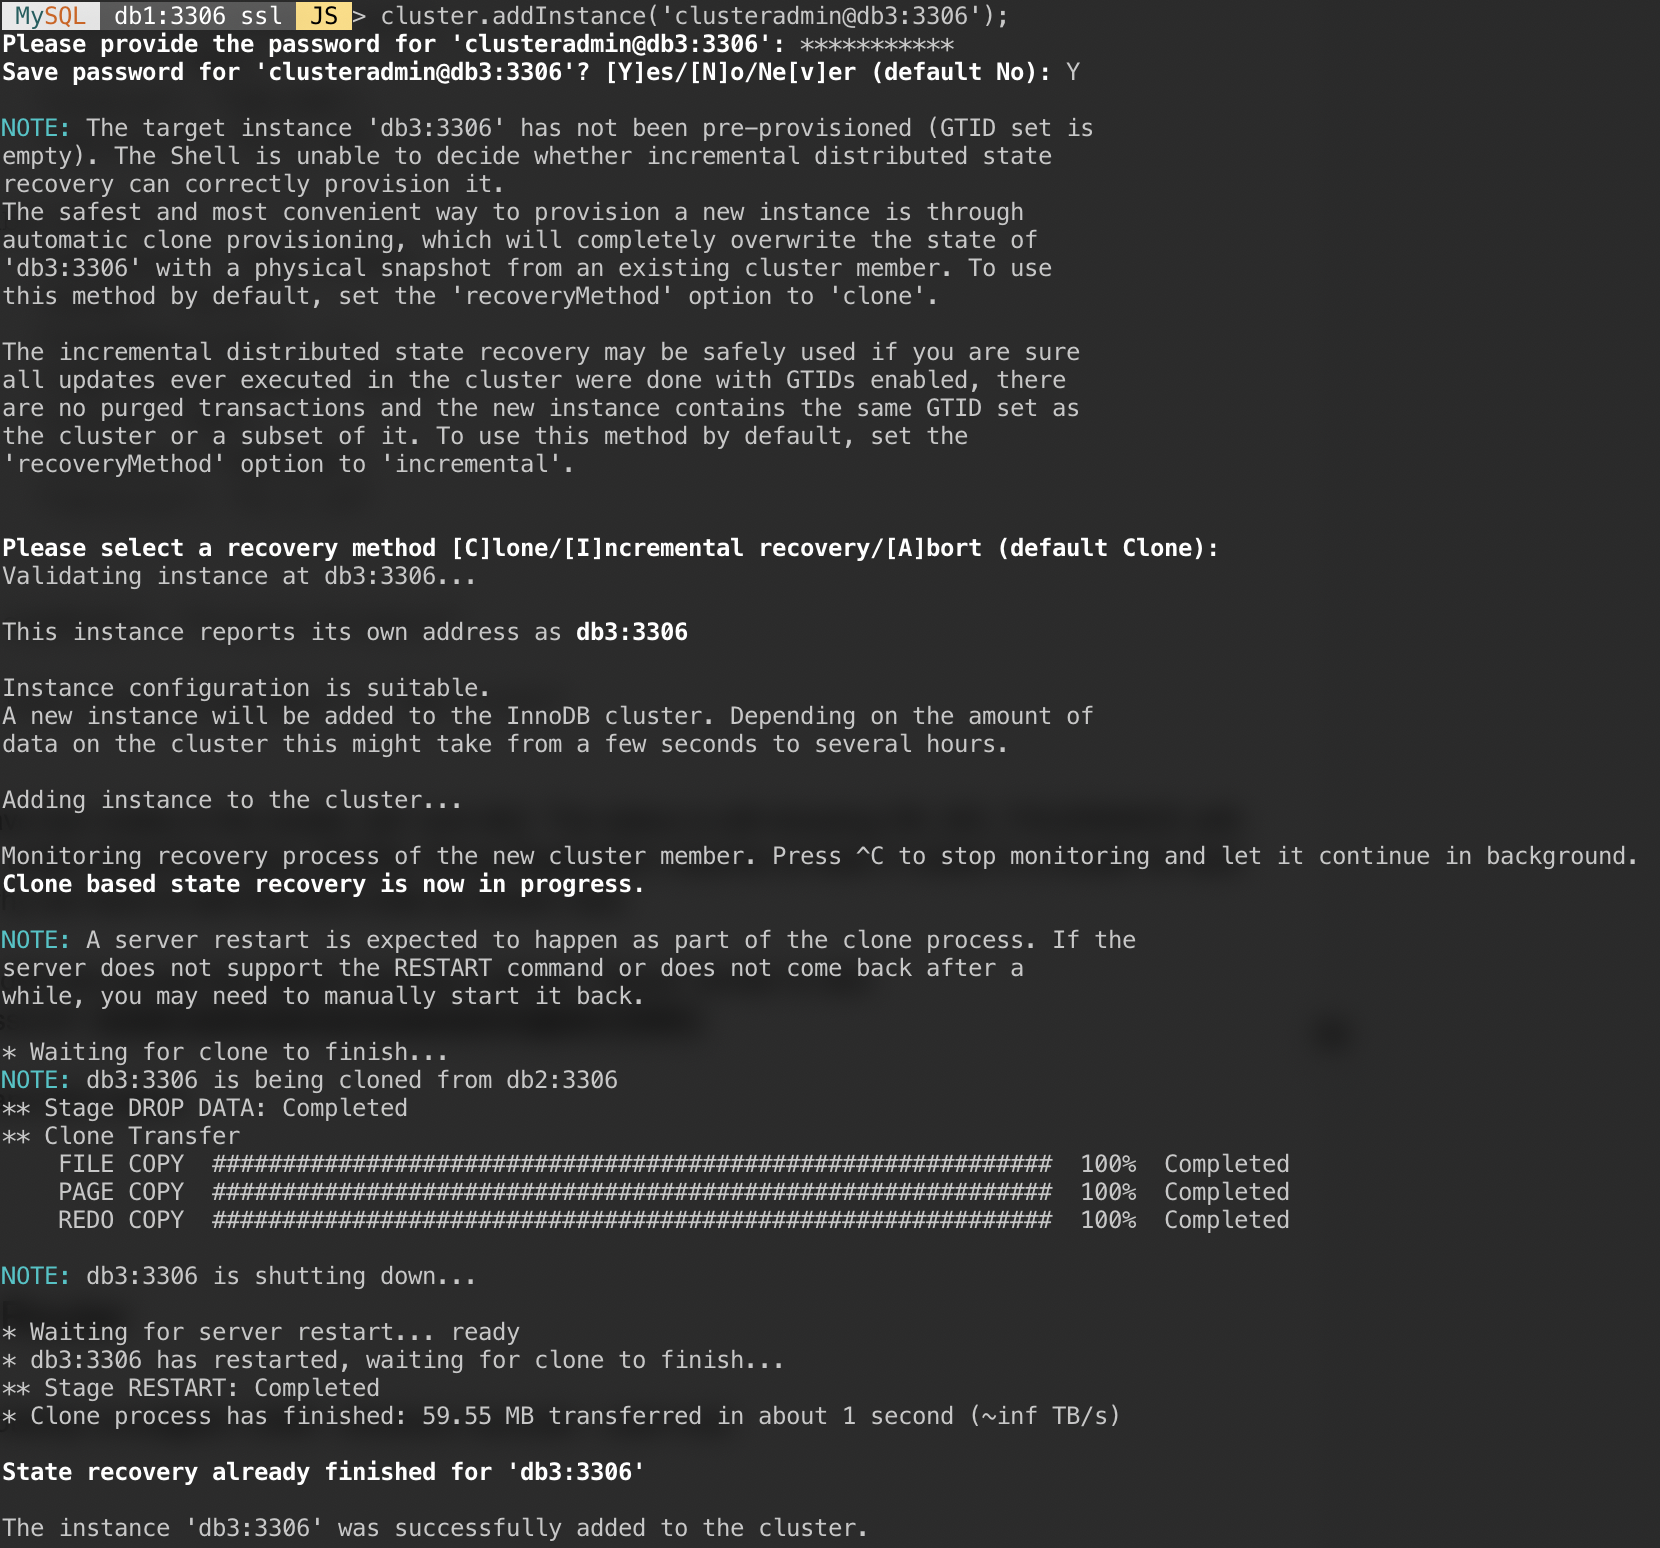
Add the last node, db3 and accept the default recovery method, “Clone” similar to db2:
MySQL|db1:3306 ssl|JS> cluster.addInstance('clusteradmin@db3:3306');The following screenshot shows the initialization progress of db3 after we executed the above command. The syncing operation is performed automatically by MySQL:
Check the cluster and db3 status:
MySQL|db1:3306 ssl|JS> cluster.status()
{
    "clusterName": "my_innodb_cluster",
    "defaultReplicaSet": {
        "name": "default",
        "primary": "db1:3306",
        "ssl": "REQUIRED",
        "status": "OK",
        "statusText": "Cluster is ONLINE and can tolerate up to ONE failure.",
        "topology": {
            "db1:3306": {
                "address": "db1:3306",
                "mode": "R/W",
                "readReplicas": {},
                "replicationLag": null,
                "role": "HA",
                "status": "ONLINE",
                "version": "8.0.18"
            },
            "db2:3306": {
                "address": "db2:3306",
                "mode": "R/O",
                "readReplicas": {},
                "replicationLag": null,
                "role": "HA",
                "status": "ONLINE",
                "version": "8.0.18"
            },
            "db3:3306": {
                "address": "db3:3306",
                "mode": "R/O",
                "readReplicas": {},
                "replicationLag": null,
                "role": "HA",
                "status": "ONLINE",
                "version": "8.0.18"
            }
        },
        "topologyMode": "Single-Primary"
    },
    "groupInformationSourceMember": "db1:3306"
}
Now the cluster looks good, where the status is OK and the cluster can tolerate up to one failure node at one time. The primary node is db1 where it shows “primary”: “db1:3306” and “mode”: “R/W”, while other nodes are in “R/O” state. If you check the read_only and super_read_only values on RO nodes, both are showing as true.
Our MySQL Group Replication deployment is now complete and in synced.
Deploying the Router
On the app server that we are going to run our application, make sure the host mapping is correct:
$ vim /etc/hosts
192.168.10.40   router apps
192.168.10.41   db1 db1.local
192.168.10.42   db2 db2.local
192.168.10.43   db3 db3.local
127.0.0.1       localhost localhost.localdomain
Stop and disable AppArmor:
$ service apparmor stop
$ service apparmor teardown
$ systemctl disable apparmor
Then install MySQL repository package, similar to what we have done when performing database installation:
$ wget https://repo.mysql.com/apt/ubuntu/pool/mysql-apt-config/m/mysql-apt-config/mysql-apt-config_0.8.14-1_all.deb
$ dpkg -i mysql-apt-config_0.8.14-1_all.deb
Add GPG key:
$ apt-key adv --recv-keys --keyserver ha.pool.sks-keyservers.net 5072E1F5Update the repo list:
$ apt-get updateInstall MySQL router and client:
$ apt-get -y install mysql-router mysql-clientMySQL Router is now installed under /usr/bin/mysqlrouter. MySQL router provides a bootstrap flag to automatically configure the router operation with a MySQL InnoDB cluster. What we need to do is to specify the string URI to one of the database node as the InnoDB cluster admin user (clusteradmin).
To simplify the configuration, we will run the mysqlrouter process as root user:
$ mysqlrouter --bootstrap clusteradmin@db1:3306 --directory myrouter --user=rootHere is what we should get after specifying the password for clusteradmin user:
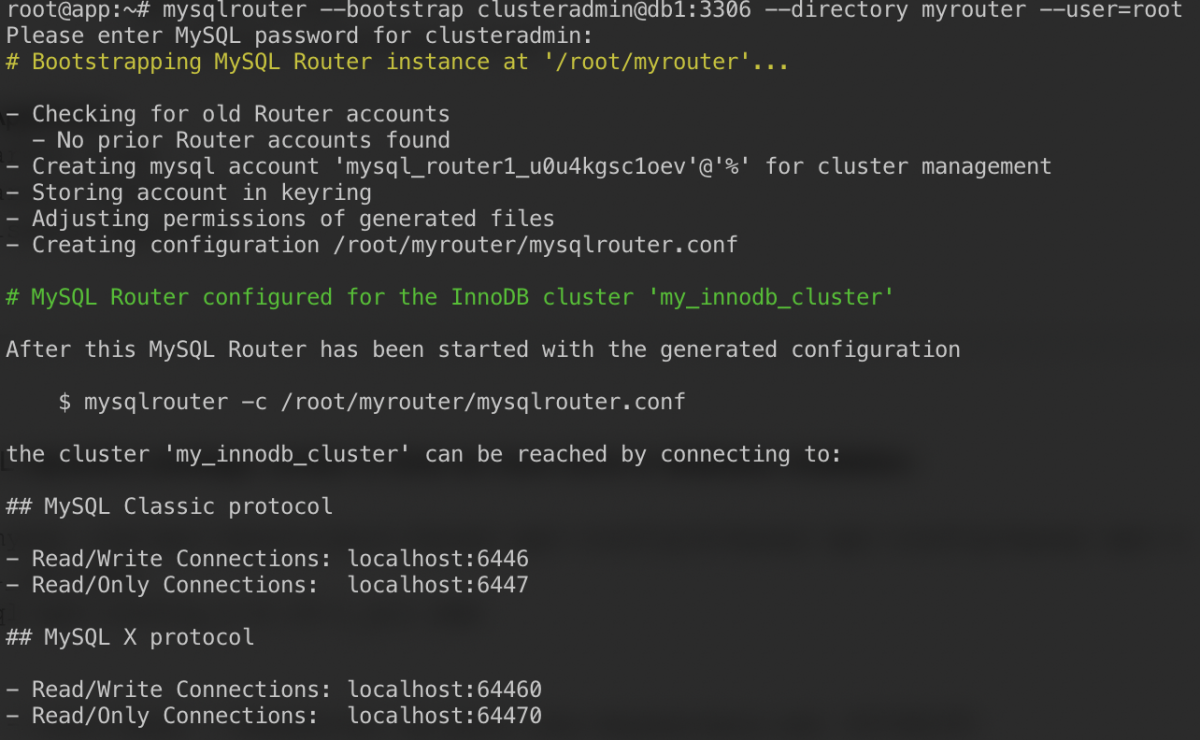
The bootstrap command will assist us to generate the router configuration file at /root/myrouter/mysqlrouter.conf. Now we can start the mysqlrouter daemon with the following command from the current directory:
$ myrouter/start.shVerify if the anticipated ports are listening correctly:
$ netstat -tulpn | grep mysql
tcp        0 0 0.0.0.0:6446            0.0.0.0:* LISTEN   14726/mysqlrouter
tcp        0 0 0.0.0.0:6447            0.0.0.0:* LISTEN   14726/mysqlrouter
tcp        0 0 0.0.0.0:64470           0.0.0.0:* LISTEN   14726/mysqlrouter
tcp        0 0 0.0.0.0:64460           0.0.0.0:* LISTEN   14726/mysqlrouter
Now our application can use port 6446 for read/write and 6447 for read-only MySQL connections.
Connecting to the Cluster
Let’s create a database user on the master node. On db1, connect to the MySQL server via MySQL shell:
$ mysqlsh root@localhost:3306Switch from Javascript mode to SQL mode:
MySQL|localhost:3306 ssl|JS> sql

Switching to SQL mode... Commands end with ;
Create a database:
MySQL|localhost:3306 ssl|SQL> CREATE DATABASE sbtest;Create a database user:
MySQL|localhost:3306 ssl|SQL> CREATE USER sbtest@'%' IDENTIFIED BY 'password';Grant the user to the database:
MySQL|localhost:3306 ssl|SQL> GRANT ALL PRIVILEGES ON sbtest.* TO sbtest@'%';Now our database and user is ready. Let’s install sysbench to generate some test data. On the app server, do:
$ apt -y install sysbench mysql-clientNow we can test on the app server to connect to the MySQL server via MySQL router. For write connection, connect to port 6446 of the router host:
$ mysql -usbtest -p -h192.168.10.40 -P6446 -e 'select user(), @@hostname, @@read_only, @@super_read_only'
+---------------+------------+-------------+-------------------+
| user()        | @@hostname | @@read_only | @@super_read_only |
+---------------+------------+-------------+-------------------+
| sbtest@router | db1        | 0           | 0                 |
+---------------+------------+-------------+-------------------+
For read-only connection, connect to port 6447 of the router host:
$ mysql -usbtest -p -h192.168.10.40 -P6447 -e 'select user(), @@hostname, @@read_only, @@super_read_only'
+---------------+------------+-------------+-------------------+
| user()        | @@hostname | @@read_only | @@super_read_only |
+---------------+------------+-------------+-------------------+
| sbtest@router | db3        | 1           | 1                 |
+---------------+------------+-------------+-------------------+
Looks good. We can now generate some test data with sysbench. On the app server, generate 20 tables with 100,000 rows per table by connecting to port 6446 of the app server:
$ sysbench
/usr/share/sysbench/oltp_common.lua
--db-driver=mysql
--mysql-user=sbtest
--mysql-db=sbtest
--mysql-password=password
--mysql-port=6446
--mysql-host=192.168.10.40
--tables=20
--table-size=100000
prepare
To perform a simple read-write test on port 6446 for 300 seconds, run:
$ sysbench
/usr/share/sysbench/oltp_read_write.lua
--report-interval=2
--threads=8
--time=300
--db-driver=mysql
--mysql-host=192.168.10.40
--mysql-port=6446
--mysql-user=sbtest
--mysql-db=sbtest
--mysql-password=password
--tables=20
--table-size=100000
run
For read-only workloads, we can send the MySQL connection to port 6447:
$ sysbench
/usr/share/sysbench/oltp_read_only.lua
--report-interval=2
--threads=1
--time=300
--db-driver=mysql
--mysql-host=192.168.10.40
--mysql-port=6447
--mysql-user=sbtest
--mysql-db=sbtest
--mysql-password=password
--tables=20
--table-size=100000
run
Conclusion
That’s it. Our MySQL InnoDB Cluster setup is now complete with all of its components running and tested. In the second part, we are going to look into management, monitoring and scaling operations of the cluster as well as solutions to a number of common problems when dealing with MySQL InnoDB Cluster. Stay tuned!


