blog
MySQL Cloud Backup and Restore Scenarios Using Microsoft Azure

Backups are a very important part of your database operations, as your business must be secured when catastrophe strikes. When that time comes (and it will), your Recovery Point Objective (RPO) and Recovery Time Objective (RTO) should be predefined, as this is how fast you can recover from the incident which occurred.
Most organizations vary their approach to backups, trying to have a combination of server image backups (snapshots), logical and physical backups. These backups are then stored in multiple locations, so as to avoid any local or regional disasters. It also means that the data can be restored in the shortest amount of time, avoiding major downtime which can impact your company’s business.
Hosting your database with a cloud provider, such as Microsoft Azure (which we will discuss in this blog), is not an exception, you still need to prepare and define your disaster recovery policy.
Like other public cloud offerings, Microsoft Azure (Azure) offers an approach for backups that is practical, cost-effective, and designed to provide you with recovery options. Microsoft Azure backup solutions allow you to configure and operate and are easily handled using their Azure Backup or through the Restore Services Vault (if you are operating your database using virtual machines).
If you want a managed database in the cloud, Azure offers Azure Database for MySQL. This should be used only if you do not want to operate and manage the MySQL database yourself. This service offers a rich solution for backup which allows you to create a backup of your database instance, either from a local region or through a geo-redundant location. This can be useful for data recovery. You may even be able to restore a node from a specific period of time, which is useful in achieving point-in-time recovery. This can be done with just one click.
In this blog, we will cover all of these backup and restore scenarios using a MySQL database on the Microsoft Azure cloud.
Performing Backups on a Virtual Machine on Azure
Unfortunately, Microsoft Azure does not offer a MySQL-specific backup type solution (e.g. MySQL Enterprise Backup, Percona XtraBackup, or MariaDB’s Mariabackup).
Upon creation of your Virtual Machine (using the portal), you can setup a process to backup your VM using the Restore Services vault. This will guard you from any incident, disaster, or catastrophe and the data stored is encrypted by default. Adding encryption is optional and, though recommended by Azure, it comes with a price. You can take a look at their Azure Backup Pricing page for more details.
To create and setup a backup, go to the left panel and click All Resources → Compute → Virtual Machine. Now set the parameters required in the text fields. Once you are on that page, go to the Management tab and scroll down below. You’ll be able to see how you can setup or create the backup. See the screenshot below:
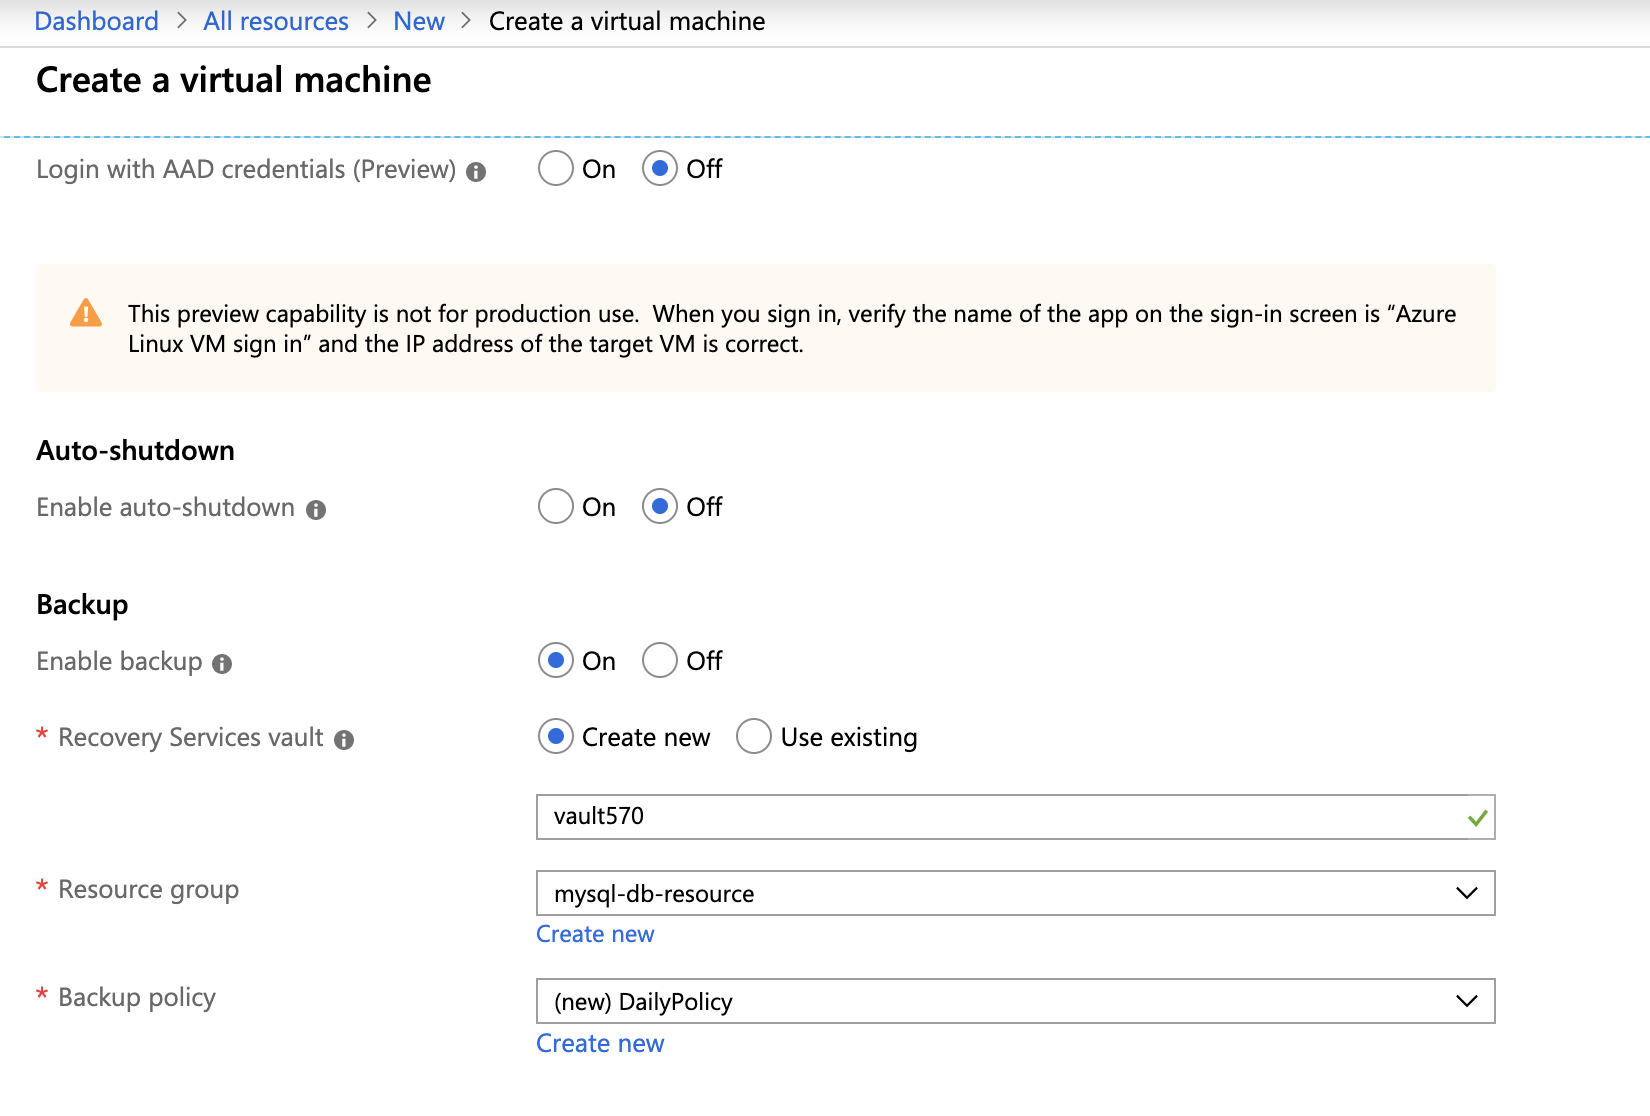
Then setup your backup policy based on your backup requirements. Just hit the Create New link in the Backup policy text field to create a new policy. See below:
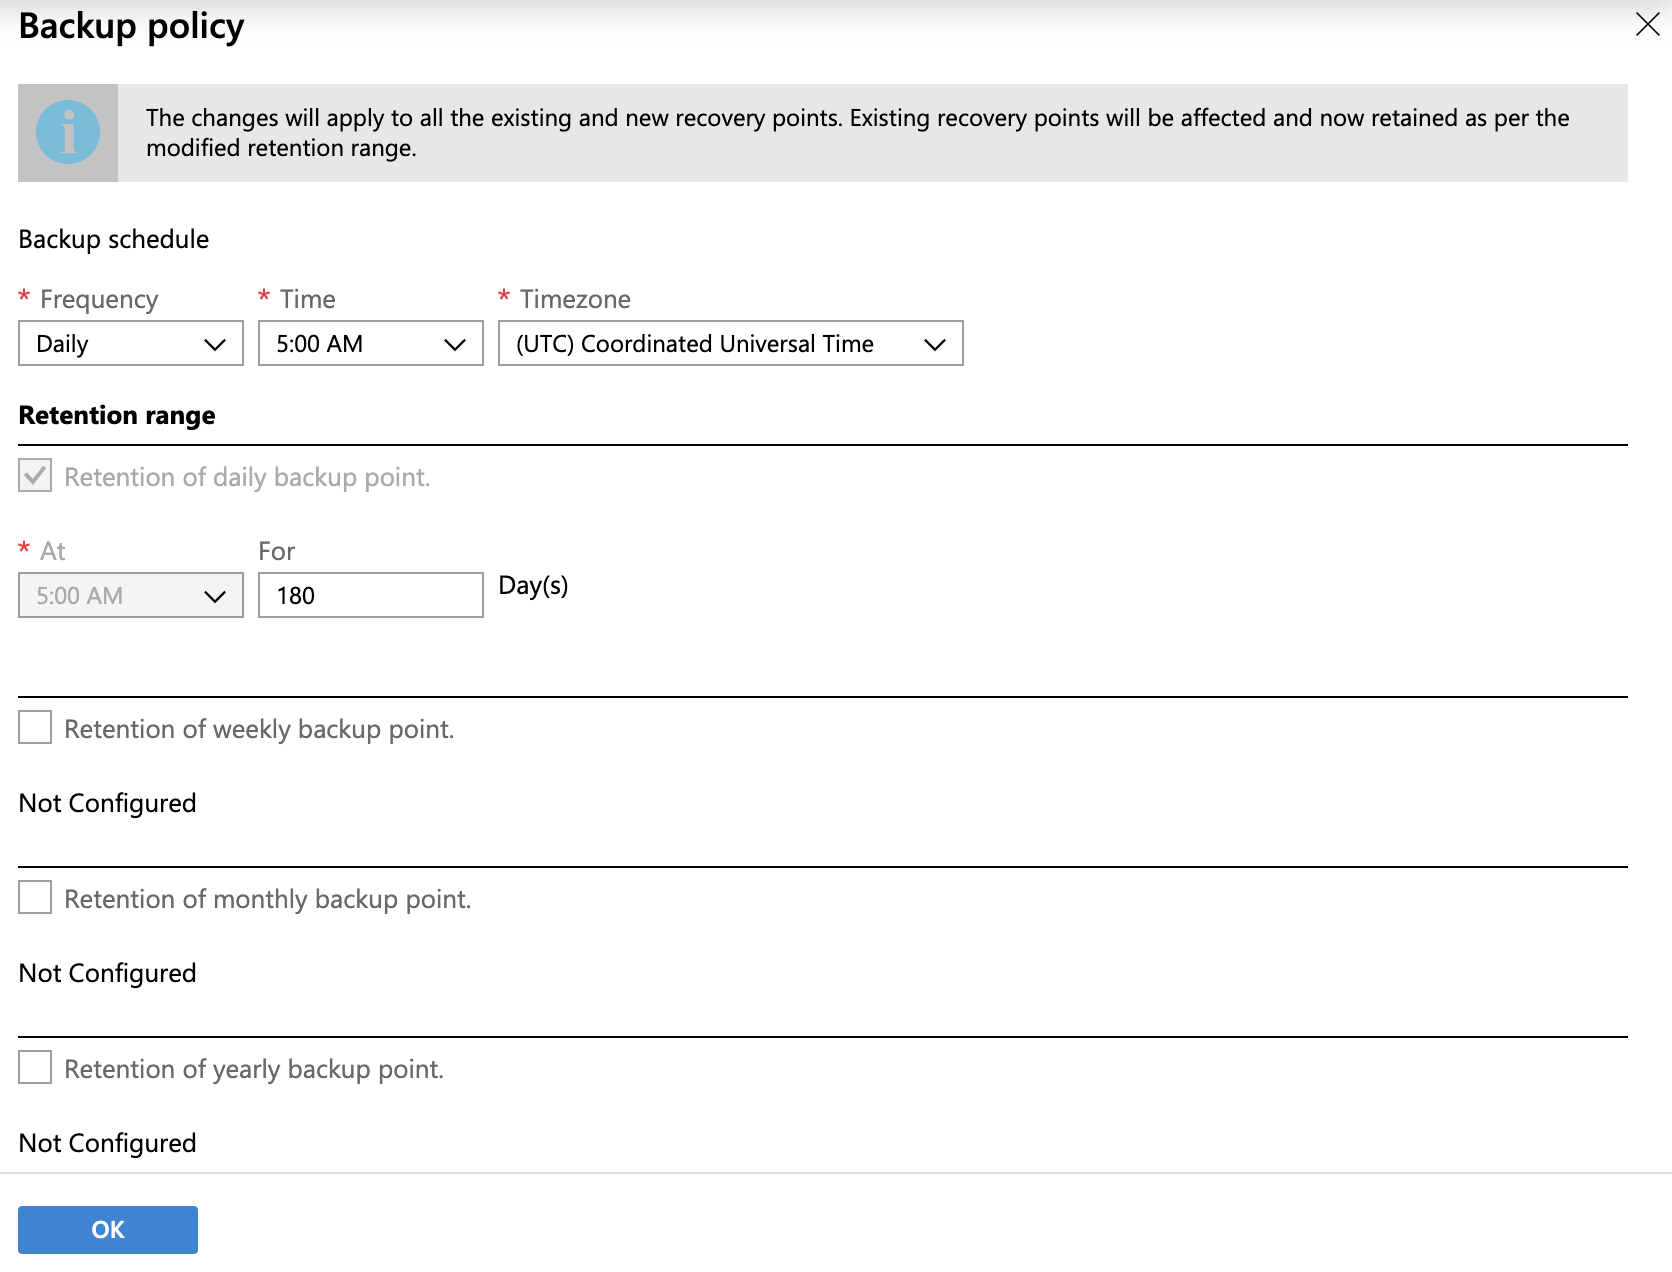
You can configure your backup policy with retention by week, monthly, and yearly.
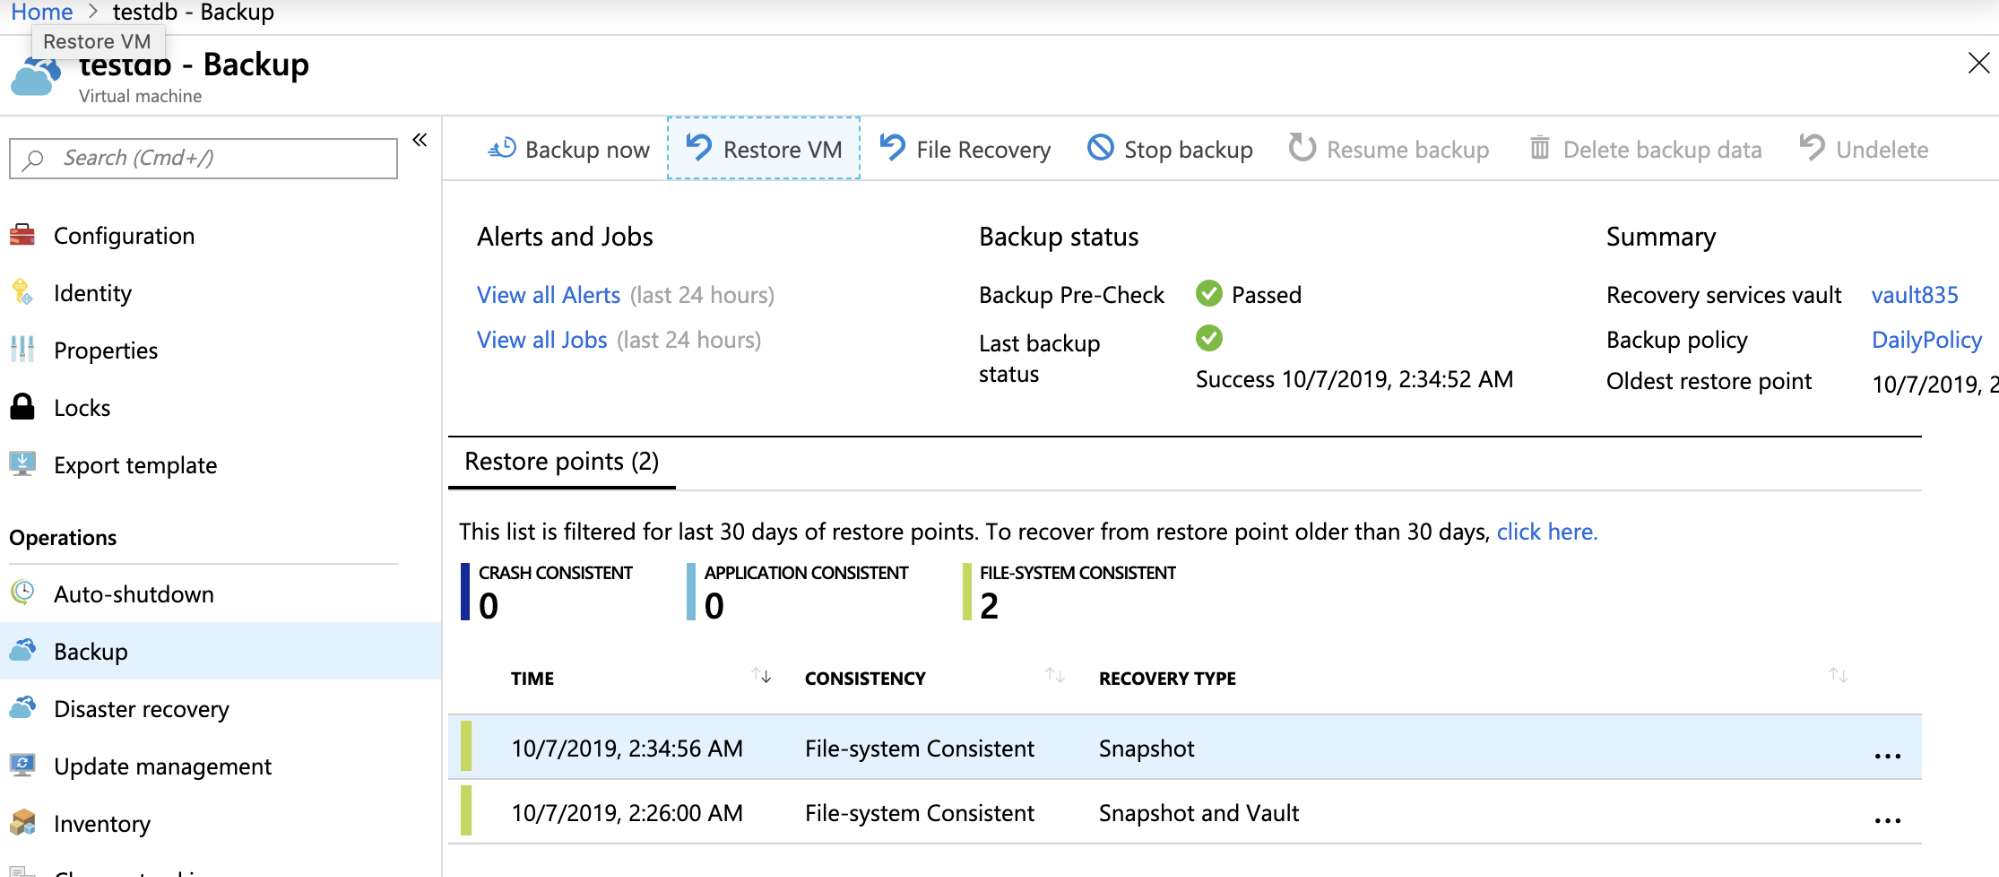
Once you have your backup configured, you can check that you have a backup enabled on that particular virtual machine you have just created. See the screenshot below:
Restore and Recover Your Virtual Machine on Azure
Designing your recovery in Azure depends on what kind of policy and requirements your application requires. It also depends on whether RTO and RPO must be low or invisible to the user in case an incident or during maintenance. You may setup your virtual machine with an availability set or on a different availability zone to achieve a higher recovery rate.
You may also setup a disaster recovery for your VM to replicate your virtual machines to another Azure region for business continuity and disaster recovery needs. However, this might not be a good idea for your organization as it comes with a high cost. If in place, Azure offers you an option to restore or create a virtual machine from the backup created.
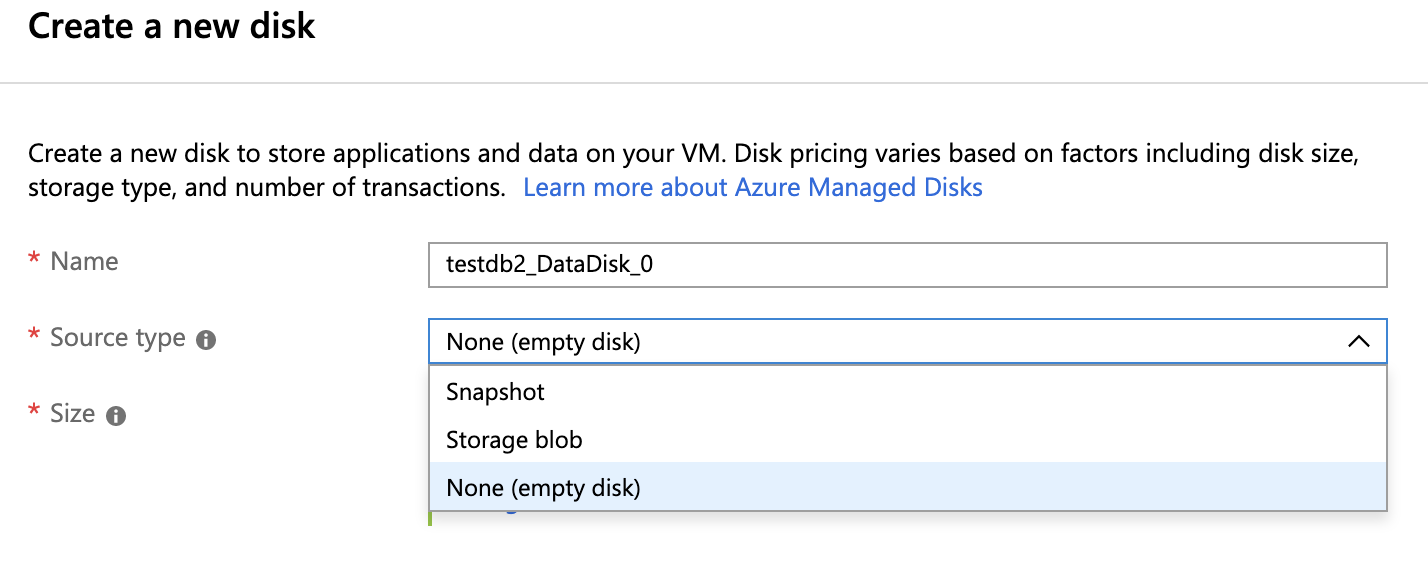
For example, during the creation of your virtual machine, you can go to Disks tab, then go to Data Disks. You can create or attach an existing disk where you can attach the snapshot you have available. See the screenshot below for which you’ll be able to choose from snapshot or storage blob:
You may also restore on a specific point in time just like in the screenshot below:
Restoring in Azure can be done in different ways, but it uses the same resources you have already created.
For example, if you have created a snapshot or a disk image stored in the Azure Storage blob, if you create a new VM, you can use that resource as long as it’s compatible and available to use. Additionally, you may even be able to do some file recovery, aside from restoring a VM just like in the screenshot below:

During File Recovery, you may be able to choose from a specific recovery point, as well as download a script to browse and recover files. This is very helpful when you need only a specific file but not the whole system or disk volume.
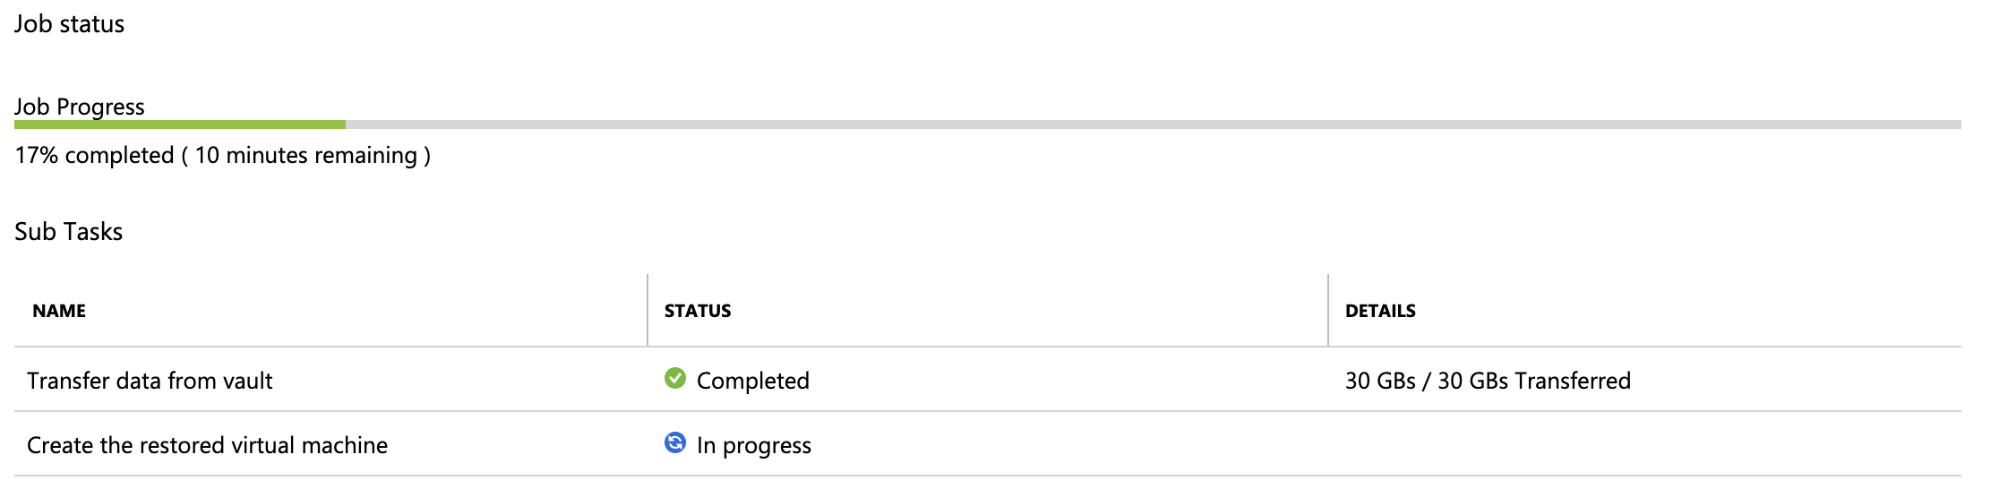
Restoring from backup on an existing VM takes about three minutes. However, restoring from backup to spawn a new VM takes twelve minutes. This, however, could depend on the size of your VM and the network bandwidth available in Azure. The good thing is that, when restoring, it will provide you with details of what has been completed and how much time is remaining. For example, see the screenshot below:
Backups for Azure Database For MySQL
Azure Database for MySQL is a fully-managed database service by Microsoft Azure. This service offers a very flexible and convenient way to setup your backup and restore capabilities.
Upon creation of your MySQL server instance, you can then setup backup retention and create your backup redundancy options; either locally redundant (local region) or geo-redundant (on a different region). Azure will provide you the estimated cost you would be charged for a month. See a sample screenshot below:

Keep in mind that geo-redundant backup options are only available on General Purpose and Memory Optimized types of compute nodes. It’s not available on a Basic compute node, but you can have your redundancy in the local region (i.e. within the availability zones available).
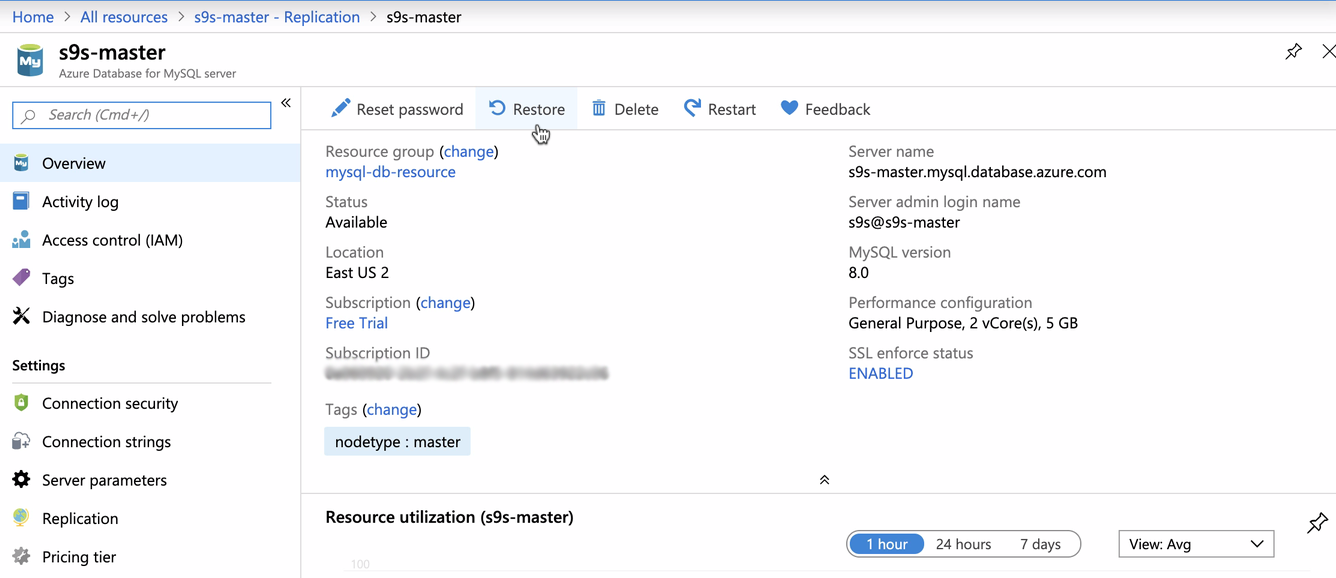
Once you have a master setup, it’s easy to create a replica by going to Azure Database for MySQL servers → Select your MyQL instance → Replication → and click Add Replica. Your replica can be used as the source or restore target when needed.
Keep in mind that in Azure, when you stop the replication between the master and a replica, this will be forever and irreversible as it makes the replica a standalone server. A replica created using Microsoft Azure is ideally a managed instance and you can stop and start the replication threads just like what you do on a normal master-slave replication. You can do a restart and that’s all. If you created the replica manually, by either restoring from the master or a backup, (e.g. via a point-in-time recovery), then you’ll be able to stop/start the replication threads or setup a slave lag if needed.
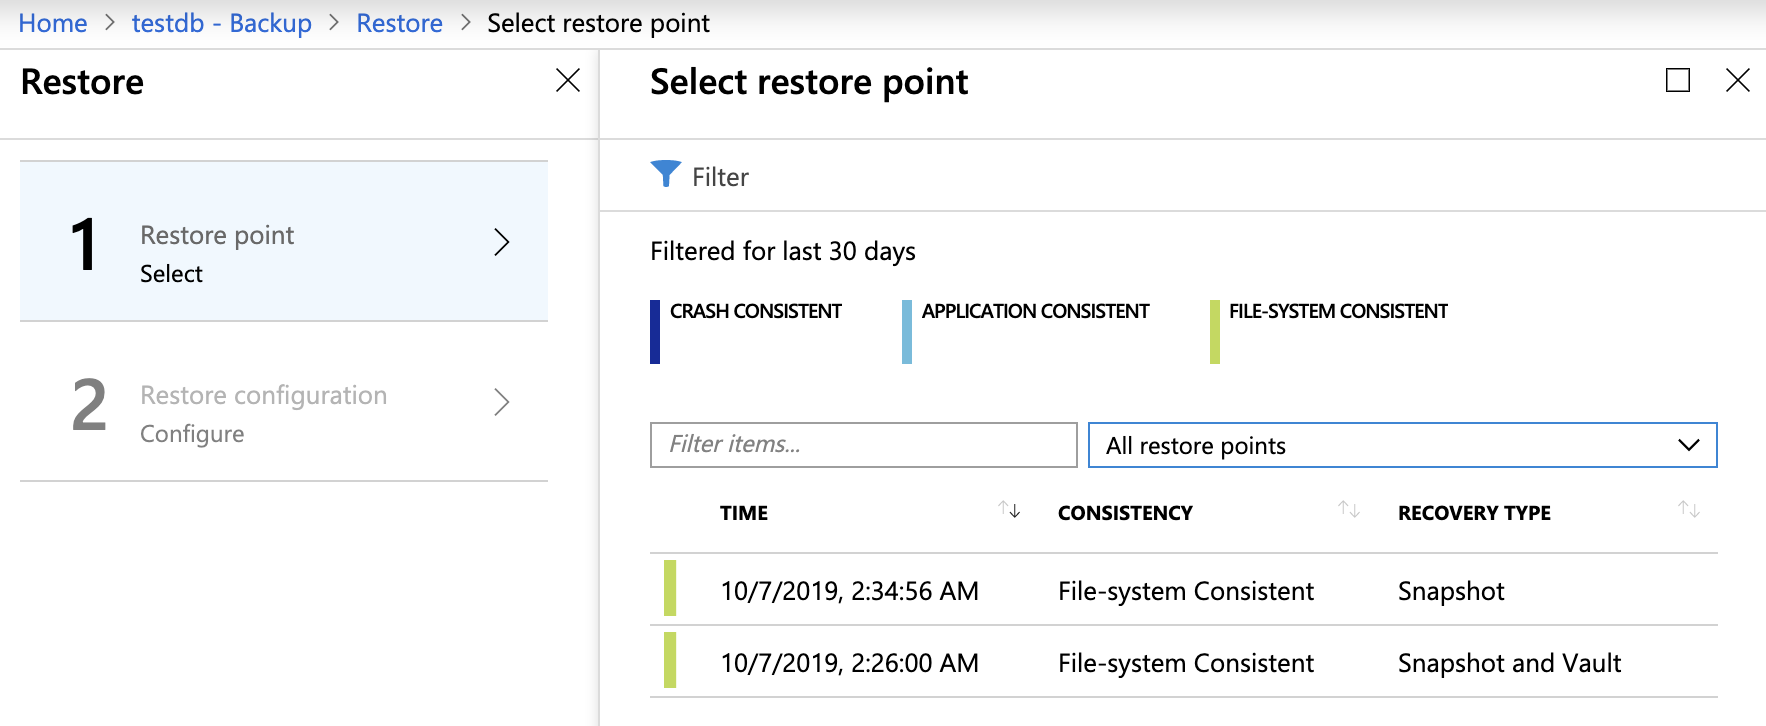
Restoring Your Azure Database For MySQL From A Backup
Restoring is very easy and quick using the Azure portal. You can just hit the restore button with your MySQL instance node and just follow the UI as shown in the screenshot below:
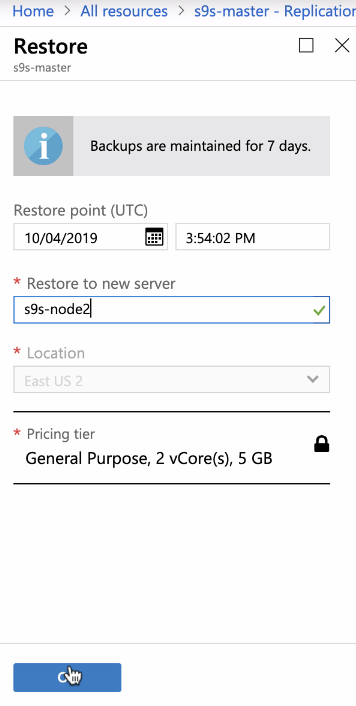
Then you can select a period of time and create/spawn a new instance based on this backup captured:
Once you have the node available, this node will not be a replica of the master yet. You need to manually set this up with easy steps using their stored procedures available:
CALL mysql.az_replication_change_master('', '', '', 3306, '', , ' where,
master_host: hostname of the master server
master_user: username for the master server
master_password: password for the master server
master_log_file: binary log file name from running show master status
master_log_pos: binary log position from running show master status
master_ssl_ca: CA certificate’s context. If not using SSL, pass in empty string.
Then starting the MySQL threads is as follows,
CALL mysql.az_replication_start;or you can stop the replication threads as follows,
CALL mysql.az_replication_stop;or you can remove the master as,
CALL mysql.az_replication_remove_master;or skip SQL thread errors as,
CALL mysql.az_replication_skip_counter;As mentioned earlier, when a replica is created using Microsoft Azure under the Add Replica feature under a MySQL instance, these specific stored procedures aren't available. However, the mysql.az_replication_restart procedure will be available since you are not allowed to stop nor start the replication threads of a managed replica by Azure. So the example we have above was restored from a master which takes the full copy of the master but acts as a single node and needs a manual setup to be a replica of an existing master.
Additionally, when you have a manual replica that you have setup, you will not be able to see this under Azure Database for MySQL servers → Select your MyQL instance → Replication since you created or setup the replication manually.
Alternative Cloud and Restore Backup Solutions
There are certain scenarios where you want to have full-access when taking a full backup of your MySQL database in the cloud. To do this you can create your own script or use open-source technologies. With these you can control how the data in your MySQL database should be backed up and precisely how it should be stored.
You can also leverage Azure Command Line Interface (CLI) to create your custom automation. For example, you can create a snapshot using the following command with Azure CLI:
az snapshot create -g myResourceGroup -source "$osDiskId" --name osDisk-backupor create your MySQL server replica with the following command:
az mysql server replica create --name mydemoreplicaserver --source-server mydemoserver --resource-group myresourcegroupAlternatively, you can also leverage an enterprise tool that features ways to take your backup with restore options. Using open-source technologies or 3rd party tools requires knowledge and skills to leverage and create your own implementation. Here's the list you can leverage:
- ClusterControl - While we may be a little biased, ClusterControl offers the ability to manage physical and logical backups of your MySQL database using battle-tested, open-source technologies (PXB, Mariabackup, and mydumper). It supports MySQL, Percona, MariaDB, Galera databases. You can easily create our backup policy and store your database backups on any cloud (AWS, GCP, or Azure) Please note that the free version of ClusterControl does not include the backup features.
- LVM Snapshots - You can use LVM to take a snapshot of your logical volume. This is only applicable for your VM since it requires access to block-level storage. Using this tool requires caveat since it can bring your database node unresponsive while the backup is running.
- Percona XtraBackup (PXB) - An open source technology from Percona. With PXB, you can create a physical backup copy of your MySQL database. You can also do a hot-backup with PXB for InnoDB storage engine but it's recommended to run this on a slave or non-busy MySQL db server. This is only applicable for your VM instance since it requires binary or file access to the database server itself.
- Mariabackup - Same with PXB, it's an open-source technology forked from PXB but is maintained by MariaDB. Specifically, if your database is using MariaDB, you should use Mariabackup in order to avoid incompatibility issues with tablespaces.
- mydumper/myloader - These backup tools creates a logical backup copies of your MySQL database. You can use this with your Azure database for MySQL though I haven't tried how successful is this for your backup and restore procedure.
- mysqldump - it's a logical backup tool which is very useful when you need to backup and dump (or restore) a specific table or database to another instance. This is commonly used by DBA's but you need to pay attention of your disks space as logical backup copies are huge compared to physical backups.
- MySQL Enterprise Backup - It delivers hot, online, non-blocking backups on multiple platforms including Linux, Windows, Mac & Solaris. It's not a free backup tool but offers a lot of features.
- rsync - It's a fast and extraordinarily versatile file copying tool. It can copy locally, to/from another host over any remote shell, or to/from a remote rsync daemon. It offers a large number of options that control every aspect of its behavior and permit very flexible specification of the set of files to be copied. Mostly in Linux systems, rsync is installed as part of the OS package.