blog
Migrating MySQL Database from Amazon RDS to DigitalOcean

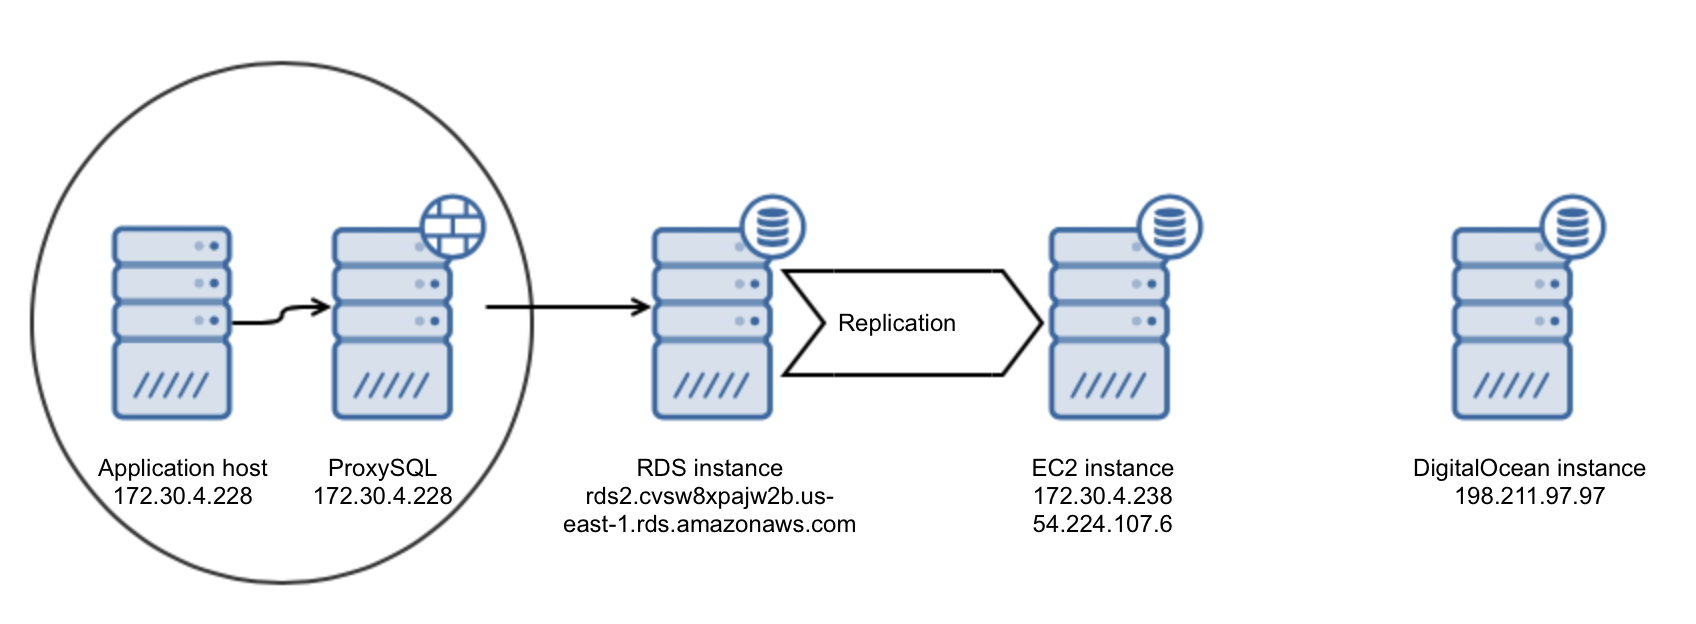
In previous blogs (part 1 and part 2), we discussed how to migrate your RDS data into an EC2 instance. In the process, we managed to move our data out of RDS, but we are still running on AWS. If you would like to move your data completely out of Amazon Web Services, there’s a bit more work to do. In today’s blog post, we will show you how it can be done.
Environment Introduction
The environment we’ll be working with is pretty similar to what we ended up with on our last post in the series. The only difference is that no cutover happened, as we will use the EC2 instance as an intermediate step in the process of moving out of AWS.
The Action Plan
In the previous blog, we first migrated our data from RDS to an EC2 instance that we have full access to. As we already have MySQL running on our EC2 instance, we have more options to choose from regarding how to copy our data to another cloud. DigitalOcean is only used for demo purposes here, the process we describe below can be used to migrate to any other hosting or cloud provider. You would need direct access to the VPS instances. In this process, we will use xtrabackup to copy the data (although it is perfectly fine to use any other method of binary transfer). We would need to prepare a safe connection between AWS and DigitalOcean. Once we do that, we will setup replication from the EC2 instance into a DigitalOcean droplet. The next step would be to perform a cutover and move applications, but we won’t cover it here.
Deciding on Connectivity Method
Amazon Web Services allows you to pick from many different ways to create a connection to external networks. If you have a hardware appliance which supports VPN connections, you can use it to form a VPN connection between your VPC in AWS and your local infrastructure. If your network provider offers you a peering connection with the AWS network and you have a BGP router, you can get a direct VLAN connection between your network and AWS via AWS Direct Connect. If you have multiple, isolated networks you can link them together with Amazon by using AWS VPN CloudHub. Finally, as EC2 instances are yours to manage, you can as well set up a VPN between that EC2 instance and your local network using software solutions like OpenVPN.
As we are talking databases, you can also decide to setup SSL replication between MySQL on EC2 (the master) and the slave running on DigitalOcean. – We still have to figure out how to do an initial data transfer to the slave – one solution could be to tar the output of xtrabackup, encrypt that file and either send it via WAN (rsync) or upload to S3 bucket and then download it from there. You could also rely on SSH encryption and just scp (or even rsync, using SSH) the data to the new location.
There are many options to choose from. We will use another solution though – we are going to establish an SSH tunnel between the EC2 instance and our DigitalOcean droplet to form a secure channel that we will use to replicate data. Initial transfer will be made using rsync over the SSH connection.
Copying Data to DigitalOcean
Once we have MySQL 5.7 up and running on the DigitalOcean instance, we need to perform a backup of the EC2 instance and then transfer it to DO. Technically, it should be possible to perform a direct streaming of xtrabackup data between the nodes but we cannot really recommend it. WAN links can be unreliable, and it would be better to take a backup locally and then use rsync with its ability to retry the transfer whenever something is not right.
First, let’s take a backup on our EC2 instance:
root@ip-172-30-4-238:~# innobackupex --user=tpcc --password=tpccpass /tmp/backupOnce it’s ready we need to transfer it to the DigitalOcean network. To do it in a safe way, we will create a new user on the DO droplet, generate an SSH key and use this user to copy the data. Of course, you can as well use any of existing users, it’s not a required to create a new one. So, let’s add a new user. There are many ways to do this, we’ll use ‘adduser’ command.
root@galera1-node-1:~# adduser rdscopy
Adding user `rdscopy' ...
Adding new group `rdscopy' (1001) ...
Adding new user `rdscopy' (1001) with group `rdscopy' ...
Creating home directory `/home/rdscopy' ...
Copying files from `/etc/skel' ...
Enter new UNIX password:
Retype new UNIX password:
passwd: password updated successfully
Changing the user information for rdscopy
Enter the new value, or press ENTER for the default
    Full Name []:
    Room Number []:
    Work Phone []:
    Home Phone []:
    Other []:
Is the information correct? [Y/n] y
Now, it’s time to generate a pair of ssh keys to use for connectivity:
root@galera1-node-1:~# ssh-keygen -C 'rdscopy' -f id_rsa_rdscopy -t rsa -b 4096
Generating public/private rsa key pair.
Enter passphrase (empty for no passphrase):
Enter same passphrase again:
Your identification has been saved in id_rsa_rdscopy.
Your public key has been saved in id_rsa_rdscopy.pub.
The key fingerprint is:
3a:b0:d2:80:5b:b8:60:1b:17:58:bd:8e:74:c9:56:b3 rdscopy
The key's randomart image is:
+--[ RSA 4096]----+
|   ..            |
|  o  . o         |
| . .. + o        |
| o ..* E         |
|+o+.*   S        |
|o+++ + .         |
|o.. o o          |
|   .   .         |
|                 |
+-----------------+
Having the SSH key, we need to set it up on our Digital Ocean droplet. We need to create .ssh directory and create authorized_keys file with proper access permissions.
root@galera1-node-1:~# mkdir /home/rdscopy/.ssh
root@galera1-node-1:~# cat id_rsa_rdscopy.pub > /home/rdscopy/.ssh/authorized_keys
root@galera1-node-1:~# chown rdscopy.rdscopy /home/rdscopy/.ssh/authorized_keys
root@galera1-node-1:~# chmod 600 /home/rdscopy/.ssh/authorized_keys
Then, we need to copy our private key to the EC2 instance. When we are ready with it, we can copy our data. As we mentioned earlier, we will use rsync for that – it will let us to restart the transfer if, for whatever reason, the process is interrupted. Combined with SSH, we have create a safe and robust method of copying the data over WAN. Let’s start rsync on the EC2 host:
root@ip-172-30-4-238:~# rsync -avz -e "ssh -i id_rsa_rdscopy -o StrictHostKeyChecking=no -o UserKnownHostsFile=/dev/null" --progress /tmp/backup/2017-02-20_16-34-18/ [email protected]:/home/rdscopyAfter a while, which will depend on the amount of data and transfer speed, our backup data should become available on the DigitalOcean droplet. This means that it is time to prepare it by applying InnoDB redo logs, and then copying it back into MySQL data directory. For that we need to stop MySQL, remove the current data directory, copy the files back using either innobackupex or manually, and finally, verify that owner and group for new files is set to mysql:
root@galera1-node-1:~# innobackupex --apply-log /home/rdscopy/
root@galera1-node-1:~# service mysql stop
root@galera1-node-1:~# rm -rf /var/lib/mysql/*
root@galera1-node-1:~# innobackupex --copy-back /home/rdscopy/
root@galera1-node-1:~# chown -R mysql.mysql /var/lib/mysql
Before we start MySQL, we also need to ensure that both server_id and UUID’s are different. The former can be edited in my.cnf, the latter can be assured by:
root@galera1-node-1:~# rm /var/lib/mysql/auto.cnfNow, we can start MySQL:
root@galera1-node-1:~# service mysql startSetting up Replication
We are ready to set up replication between EC2 and DO, but first we need to setup an ssh tunnel – we’ll create an additional ssh key for ubuntu user on EC2 instance and copy it to the DO instance. Then we will use the ubuntu user to create a tunnel that we will use for the replication.
Let’s start by creating the new ssh key:
root@ip-172-30-4-238:~# ssh-keygen -C 'tunnel' -f id_rsa_tunnel -t rsa -b 4096
Generating public/private rsa key pair.
Enter passphrase (empty for no passphrase):
Enter same passphrase again:
Your identification has been saved in id_rsa_tunnel.
Your public key has been saved in id_rsa_tunnel.pub.
The key fingerprint is:
c4:44:79:39:9c:c6:ce:45:bb:13:e5:6f:c5:d9:8c:14 tunnel
The key's randomart image is:
+--[ RSA 4096]----+
|       .o+ +. E. |
|       o. O .= +o|
|        o= oo o.=|
|       .  o  o ..|
|        S   o   o|
|             . . |
|                 |
|                 |
|                 |
+-----------------+
Next step – we need to add our public key to the authorized_keys file on the EC2 instance, to which we will connect from DigitalOcean to create a tunnel.
root@ip-172-30-4-238:~# cat id_rsa_tunnel.pub >> /home/ubuntu/.ssh/authorized_keysWe also need a private key to be transferred to the DO droplet. It can be done in many ways, but we’ll use secure scp using rdscopy user and key that we created earlier:
root@ip-172-30-4-238:~# scp -i id_rsa_rdscopy id_rsa_tunnel [email protected]:/home/rdscopy
id_rsa_tunnel                                                                                                                                                                    100% 3247     3.2KB/s   00:00
That’s all we need – now we can create the SSH tunnel. We want it to be available all the time so we will use screen session for it.
root@galera1-node-1:~# screen -S tunnel
root@galera1-node-1:~# ssh -L 3307:localhost:3306 [email protected] -i /home/rdscopy/id_rsa_tunnel
What we did here was to open an SSH tunnel between localhost, port 3307 and remote host, 54.224.107.6, port 3306 using “ubuntu” user and a key located in /home/rdscopy/id_rsa_tunnel. Detach the screen session and remote host should be available via 127.0.0.1:3307.
To setup replication, we still need to add n user that we will use to connect to MySQL on EC2. We will create it on the EC2 host and we’ll use ‘127.0.0.1’ as host – connections via SSH tunnel will look like they come from localhost:
mysql> CREATE USER [email protected] IDENTIFIED BY 'rds_rpl_pass';
Query OK, 0 rows affected (0.00 sec)
mysql> GRANT REPLICATION SLAVE ON *.* TO [email protected];
Query OK, 0 rows affected (0.00 sec)All is ready to setup replication, it’s time now to follow a traditional process of creating a slave based on xtrabackup data. We need to use data from xtrabackup_binlog_info to identify the master position at the time of the backup. This position is what we want to use in our CHANGE MASTER TO … command. Let’s take a look at the contents of xtrabackup_binlog_info file:
root@galera1-node-1:~# cat /home/rdscopy/xtrabackup_binlog_info
binlog.000052    896957365
This is the binary log file and position we’ll use in our CHANGE MASTER TO:
root@galera1-node-1:~# mysql -u root -ppassmysql> CHANGE MASTER TO MASTER_HOST='127.0.0.1', MASTER_PORT=3307, MASTER_USER='rds_rpl', MASTER_PASSWORD='rds_rpl_pass', MASTER_LOG_FILE='binlog.000052', MASTER_LOG_POS=896957365; START SLAVE;This is it – replication should be now up and running and our DigitalOcean slave should be catching up on the replication. Once it has caught up, our database tier is ready for switchover. Of course, usually it’s more than just a single node – you will most likely have to setup multiple slaves on DO before the infrastructure is ready to handle production traffic.
Switchover itself is a different topic – you will have to devise a plan to minimize downtime. In general, traffic should be moved from old to new location but how it should be done depends mostly on your environment. It can be anything from a simple change in DNS entry, to complex scripts which will pull all triggers in a correct order to redirect the traffic. No matter what, your database is now already in the new location, ready to serve requests.


