blog
MariaDB Server Database Encryption Basics

Encryption is one of the most important security features to keep your data as secure as possible. Depending on the data that you are handling, not always it is a must but you should at least consider it as a security improvement in your organization anyway, and it is actually recommended to avoid data theft or unauthorized access.
In this blog, we will describe two basic types of encryption and how to configure it on a MariaDB Server.
What is Data Encryption?
There are two basic types of data encryption: at-rest and in-transit. Let’s see what they mean.
Data-at-Rest Encryption
Data stored in a system is known as data-at-rest. The encryption of this data consists of using an algorithm to convert text or code to unreadable. You must have an encryption key to decode the encrypted data.
Encrypting an entire database should be done with caution since it can result in a serious performance impact. It is therefore wise to encrypt only individual fields or tables.
Encrypting data-at-rest protects the data from physical theft of hard drives or unauthorized file storage access. This encryption also complies with data security regulations, especially if there is financial or health data stored on the filesystem.
Data-in-Transit Encryption
Data transferred or moving around between transactions is known as data-in-transit. The data moving between the server and client while browsing web pages is a good example of this kind of data.
Since it is always on the move, it needs to be protected with proper encryption to avoid any theft or alteration to the data before it reaches its destination.
The ideal situation to protect data-in-transit is to have the data encrypted before it moves and is only decrypted when it reaches the final destination.
MariaDB Data-at-Rest Encryption
The encryption of tables and tablespaces was added in MariaDB from 10.1 version, and it supports encryption for XtraDB, InnoDB, and Aria storage engines, and also for binary logs.
You can choose different ways to encrypt:
- All tables
- Individual tables
- Everything, excluding individual tables
According to the documentation, using encryption has an overhead of roughly 3-5%, so it is important to have a test environment to stress it and see how it responds, to avoid issues in production.
How to Configure Data-at-Rest Encryption on MariaDB
Let’s check an existing “city” table in a MariaDB database:
$ strings city.ibd |head

infimum

supremum

infimum

supremum

3ABW

3KHM

infimum

supremum

Kabul                              AFGKabol

Qandahar                           AFGQandahar
As you can see, you can read data from there without any issue using the strings Linux command for example. Now, let’s see how to encrypt it.
Generate an encryption keys using the openssl rand command:
$ mkdir -p /etc/mysql/encryption

$ for i in {1..4}; do openssl rand -hex 32 >> /etc/mysql/encryption/keyfile;  done;
Edit the generated file /etc/mysql/encryption/keyfile and add the key IDs which will be referenced when creating encrypted tables. The format should be as follows:
You can edit it using the sed linux command in this way:
$ for i in {1..4}; do sed -i -e "$i s/^/$i;/" keyfile; doneSo the file should be something like this:
$ cat /etc/mysql/encryption/keyfile

1;f237fe72e16206c0b0f6f43c3b3f4accc242564d77f5fe17bb621de388c193af

2;0c0819a10fb366a5ea657a71759ee6a950ae8f25a5ba7400a91f59b63683edc5

3;ac9ea3a839596dbf52492d9ab6b180bf11a35f44995b2ed752c370d920a10169

4;72afc936e16a8df05cf994c7902e588de0d11ca7301f9715d00930aa7d5ff8ab
Now, generate a random password using the similar openssl command that you saw earlier:
$ openssl rand -hex 128 > /etc/mysql/encryption/keyfile.keyBefore proceeding to the next step, it is important to know the following details about encrypting the key file:
- The only algorithm that MariaDB currently supports to encrypt the key file is Cipher Block Chaining (CBC) mode of Advanced Encryption Standard (AES).
- The encryption key size can be 128-bits, 192-bits, or 256-bits.
- The encryption key is created from the SHA-1 hash of the encryption password.
- The encryption password has a max length of 256 characters.
Now, to encrypt the key file using the openssl enc command, run the following command:
$ openssl enc -aes-256-cbc -md sha1 -pass file:/etc/mysql/encryption/keyfile.key -in /etc/mysql/encryption/keyfile -out /etc/mysql/encryption/keyfile.encFinally, you need to add the following parameters in your my.cnf configuration file (located in /etc/ on RedHat-based OS or /etc/mysql/ on Debian-Based OS):
[mysqld]

…

#################### DATABASE ENCRYPTION ####################

plugin_load_add = file_key_management

file_key_management_filename = /etc/mysql/encryption/keyfile.enc

file_key_management_filekey = FILE:/etc/mysql/encryption/keyfile.key

file_key_management_encryption_algorithm = aes_cbc

encrypt_binlog = 1


innodb_encrypt_tables = ON

innodb_encrypt_log = ON

innodb_encryption_threads = 4

innodb_encryption_rotate_key_age = 0

…
And restart the MariaDB service to take the changes:
$ systemctl restart mariadbAt this point, everything is ready to use the encryption feature. Let’s encrypt the same table that we showed earlier, “city”. For this, you need to use the ALTER TABLE statement setting the ENCRYPTED parameter in YES:
MariaDB [world]> ALTER TABLE city ENCRYPTED=YES;

Query OK, 0 rows affected (0.483 sec)

Records: 0  Duplicates: 0  Warnings: 0
Now, if you try to access the table directly from the file system, you will see something like this:
$ strings city.ibd |head

PU%O

!ybN)b

9,{9WB4

T3uG:

?oiN

,35sz

8g)Q

o(o

q_A1

k=-w
As you can see, the table is unreadable. You can also specify the Encryption Key ID by adding the ENCRYPTION_KEY_ID =
New tables will be encrypted by default as we set the innodb_encrypt_tables parameter in ON in the my.cnf configuration file.
MariaDB Data-in-Transit Encryption
MariaDB allows you to encrypt data-in-transit between the server and clients using the Transport Layer Security protocol (TLS), formerly known as Secure Socket Layer or SSL.
First of all, you need to ensure that your MariaDB server was compiled with TLS support. You can verify this by running the following SHOW GLOBAL VARIABLES statement:
MariaDB [(none)]> SHOW GLOBAL VARIABLES LIKE 'version_ssl_library';

+---------------------+----------------------------+

| Variable_name       | Value                      |

+---------------------+----------------------------+

| version_ssl_library | OpenSSL 1.1.1  11 Sep 2018 |

+---------------------+----------------------------+

1 row in set (0.001 sec)
And check if it is not currently in use using the SHOW VARIABLES statement:
MariaDB [(none)]> SHOW VARIABLES LIKE '%ssl%';

+---------------------+----------------------------+

| Variable_name       | Value                      |

+---------------------+----------------------------+

| have_openssl        | YES                        |

| have_ssl            | DISABLED                   |

| ssl_ca              |                            |

| ssl_capath          |                            |

| ssl_cert            |                            |

| ssl_cipher          |                            |

| ssl_crl             |                            |

| ssl_crlpath         |                            |

| ssl_key             |                            |

| version_ssl_library | OpenSSL 1.1.1  11 Sep 2018 |

+---------------------+----------------------------+

10 rows in set (0.001 sec)
You can also verify the SSL status using the status MariaDB command:
MariaDB [(none)]> status

--------------

mysql  Ver 15.1 Distrib 10.4.13-MariaDB, for debian-linux-gnu (x86_64) using readline 5.2

Connection id: 22

Current database:

Current user: root@localhost

SSL: Not in use

Current pager: stdout

Using outfile: ''

Using delimiter: ;

Server: MariaDB

Server version: 10.4.13-MariaDB-1:10.4.13+maria~bionic-log mariadb.org binary distribution

Protocol version: 10

Connection: Localhost via UNIX socket

Server characterset: latin1

Db     characterset: latin1

Client characterset: utf8

Conn.  characterset: utf8

UNIX socket: /var/lib/mysql/mysql.sock

Uptime: 4 hours 28 min 25 sec

Threads: 11  Questions: 111668  Slow queries: 0  Opens: 92  Flush tables: 1  Open tables: 85  Queries per second avg: 6.933

--------------
How to Configure Data-in-Transit Encryption on MariaDB
Let’s create the certs directory to store all the certificates:
$ mkdir -p /etc/mysql/certsNow, let’s generate the CA certificates that will be configured to encrypt the connection:
$ openssl genrsa 2048 > ca-key.pem

$ openssl req -new -x509 -nodes -days 365000 -key ca-key.pem -out ca-cert.pem
This last command will ask you to complete the following information:
Country Name (2 letter code) [AU]:

State or Province Name (full name) [Some-State]:

Locality Name (eg, city) []:

Organization Name (eg, company) [Internet Widgits Pty Ltd]:

Organizational Unit Name (eg, section) []:

Common Name (e.g. server FQDN or YOUR name) []:

Email Address []:
Now, you need to generate the server certificates:
$ openssl req -newkey rsa:2048 -nodes -keyout server-key.pem -out server-req.pemThis command will ask you to fill the same information that before plus an optional certificate password.
$ openssl rsa -in server-key.pem -out server-key.pem

$ openssl x509 -req -in server-req.pem -days 365000 -CA ca-cert.pem -CAkey ca-key.pem -set_serial 01 -out server-cert.pem
And finally, you need to generate the client certificates:
$ openssl req -newkey rsa:2048 -nodes -keyout client-key.pem -out client-req.pemThis will also ask you to complete the information and an optional certificate password.
$ openssl rsa -in client-key.pem -out client-key.pem

$ openssl x509 -req -in client-req.pem -CA ca-cert.pem -CAkey ca-key.pem -set_serial 01 -out client-cert.pem
Make sure you’re using a different Common Name on each certificate, otherwise it won’t work and you will receive a message like:
ERROR 2026 (HY000): SSL connection error: self signed certificateAt this time, you will have something like this:
$ ls /etc/mysql/certs/

ca-cert.pem  ca-key.pem  client-cert.pem  client-key.pem  client-req.pem  server-cert.pem  server-key.pem  server-req.pem
And you can validate the certificates using the following command:
$ openssl verify -CAfile ca-cert.pem server-cert.pem client-cert.pem

server-cert.pem: OK

client-cert.pem: OK
So now let’s configure it in the my.cnf configuration file (located in /etc/ on RedHat-based OS or /etc/mysql/ on Debian-Based OS):
[mysqld]

ssl_ca=/etc/mysql/certs/ca-cert.pem

ssl_cert=/etc/mysql/certs/server-cert.pem

ssl_key=/etc/mysql/certs/server-key.pem


[client-mariadb]

ssl_ca =/etc/mysql/certs/ca-cert.pem

ssl_cert=/etc/mysql/certs/client-cert.pem

ssl_key=/etc/mysql/certs/client-key.pem
Make sure you are adding it under the corresponding section (mysqld and client-mariadb).
Change the certificate’s owner and restart the database service:
$ chown mysql.mysql /etc/mysql/certs/

$ systemctl restart mariadb
After this, if you take a look at the SHOW VARIABLES output, you should have this:
MariaDB [(none)]> SHOW VARIABLES LIKE '%ssl%';

+---------------------+----------------------------------+

| Variable_name       | Value                            |

+---------------------+----------------------------------+

| have_openssl        | YES                              |

| have_ssl            | YES                              |

| ssl_ca              | /etc/mysql/certs/ca-cert.pem     |

| ssl_capath          |                                  |

| ssl_cert            | /etc/mysql/certs/server-cert.pem |

| ssl_cipher          |                                  |

| ssl_crl             |                                  |

| ssl_crlpath         |                                  |

| ssl_key             | /etc/mysql/certs/server-key.pem  |

| version_ssl_library | OpenSSL 1.1.1  11 Sep 2018       |

+---------------------+----------------------------------+

10 rows in set (0.001 sec)
Now, let’s create an user with the REQUIRE SSL parameter to use it:
MariaDB [(none)]> GRANT ALL PRIVILEGES ON *.* TO 's9s'@'%' IDENTIFIED BY 'root123' REQUIRE SSL;

Query OK, 0 rows affected (0.005 sec)
If you use this user to access the database, and check the status command, you will see the SSL in use:
MariaDB [(none)]> status

--------------

mysql  Ver 15.1 Distrib 10.4.13-MariaDB, for debian-linux-gnu (x86_64) using readline 5.2

Connection id: 15

Current database:

Current user: [email protected]

SSL: Cipher in use is TLS_AES_256_GCM_SHA384

Current pager: stdout

Using outfile: ''

Using delimiter: ;

Server: MariaDB

Server version: 10.4.13-MariaDB-1:10.4.13+maria~bionic-log mariadb.org binary distribution

Protocol version: 10

Connection: 127.0.0.1 via TCP/IP

Server characterset: latin1

Db     characterset: latin1

Client characterset: utf8

Conn.  characterset: utf8

TCP port: 3306

Uptime: 16 sec

Threads: 11  Questions: 136  Slow queries: 0  Opens: 17  Flush tables: 1  Open tables: 11  Queries per second avg: 8.500

--------------
How to Enable SSL Encryption with ClusterControl
Another way, and even an easier way, to enable SSL on your MariaDB database is by using ClusterControl. We will assume you have ClusterControl installed and you are managing your MariaDB database using it, so go to ClusterControl -> Select your MariaDB Cluster -> Security -> SSL Encryption -> Enable.
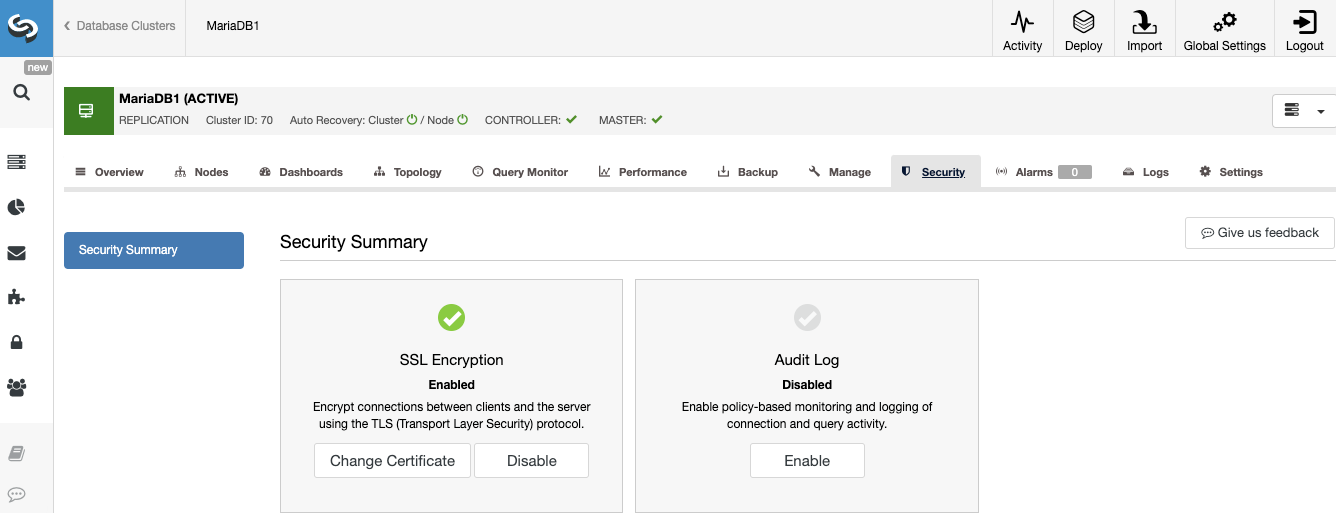
And that’s it, you will have your SSL encryption enabled in your MariaDB database without any manual task.
At-Rest Encryption Limitations in MariaDB
There are some limitations related to MariaDB at-rest encryption to take into account:
- Metadata (for example .frm files) and data sent to the client are not encrypted.
- Only the MariaDB server knows how to decrypt the data, in particular
- mysqlbinlog can read encrypted binary logs only when –read-from-remote-server is used.
- Percona XtraBackup can’t back up instances that use encrypted InnoDB. However, Mariabackup can backup encrypted instances.
- The disk-based Galera gcache is not encrypted in the community version of MariaDB Server, however, this file is encrypted in MariaDB Enterprise Server 10.4.
- The Audit plugin can’t create encrypted output. Send it to syslog and configure the protection there instead.
- File-based general query log and slow query log can’t be encrypted.
- The Aria log is not encrypted. This affects only non-temporary Aria tables.
- The MariaDB error log is not encrypted. The error log can contain query text and data in some cases, including crashes, assertion failures, and cases where InnoDB/XtraDB write monitor output to the log to aid in debugging. It can be sent to syslog too if needed.
Conclusion
Protecting data-in-transit is as important as protecting data-at-rest, and even if it is not a must in your organization, you should consider applying it as it can help you to avoid data theft or unauthorized access.
MariaDB has a pretty easy way to implement it following the steps mentioned earlier, but it is even easier using ClusterControl for sure.