blog
MariaDB MaxScale Load Balancing on Docker: Deployment: Part One

MariaDB MaxScale is an advanced, plug-in database proxy for MariaDB database servers. It sits between client applications and the database servers, routing client queries and server responses. MaxScale also monitors the servers, so it will quickly notice any changes in server status or replication topology. This makes MaxScale a natural choice for controlling failover and similar features.
In this two-part blog series we are going to give a complete walkthrough on how to run MariaDB MaxScale on Docker. This part covers the deployment as a standalone Docker container and MaxScale clustering via Docker Swarm for high availability.
MariaDB MaxScale on Docker
There are a number of MariaDB Docker images available in Docker Hub. In this blog, we are going to use the official image maintained and published by MariaDB called “mariadb/maxscale” (tag: latest). The image is around 71MB in size. At this time of writing, the image is pre-installed with MaxScale 2.3.4 as part of its required packages.
Generally, the following steps are required to run a MaxScale with this image on container environment:
- A running MariaDB (master-slave or master-master) replication/Galera Cluster or NDB Cluster
- Create and grant a database user dedicated for MaxScale monitoring
- Prepare the MaxScale configuration file
- Map the configuration file into container or load into Kubernetes ConfigMap or Docker Swarm Configs
- Start the container/pod/service/replicaset
Note that MaxScale is a product of MariaDB, which means it is tailored towards MariaDB server. Most of the features are still compatible with MySQL except some parts like for example GTID handling, Galera Cluster configuration and internal data files. The version that we are going to use is 2.3.4, which is released under Business Source License (BSL). It allows for all the code to be open and usage under THREE servers is free. When usage goes over three backend servers, the company using it must pay for a commercial subscription. After a specific time period (2 years in the case of MaxScale) the release moves to GPL and all usage is free.
Just to be clear, since this is a test environment, we are okay to have more than 2 nodes. As stated in the MariaDB BSL FAQ page:
Q: Can I use MariaDB products licensed under BSL in test and development environment?
A: Yes, In non-production test and development environment, you can use products licensed under BSL without needing a subscription from MariaDB
In this walkthrough, we already have a three-node MariaDB Replication deployed using ClusterControl. The following diagram illustrates the setup that we are going to deploy:

Our system architecture consists of:
- mariadb1 – 192.168.0.91 (master)
- mariadb2 – 192.168.0.92 (slave)
- mariadb3 – 192.168.0.93 (slave)
- docker1 – 192.168.0.200 (Docker host for containers – maxscale, app)
Preparing the MaxScale User
Firstly, create a MySQL database user for MaxScale and allow all hosts in the network 192.168.0.0/24:
MariaDB> CREATE USER 'maxscale'@'192.168.0.%' IDENTIFIED BY 'my_s3cret';Then, grant the required privileges. If you just want to monitor the backend servers with load balancing, the following grants would suffice:
MariaDB> GRANT SHOW DATABASES ON *.* TO 'maxscale'@'192.168.0.%';
MariaDB> GRANT SELECT ON `mysql`.* TO 'maxscale'@'192.168.0.%';
However, MaxScale can do much more than routing queries. It has the ability to perform failover and switchover for example promoting a slave to a new master. This requires SUPER and REPLICATION CLIENT privileges. If you would like to use this feature, assign ALL PRIVILEGES to the user instead:
mysql> GRANT ALL PRIVILEGES ON *.* TO maxscale@'192.168.0.%';That’s it for the user part.
Preparing MaxScale Configuration File
The image requires a working configuration file to be mapped into the container before it is started. The minimal configuration file provided in the container is not going to help us build the reverse proxy that we want. Therefore, the configuration file has to be prepared beforehand.
The following list can help us in collecting required basic information to construct our configuration file:
- Cluster type – MaxScale supports MariaDB replication (master-slave, master-master), Galera Cluster, Amazon Aurora, MariaDB ColumnStore and NDB Cluster (aka MySQL Cluster).
- Backend IP address and/or hostname – Reachable IP address or hostname for all backend servers.
- Routing algorithm – MaxScale supports two types of query routing – read-write splitting and load balancing in round-robin.
- Port to listen by MaxScale – By default, MaxScale uses port 4006 for round-robin connections and 4008 for read-write split connections. You may use UNIX socket if you want.
In the current directory, create a text file called maxscale.cnf so we can map it into the container when starting up. Paste the following lines in the file:
########################
## Server list
########################

[mariadb1]
type            = server
address         = 192.168.0.91
port            = 3306
protocol        = MariaDBBackend
serv_weight     = 1

[mariadb2]
type            = server
address         = 192.168.0.92
port            = 3306
protocol        = MariaDBBackend
serv_weight     = 1

[mariadb3]
type            = server
address         = 192.168.0.93
port            = 3306
protocol        = MariaDBBackend
serv_weight     = 1

#########################
## MaxScale configuration
#########################

[maxscale]
threads                 = auto
log_augmentation        = 1
ms_timestamp            = 1
syslog                  = 1

#########################
# Monitor for the servers
#########################

[monitor]
type                    = monitor
module                  = mariadbmon
servers                 = mariadb1,mariadb2,mariadb3
user                    = maxscale
password                = my_s3cret
auto_failover           = true
auto_rejoin             = true
enforce_read_only_slaves = 1

#########################
## Service definitions for read/write splitting and read-only services.
#########################

[rw-service]
type            = service
router          = readwritesplit
servers         = mariadb1,mariadb2,mariadb3
user            = maxscale
password        = my_s3cret
max_slave_connections           = 100%
max_sescmd_history              = 1500
causal_reads                    = true
causal_reads_timeout            = 10
transaction_replay              = true
transaction_replay_max_size     = 1Mi
delayed_retry                   = true
master_reconnection             = true
master_failure_mode             = fail_on_write
max_slave_replication_lag       = 3

[rr-service]
type            = service
router          = readconnroute
servers         = mariadb1,mariadb2,mariadb3
router_options  = slave
user            = maxscale
password        = my_s3cret

##########################
## Listener definitions for the service
## Listeners represent the ports the service will listen on.
##########################

[rw-listener]
type            = listener
service         = rw-service
protocol        = MariaDBClient
port            = 4008

[ro-listener]
type            = listener
service         = rr-service
protocol        = MariaDBClient
port            = 4006
A bit of explanations for every section:
- Server List – The backend servers. Define every MariaDB server of this cluster in its own stanza. The stanza name will be used when we specify the service definition further down. The component type must be “server”.
- MaxScale Configuration – Define all MaxScale related configurations there.
- Monitor module – How MaxScale should monitor the backend servers. The component type must be “monitor” followed by either one of the monitoring modules. For the list of supported monitors, refer to MaxScale 2.3 Monitors.
- Service – Where to route the query. The component type must be “service”. For the list of supported routers, refer to MaxScale 2.3 Routers.
- Listener – How MaxScale should listen to incoming connections. It can be port or socket file. The component type must be “listener”. Commonly, listeners are tied to services.
So basically, we would like MaxScale to listen on two ports, 4006 and 4008. Port 4006 is specifically for round-robin connection, suitable for read-only workloads for our MariaDB Replication while port 4008 is specifically for critical read and write workloads. We also want to use MaxScale to perform action to our replication in case of a failover, switchover or slave rejoining, thus we use the monitor module for called “mariadbmon”.
Running the Container
We are now ready to run our standalone MaxScale container. Map the configuration file with -v and make sure to publish both listener ports 4006 and 4008. Optionally, you can enable MaxScale REST API interface at port 8989:
$ docker run -d
--name maxscale
--restart always
-p 4006:4006
-p 4008:4008
-p 8989:8989
-v $PWD/maxscale.cnf:/etc/maxscale.cnf
mariadb/maxscale
Verify with:
$ docker logs -f maxscale
...
2019-06-14 07:15:41.060   notice : (main): Started REST API on [127.0.0.1]:8989
2019-06-14 07:15:41.060   notice : (main): MaxScale started with 8 worker threads, each with a stack size of 8388608 bytes.
Ensure you see no error when looking at the above logs. Verify if the docker-proxy processes are listening on the published ports – 4006, 4008 and 8989:
$ netstat -tulpn | grep docker-proxy
tcp6       0      0 :::8989                 :::*                    LISTEN      4064/docker-proxy
tcp6       0      0 :::4006                 :::*                    LISTEN      4092/docker-proxy
tcp6       0      0 :::4008                 :::*                    LISTEN      4078/docker-proxy
At this point, our MaxScale is running and capable of processing queries.
MaxCtrl
MaxCtrl is a command line administrative client for MaxScale which uses the MaxScale REST API for communication. It is intended to be the replacement software for the legacy MaxAdmin command line client.
To enter MaxCtrl console, execute the “maxctrl” command inside the container:
$ docker exec -it maxscale maxctrl
 maxctrl: list servers
┌──────────┬──────────────┬──────┬─────────────┬─────────────────┬─────────────┐
│ Server   │ Address      │ Port │ Connections │ State           │ GTID        │
├──────────┼──────────────┼──────┼─────────────┼─────────────────┼─────────────┤
│ mariadb1 │ 192.168.0.91 │ 3306 │ 0           │ Master, Running │ 0-5001-1012 │
├──────────┼──────────────┼──────┼─────────────┼─────────────────┼─────────────┤
│ mariadb2 │ 192.168.0.92 │ 3306 │ 0           │ Slave, Running  │ 0-5001-1012 │
├──────────┼──────────────┼──────┼─────────────┼─────────────────┼─────────────┤
│ mariadb3 │ 192.168.0.93 │ 3306 │ 0           │ Slave, Running  │ 0-5001-1012 │
└──────────┴──────────────┴──────┴─────────────┴─────────────────┴─────────────┘
To verify if everything is okay, simply run the following commands:
maxctrl: list servers
maxctrl: list services
maxctrl: list filters
maxctrl: list sessions
To get further info on every component, prefix with “show” command instead, for example:
maxctrl: show servers
┌──────────────────┬──────────────────────────────────────────┐
│ Server           │ mariadb3                                 │
├──────────────────┼──────────────────────────────────────────┤
│ Address          │ 192.168.0.93                             │
├──────────────────┼──────────────────────────────────────────┤
│ Port             │ 3306                                     │
├──────────────────┼──────────────────────────────────────────┤
│ State            │ Slave, Running                           │
├──────────────────┼──────────────────────────────────────────┤
│ Last Event       │ new_slave                                │
├──────────────────┼──────────────────────────────────────────┤
│ Triggered At     │ Mon, 17 Jun 2019 08:57:59 GMT            │
├──────────────────┼──────────────────────────────────────────┤
│ Services         │ rw-service                               │
│                  │ rr-service                               │
├──────────────────┼──────────────────────────────────────────┤
│ Monitors         │ monitor                                  │
├──────────────────┼──────────────────────────────────────────┤
│ Master ID        │ 5001                                     │
├──────────────────┼──────────────────────────────────────────┤
│ Node ID          │ 5003                                     │
├──────────────────┼──────────────────────────────────────────┤
│ Slave Server IDs │                                          │
├──────────────────┼──────────────────────────────────────────┤
│ Statistics       │ {                                        │
│                  │     "connections": 0,                    │
│                  │     "total_connections": 0,              │
│                  │     "persistent_connections": 0,         │
│                  │     "active_operations": 0,              │
│                  │     "routed_packets": 0,                 │
│                  │     "adaptive_avg_select_time": "0ns"    │
│                  │ }                                        │
├──────────────────┼──────────────────────────────────────────┤
│ Parameters       │ {                                        │
│                  │     "address": "192.168.0.93",           │
│                  │     "protocol": "MariaDBBackend",        │
│                  │     "port": 3306,                        │
│                  │     "extra_port": 0,                     │
│                  │     "authenticator": null,               │
│                  │     "monitoruser": null,                 │
│                  │     "monitorpw": null,                   │
│                  │     "persistpoolmax": 0,                 │
│                  │     "persistmaxtime": 0,                 │
│                  │     "proxy_protocol": false,             │
│                  │     "ssl": "false",                      │
│                  │     "ssl_cert": null,                    │
│                  │     "ssl_key": null,                     │
│                  │     "ssl_ca_cert": null,                 │
│                  │     "ssl_version": "MAX",                │
│                  │     "ssl_cert_verify_depth": 9,          │
│                  │     "ssl_verify_peer_certificate": true, │
│                  │     "disk_space_threshold": null,        │
│                  │     "type": "server",                    │
│                  │     "serv_weight": "1"                   │
│                  │ }                                        │
└──────────────────┴──────────────────────────────────────────┘
Connecting to the Database
The application’s database user must be granted with the MaxScale host since from MariaDB server point-of-view, it can only sees the MaxScale host. Consider the following example without MaxScale in the picture:
- Database name: myapp
- User: myapp_user
- Host: 192.168.0.133 (application server)
To allow the user to access the database inside MariaDB server, one has to run the following statement:
MariaDB> CREATE USER 'myapp_user'@'192.168.0.133' IDENTIFIED BY 'mypassword';
MariaDB> GRANT ALL PRIVILEGES ON myapp.* to 'myapp_user'@'192.168.0.133';
With MaxScale in the picture, one has to run the following statement instead (replace the application server IP address with the MaxScale IP address, 192.168.0.200):
MariaDB> CREATE USER 'myapp_user'@'192.168.0.200' IDENTIFIED BY 'mypassword';
MariaDB> GRANT ALL PRIVILEGES ON myapp.* to 'myapp_user'@'192.168.0.200';
From the application, there are two ports you can use to connect to the database:
- 4006 – Round-robin listener, suitable for read-only workloads.
- 4008 – Read-write split listener, suitable for write workloads.
If your application is allowed to specify only one MySQL port (e.g, WordPress, Joomla, etc), pick the RW port 4008 instead. This is the safest endpoint connect regardless of the cluster type. However, if your application can handle connections to multiple MySQL ports, you may send the reads to the round-robin listener. This listener has less overhead and much faster if compared to the read-write split listener.
For our MariaDB replication setup, connect to either one of these endpoints as database host/port combination:
- 192.168.0.200 port 4008 – MaxScale – read/write or write-only
- 192.168.0.200 port 4006 – MaxScale – balanced read-only
- 192.168.0.91 port 3306 – MariaDB Server (master) – read/write
- 192.168.0.92 port 3306 – MariaDB Server (slave) – read-only
- 192.168.0.93 port 3306 – MariaDB Server (slave) – read-only
Note for multi-master cluster type like Galera Cluster and NDB Cluster, port 4006 can be used as multi-write balanced connections instead. With MaxScale you have many options to pick from when connecting to the database, with each of them provide its own set of advantages.
MaxScale Clustering with Docker Swarm
With Docker Swarm, we can create a group of MaxScale instances via Swarm service with more than one replica together with Swarm Configs. Firstly, import the configuration file into Swarm:
$ cat maxscale.conf | docker config create maxscale_config -Verify with:
$ docker config inspect --pretty maxscale_configThen, grant the MaxScale database user to connect from any Swarm hosts in the network:
MariaDB> CREATE USER 'maxscale'@'192.168.0.%' IDENTIFIED BY 'my_s3cret';
MariaDB> GRANT ALL PRIVILEGES ON *.* TO maxscale@'192.168.0.%';
When starting up the Swarm service for MaxScale, we can create multiple containers (called replicas) mapping to the same configuration file as below:
$ docker service create
--name maxscale-cluster
--replicas=3
--publish published=4008,target=4008
--publish published=4006,target=4006
--config source=maxscale_config,target=/etc/maxscale.cnf
mariadb/maxscale
The above will create three MaxScale containers spread across Swarm nodes. Verify with:
$ docker service ls
ID NAME MODE REPLICAS IMAGE PORTS
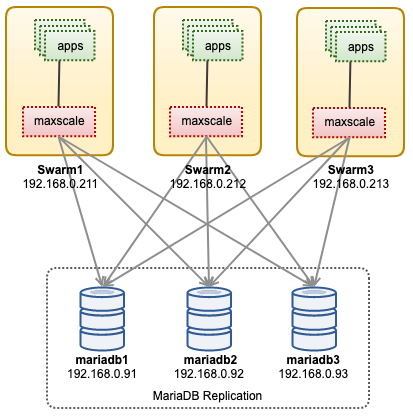
yj6u2xcdj7lo maxscale-cluster replicated 3/3 mariadb/maxscale:latest *:4006->4006/tcp, *:4008->4008/tcpIf the applications are running within the Swarm network, you can simply use the service name “maxscale-cluster” as the database host for your applications. Externally, you can connect to any of the Docker host on the published ports and Swarm network will route and balance the connections to the correct containers in round-robin fashion. At this point our architecture can be illustrated as below:
In the second part, we are going to look at advanced use cases of MaxScale on Docker like service control, configuration management, query processing, security and cluster reconciliation.


