blog
Installing ClusterControl to Deploy a Database Cluster Using Vagrant

If you are dealing with a bunch of virtual machines, using Vagrant is probably the best tool to build, automate and manage the virtual machines to increase efficiency and productivity, especially in a development environment. ClusterControl can also be configured to run on Vagrant and can be automated easily using the Vagrantfile together with an automation script.
Vagrant supports a number of virtualization platforms; e.g., VirtualBox, KVM, Hyper-V, Docker containers, VMware and AWS. In this example, we are going to use VirtualBox as the virtual machine provider and use Vagrant to provision the virtual machine host automatically.
Download VirtualBox from here, and download Vagrant from here. Install them into your workstation and you are good to go.
Deploying ClusterControl on Vagrant
To deploy a ClusterControl virtual machine, simply create the following files:
- Vagrantfile – Virtual machine definition and specification
- deploy-cc.sh – A bash script to install ClusterControl
Create a directory to store the Vagrant definition file:
$ mkdir ~/vagrant/clustercontrol
$ cd ~/vagrant/clustercontrol
Create the Vagrantfile definition file:
$ vim VagrantfileAnd add the following lines:
Vagrant.configure("2") do |config|
  config.vm.box = "centos/7"
  config.vm.network "forwarded_port", guest: 80, host: 8080
  config.vm.network "forwarded_port", guest: 443, host: 8443
  config.vm.network :private_network, ip: "192.168.11.11"
  config.vm.hostname = "cc.local"
  config.vm.provision "shell" do |s|
    s.inline = "yum install -y vim wget"
  end
  config.vm.provision "shell", path: "deploy-cc.sh"

  config.vm.provider :virtualbox do |vb|
    vb.customize [
      "modifyvm", :id,
      "--memory", "4096",
    ]
  end
end
Create the deployment script, deploy-cc.sh in the same directory. This script will be executed automatically every time the virtual machine starts up:
$ vim deploy-cc.shAnd add the following lines:
CC_IP=192.168.11.11 # IP address of the ClusterControl VM
CMON_PASS='cmonP455&' # CMON user password
ROOT_PASS='S3cr3t&' # MySQL root password
MYSQL_PORT=3306

# only install ClusterControl if cmon does not exist
if [ ! -e /usr/sbin/cmon ]; then

    # download installer script
    sudo wget severalnines.com/downloads/cmon/install-cc
    # make it executable
    sudo chmod 755 install-cc
    # execute the installation
    sudo S9S_CMON_PASSWORD=${CMON_PASS} S9S_ROOT_PASSWORD=${ROOT_PASS} S9S_DB_PORT=$MYSQL_PORT HOST=${CC_IP} ./install-cc

    # generate an SSH key for user vagrant
    ssh-keygen -t rsa -N '' -C vagrant@cc -f /home/vagrant/.ssh/id_rsa
    # assign correct ownership to the private and public keys
    sudo chown vagrant:vagrant /home/vagrant/.ssh/id_rsa
    sudo chown vagrant:vagrant /home/vagrant/.ssh/id_rsa.pub

    # optional - copy the public key to Apache docroot so others can download it for authorization
    cat /home/vagrant/.ssh/id_rsa.pub | sudo tee /var/www/html/cc.pub
    # optional - assign correct ownership to the public key
    sudo chown -f apache:apache /var/www/html/cc.pub
fi
We are now ready to start our first instance. We can check the VM status by using the following command:
$ vagrant statusTo create and start the VM, run the following command:
$ vagrant upYou should see a lot of lines coming up on the screen indicating the VM is being prepared by Vagrant. Wait until the process completes, and you should be able to access the ClusterControl UI at http://127.0.0.1:8080/ or https://127.0.0.1:8443/ of your local machine. Port 8080 is for plain HTTP connection while 8443 is for HTTPS, as defined inside the Vagrantfile under “forwarded_port” lines.
Deploying Database Clusters on Vagrant
Now we have the ClusterControl provisioned and ready to manage and monitor our development database cluster environment. Creating multiple virtual machines using Vagrant is easy using the Vagrantfile. In this example, we would like to deploy a 3-node Galera Cluster running on Percona XtraDB Cluster 8.0 as illustrated in the following diagram:
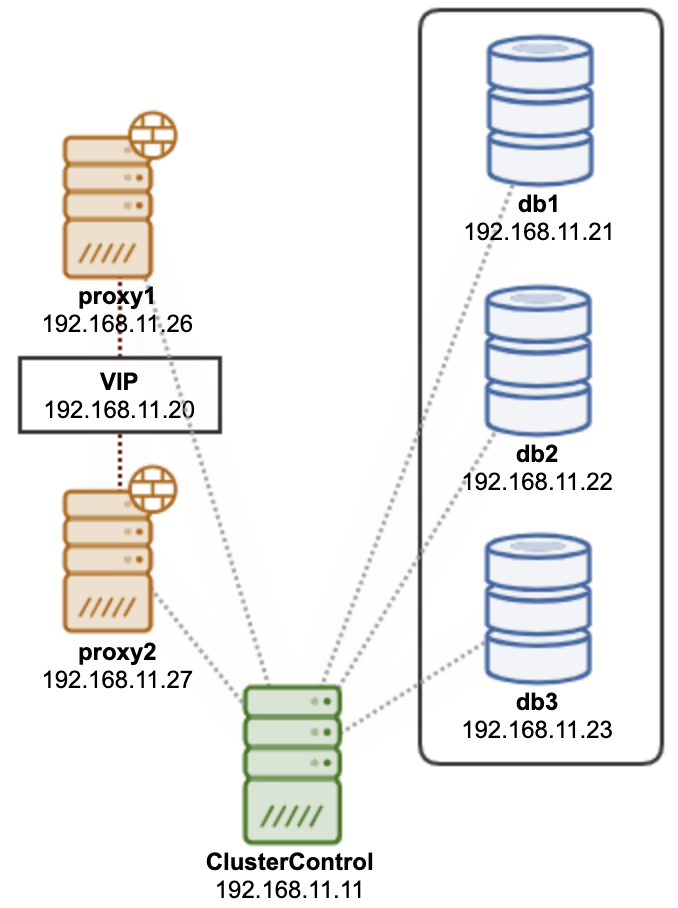
The cluster consists of 3 nodes of database nodes and 2 nodes of ProxySQL nodes for MySQL load balancing. This whole set can be considered as one group of nodes for this cluster. Therefore, we are going to define the VMs specification in one single Vagrantfile. Firstly, create a directory for our database cluster:
$ mkdir ~/vagrant/clustercontrol/percona-xtradb-cluster-80/
$ cd ~/vagrant/clustercontrol/percona-xtradb-cluster-80/
Then, create a Vagrantfile definition using your preferred text editor for our 3-node database cluster and 2-node ProxySQL cluster:
$ vim ~/vagrant/clustercontrol/percona-xtradb-cluster-80/VagrantfileAnd add the following lines:
nodes = [
  { :hostname => 'db1', :ip => '192.168.11.21', :ram => 1024, :guestport => 3306, :hostport => 13306 },
  { :hostname => 'db2', :ip => '192.168.11.22', :ram => 1024, :guestport => 3306, :hostport => 23306 },
  { :hostname => 'db3', :ip => '192.168.11.23', :ram => 1024, :guestport => 3306, :hostport => 33306 },
  { :hostname => 'proxy1', :ip => '192.168.11.26', :ram => 512, :guestport => 6033, :hostport => 16033 },
  { :hostname => 'proxy2', :ip => '192.168.11.27', :ram => 512, :guestport => 6033, :hostport => 26033 }
]

Vagrant.configure("2") do |config|
  nodes.each do |node|
    config.vm.define node[:hostname] do |nodeconfig|
      nodeconfig.vm.box = 'centos/7'
      nodeconfig.vm.hostname = node[:hostname] + ".local"
      nodeconfig.vm.network :private_network, ip: node[:ip]
      nodeconfig.vm.network "forwarded_port", guest: node[:guestport], host: node[:hostport]

      memory = node[:ram] ? node[:ram] : 512;
      nodeconfig.vm.provider :virtualbox do |vb|
        vb.customize [ "modifyvm", :id, "--memory", memory.to_s ]
        vb.customize [ "modifyvm", :id, "--audio", "none" ]
      end

      nodeconfig.vm.provision "shell" do |s|
        s.inline = "yum install -y wget vim"
      end
    end
  end

  (1..3).each do |i|
    config.vm.define "db#{i}" do |dbnode|
      dbnode.vm.provision "shell", path: "authorize.sh"
    end
  end

  (1..2).each do |i|
    config.vm.define "proxy#{i}" do |dbnode|
      dbnode.vm.provision "shell", path: "authorize.sh"
    end
  end

end
In the same directory, create a shell script called authorize.sh and add the following lines:
CC_IP=192.168.11.11
curl -s http://${CC_IP}/cc.pub >> /home/vagrant/.ssh/authorized_keys
This script will pull the public key from the ClusterControl server (as configured inside deploy-cc.sh when we provision our ClusterControl VM), and store it inside the authorized key list for the OS user “vagrant”. This is basically to automatically configure the passwordless SSH which is mandatory for the nodes to be managed by ClusterControl.
To create and start the VMs for our cluster, run the following command:
$ vagrant upWait for a moment until all VMs are up and running. You can verify with the vagrant status command:
$ vagrant statusOnce done, it’s time to deploy our Percona XtraDB Cluster using ClusterControl. Open ClusterControl at http://127.0.0.1:8080/clustercontrol and go to Deploy -> MySQL Galera and enter the following details:
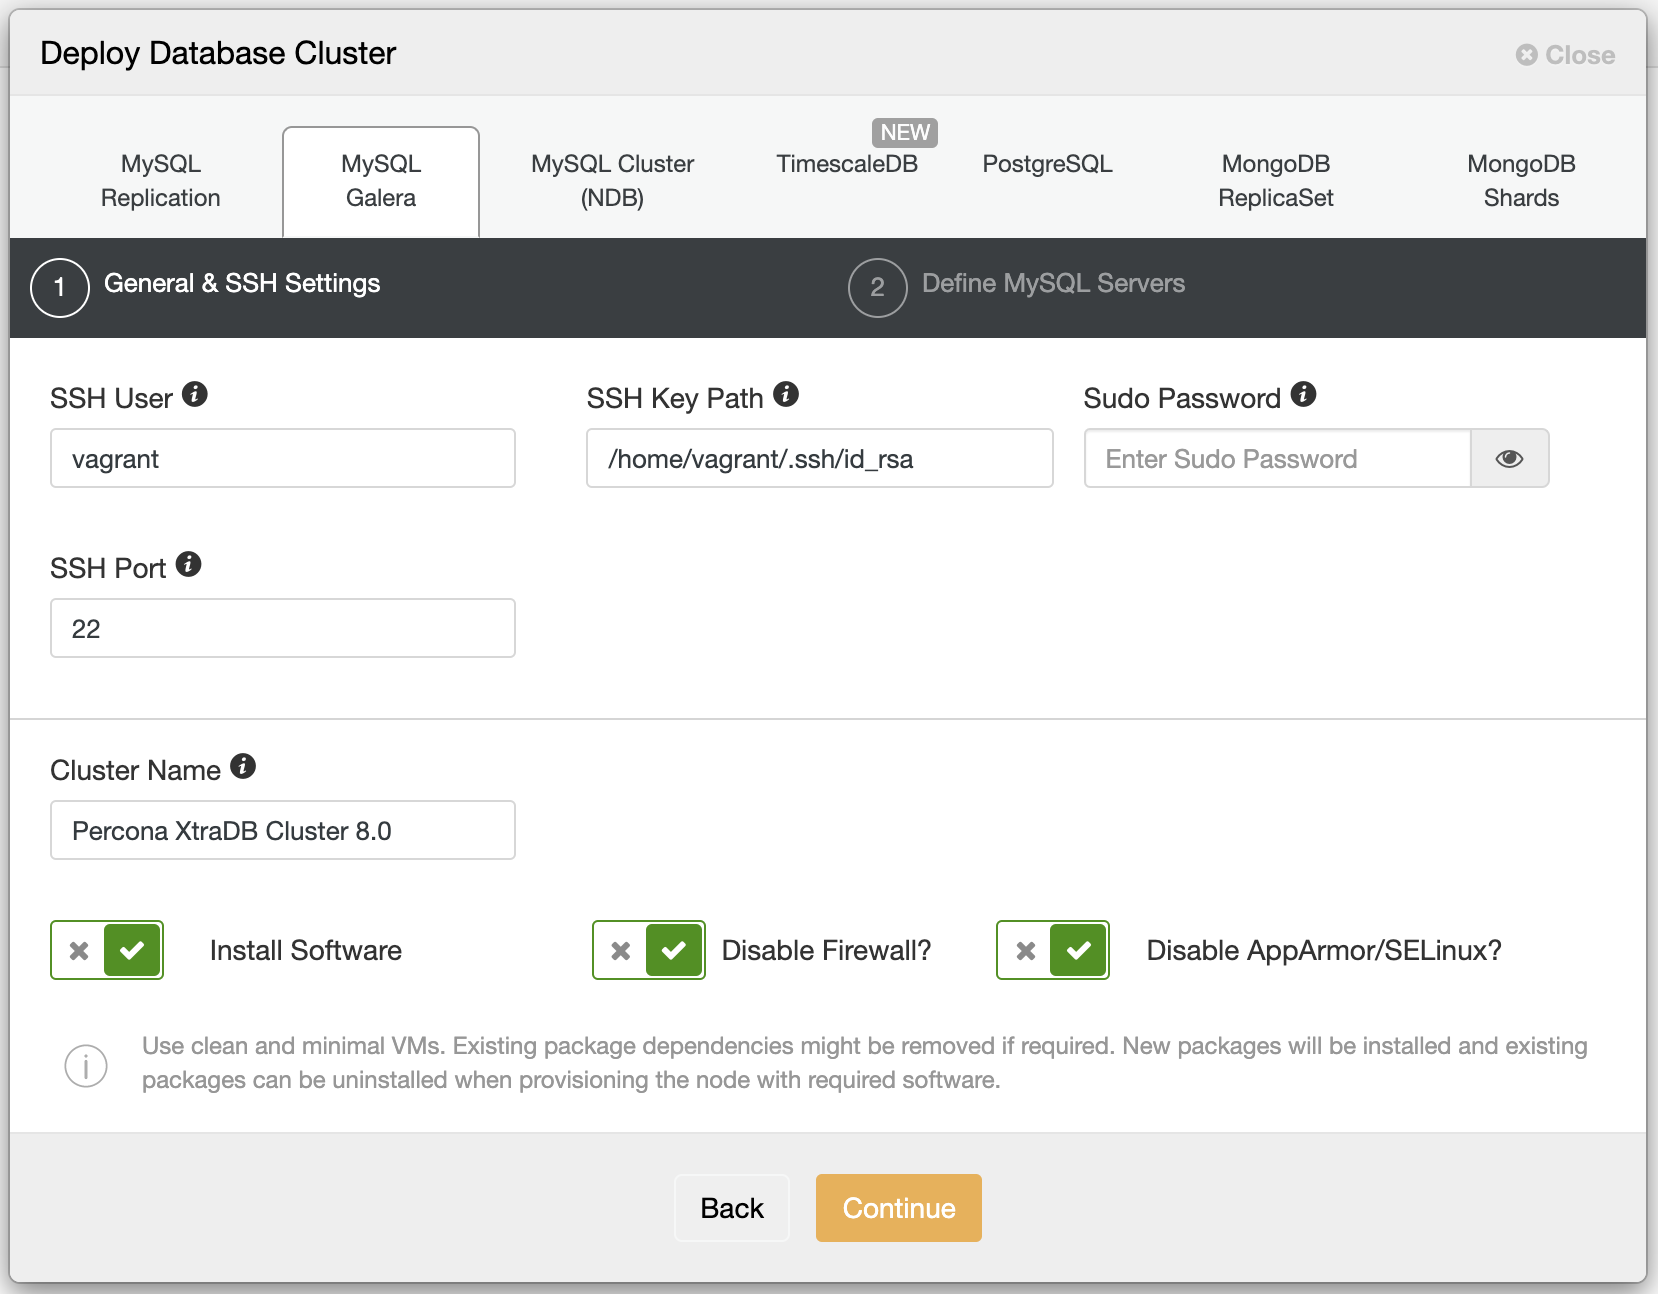
We specified vagrant as the SSH user because we have auto-authorized the public key in every nodes’ authorized_keys list when provisioning the VMs using Vagrant using the authorize.sh script. Note that every Vagrant address VM for Virtualbox will have at least two network interfaces. With VirtualBox, Vagrant requires the first network device attached to the virtual machine to be a NAT device. The NAT device is used for port forwarding, which is how Vagrant gets SSH access to the virtual machine. Our IP address as defined in the Vagrantfile will be added as in interface eth1, eth2 and so on, which is crucial when defining them under the “Define MySQL Servers” section as shown below:
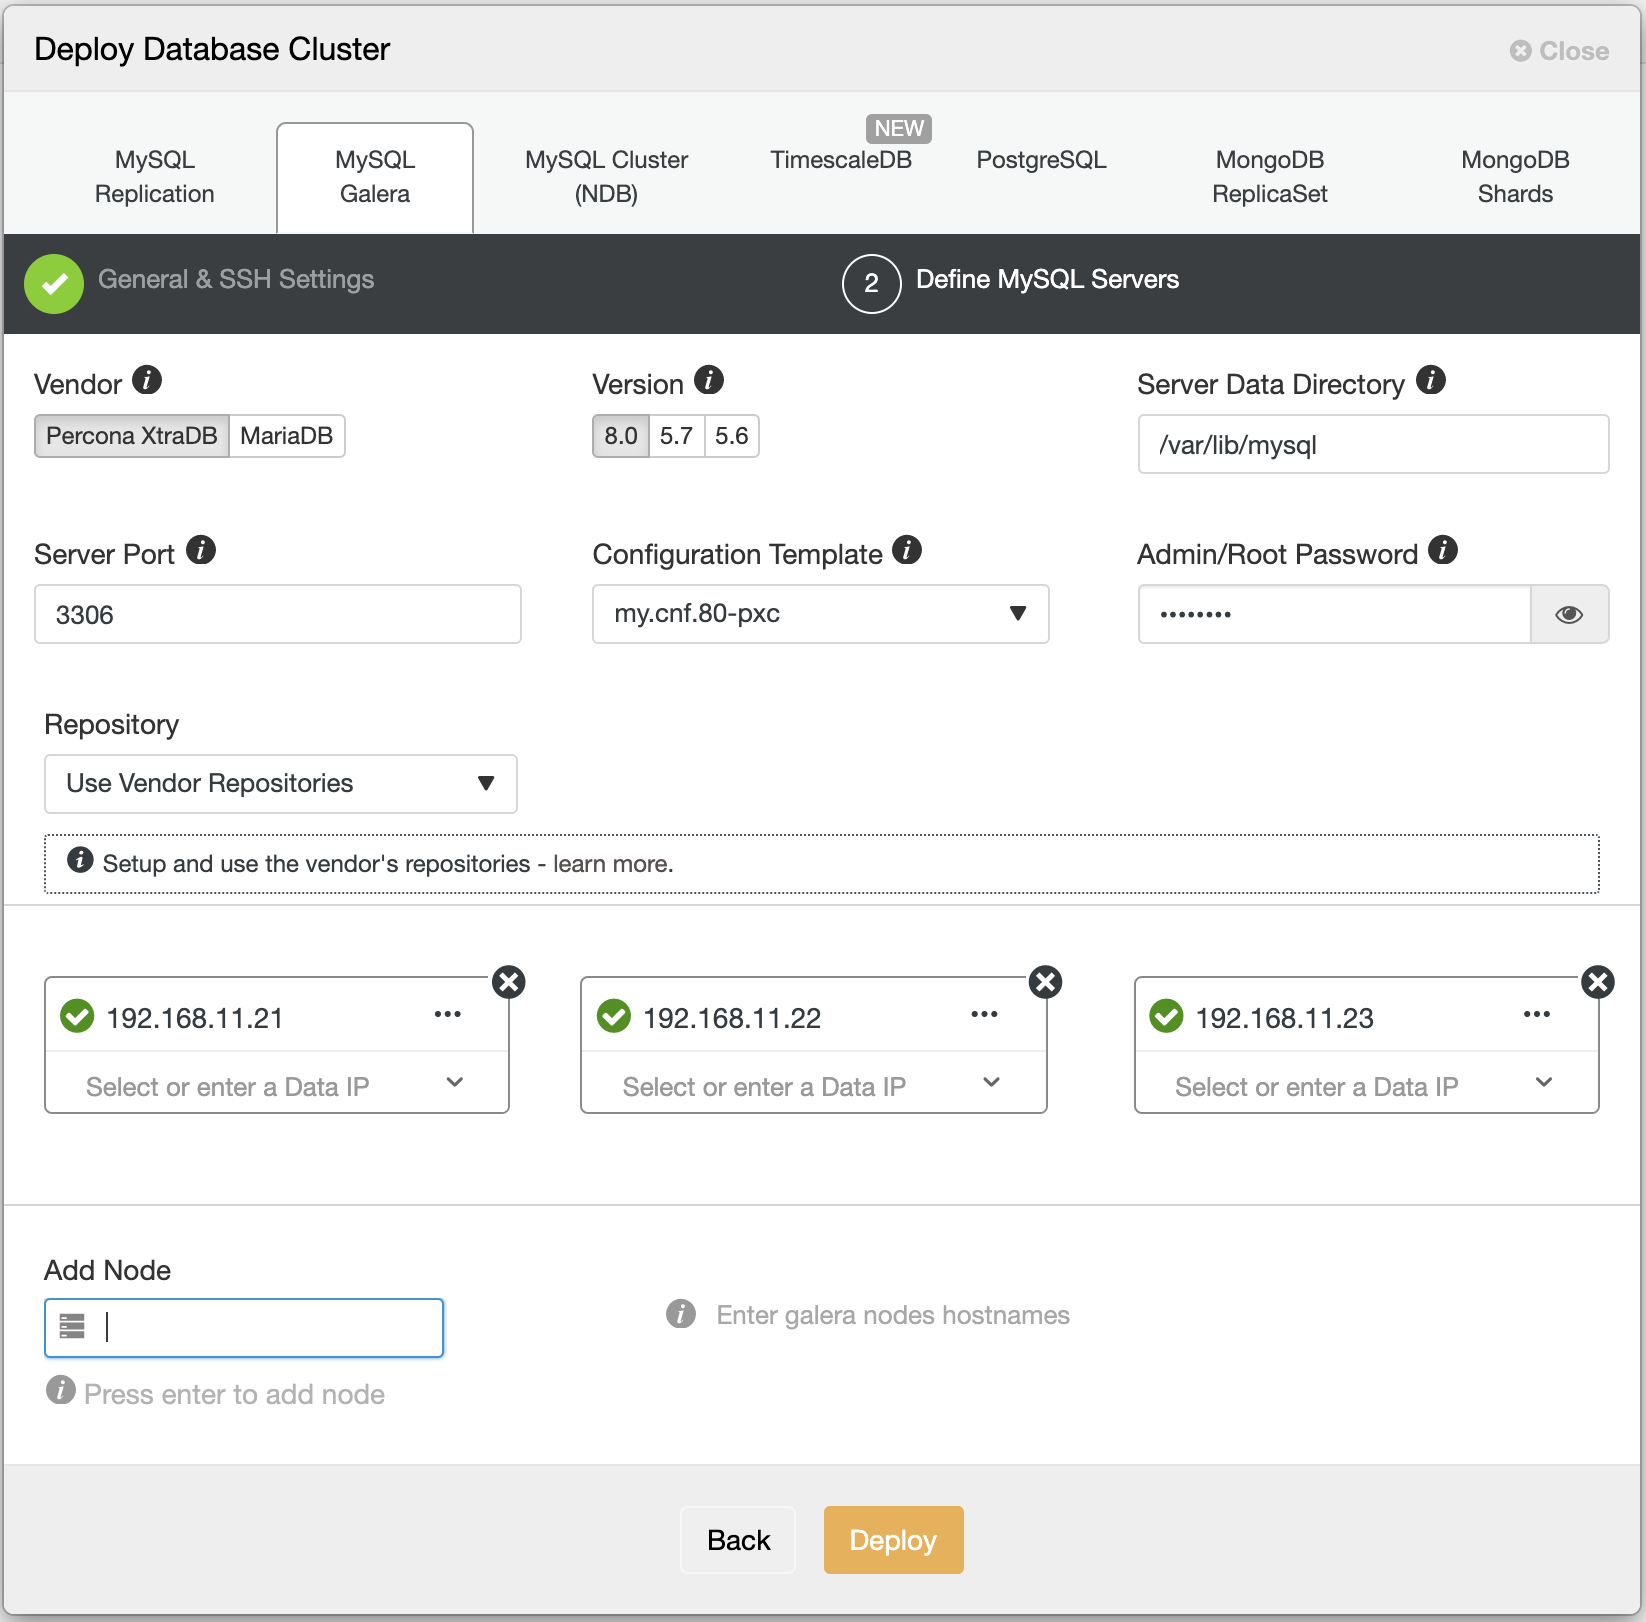
When specifying the IP address in the second step above, use the IP address of what we have defined inside Vagrantfile (which is equivalent to eth1’s IP address of the created VM). The green tick next to the IP address indicates the node is reachable via passwordless SSH from the ClusterControl node. Finally, click “Deploy” and wait until the deployment completes.
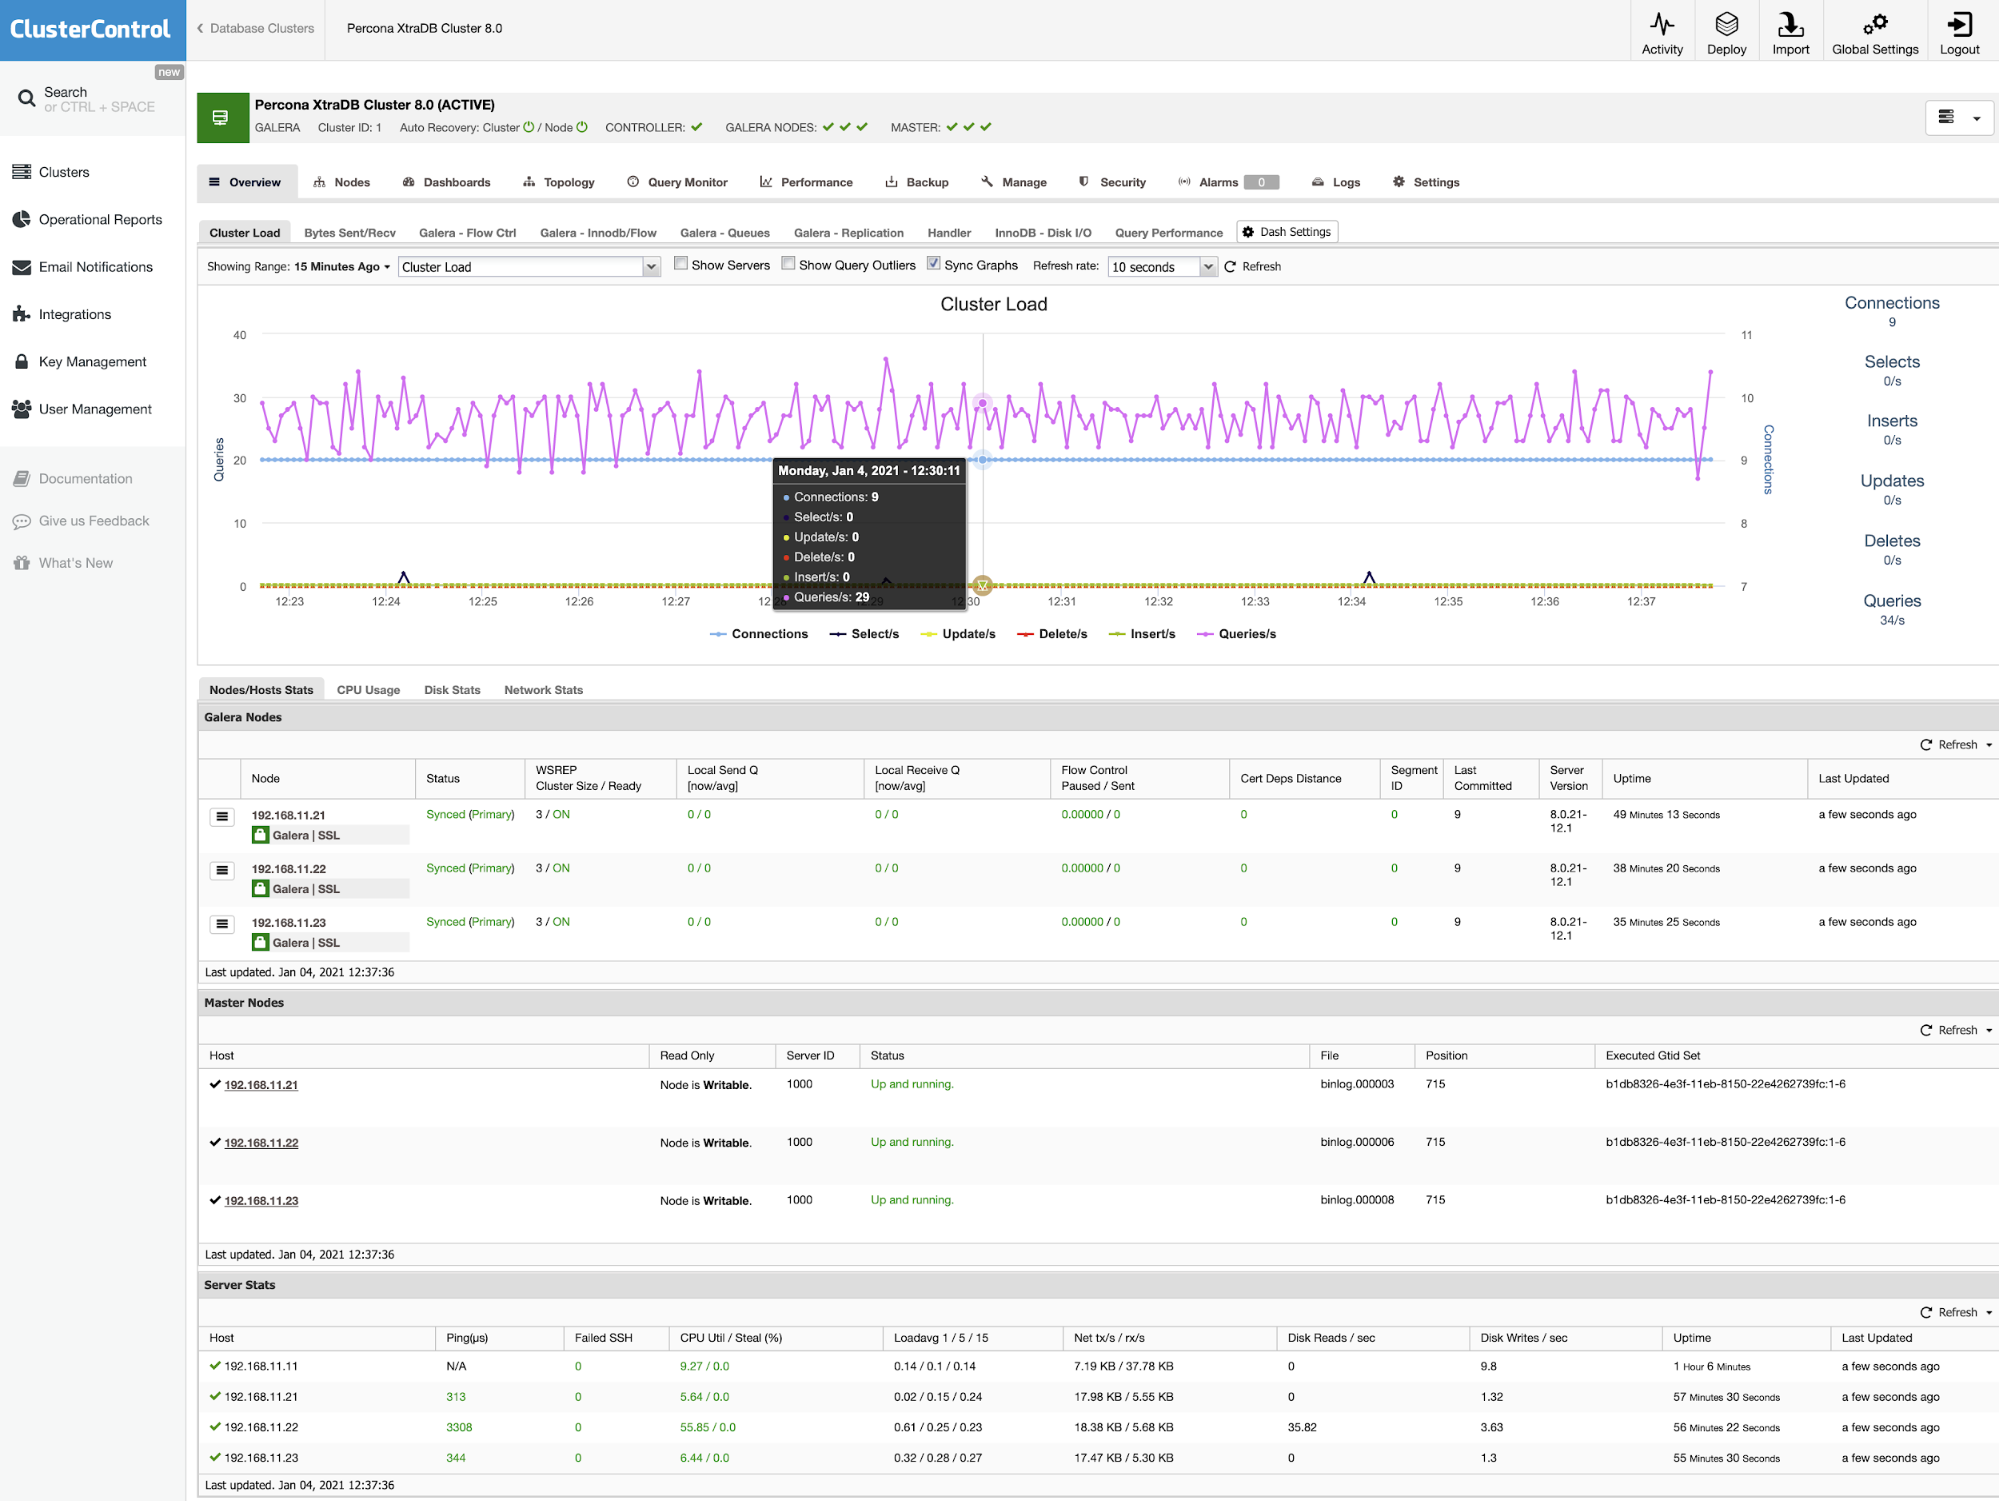
You should see the following once the deployment job is complete:
Deploying Load Balancers on Vagrant
Similarly, for load balancers, we have already prepared the virtual machine using Vagrant with the proper IP address and passwordless SSH. To deploy a ProxySQL, go to ClusterControl -> Manage -> Load Balancers -> ProxySQL -> Deploy ProxySQL and specify the first load balancer, 192.168.11.26 as below:
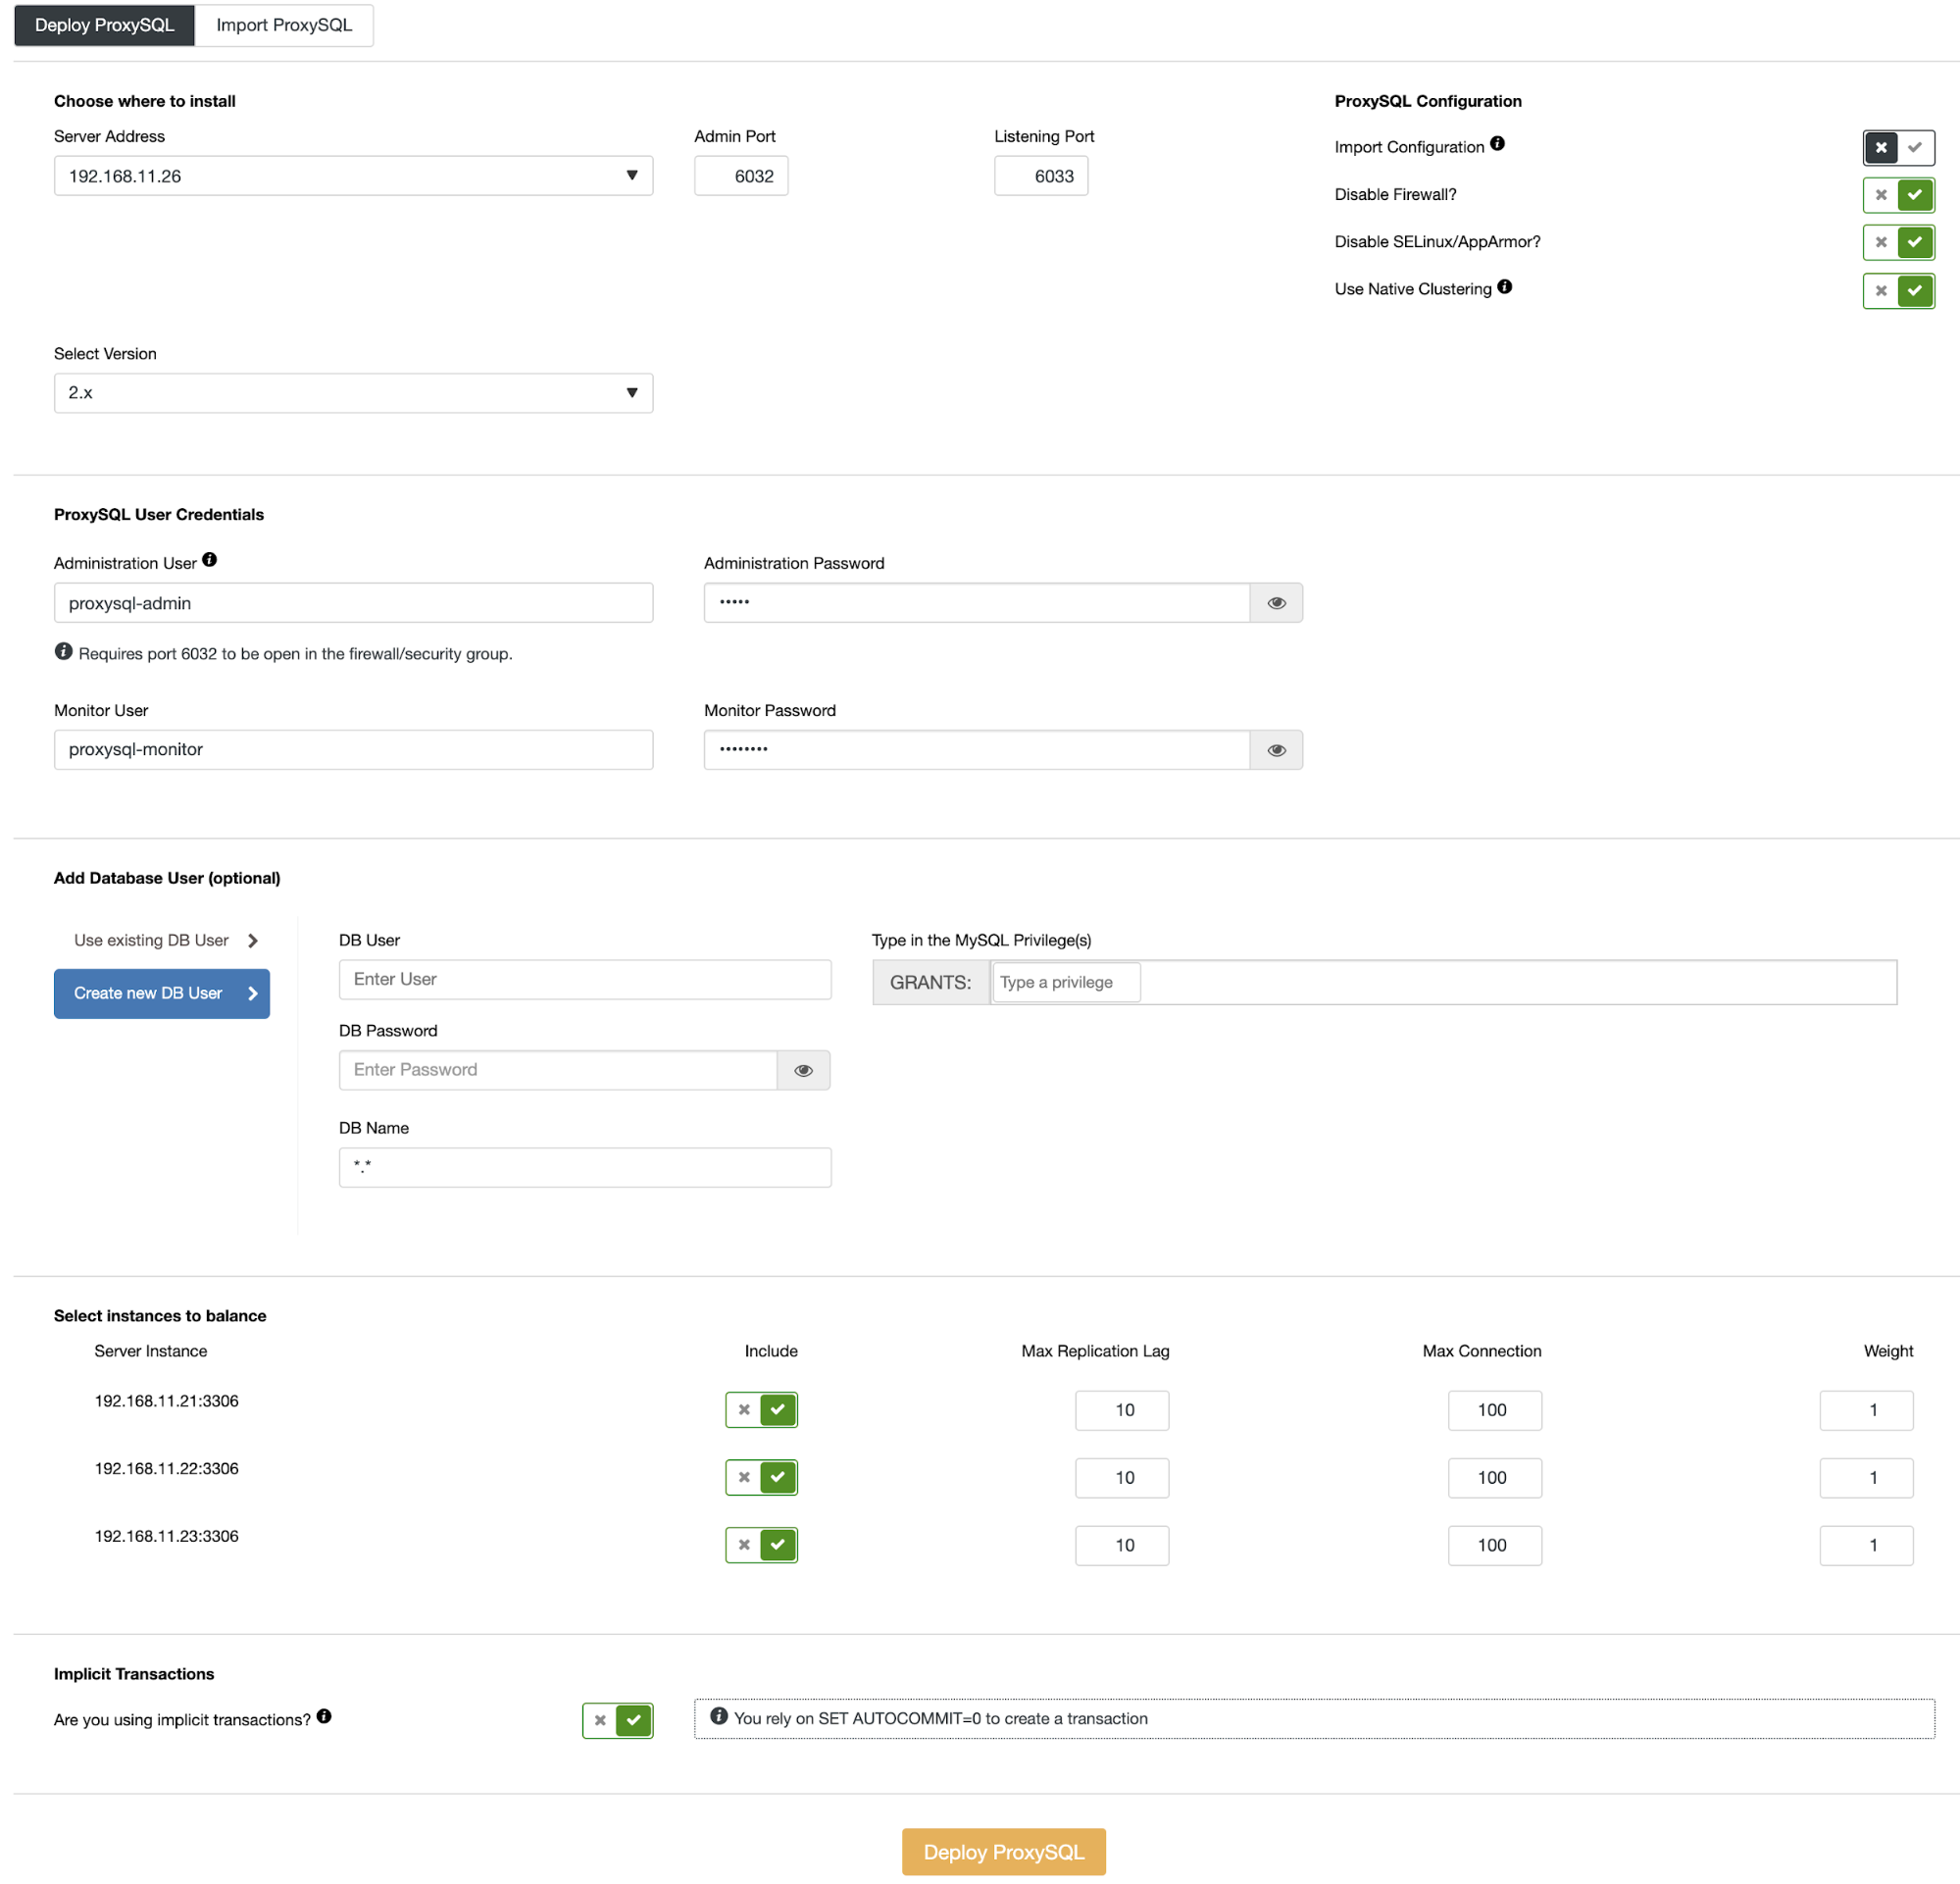
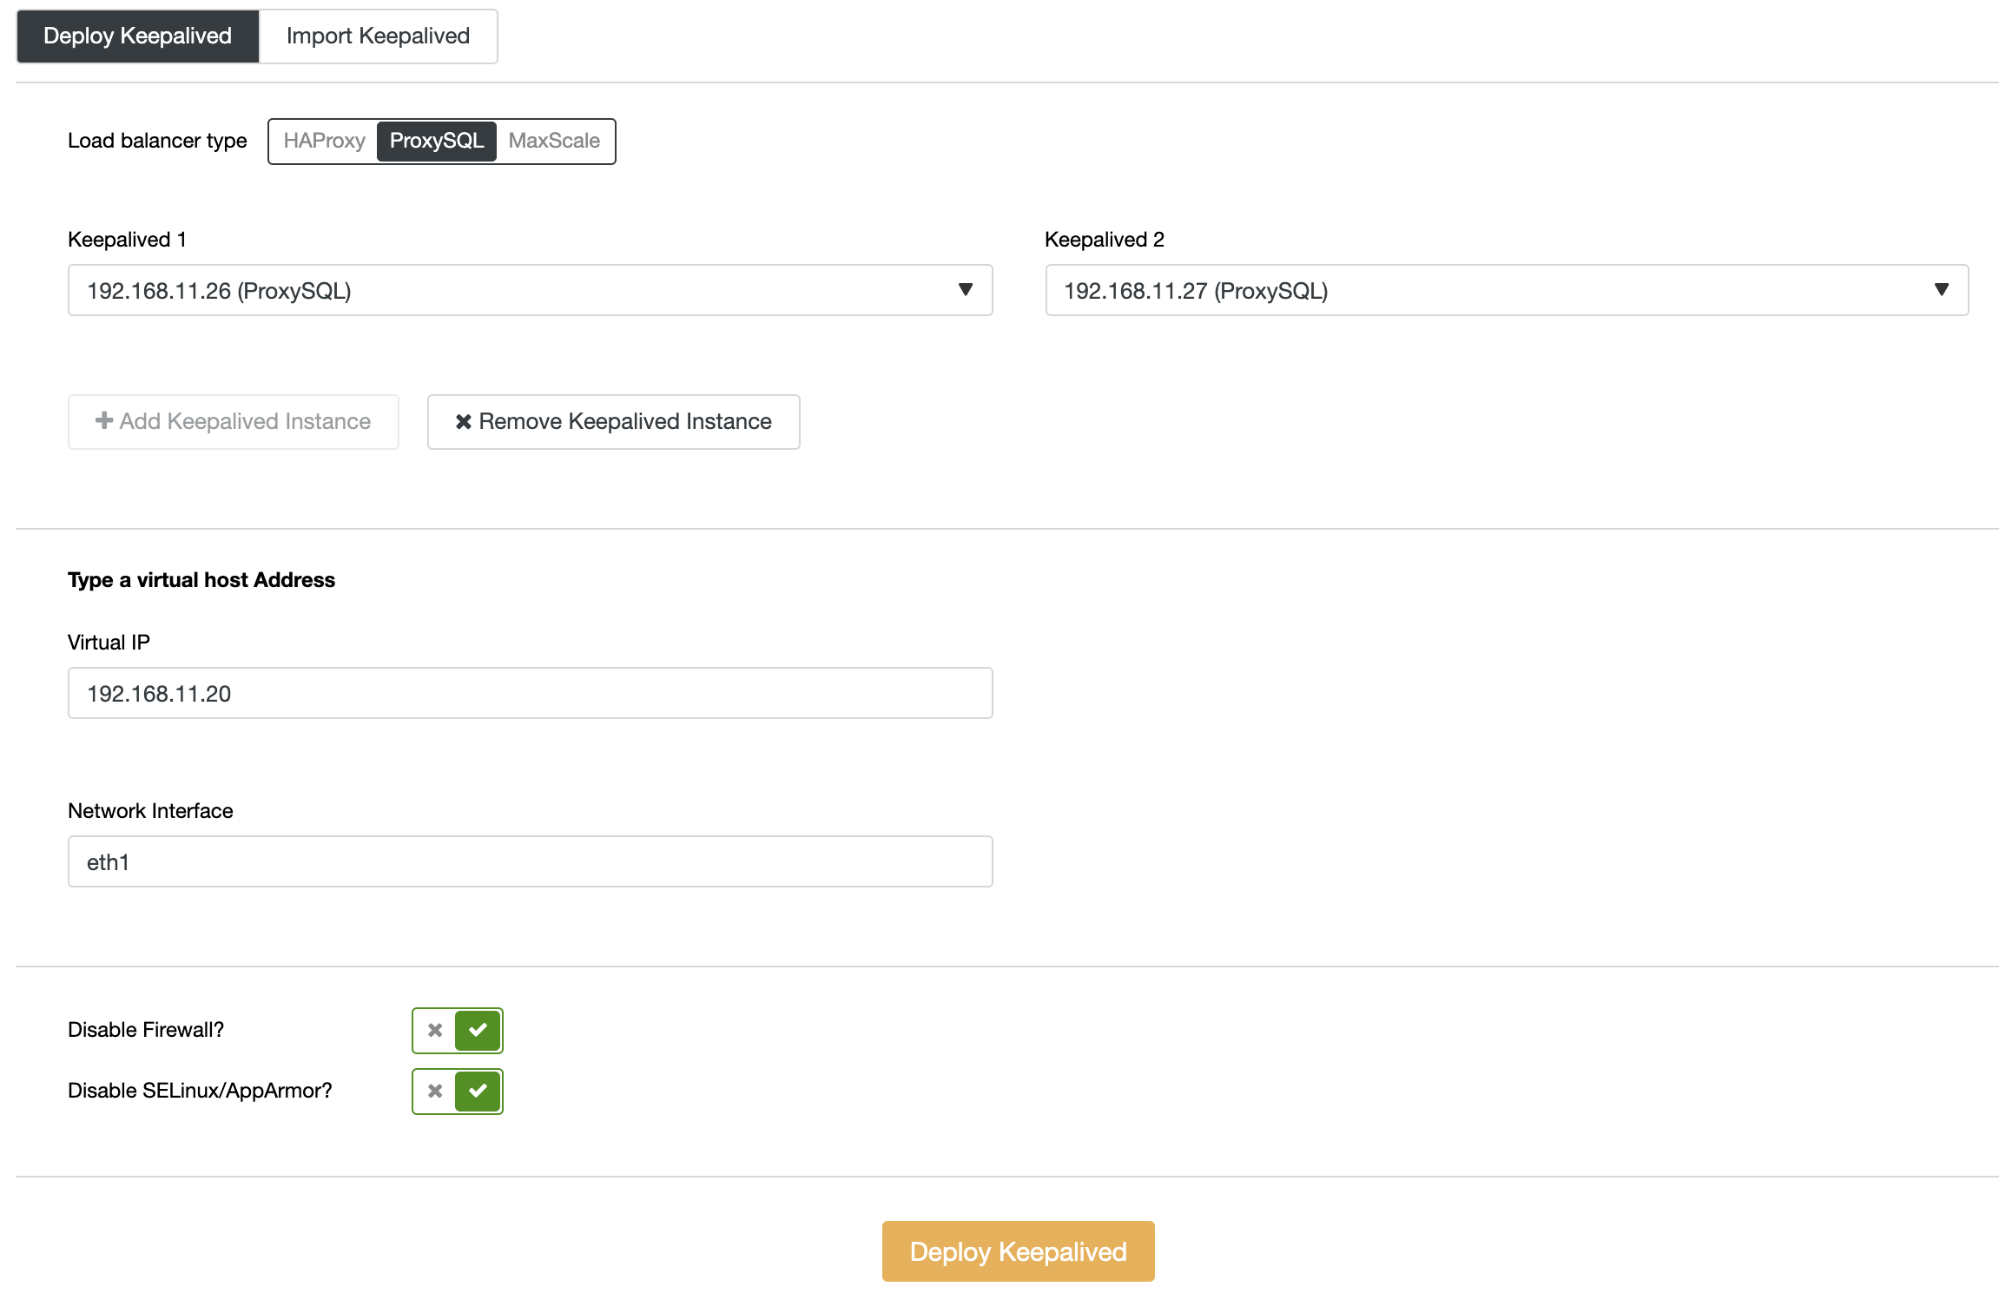
Do not forget to toggle on the “Use Native Clustering” since we are going to have more than one ProxySQL host running. Click on the “Deploy ProxySQL” button to start the load balancer deployment. You can monitor the job progress under ClusterControl -> Activity -> Jobs. Repeat the above steps for the second load balancer, 192.168.11.27. Finally, we can tie these load balancers together with a virtual IP address (a floating IP address for a single endpoint) using Keepalived by going to ClusterControl -> Manage -> Load Balancers -> Keepalived -> Deploy Keepalived and choose both of the load balancers with a virtual IP address (192.168.11.20) on the interface eth1, as shown below:
Our database cluster deployment with a high-availability setup similar to our production cluster is now complete.
To shut down all the database nodes, we can just simply run the following command in the active directory:
$ cd ~/vagrant/clustercontrol/percona-xtradb-cluster-80
$ vagrant halt
To shut down the ClusterControl node, navigate back to the ClusterControl directory and run the same command:
$ cd ~/vagrant/clustercontrol
$ vagrant halt
Substitute the “vagrant halt” command with the “vagrant destroy” command if you want to destroy the virtual machines (usually for housekeeping purposes) and you can always re-create it back later using the “vagrant up” command.


