blog
Implementing a Multi-Datacenter Setup for PostgreSQL – Part One

Having a multi-datacenter setup is a common topology for a Disaster Recovery Plan(DRP), but there are some limitations around implementing this kind of environment.
You should first solve the communication between the data centers by using SSH access or configuring a VPN. Then, you have the latency that (depending on the configuration) could affect your database cluster. Finally, you should think about how to perform the failover. Can the application access the remote node in case of master failure?
In this blog, we will show how to implement a multi-datacenter setup for PostgreSQL covering all these points mentioned earlier, some of them using ClusterControl. To not make it too boring, we will split it into two parts. In the first part, we will cover the connectivity between the data centers. The second one will be about the deployment and configuration itself, so let’s start!
Objective
Let’s say you want to have the following topology:
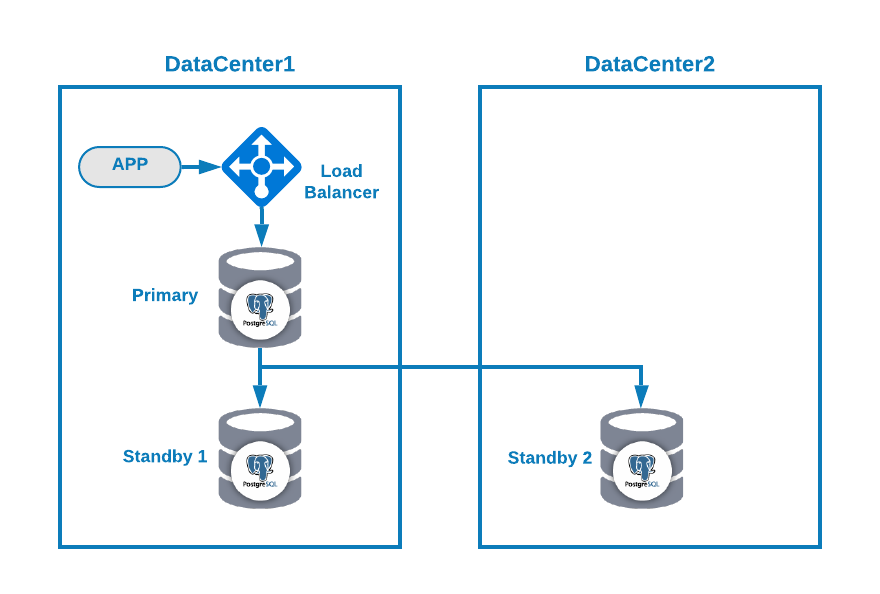
Where you have your application connected to a load balancer, a primary database node, and one standby node in one datacenter, and another standby node in a secondary datacenter for DR purposes. This could be a minimal setup for having a multi-datacenter environment. You can avoid using the load balancer, but in case of failover, you should reconfigure your application to connect to the new master, so to avoid that we recommend using it, or even use two of them (one on each DC) to avoid single point of failure.
To make it more clear, let’s assign some public IP addresses to both datacenter 1 and 2 as an example.
In datacenter 1, the public network is 35.166.37.0/24, so let’s assign the following IP addresses in this way:
APP: 35.166.37.10

Load Balancer + ClusterControl: 35.166.37.11

Primary Node: 35.166.37.12

Standby 1 Node: 35.166.37.13
In datacenter 2, the public network is 18.197.23.0/24, so:
Standby 2 Node: 18.197.23.14Data Center Connectivity
The first problem could be this one. You can configure a VPN between them, and that must be the most secure way, but as we covered a VPN configuration in a previous blog, and to make it as short as possible, we will connect them via SSH access using private/public keys.
Let’s create a user called ‘remote’ in all the nodes (to avoid using root):
$ useradd remote

$ passwd remote

Changing password for user remote.

New password:

Retype new password:

passwd: all authentication tokens updated successfully.
And you can add it to the sudoers file to assign privileges:
$ visudo

remote    ALL=(ALL)       ALL
Now, in the load balancer server (which will be also the ClusterControl server), generate the key pair for the new user:
$ su remote

$ ssh-keygen

Generating public/private rsa key pair.

Enter file in which to save the key (/home/remote/.ssh/id_rsa):

Created directory '/home/remote/.ssh'.

Enter passphrase (empty for no passphrase):

Enter same passphrase again:

Your identification has been saved in /home/remote/.ssh/id_rsa.

Your public key has been saved in /home/remote/.ssh/id_rsa.pub.

The key fingerprint is:

SHA256:hgVe/unld9+r/Ynk1HM+t089A41bwxFlPYt5/q+ZyL8 remote@lb1

The key's randomart image is:

+---[RSA 3072]----+

|      . .   .=|

|     . +     oo|

|      . o o.o|

|       o . . o+o.|

|      . S o .oo= |

|       . . o =.o|

|          . .+.=*|

|           .+ooB@|

|            o=EB/|

+----[SHA256]-----+

Now you will have a new directory in the home
Copy the public key to each node using the remote public IP Address:
$ ssh-copy-id 35.166.37.12

/bin/ssh-copy-id: INFO: Source of key(s) to be installed: "/home/remote/.ssh/id_rsa.pub"

/bin/ssh-copy-id: INFO: attempting to log in with the new key(s), to filter out any that are already installed

/bin/ssh-copy-id: INFO: 1 key(s) remain to be installed -- if you are prompted now it is to install the new keys

[email protected]'s password:

Number of key(s) added: 1

Now try logging into the machine, with:   "ssh '35.166.37.12'"

and check to make sure that only the key(s) you wanted were added.
This command will copy your public key to the remote node in the authorized_keys file, so you will access it using the private one.
Then, try to access them:
$ ssh 35.166.37.12Make sure you have the SSH traffic allowed in your firewall, and to make it more secure, you should allow it only from a known source (e.g. from 35.166.37.0/24).
For example, if you’re using AWS, you should allow the traffic from 35.166.37.0/24 to the SSH port in this way:

Or if you’re using IPTABLES, you should run something like this:
$ iptables -A INPUT -p tcp -s 35.166.37.0/24 --destination-port 22 -j ACCEPTOr a similar command if you’re using a different firewall solution.
To make it a bit more secure, we recommend using a different SSH port than the default one, and also could be useful using some tool to ban multiple failed attempts to access it, like fail2ban.
Conclusion
At this point, if everything went fine, you will have SSH communication between your data centers, so the next step is to deploy your PostgreSQL cluster and manage the failover in case of failure, as we will see in the second part of this blog.