blog
How to Monitor PostgreSQL Running Inside a Docker Container: Part One

Monitoring is the action of watching and checking over a period of time in order to see how what you are monitoring develops and performs. You do it so you can make any necessary changes to ensure things work correctly. It is essential that processes are monitored to produce good insights into the activities that are being performed in order to plan, organize, and run an efficient solution.
Docker is a program created to operate as a builder ready to answer the question “Will the software run on my machine?” It basically assembles different parts together creating a model easy to store and transport. The model, also known as container, can be shipped to any computer which has Docker installed.
In this article we will be introduced to Docker, describing some ways of configuration and comparing them. Furthermore PostgreSQL comes to play, and we will deploy it inside a Docker container in a smart way, and finally, we will see the benefits that ClusterControl can provide, to monitor key metrics about PostgreSQL and the OS outside of it.
Docker Overview
When Docker starts, it creates a new network connection to allow the transmission of data between two endpoints, called bridge, and this is where new containers are held by default.
In the following, we will see details about this bridge, and discuss why it’s not a good idea to use in production.
$ docker network inspect bridge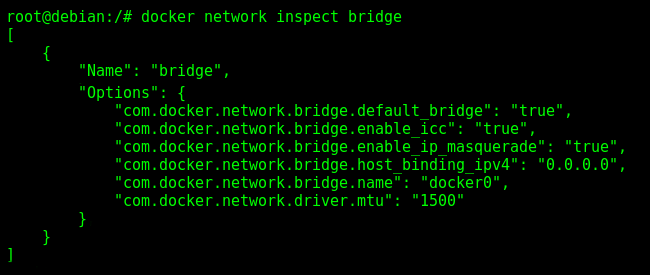
Please note the embedded options, because if you run a container without specify the desired network you will agree with it.
On this default network connection, we lose some good advantages of networking, like DNS. Imagine that you want to access Google, which one address do you prefer, www.google.com, or 172.217.165.4?
I don’t know about you but I prefer the earlier choice, and to be honest, I don’t type the ‘www.’.
User-Defined Bridge Network
So we want DNS in our network connection, and the benefit of isolation, because imagine the scenario where you deploy different containers inside of the same network.
When we create a Docker container, we can give a name into it, or Docker makes it for us randomizing two words connected by underline, or ‘_’.
If we don’t use a User-Defined Bridge Network, in the future could be a problem in the middle of the IP addresses, because we are clearly not machines, and remember these values can be hard and error-prone.
Creating a custom bridge, or a User-Defined Bridge Network, is very easy.
Before creating our first one, to understand the process better, let’s open a new terminal, type a Linux command of the package iproute2, and forget about it by now.
$ ip monitor all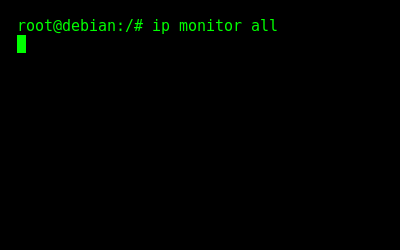
This terminal will now be listening to the network activity and displaying there.
You may have seen commands like “ifconfig”, or “netstat” before, and I tell you that they are deprecated since 2001. The package net-tools is still widely used, but not updated anymore.
Now it’s time to create our first custom network, so open another terminal and enter:
$ docker network create --driver bridge br-db
This very long mix of letters and numbers is called UUID, or Universally Unique IDentifier. It’s basically saying that the network has been created successfully.
The given name for our first network manually created has been “br-db”, and it needs to be in the final of the command, but before that, we have the argument ‘“-driver”, and then the value “bridge”, why?
In the Community Edition, Docker provides three different drivers available: bridge, host, and none. At creation time, like this, the default is bridge and it doesn’t need to be specified, but we are learning about it.
If you’ve done everything with me, look at the other terminal because I will explain what is going on to you.
Docker has created the network, called “br-db”, but this is only called like this by him.
On the other side of this custom bridge created, there is another layer, the OS. The given name for the same bridge network has changed, and becomes a representation of the nomenclature for bridge, “br”, followed by the first 12 characters of the UUID value above, in red.

With our new network connection, we have a subnet, gateway, and broadcast.
The Gateway, as the name suggests, is where all the traffic of packets happens between the bridge endpoints, and it is called “inet” for the OS as you can see.
Broadcast stands in the last IP address, and is responsible for sending the same traffic of data for all the IP addresses in the subnet when necessary.
They are always present in network connections, and this is why we have at the beginning of the output, the value “[ADDR]”. This value represents IP address changes, and it is like an event being fired for the network activity monitoring, because we have created a new network connection!
Docker Container
Please visit the Docker Hub, and see that what is there is known as Docker Image, and it is basically the skeleton of the container (model).
Docker Images are generated by Dockerfiles, and they contain all the information needed to create a container, in order to make it easy to maintain and customize.
If you look with attention into the Docker Hub, it’s easy to see that the PostgreSQL image, called postgres, have different tags and versions, and if you don’t specify one of them the default will be used, the latest, but maybe in the future if you need different containers of PostgreSQL working together, you may want them to be in the same version.
Let’s create our first right container now, remember the need for the argument ‘–network’, or it will be deployed in the default bridge.
$ docker container run --name postgres-1 --network br-db -e POSTGRES_PASSWORD=5af45Q4ae3Xa3Ff4 -p 6551:5432 -d postgres
Again the UUID, success, and in the other terminal, what is going on?
Network interface changes is the event happening right now, or simply “[LINK]”. Anything after the “veth” you can forget, trust me, the value always changes when the container is restarted or something similar happens.

The other option “-e POSTGRES_PASSWORD=?” stands for Environment, and it is only available when running PostgreSQL containers, it is configuring the password for the super user account in the database, called postgres.
Publish is the long name for the “-p 6551:5432” parameter, and it’s basically making the OS port 6551 bi-directional bound to the port 5432 of the container.
Last but not less important, is the Detach option, “-d”, and what it does is make the container run independent of this terminal.
The Docker Image name must be in the end, following the same pattern of the network creation, having all the arguments and options in the left, and at the end the most important thing, in this case, the image name.
Remember that the containers are held in the network subnet, standing on IP addresses allowed for each one of them, and they will never be in the first or last address, because the Gateway and Broadcast will be always there.
We have shown the details of the created bridge, and now will be displayed by each one of the endpoints these details kept by them.
$ docker network inspect br-db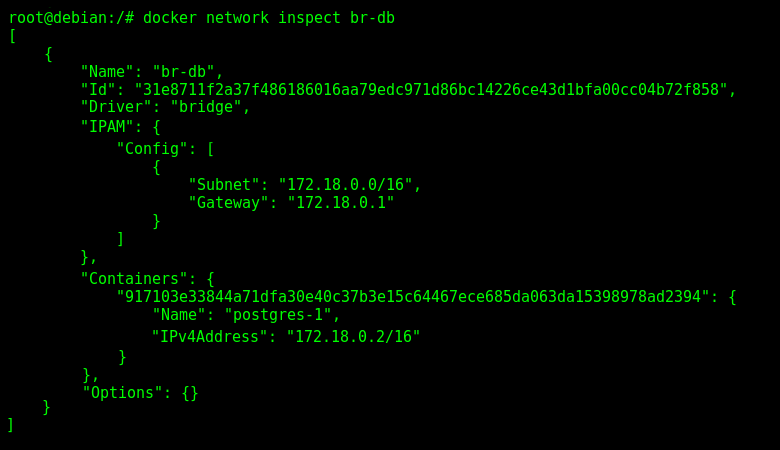
$ brctl show
As you can see, the network and container names differ, having the second being recognized as an interface by the OS, called “veth768ff71”, and the original name given by us “postgres-1” for Docker.
In the Docker command is possible to note the IP address for the container created earlier, the subnet matching what appeared in the other terminal opened moments ago, and lastly the options empty for this custom network.
The Linux command “brctl show” is part of the package bridge-utils, and as the name suggests, its purpose is to provide a set of tools to configure and manage Linux Ethernet bridges.
Another Custom Bridge Network
We will discuss about DNS soon, but it has been very good make things simple for us in the future. Great configurations tend to make the life of the DBA easier in the future.
With networks is the same, so we can change how the OS recognizes subnet the address and the network name adding more arguments at creation time.
$ docker network create --driver bridge --subnet 172.23.0.0/16 -o “com.docker.network.bridge.name”=”bridge-host” bridge-docker
$ ip route show
With this Linux command, we can see almost the same thing as the other command earlier, but now instead of listing the “veth” interfaces for each network, we simply have this “linkdown” displaying those who are empty.
The desired subnet address has been specified as an argument, and similar to the Environment option for the container creation, for network we have the “-o” followed by the pair of key and value. In this case, we are telling Docker, to tell the OS, that he should call the network as “bridge-host”.
The existence of those three networks can be verified in Docker too, just enter:
$ docker network ls
Now we have discussed earlier that the values of these “veth” for the containers don’t matter, and I will show you in practice.
The exercise consists of verifying the current value, then restart the container, then verify again. To do so we will need a mix of Linux commands used before, and Docker ones, which are new here but very simple:
$ brctl show
$ docker container stop postgres-1
$ docker container start postgres-1
$ brctl show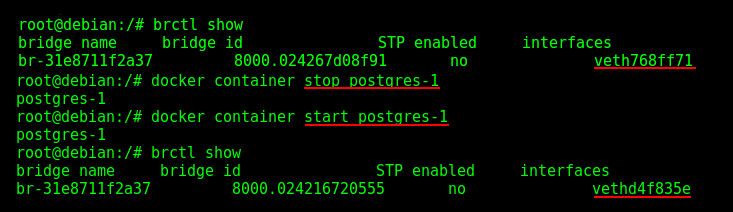
When the container is stopped, the IP address must be set free to receive a new one if necessary, and that’s a reminder of how DNS can be important.
The OS gives these names for the interfaces every time a container stands in an IP address, and they are generated using the package iptables, who will soon be replaced by the new framework called nftables.
It’s not recommended to change these rules, but exists tools available to help with their visualization, if necessary, like dockerveth.
Container Restart Policy
When we restart the Docker program, or even the computer, the networks created by him are kept in the OS, but empty.
Containers have what is called Container Restart Policy, and this is another very important argument specified at creation time. PostgreSQL, as a production database, his availability is crucial, and this is how Docker can help with it.
$ docker container run --name postgres-2 --network bridge-docker --restart always -e POSTGRES_PASSWORD=5af45Q4ae3Xa3Ff4 -p 6552:5432 -d postgres
Unless you stop it manually, this container “postgres-2” will be always available.
To understand it better, the containers running will be displayed and the Docker program restarted, then the first step again:
$ docker container ls
$ systemctl restart docker
$ docker container ls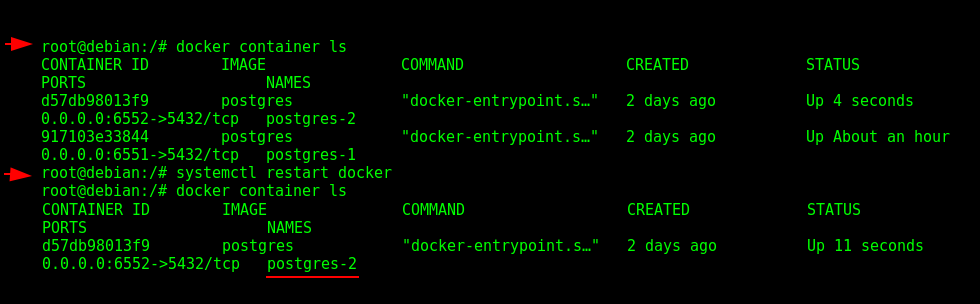
Only the container “postgres-2” is running, the another “postgres-1” container doesn’t starts alone. More information about it can be seen in the Docker Documentation.
Domain Name System (DNS)
One benefit of the User-Defined Bridge Network is the organization, certainly, because we can create as many as we want to run new containers and even connect old ones, but another benefit that we don’t have using the Docker default bridge, is DNS.
When containers need to communicate with each other can be painful for the DBA to memorize the IP addresses, and we have discussed it earlier showing the example of www.google.com and 172.217.165.4. DNS solves this problem seamlessly, making possible to interact with containers using their names given at creation time by us, like “postgres-2”, instead of the IP address “172.23.0.2”.
Let’s see how it works. We will create another container just for demonstration purposes in the same network called “postgres-3”, then, we’ll install the package iputils-ping to transmit packets of data to the container “postgres-2”, using its name of course.
$ docker container run --name postgres-3 --network bridge-docker --restart always -e POSTGRES_PASSWORD=5af45Q4ae3Xa3Ff4 -p 6553:5432 -d postgres
$ docker container exec -it postgres-3 bash
For a better understanding let’s separate it into parts, in the following outputs, the blue arrow will indicate when the command is performed inside of a container, and in red, in the OS.

$ apt-get update && apt-get install -y iputils-ping
$ ping postgres-2
Summary
PostgreSQL is running inside of Docker, and his availability is guaranteed by now. When used inside of a User-Defined Bridge Network, the containers can be managed easier with many benefits such as DNS, custom subnet addresses and OS names for the networks.
We have seen details about Docker, and the importance of being aware of updated packages and frameworks on the OS.