blog
How to Deploy Percona Server for MySQL for High Availability

Percona Server for MySQL 8.0 offers a number of clustering solutions for high availability out-of-the-box:
- Single-master:
- Asynchronous replication
- Semi synchronous replication
- Multi-master:
- Group replication
- InnoDB Cluster (a combination of MySQL Router, MySQL Shell and Percona Server with Group Replication)
The most popular, battle-tested, and highly scalable solution is, of course, asynchronous replication. In this blog post, we are going to deploy a Percona Server replication setup specifically for high availability. The instructions described here are based on CentOS 7.
Installing Percona Server
For high availability, we need at least two nodes in a simple master-slave replication setup:
- db1 – master (192.168.0.61)
- db2 – slave (192.168.0.62)
The steps described in this section should be performed on all database nodes (db1 and db2). We will start by installing the Percona repository package:
$ yum -y install https://repo.percona.com/yum/percona-release-latest.noarch.rpmThe latest stable version at this point is Percona Server for MySQL 8.0, but by default, the repository package is only configured up until version 5.7. The percona-release package contains a script that can enable additional repositories for the newer products. Let’s run that script and enabled 8.0 repositories:
$ percona-release setup ps80Then install the latest Percona Server and Percona Xtrabackup:
$ yum -y install percona-server-server percona-xtrabackup-80At this moment in time, you should get a Percona Server for MySQL 8.0.21 installed. All dependency packages will be installed like shared-compat, shared and client packages. We can then enable the MySQL service on startup and start the service:
$ systemctl enable mysql
$ systemctl start mysql
A new root password will be generated during the first startup. We need to retrieve the root password information first from the MySQL error log (default is /var/log/mysqld.log in RHEL-based systems):
$ cat /var/log/mysqld.log | grep temporary
2020-11-06T04:53:07.402040Z 6 [Note] [MY-010454] [Server] A temporary password is generated for root@localhost: o%(_M>t1)R-P
As you can see the generated password is “o%(_M>t1)R-P”. Next, we need to perform a post-installation task to secure the MySQL server installation. Run the following command:
$ mysql_secure_installation

Securing the MySQL server deployment.

Enter password for user root:

The existing password for the user account root has expired. Please set a new password.


New password:
Re-enter new password:

The 'validate_password' component is installed on the server.
The subsequent steps will run with the existing configuration
of the component.

Using existing password for root.


Estimated strength of the password: 100
Change the password for root ? ((Press y|Y for Yes, any other key for No) : y

New password:

Re-enter new password:

Estimated strength of the password: 100

Do you wish to continue with the password provided?(Press y|Y for Yes, any other key for No) : y

By default, a MySQL installation has an anonymous user,
allowing anyone to log into MySQL without having to have
a user account created for them. This is intended only for
testing, and to make the installation go a bit smoother.

You should remove them before moving into a production
environment.

Remove anonymous users? (Press y|Y for Yes, any other key for No) : y
Success.

Normally, root should only be allowed to connect from
'localhost'. This ensures that someone cannot guess at
the root password from the network.

Disallow root login remotely? (Press y|Y for Yes, any other key for No) : y
Success.

By default, MySQL comes with a database named 'test' that
anyone can access. This is also intended only for testing,
and should be removed before moving into a production
environment.

Remove test database and access to it? (Press y|Y for Yes, any other key for No) : y
 - Dropping test database...
Success.

 - Removing privileges on test database...
Success.

Reloading the privilege tables will ensure that all changes
made so far will take effect immediately.

Reload privilege tables now? (Press y|Y for Yes, any other key for No) : y
Success.

All done!
The generated root password will be expired immediately upon the first root login. The above helper script helps us to configure a new MySQL root password, disabling remote login for root, remove test database and anonymous users and also reload the privilege tables.
We are now ready to configure the high availability feature for Percona Server 8.0.
Semi synchronous Replication
Semi synchronous replication falls between asynchronous and fully synchronous replication. The source waits until at least one replica has received and logged the events, and then commits the transaction. The source does not wait for all replicas to acknowledge receipt, and it requires only an acknowledgment from the replicas, not that the events have been fully executed and committed on the replica side. Semi synchronous replication, therefore, guarantees that if the source crashes, all the transactions that it has committed have been transmitted to at least one replica.
For the best replication integrity, choose semi-synchronous replication. To configure it, on the first node, db1 (192.168.0.61), add the following lines inside /etc/my.cnf (it must be under the [mysqld] section):
# Compatibility
default-authentication-plugin = mysql_native_password

# Replication
server_id = 61 # must be distinct on all nodes in the cluster
binlog_format = ROW
log_bin = binlog
log_slave_updates = 1
gtid_mode = ON
enforce_gtid_consistency = 1
binlog_expire_logs_seconds = 604800 # 7 days
sync_binlog = 1
report_host = 192.168.0.61 # IP address of this host
read_only = OFF # Set ON on slave
super_read_only = OFF # Set ON on slave

# Replication safety
master_info_repository = TABLE
relay_log_info_repository = TABLE
relay_log_recovery = ON

# Semi-sync
plugin_load_add = rpl_semi_sync_master=semisync_master.so
plugin_load_add = rpl_semi_sync_slave=semisync_slave.so
rpl_semi_sync_master_enabled = ON
rpl_semi_sync_master_timeout = 1000
rpl_semi_sync_slave_enabled = ON
On the second node, db2 (192.168.0.62), add the following lines inside /etc/my.cnf (it must be under the [mysqld] section):
# Compatibility
default-authentication-plugin = mysql_native_password

# Replication
server_id = 62 # must be distinct on all nodes in the cluster
binlog_format = ROW
log_bin = binlog
log_slave_updates = 1
gtid_mode = ON
enforce_gtid_consistency = 1
binlog_expire_logs_seconds = 604800 # 7 days
sync_binlog = 1
report_host = 192.168.0.62 # IP address of this host
read_only = ON # Set ON on slave
super_read_only = ON # Set ON on slave

# Replication safety
master_info_repository = TABLE
relay_log_info_repository = TABLE
relay_log_recovery = ON

# Semi-sync
plugin_load_add = rpl_semi_sync_master=semisync_master.so
plugin_load_add = rpl_semi_sync_slave=semisync_slave.so
rpl_semi_sync_master_enabled = ON
rpl_semi_sync_master_timeout = 1000
rpl_semi_sync_slave_enabled = ON
We can then proceed to set up the replication link as described in the “Setting up Replication Link” further down.
Asynchronous Replication
For asynchronous replication, simply remove all semi-synchronous replication related options and we should be good. On the first node, db1 (192.168.0.61), add the following lines inside /etc/my.cnf (it must be under the [mysqld] section):
# Compatibility
default-authentication-plugin = mysql_native_password

# Replication
server_id = 61 # must be distinct on all nodes in the cluster
binlog_format = ROW
log_bin = binlog
log_slave_updates = 1
gtid_mode = ON
enforce_gtid_consistency = 1
binlog_expire_logs_seconds = 604800 # 7 days
sync_binlog = 1
report_host = 192.168.0.61 # IP address of this host
read_only = OFF # Set ON on slave
super_read_only = OFF # Set ON on slave

# Replication safety
master_info_repository = TABLE
relay_log_info_repository = TABLE
relay_log_recovery = ON
On the second node, db2 (192.168.0.62), add the following lines inside /etc/my.cnf (it must be under the [mysqld] section):
# Compatibility
default-authentication-plugin = mysql_native_password

# Replication
server_id = 62 # must be distinct on all nodes in the cluster
binlog_format = ROW
log_bin = binlog
log_slave_updates = 1
gtid_mode = ON
enforce_gtid_consistency = 1
binlog_expire_logs_seconds = 604800 # 7 days
sync_binlog = 1
report_host = 192.168.0.62 # IP address of this host
read_only = ON # Set ON on slave
super_read_only = ON # Set ON on slave

# Replication safety
master_info_repository = TABLE
relay_log_info_repository = TABLE
relay_log_recovery = ON
We can then proceed to set up the replication link as described in the “Setting up Replication Link” down below.
Setting up the Replication Link
On the master (db1), create a slave user and allow the user to connect from all hosts under this network (using % wildcard):
mysql> CREATE USER 'slave'@'192.168.0.%' IDENTIFIED WITH mysql_native_password BY 'c7SdB239@8XMn2&9';
mysql> GRANT REPLICATION SLAVE ON *.* TO 'slave'@'192.168.0.%';
On the slave (db2), reset the binary logs, configure the replication credentials and start the replication process:
mysql> RESET MASTER;
mysql> CHANGE MASTER TO MASTER_HOST = '192.168.0.61', MASTER_USER = 'slave', MASTER_PASSWORD = 'c7SdB239@8XMn2&9', MASTER_AUTO_POSITION = 1;
mysql> START SLAVE;
Check the replication status:
mysql> SHOW SLAVE STATUSG
*************************** 1. row ***************************
               Slave_IO_State: Waiting for master to send event
                  Master_Host: 192.168.0.61
                  Master_User: slave
                  Master_Port: 3306
                Connect_Retry: 60
              Master_Log_File: binlog.000008
          Read_Master_Log_Pos: 912
               Relay_Log_File: db2-relay-bin.000007
                Relay_Log_Pos: 1081
        Relay_Master_Log_File: binlog.000008
             Slave_IO_Running: Yes
            Slave_SQL_Running: Yes
              Replicate_Do_DB:
          Replicate_Ignore_DB:
           Replicate_Do_Table:
       Replicate_Ignore_Table:
      Replicate_Wild_Do_Table:
  Replicate_Wild_Ignore_Table:
                   Last_Errno: 0
                   Last_Error:
                 Skip_Counter: 0
          Exec_Master_Log_Pos: 912
              Relay_Log_Space: 1500
              Until_Condition: None
               Until_Log_File:
                Until_Log_Pos: 0
           Master_SSL_Allowed: No
           Master_SSL_CA_File:
           Master_SSL_CA_Path:
              Master_SSL_Cert:
            Master_SSL_Cipher:
               Master_SSL_Key:
        Seconds_Behind_Master: 0
Master_SSL_Verify_Server_Cert: No
                Last_IO_Errno: 0
                Last_IO_Error:
               Last_SQL_Errno: 0
               Last_SQL_Error:
  Replicate_Ignore_Server_Ids:
             Master_Server_Id: 66
                  Master_UUID: f60cf793-1feb-11eb-af72-5254008afee6
             Master_Info_File: mysql.slave_master_info
                    SQL_Delay: 0
          SQL_Remaining_Delay: NULL
      Slave_SQL_Running_State: Slave has read all relay log; waiting for more updates
           Master_Retry_Count: 86400
                  Master_Bind:
      Last_IO_Error_Timestamp:
     Last_SQL_Error_Timestamp:
               Master_SSL_Crl:
           Master_SSL_Crlpath:
           Retrieved_Gtid_Set: f60cf793-1feb-11eb-af72-5254008afee6:5-7
            Executed_Gtid_Set: f60cf793-1feb-11eb-af72-5254008afee6:1-7
                Auto_Position: 1
         Replicate_Rewrite_DB:
                 Channel_Name:
           Master_TLS_Version:
       Master_public_key_path:
        Get_master_public_key: 0
            Network_Namespace:
Pay attention to the following important status to determine if the replication is configured correctly and the slave has caught up with the master:
- Slave_IO_Running: Yes
- Slave_SQL_Running: Yes
- Seconds_Behind_Master: 0
If semi-synchronous replication is enabled, you should get the following output on the master:
mysql> SHOW STATUS LIKE '%semi%status';
+-----------------------------+-------+
| Variable_name               | Value |
+-----------------------------+-------+
| Rpl_semi_sync_master_status | ON    |
| Rpl_semi_sync_slave_status  | OFF   |
+-----------------------------+-------+
While on the slave, the status is as below:
mysql> SHOW STATUS LIKE '%semi%status';
+-----------------------------+-------+
| Variable_name               | Value |
+-----------------------------+-------+
| Rpl_semi_sync_master_status | OFF   |
| Rpl_semi_sync_slave_status  | ON    |
+-----------------------------+-------+
For asynchronous replication, the above query shall return nothing (empty set), because the semi-synchronous replication plugins are not enabled. In one replication set, it is possible to have a mix of slaves host replicating with asynchronous and semi-synchronous replication.
Deploying Percona Server for MySQL using ClusterControl
It’s practically easy to deploy a master-slave Percona Server replication with ClusterControl, and by default, ClusterControl will configure the replication deployment with an asynchronous replication. Simply prepare the nodes that you want to deploy, and in this example, we are going to deploy a three-node Percona Server for MySQL 8.0 with master-slave replication. With ClusterControl comes into the picture, we are required to have an additional node for ClusterControl. Therefore, our setup looks like this:
- ClusterControl – cc (192.168.0.19)
- Master – db1 (192.168.0.61)
- Slave – db2 (192.168.0.62)
- Slave – db3 (192.168.0.63)
On the ClusterControl server, install ClusterControl using the installer script. As root, run the following:
$ wget https://severalnines.com/downloads/cmon/install-cc
$ chmod 755 install-cc
$ ./install-cc
Follow the installation instructions until it finishes. Then, open a web browser and go to http://{ClusterControl_IP_address}/clustercontrol and create a default admin user and password. Next, we need to set up passwordless SSH from the ClusterControl server to all database nodes. As the root user, we need to first generate an SSH key:
$ whoami
root
$ ssh-keygen -t rsa # press Enter on all prompts
Then, copy the created SSH public key to all database nodes:
$ ssh-copy-id -i ~/.ssh/id_rsa [email protected] # db1
$ ssh-copy-id -i ~/.ssh/id_rsa [email protected] # db2
$ ssh-copy-id -i ~/.ssh/id_rsa [email protected] # db3
We are now ready to start the cluster deployment. Go to ClusterControl -> Deploy -> MySQL Replication and specify the required details as below:
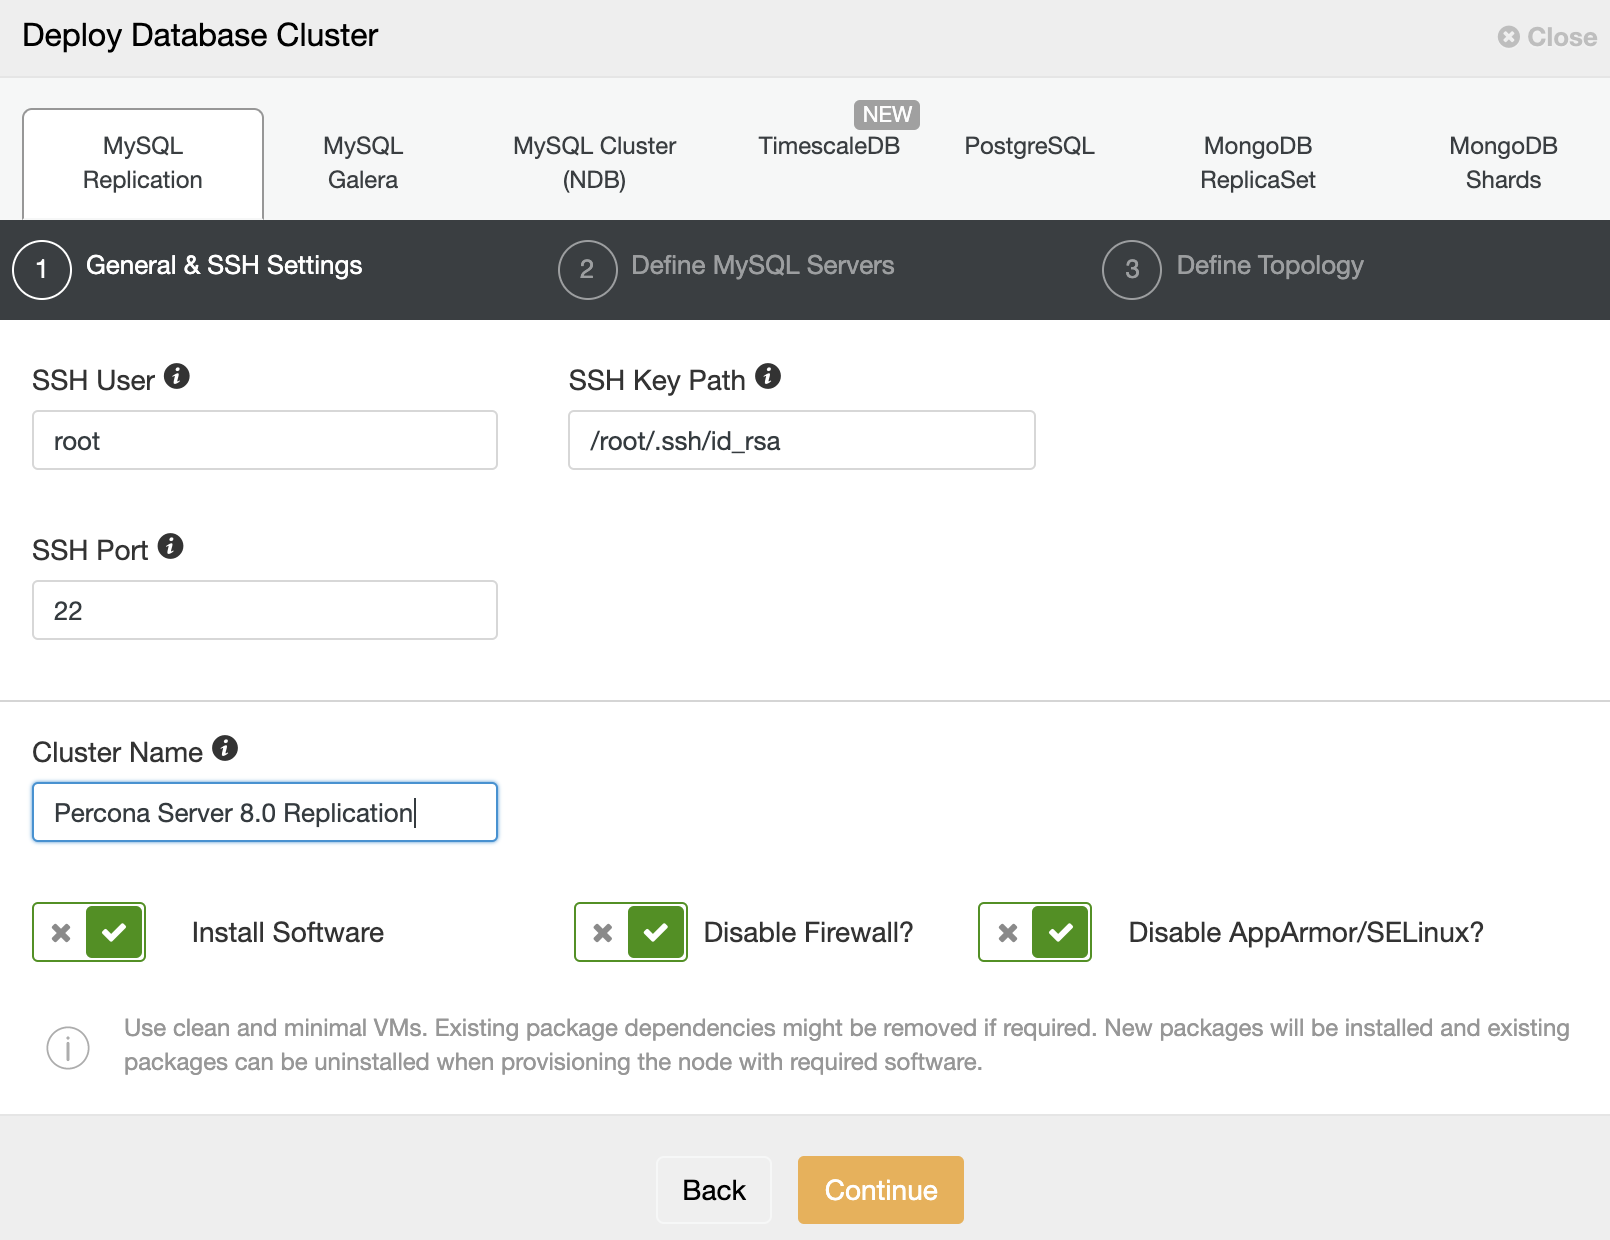
Then, click “Continue” to proceed to the next step where we configure the MySQL installation specification:

Choose “Percona” for the Vendor and 8.0 as the Version. Keep the rest as default and enter the MySQL root password. Click “Continue” to proceed to the host and topology configuration:
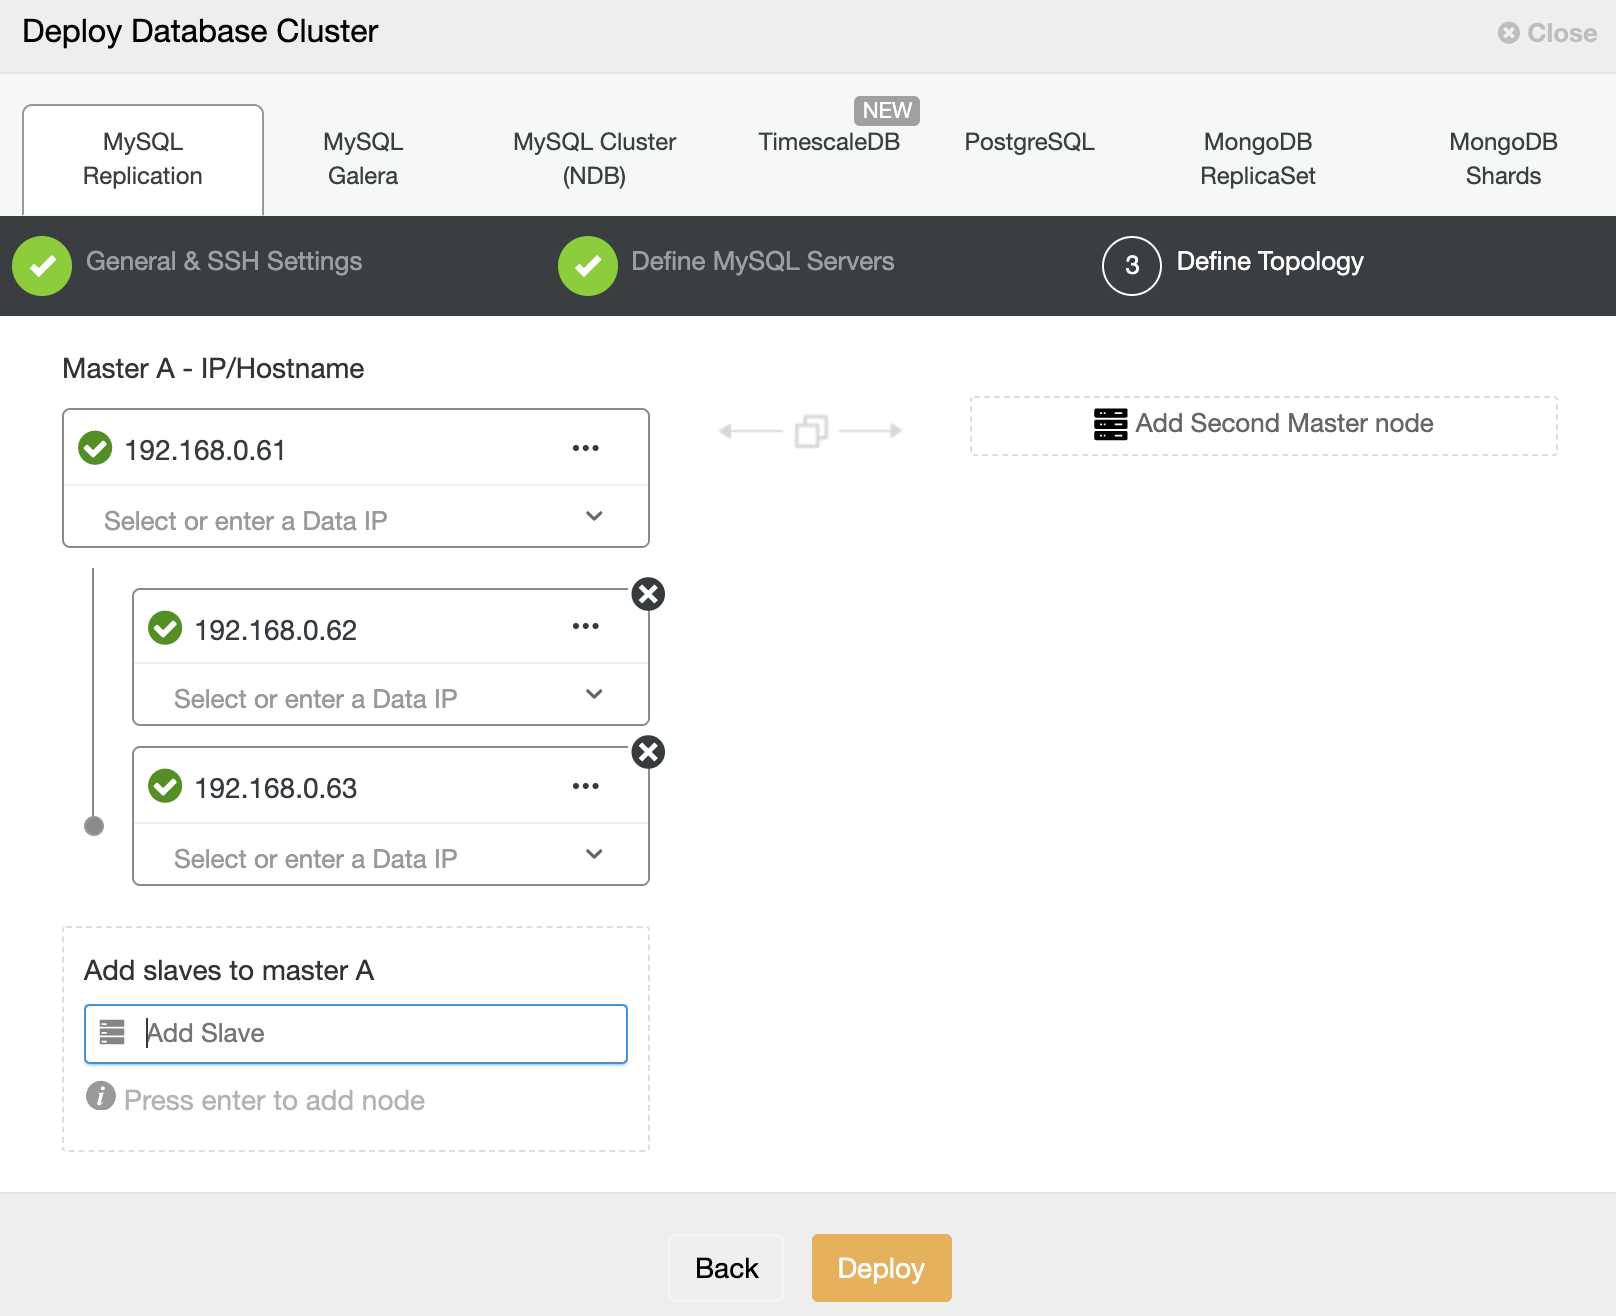
Specify the IP address or hostname of the database hosts one by one and make sure you get the green tick icons after each insertion. This indicates that ClusterControl is able to reach the corresponding hosts via passwordless SSH with the provided SSH user and key as defined in step 1. Click on the “Deploy” button to start the deployment.
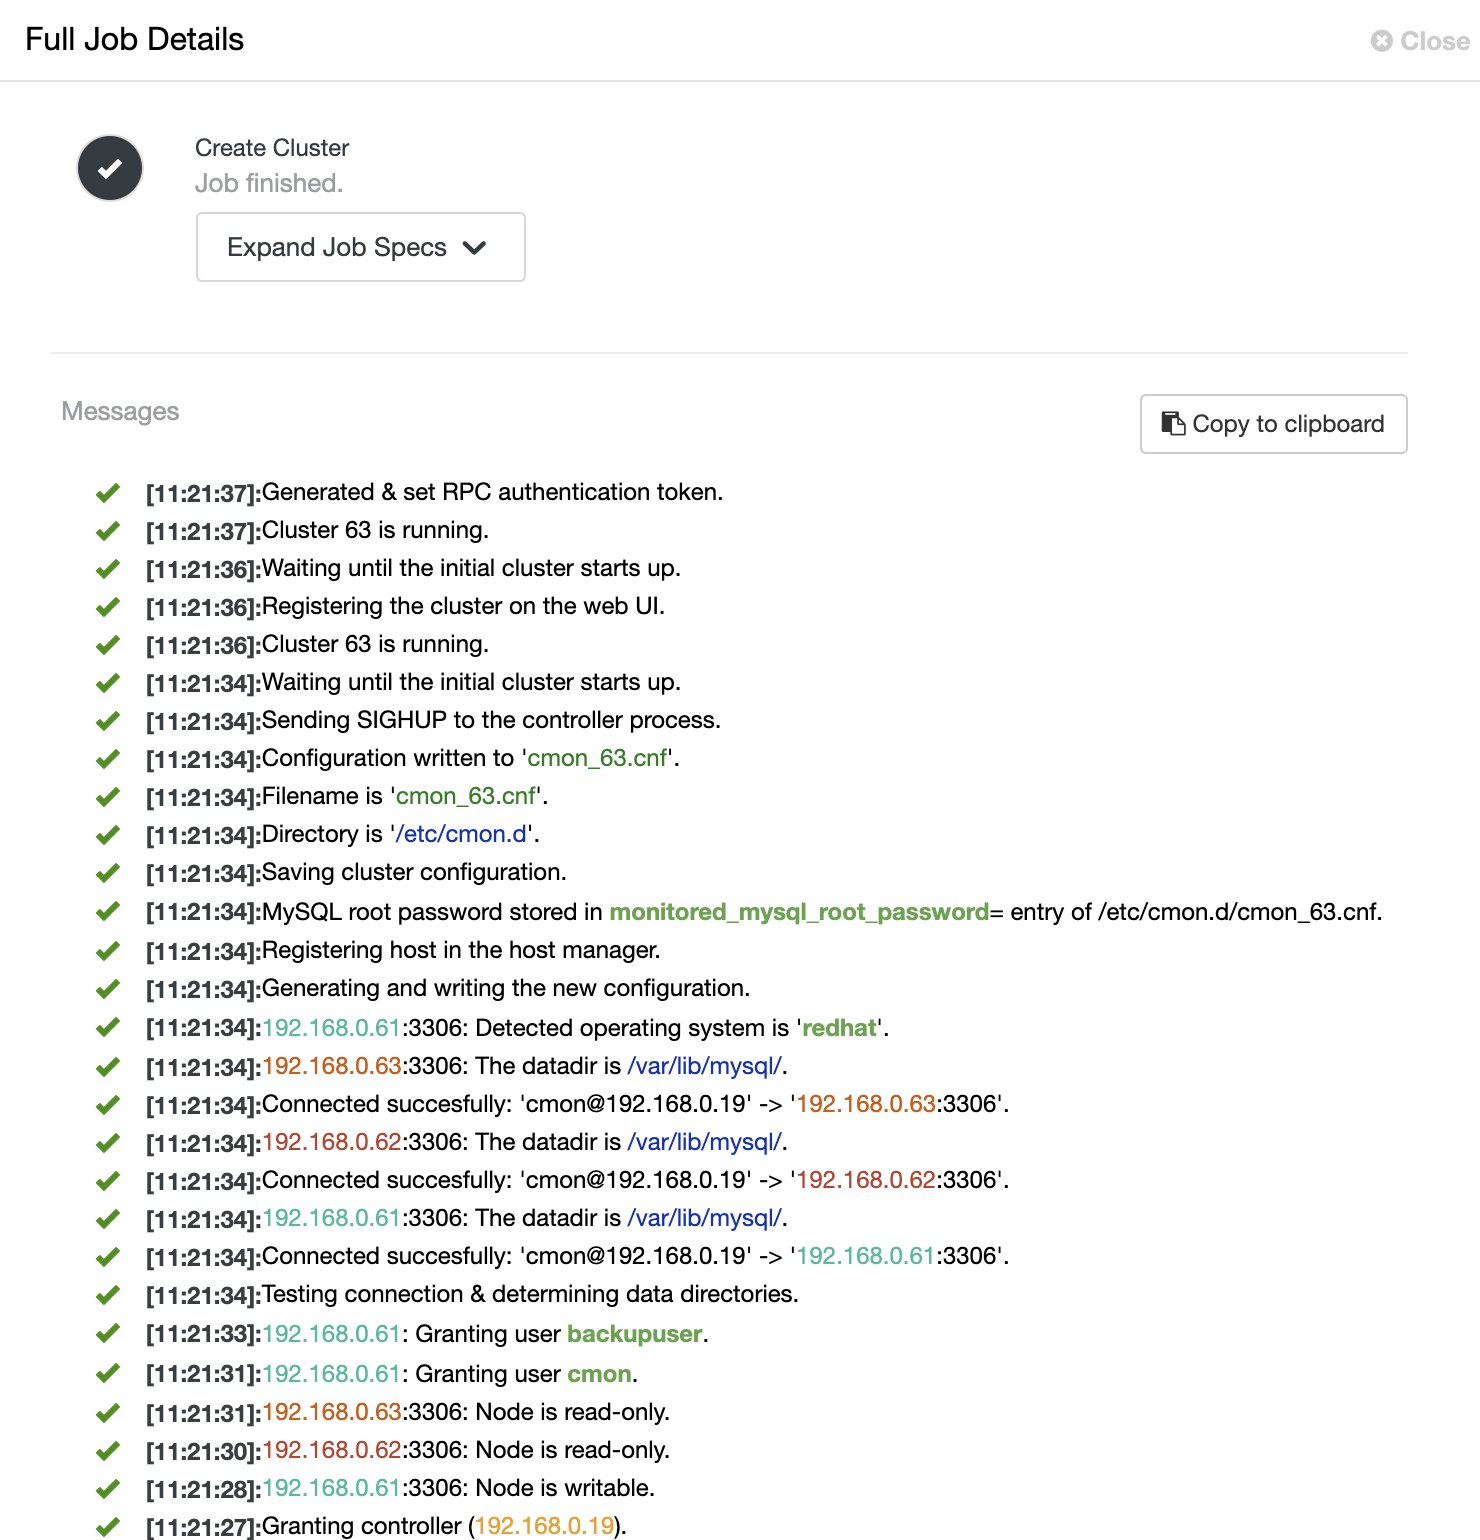
ClusterControl then triggers a deployment job where you can monitor the deployment progress by going to ClusterControl -> Activity -> Jobs -> Create Cluster -> Full Job Details, as shown in the following screenshot:
Once the process completes, you should see the cluster is listed in the Dashboard:
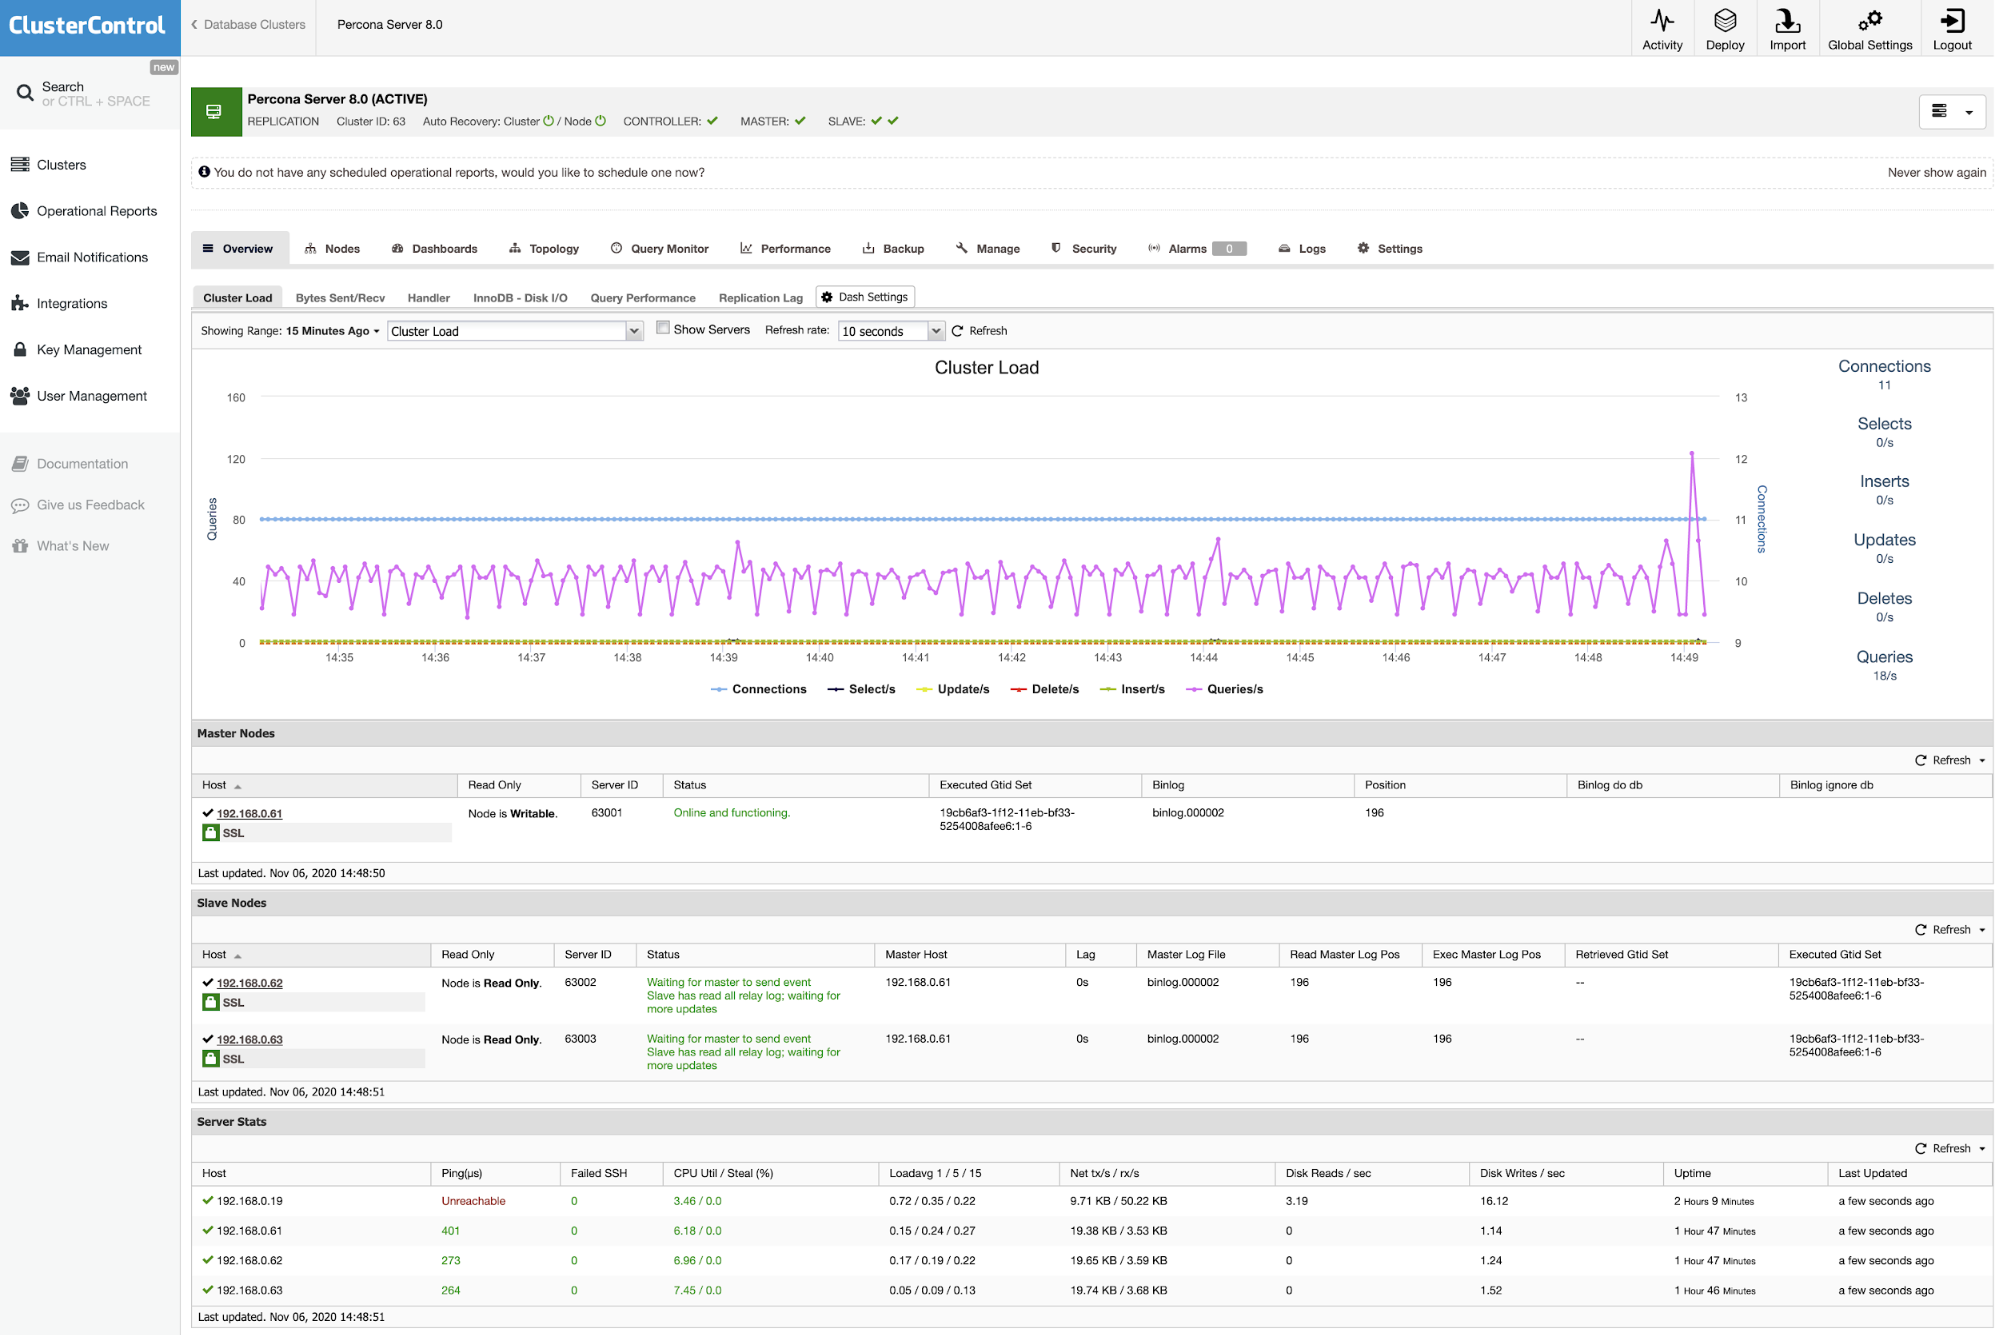
That’s it. The deployment is now complete.


