blog
How to Deploy Percona Distribution for PostgreSQL for High Availability

High Availability is a requirement for many systems, no matter what technology you are using. This is especially important for databases, as they store data that applications rely upon. Depending on the requirements, there are different ways to deploy a High Availability environment for PostgreSQL, but it is always necessary to use a complementary tool as the native PostgreSQL features are not enough.
In this blog, we will see how to deploy Percona Distribution for PostgreSQL for High Availability, and what kind of tools are necessary to do it.
Percona Distribution for PostgreSQL
It is a collection of tools to assist you in managing your PostgreSQL database system. It installs PostgreSQL and complements it by a selection of extensions that enable solving essential practical tasks efficiently, including:
- pg_repack: It rebuilds PostgreSQL database objects.
- pgaudit: It provides detailed session or object audit logging via the standard PostgreSQL logging facility.
- pgBackRest: It is a backup and restore solution for PostgreSQL.
- Patroni: It is a High Availability solution for PostgreSQL.
- pg_stat_monitor: It collects and aggregates statistics for PostgreSQL and provides histogram information.
- A collection of additional PostgreSQL contrib extensions.
High Availability on PostgreSQL
There are different architectures for PostgreSQL high availability, but the most common is to have a Master-Slave topology (Primary-Standby). It is based on one primary database with one or more standby nodes. These standby databases will remain synchronized (or almost synchronized) with the primary, depending on whether the replication is synchronous or asynchronous. If the main server fails, the standby contains almost all of the data of the main server, and can quickly be turned into the new primary database server.
But a master-slave setup is not enough to effectively ensure high availability, as you also need to handle failures. Once a failure is detected, you should be able to select a standby node and failover to it with the smaller delay possible. PostgreSQL itself does not include an automatic failover mechanism, so that will require some custom script or third-party tools for this automation.
After a failover happens, the application(s) need to be notified accordingly, so they can start using the new primary node. Also, you need to evaluate the state of our architecture after a failover, because you can run in a situation where you only have the new primary running (i.e., you had a primary and only one standby node before the issue). In that case, you will need to add a new standby node somehow so as to re-create the master-slave setup you originally had for High Availability.
To make it work, you will need to have different tools/services to help you with this task.
Load Balancers
Load balancers are tools that can be used to manage the traffic from your application to get the most out of your database architecture.
Not only is it useful for balancing the load of our databases, it also helps applications get redirected to the available/healthy nodes and even specify ports with different roles.
HAProxy is a load balancer that distributes traffic from one origin to one or more destinations and can define specific rules and/or protocols for this task. If any of the destinations stops responding, it is marked as offline, and the traffic is sent to the rest of the available destinations.
Keepalived is a service that allows you to configure a virtual IP within an active/passive group of servers. This virtual IP is assigned to an active server. If this server fails, the IP is automatically migrated to the “Secondary” passive server, allowing it to continue working with the same IP in a transparent way for the systems.
To implement all these things you can do it manually, which will mean extra work and time-consuming tasks, or you can do it from just one system using ClusterControl.
Let’s see how to import your existing Percona Distribution for PostgreSQL to ClusterControl, and then how to configure a High Availability environment using HAProxy and Keepalived around this setup from a friendly and easy to use interface.
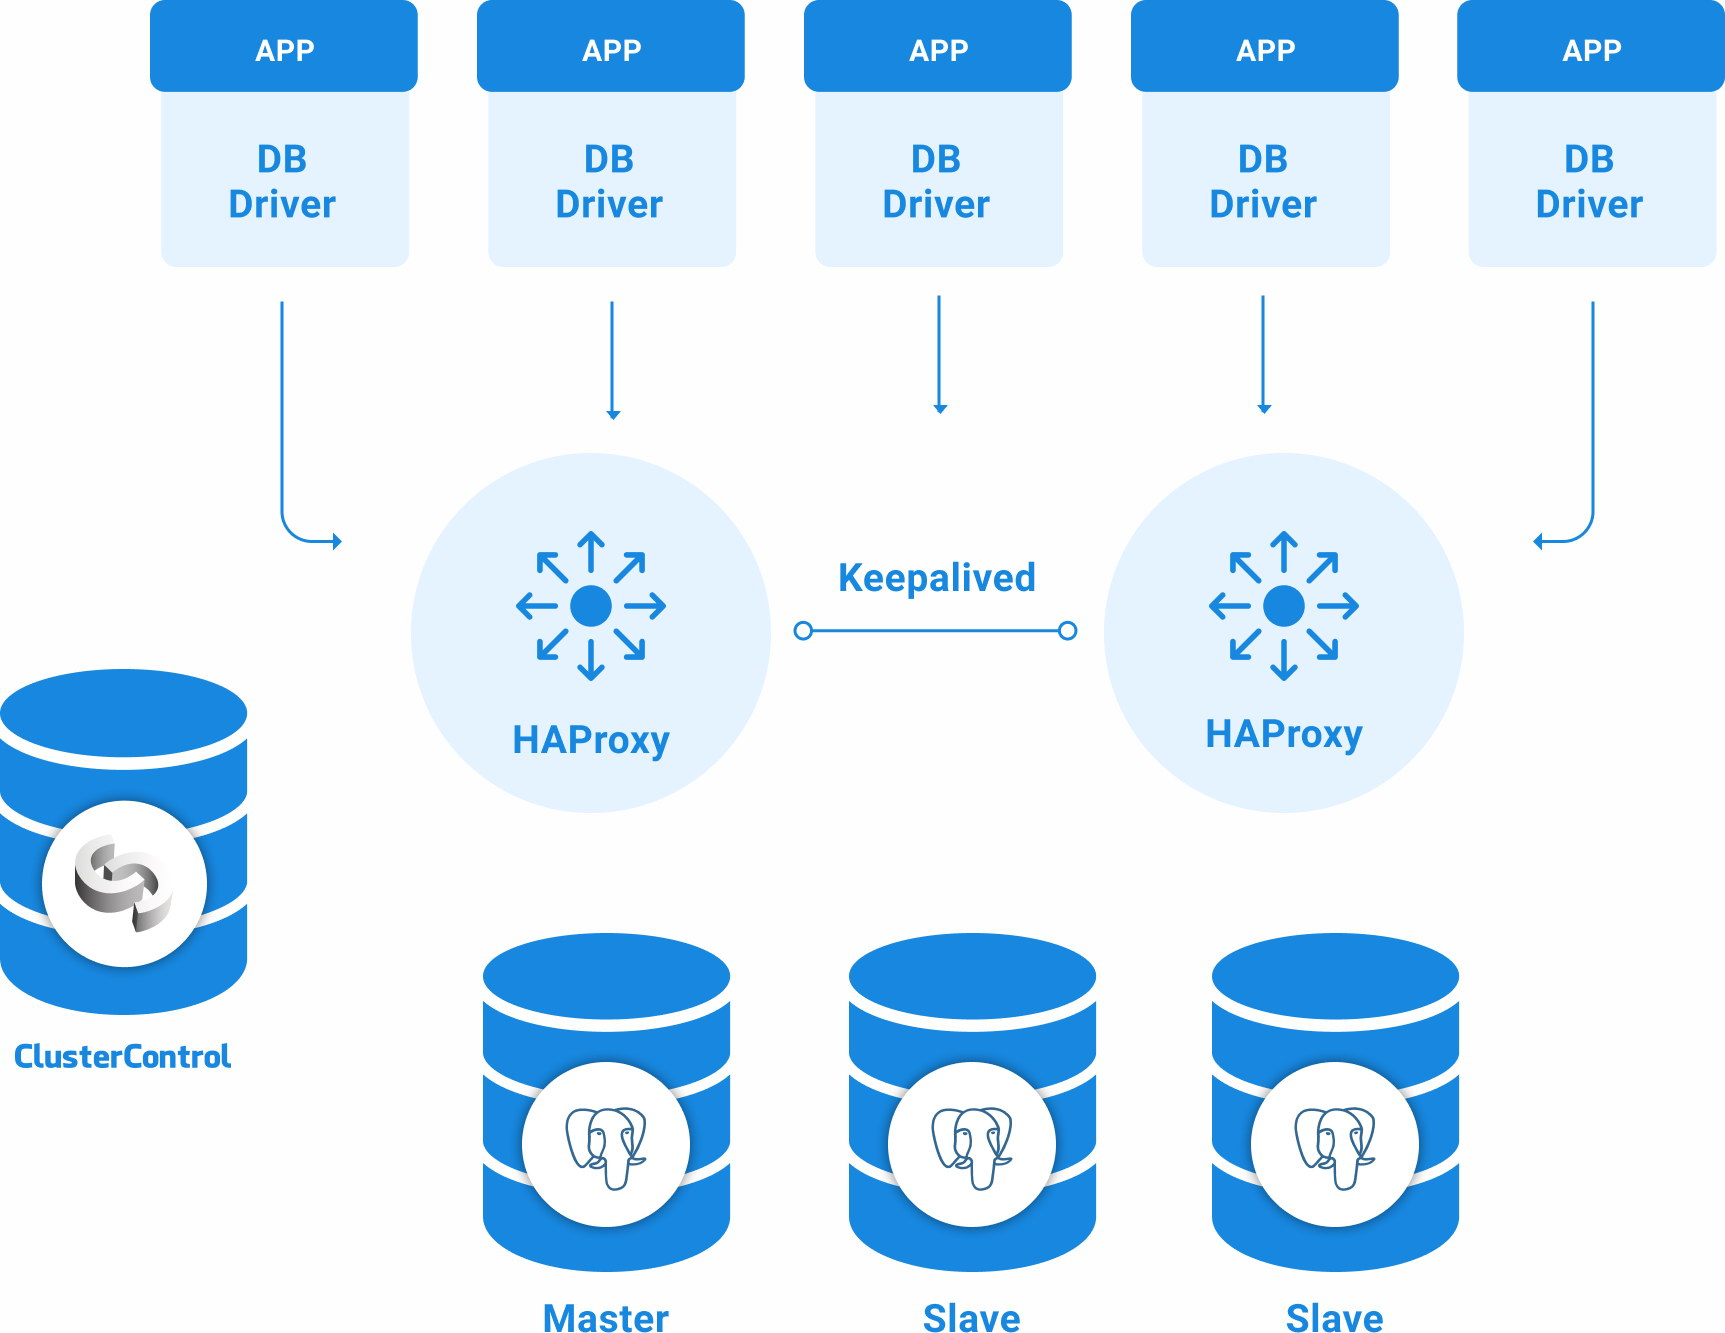
PostgreSQL Topology for High Availability
A basic High Availability topology for PostgreSQL can be:
- 3 PostgreSQL 12 servers (one primary and two standby nodes).
- 2 HAProxy Load Balancers.
- Keepalived configured between the load balancer servers.
- 1 ClusterControl server
So, you will have the following topology:
How to install Percona Distribution for PostgreSQL
Let’s start by installing Percona Distribution for PostgreSQL. For this example, we will use CentOS 7 and PostgreSQL 12.
If you have your cluster installed, you go to the next section to import your existing database to ClusterControl.
Install epel-release and percona-release
$ yum install epel-release

$ yum install https://repo.percona.com/yum/percona-release-latest.noarch.rpm
Enable the PostgreSQL 12 repository
$ percona-release setup ppg-12

* Disabling all Percona Repositories

* Enabling the Percona Distribution for PostgreSQL 12 repository

<*> All done!
Install the server package
$ yum install percona-postgresql12-serverNote that this package will not install all the Percona Distribution components. To install these components use the appropriate optional packages as shown below:
$ yum install percona-pg_repack12
$ yum install percona-pgaudit
$ yum install percona-pgbackrest
$ yum install percona-patroni
$ yum install percona-pg-stat-monitor12
$ yum install percona-postgresql12-contribInitialize the Database
$ /usr/pgsql-12/bin/postgresql-12-setup initdb

Initializing database ... OK
Make sure you have the correct configuration to be able to configure a PostgreSQL replication, similar to:
$ vi /var/lib/pgsql/12/data/postgresql.conf

listen_addresses = '*'

wal_level=logical

max_wal_senders = 16

wal_keep_segments = 32

hot_standby = on
Then, start the database service
$ systemctl start postgresql-12Now, if you want to add standby nodes, repeat the steps 1, 2, and 3 in all the nodes that you want to add to the cluster. For those nodes, you don’t need to configure anything else as ClusterControl will create the corresponding configuration.
Importing Percona Distribution for PostgreSQL in ClusterControl
With ClusterControl you can deploy or import different open source database engines from the same system, and only SSH access and a privileged user is required to use it.
Go to the “Import” section and complete the required information of your PostgreSQL server.
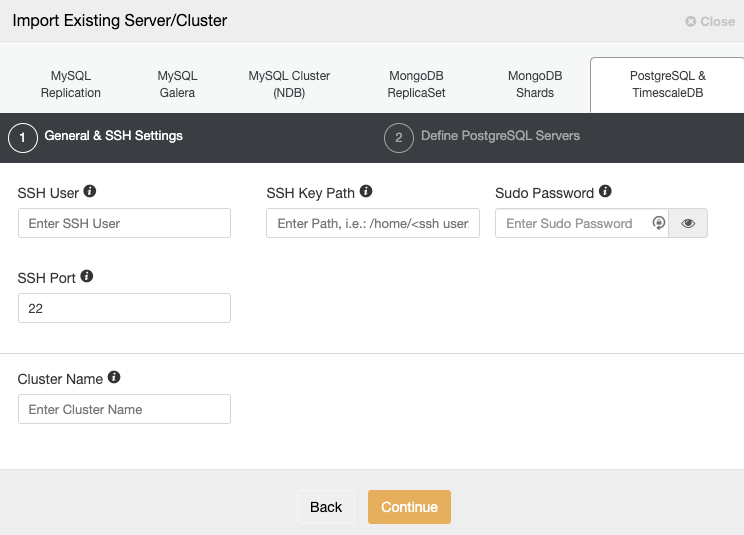
You must specify User, Key or Password, and port to connect by SSH to your servers. You also need a name for your new cluster, otherwise, ClusterControl will assign a generic one for you.
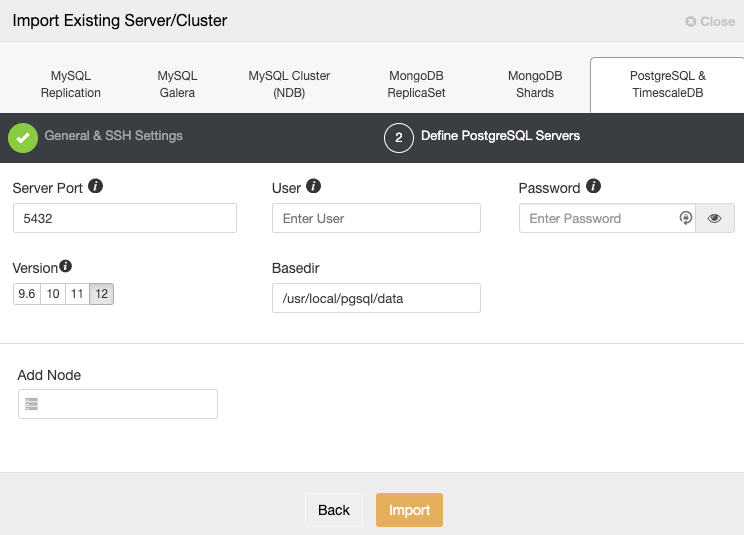
After setting up the SSH access information, you must define the database credentials, version, basedir, and the IP Address or Hostname for each database node.
If you don’t have the replication configured yet, you just need to add the IP address or Hostname for the primary node, as we will show you how to add the rest of the nodes later.
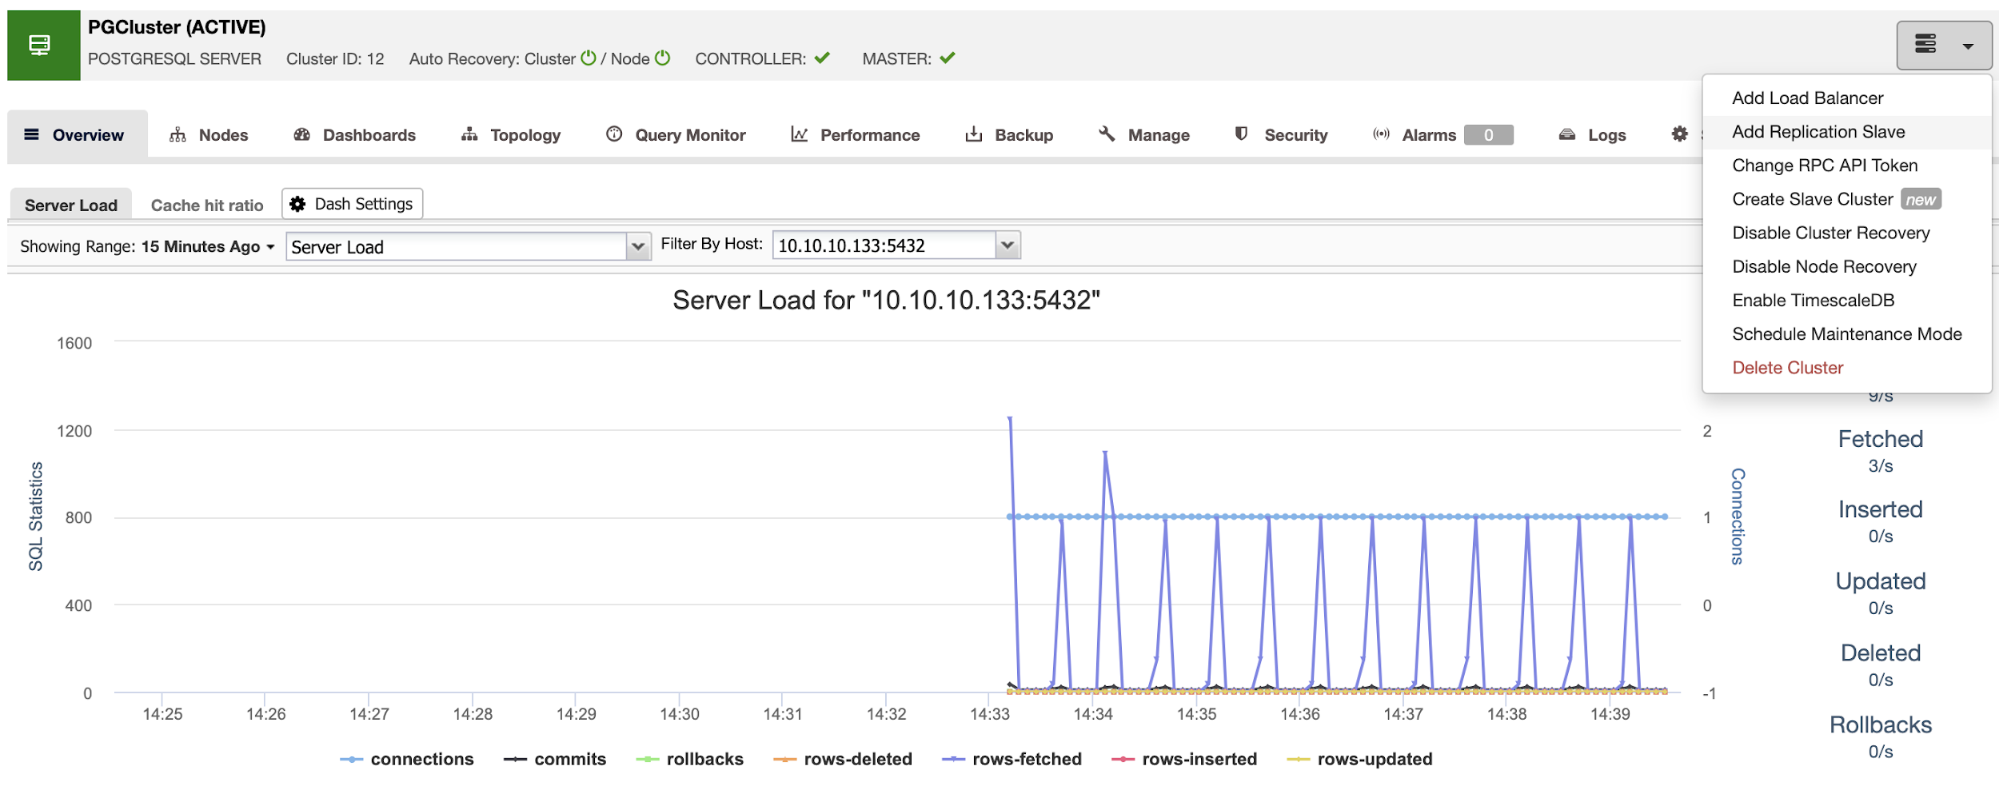
Make sure you get the green tick when entering the hostname or IP address, indicating ClusterControl is able to communicate with the node. Then, click the Import button and wait until ClusterControl finishes its job. You can monitor the process in the ClusterControl Activity Section. When it is finished, you will see the new cluster on the ClusterControl main screen. To add a new replica, go to the cluster actions, and select the option “Add Replication Slave”.
If you followed the previous steps, you will have Percona Distribution for PostgreSQL installed in all the standby nodes, so you need to disable the “Install PostgreSQL software” in this section.
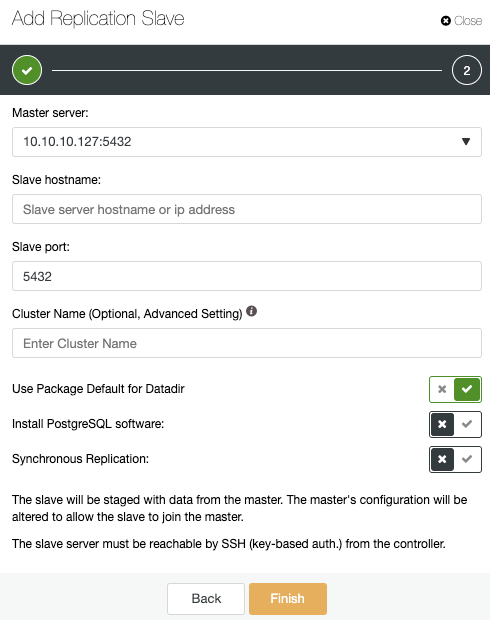
In this way, ClusterControl will use the installed Percona Distribution for PostgreSQL packages instead of installing the official PostgreSQL packages.
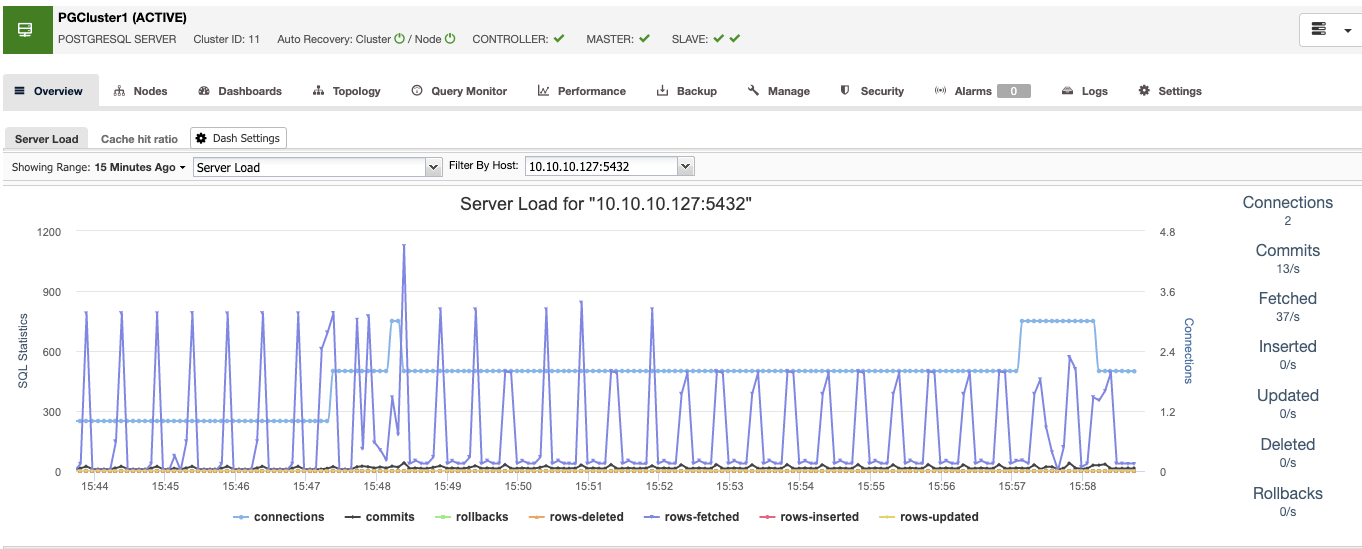
When you finish this, you will see all the nodes in the cluster and the status of all of them in the overview section.
Now you have the database side ready, let’s see how to complete the High Availability environment by adding the rest of the tools using ClusterControl.
Load Balancer Deployment
To perform a load balancer deployment, select the option “Add Load Balancer” in cluster actions and fill the asked information.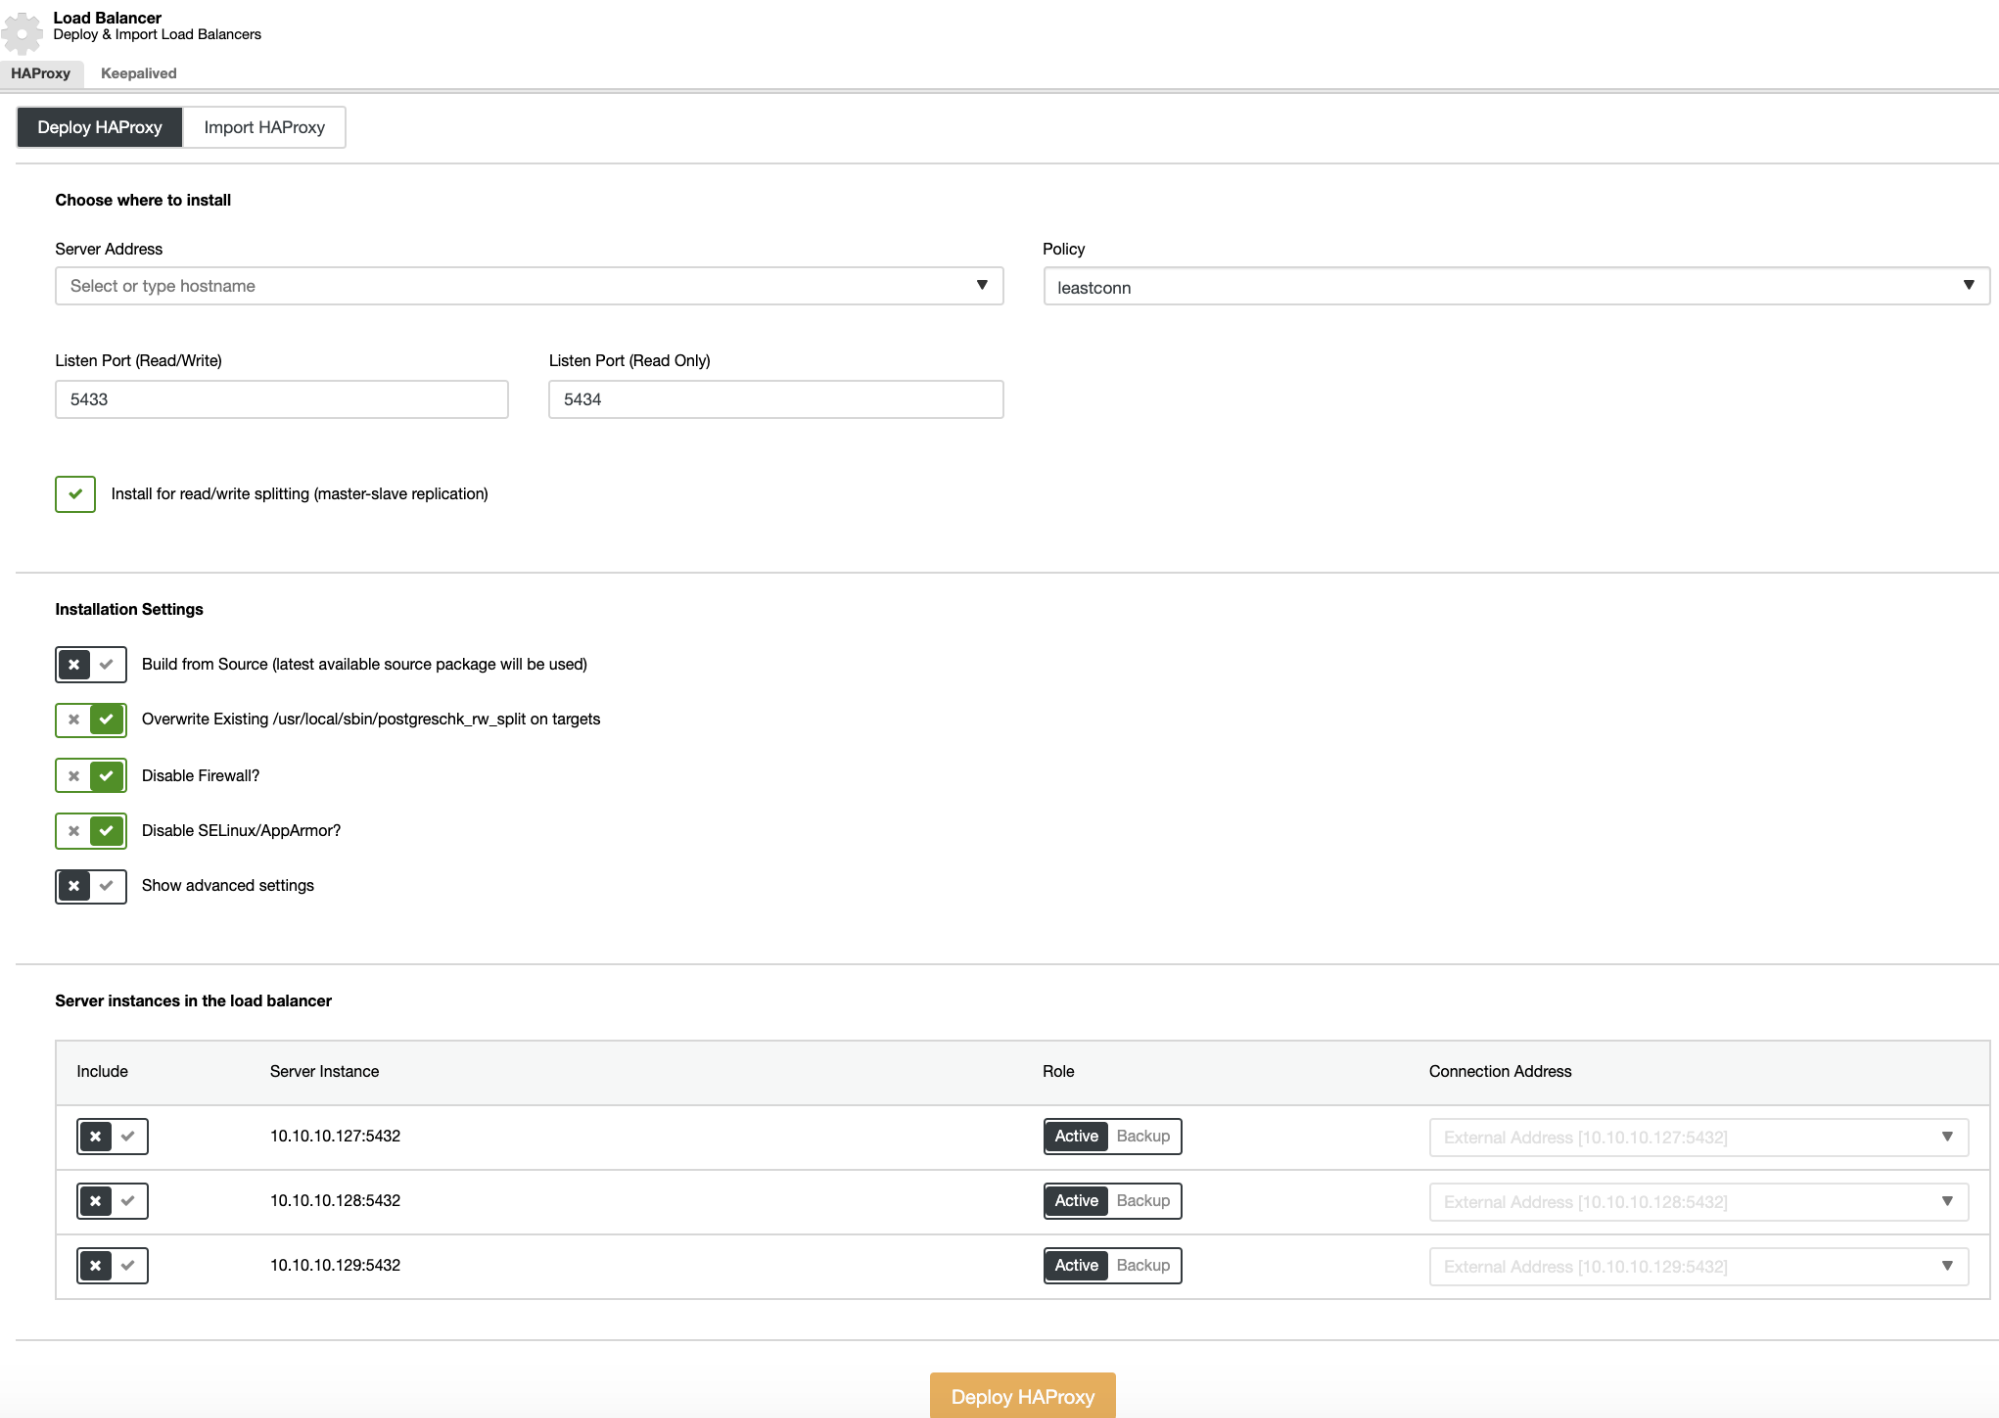
You only need to add IP Address or Hostname, port, policy, and the nodes you are going to add to the load balancer configuration.
Keepalived Deployment
To perform a Keepalived deployment, select the cluster, go to cluster actions, select “Add Load Balancer”, and then go to the “Keepalived” section.
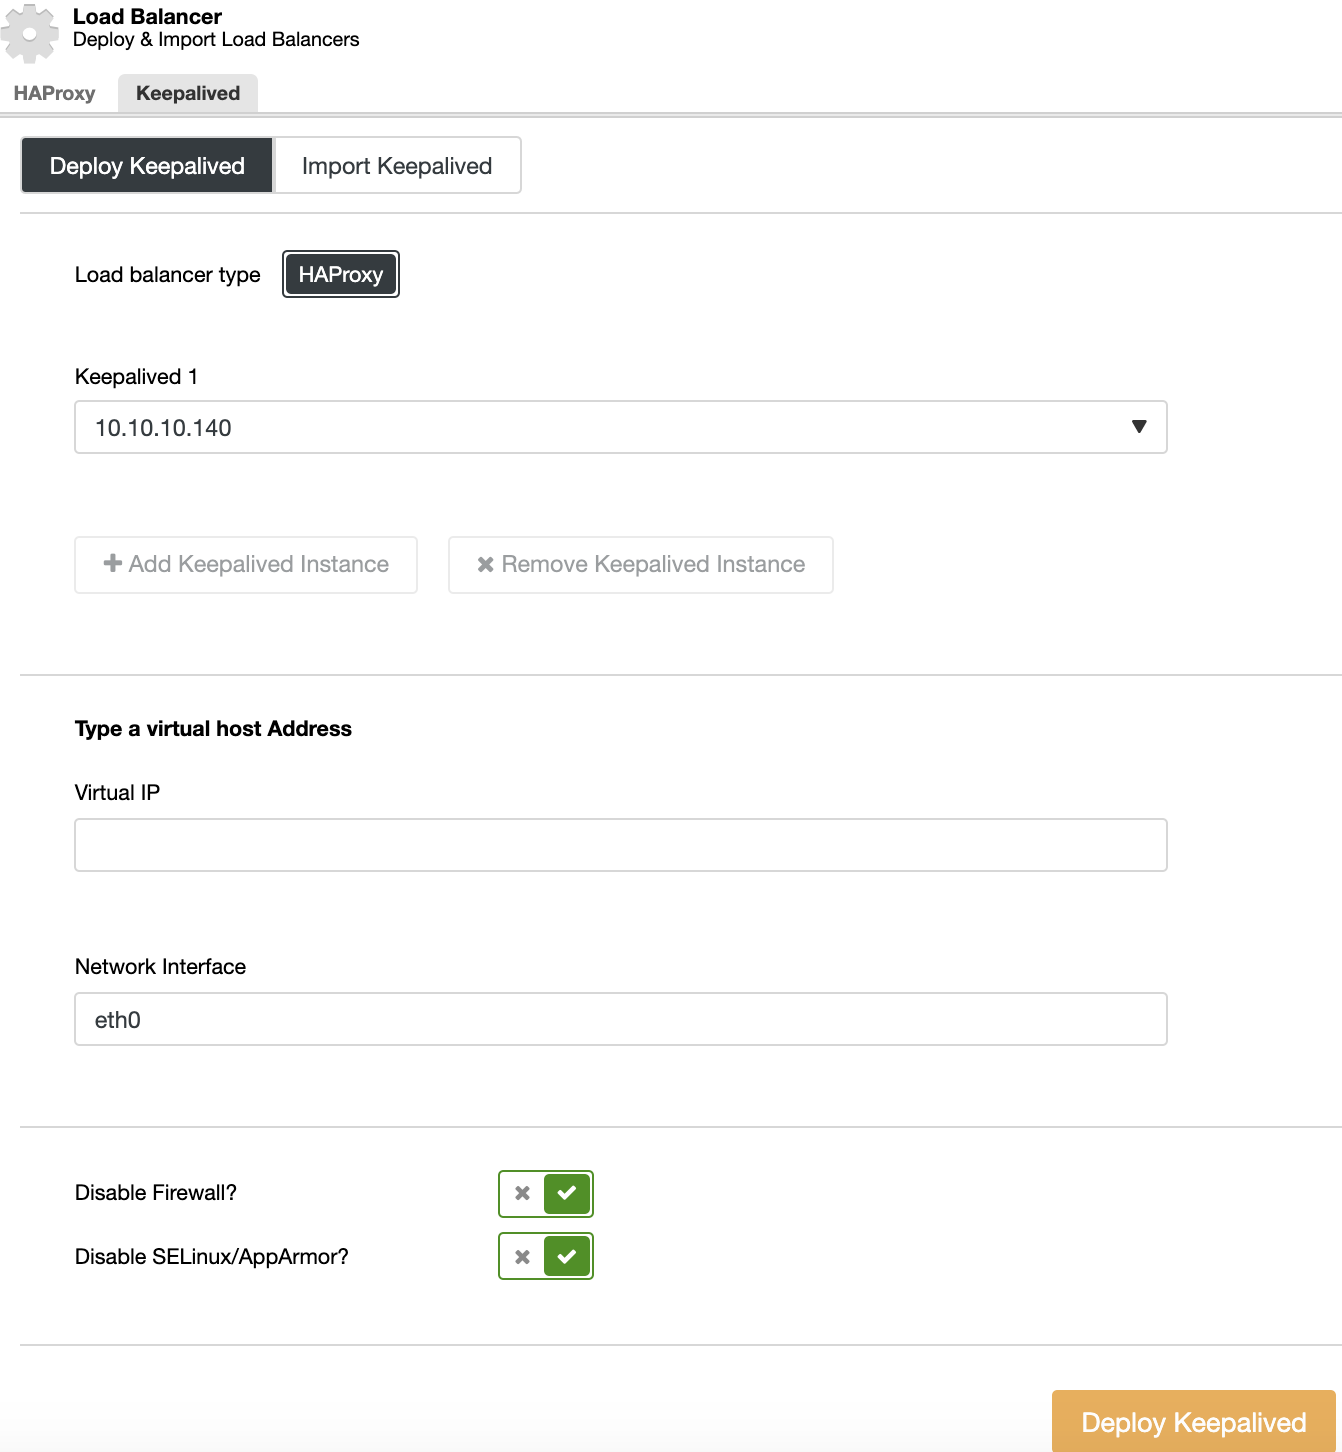
For your High Availability environment, you need to select the load balancer servers and the virtual IP address, which you will need to use to access your cluster. Keepalived configures this virtual IP in the active load balancer and migrates it from one load balancer to another in case of failure, so your setup can continue to function normally.
Conclusion
As you can’t deploy Percona Distribution for PostgreSQL directly from ClusterControl yet, in this blog, we showed you how to be able to manage it using ClusterControl, and how to add different tools like HAProxy and Keepalived to have a High Availability environment in place in an easy way.


