blog
How to Configure PostgreSQL Sharding with ClusterControl

Sometimes it is hard to manage a large amount of data in a company, especially with the exponential increment of Data Analytics and IoT usage. Depending on the size, this amount of data could affect the performance of your systems and you will probably need to scale your databases or find a way to fix this. There are different ways to scale your PostgreSQL databases and one of them is Sharding. In this blog, we will see what Sharding is and how to configure it in PostgreSQL using ClusterControl to simplify the task.
What is Sharding?
Sharding is the action of optimizing a database by separating data from a big table into multiple small ones. Smaller tables are Shards (or partitions). Partitioning and Sharding are similar concepts. The main difference is that sharding implies the data is spread across multiple computers while partitioning is about grouping subsets of data within a single database instance.
There are two types of Sharding:
-
Horizontal Sharding: Each new table has the same schema as the big table but unique rows. It is useful when queries tend to return a subset of rows that are often grouped together.
-
Vertical Sharding: Each new table has a schema that is a subset of the original table’s schema. It is useful when queries tend to return only a subset of columns of the data.
Let’s see an example:
Original Table
|
ID |
Name |
Age |
Country |
|---|---|---|---|
|
1 |
James Smith |
26 |
USA |
|
2 |
Mary Johnson |
31 |
Germany |
|
3 |
Robert Williams |
54 |
Canada |
|
4 |
Jennifer Brown |
47 |
France |
Vertical Sharding
|
Shard1 |
Shard2 |
|||
|---|---|---|---|---|
|
ID |
Name |
Age |
ID |
Country |
|
1 |
James Smith |
26 |
1 |
USA |
|
2 |
Mary Johnson |
31 |
2 |
Germany |
|
3 |
Robert Williams |
54 |
3 |
Canada |
|
4 |
Jennifer Brown |
47 |
4 |
France |
Horizontal Sharding
|
Shard1 |
Shard2 |
||||||
|---|---|---|---|---|---|---|---|
|
ID |
Name |
Age |
Country |
ID |
Name |
Age |
Country |
|
1 |
James Smith |
26 |
USA |
3 |
Robert Williams |
54 |
Canada |
|
2 |
Mary Johnson |
31 |
Germany |
4 |
Jennifer Brown |
47 |
France |
Now that we reviewed some Sharding concepts, let’s proceed to the next step.
How to Deploy a PostgreSQL Cluster?
We will use ClusterControl for this task. If you are not using ClusterControl yet, you can install it and deploy or import your current PostgreSQL database selecting the “Import” option and follow the steps to take advantage of all the ClusterControl features like backups, automatic failover, alerts, monitoring, and more.
To perform a deployment from ClusterControl, simply select the “Deploy” option and follow the instructions that appear.

When selecting PostgreSQL, you must specify your User, Key or Password, and Port to connect by SSH to your servers. You can also add a name for your new cluster and if you want, you can also use ClusterControl to install the corresponding software and configurations for you.
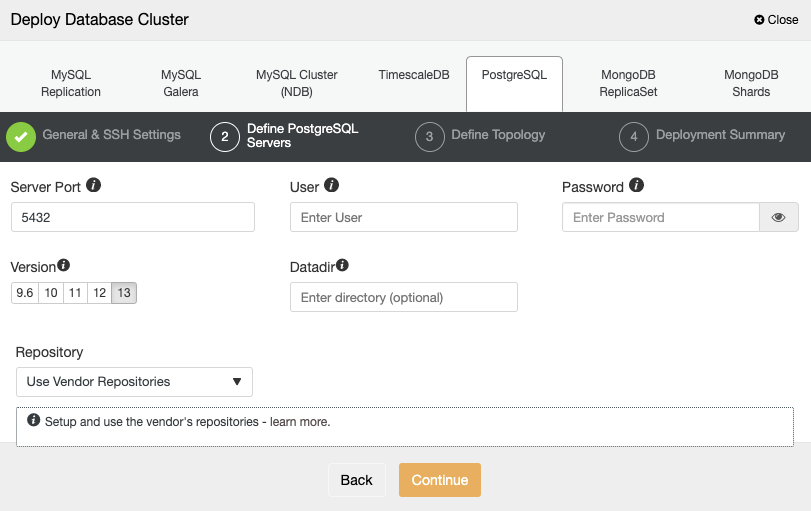
After setting up the SSH access information, you need to define the database credentials, version, and datadir (optional). You can also specify which repository to use.
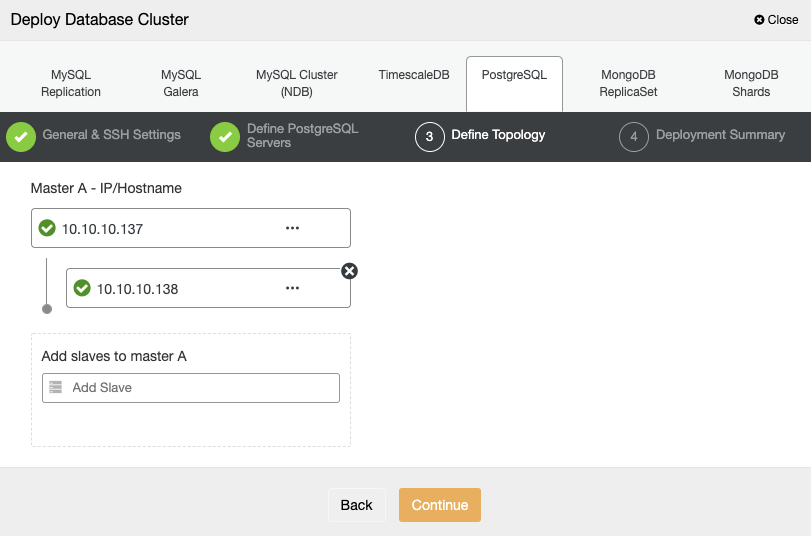
For the next step, you need to add your servers to the cluster that you are going to create using the IP Address or Hostname.
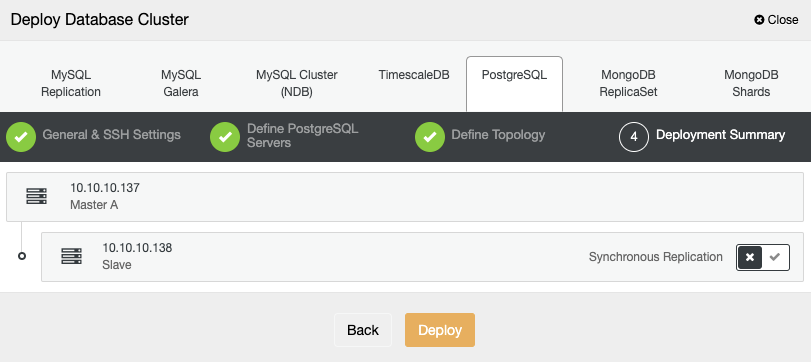
In the last step, you can choose if your replication will be Synchronous or Asynchronous, and then just press on “Deploy”.
Once the task is finished, you will see your new PostgreSQL cluster in the main ClusterControl screen.

Now that you have your cluster created, you can perform several tasks on it like adding a load balancer (HAProxy), connection pooler (pgBouncer), or a new replica.
Repeat the process to have at least two separate PostgreSQL clusters to configure Sharding, which is the next step.
How to Configure PostgreSQL Sharding?
Now we will configure Sharding using PostgreSQL Partitions and Foreign Data Wrapper (FDW). This functionality allows PostgreSQL to access data stored in other servers. It is an extension available by default in the common PostgreSQL installation.
We will use the following environment:
Servers: Shard1 - 10.10.10.137, Shard2 - 10.10.10.138
Database User: admindb
Table: customers
To enable the FDW extension, you just need to run the following command in your main server, in this case, Shard1:
postgres=# CREATE EXTENSION postgres_fdw;
CREATE EXTENSION
Now let’s create the table customers partitioned by registered date:
postgres=# CREATE TABLE customers (
  id INT NOT NULL,
  name VARCHAR(30) NOT NULL,
  registered DATE NOT NULL
)
PARTITION BY RANGE (registered);
And the following partitions:
postgres=# CREATE TABLE customers_2021
    PARTITION OF customers
    FOR VALUES FROM ('2021-01-01') TO ('2022-01-01');
postgres=# CREATE TABLE customers_2020
    PARTITION OF customers
    FOR VALUES FROM ('2020-01-01') TO ('2021-01-01');
These Partitions are locals. Now let’s insert some test values and check them:
postgres=# INSERT INTO customers (id, name, registered) VALUES (1, 'James', '2020-05-01');
postgres=# INSERT INTO customers (id, name, registered) VALUES (2, 'Mary', '2021-03-01');
Here you can query the main partition to see all the data:
postgres=# SELECT * FROM customers;
 id | name  | registered
----+-------+------------
  1 | James | 2020-05-01
  2 | Mary  | 2021-03-01
(2 rows)
Or even query the corresponding partition:
postgres=# SELECT * FROM customers_2021;
 id | name | registered
----+------+------------
  2 | Mary | 2021-03-01
(1 row)

postgres=# SELECT * FROM customers_2020;
 id | name  | registered
----+-------+------------
  1 | James | 2020-05-01
(1 row)
As you can see, data was inserted in different partitions, according to the registered date. Now, in the remote node, in this case Shard2, let’s create another table:
postgres=# CREATE TABLE customers_2019 (
    id INT NOT NULL,
    name VARCHAR(30) NOT NULL,
    registered DATE NOT NULL);
You need to create this Shard2 server in Shard1 in this way:
postgres=# CREATE SERVER shard2 FOREIGN DATA WRAPPER postgres_fdw OPTIONS (host '10.10.10.138', dbname 'postgres');And the user to access it:
postgres=# CREATE USER MAPPING FOR admindb SERVER shard2 OPTIONS (user 'admindb', password 'Passw0rd');Now, create the FOREIGN TABLE in Shard1:
postgres=# CREATE FOREIGN TABLE customers_2019
PARTITION OF customers
FOR VALUES FROM ('2019-01-01') TO ('2020-01-01')
SERVER shard2;
And let’s insert data in this new remote table from Shard1:
postgres=# INSERT INTO customers (id, name, registered) VALUES (3, 'Robert', '2019-07-01');
INSERT 0 1
postgres=# INSERT INTO customers (id, name, registered) VALUES (4, 'Jennifer', '2019-11-01');
INSERT 0 1
If everything went fine, you should be able to access the data from both Shard1 and Shard2:
Shard1:

postgres=# SELECT * FROM customers;
 id |   name   | registered
----+----------+------------
  3 | Robert   | 2019-07-01
  4 | Jennifer | 2019-11-01
  1 | James    | 2020-05-01
  2 | Mary     | 2021-03-01
(4 rows)

postgres=# SELECT * FROM customers_2019;
 id |   name   | registered
----+----------+------------
  3 | Robert   | 2019-07-01
  4 | Jennifer | 2019-11-01
(2 rows)
Shard2:
postgres=# SELECT * FROM customers_2019;

 id |   name   | registered
----+----------+------------
  3 | Robert   | 2019-07-01
  4 | Jennifer | 2019-11-01
(2 rows)
That’s it. Now you are using Sharding in your PostgreSQL Cluster.
Conclusion
Partitioning and Sharding in PostgreSQL are good features. It helps you in case you need to separate data in a big table to improve performance, or even to purge data in an easy way, among other situations. An important point when you are using Sharding is to choose a good shard key that distributes the data between the nodes in the best way. Also, you can use ClusterControl to simplify the PostgreSQL deployment and to take advantage of some features like monitoring, alerting, automatic failover, backup, point-in-time recovery, and more.