blog
A Guide to Deploying TimescaleDB with Docker

Nowadays, Docker is the most common tool to create, deploy, and run applications by using containers. It allows us to package up an application with all of the parts it needs, such as libraries and other dependencies, and ship it all out as one package. It could be considered as a virtual machine, but instead of creating a whole virtual operating system, Docker allows applications to use the same Linux kernel as the system that they’re running on and only requires applications to be shipped with things not already running on the host computer. This gives a significant performance boost and reduces the size of the application.
In case of Docker Images, they come with a predefined OS version and the packages are installed in a way that was decided by the person who created the image. It’s possible that you want to use a different OS or maybe you want to install the packages in a different way. For these cases, you should use a clean OS Docker Image and install the software from scratch.
Replication is a common feature in a database environment, so after having the TimescaleDB Docker Images deployed, if you want to configure a replication setup, you’ll need to do it manually from the container, by using a Docker file or even a script. This task could be complex if you don’t have Docker knowledge.
In this blog, we’ll see how we can deploy TimescaleDB via Docker by using a TimescaleDB Docker Image, and then, we’ll see how to install it from scratch by using a CentOS Docker Image and ClusterControl.
How to Deploy TimescaleDB with a Docker Image
First, let’s see how to deploy TimescaleDB by using a Docker Image available on Docker Hub.
$ docker search timescaledb
NAME                                       DESCRIPTION                                     STARS               OFFICIAL            AUTOMATED
timescale/timescaledb                      An open-source time-series database optimize…   52
We’ll take the first result. So, we need to pull this image:
$ docker pull timescale/timescaledbAnd run the node containers mapping a local port to the database port into the container:
$ docker run -d --name timescaledb1 -p 7551:5432 timescale/timescaledb
$ docker run -d --name timescaledb2 -p 7552:5432 timescale/timescaledb
After running these commands, you should have this Docker environment created:
$ docker ps
CONTAINER ID        IMAGE                   COMMAND                  CREATED             STATUS              PORTS                    NAMES
6d3bfc75fe39        timescale/timescaledb   "docker-entrypoint.s…"   15 minutes ago      Up 15 minutes       0.0.0.0:7552->5432/tcp   timescaledb2
748d5167041f        timescale/timescaledb   "docker-entrypoint.s…"   16 minutes ago      Up 16 minutes       0.0.0.0:7551->5432/tcp   timescaledb1
Now, you can access each node with the following commands:
$ docker exec -ti [db-container] bash
$ su postgres
$ psql
psql (9.6.13)
Type "help" for help.
postgres=#
As you can see, this Docker Image contains a TimescaleDB 9.6 version by default, and it’s installed on Alpine Linux v3.9. You can use a different TimescaleDB version by changing the tag:
$ docker pull timescale/timescaledb:latest-pg11Then, you can create a database user, change the configuration according to your requirements or configure replication between the nodes manually.
How to Deploy TimescaleDB with ClusterControl
Now, let’s see how to deploy TimescaleDB with Docker by using a CentOS Docker Image (centos) and a ClusterControl Docker Image (severalnines/clustercontrol).
First, we’ll deploy a ClusterControl Docker Container using the latest version, so we need to pull the severalnines/clustercontrol Docker Image.
$ docker pull severalnines/clustercontrolThen, we’ll run the ClusterControl container and publish the port 5000 to access it.
$ docker run -d --name clustercontrol -p 5000:80 severalnines/clustercontrolNow, we can open the ClusterControl UI at http://[Docker_Host]:5000/clustercontrol and create a default admin user and password.
The CentOS Official Docker Image comes without SSH service, so we’ll install it and allow the connection from the ClusterControl node with passwordless by using an SSH key.
$ docker search centos
NAME                               DESCRIPTION                                     STARS               OFFICIAL            AUTOMATED
centos                             The official build of CentOS.                   5378                [OK]
So, we’ll pull the CentOS Official Docker Image.
$ docker pull centosAnd then, we’ll run two node containers, timescale1 and timescale2, linked with ClusterControl and we’ll map a local port to connect to the database (optional).
$ docker run -dt --privileged --name timescale1 -p 8551:5432 --link clustercontrol:clustercontrol centos /usr/sbin/init
$ docker run -dt --privileged --name timescale2 -p 8552:5432 --link clustercontrol:clustercontrol centos /usr/sbin/init
As we need to install and configure the SSH service, we need to run the container with privileged and /usr/sbin/init parameters to be able to manage the service inside the container.
After running these commands, we should have this Docker environment created:
$ docker ps
CONTAINER ID        IMAGE                         COMMAND             CREATED             STATUS                       PORTS                                                                                     NAMES
230686d8126e        centos                        "/usr/sbin/init"    4 seconds ago       Up 3 seconds                 0.0.0.0:8552->5432/tcp                                                                    timescale2
c0e7b245f7fe        centos                        "/usr/sbin/init"    23 seconds ago      Up 22 seconds                0.0.0.0:8551->5432/tcp                                                                    timescale1
7eadb6bb72fb        severalnines/clustercontrol   "/entrypoint.sh"    2 weeks ago         Up About an hour (healthy)   22/tcp, 443/tcp, 3306/tcp, 9500-9501/tcp, 9510-9511/tcp, 9999/tcp, 0.0.0.0:5000->80/tcp   clustercontrol
We can access each node with the following command:
$ docker exec -ti [db-container] bashAs we mentioned earlier, we need to install the SSH service, so let’s install it, allow the root access and set the root password for each database container:
$ docker exec -ti [db-container] yum update -y
$ docker exec -ti [db-container] yum install -y openssh-server openssh-clients
$ docker exec -it [db-container] sed -i 's|^#PermitRootLogin.*|PermitRootLogin yes|g' /etc/ssh/sshd_config
$ docker exec -it [db-container] systemctl start sshd
$ docker exec -it [db-container] passwd
The last step is setting up the passwordless SSH to all database containers. For this, we need to know the IP Address for each database node. To know it, we can run the following command for each node:
$ docker inspect [db-container] |grep IPAddress
            "IPAddress": "172.17.0.5",
Then, attach to the ClusterControl container interactive console:
$ docker exec -it clustercontrol bashAnd copy the SSH key to all database containers:
$ ssh-copy-id 172.17.0.5Now we have the server nodes up and running, we need to deploy our database cluster. To make it in an easy way we’ll use ClusterControl.
To perform a deployment from ClusterControl, open the ClusterControl UI at http://[Docker_Host]:5000/clustercontrol, then select the option “Deploy” and follow the instructions that appear.
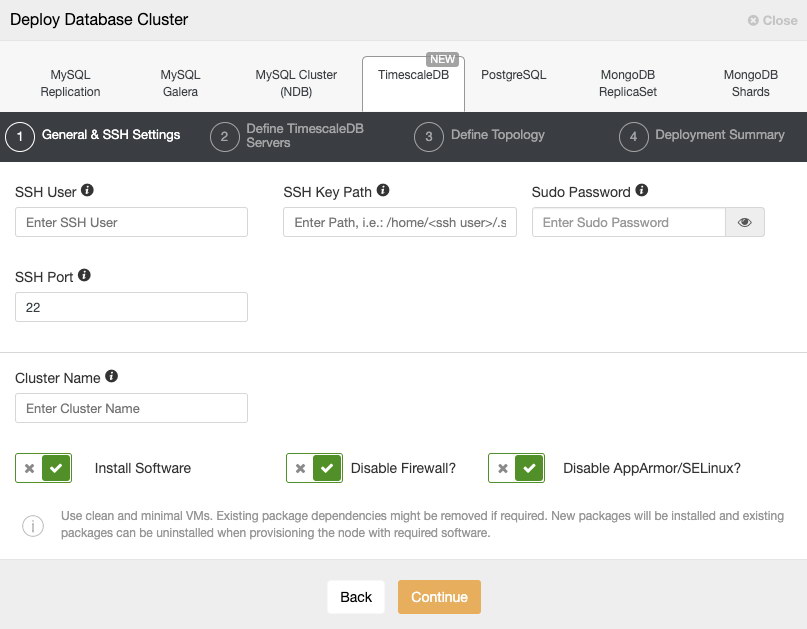
When selecting TimescaleDB, we must specify User, Key or Password and port to connect by SSH to our servers. We also need a name for our new cluster and if we want ClusterControl to install the corresponding software and configurations for us.
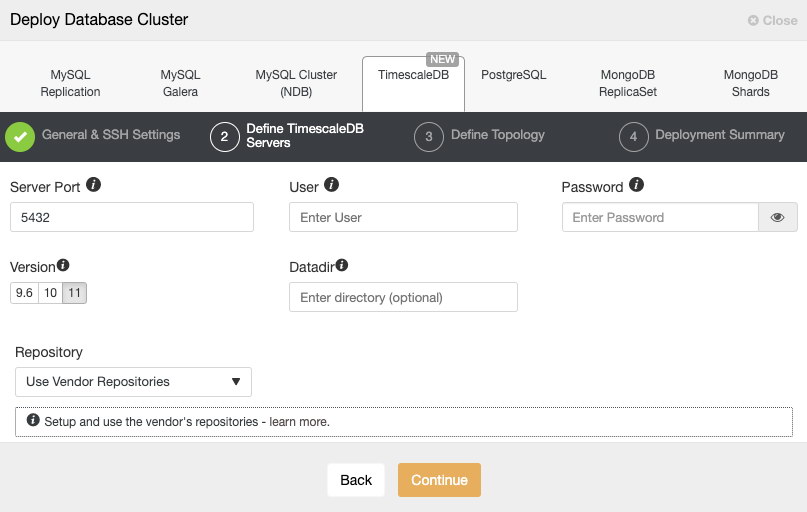
After setting up the SSH access information, we must define the database user, version and datadir (optional). We can also specify which repository to use.
In the next step, we need to add our servers to the cluster that we are going to create.
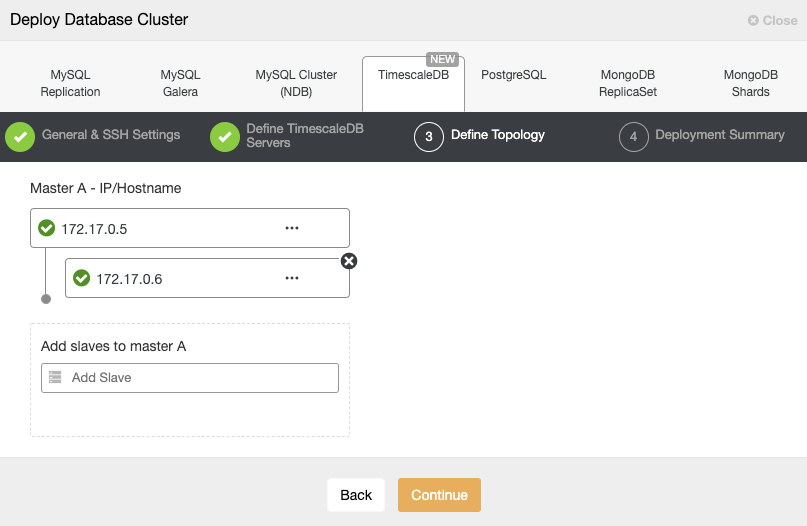
Here we must use the IP Address that we got from each container previously.
In the last step, we can choose if our replication will be Synchronous or Asynchronous.
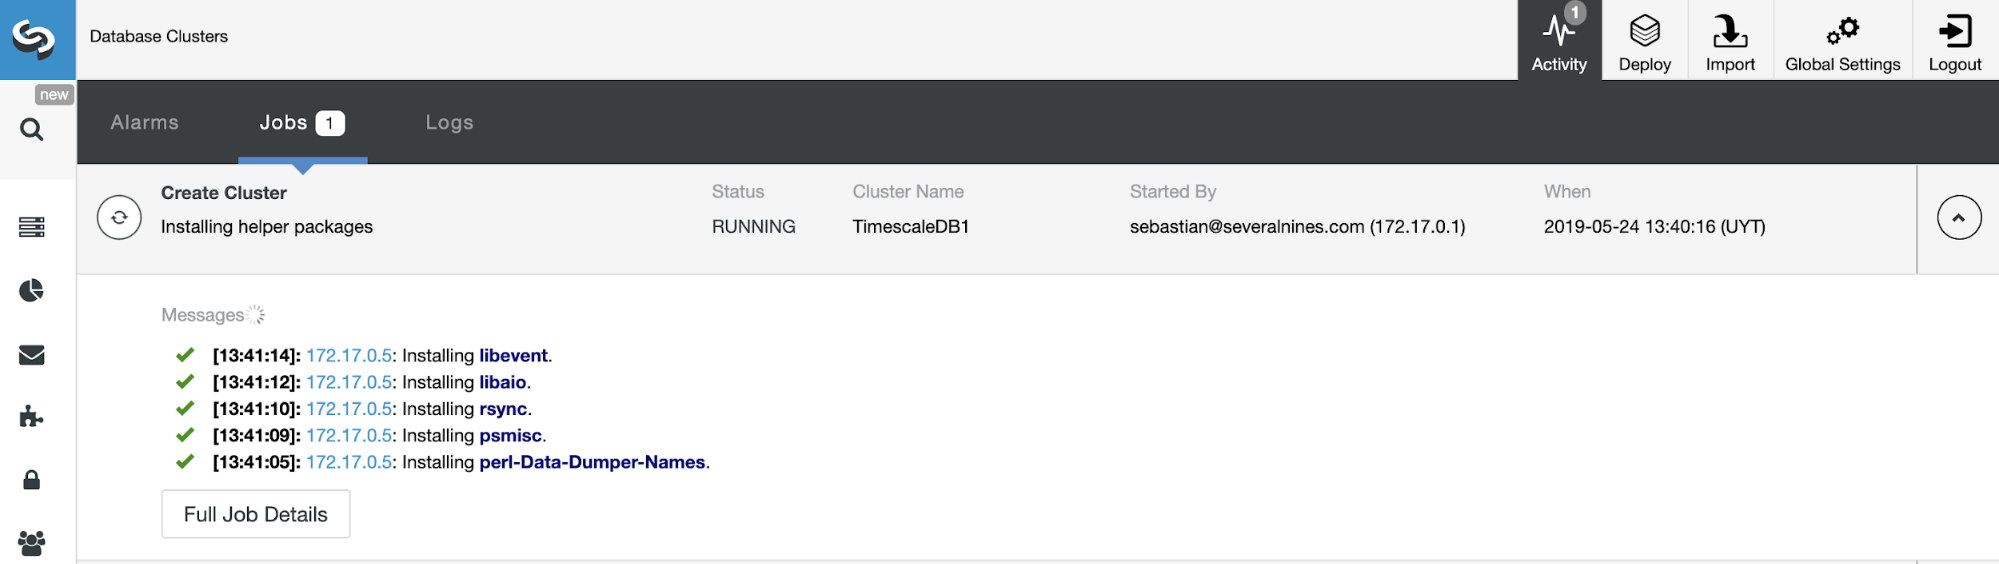
We can monitor the status of the creation of our new cluster from the ClusterControl activity monitor.
Once the task is finished, we can see our cluster in the main ClusterControl screen.

Note that, if you want to add more standby nodes, you can do it from the ClusterControl UI in the Cluster Actions menu.
In the same way, if you have your TimescaleDB cluster running on Docker and you want ClusterControl to manage it to be able to use all the features of this system like monitoring, backing up, automatic failover, and even more, you can simply run the ClusterControl container in the same Docker network as the database containers. The only requirement is to ensure the target containers have SSH related packages installed (openssh-server, openssh-clients). Then allow passwordless SSH from ClusterControl to the database containers. Once done, use the “Import Existing Server/Cluster” feature and the cluster should be imported into ClusterControl.
One possible issue running containers is the IP address or hostname assignment. Without an orchestration tool like Kubernetes, the IP address or hostname could be different if you stop the nodes and create new containers before start it again. You’ll have a different IP address for the old nodes and ClusterControl is assuming that all nodes are running on an environment with a dedicated IP address or hostname, so after the IP address changed, you should re-import the cluster into ClusterControl. There are many workarounds for this issue, you can check this link to use Kubernetes with StatefulSet, or this one for running containers without orchestration tool.
Conclusion
As we could see, the deploy of TimescaleDB with Docker should be easy if you don’t want to configure a replication or failover environment and if you don’t want to make any changes on the OS version or database packages installation.
With ClusterControl, you can import or deploy your TimescaleDB cluster with Docker by using the OS image that you prefer, as well as automate the monitoring and management tasks like backup and automatic failover/recovery.