blog
Deploying an Active-Active FreeRadius Cluster with MySQL NDB or Galera

MySQL Cluster is a popular backend for FreeRADIUS, as it provides a scalable backend to store user and accounting data. However, there are situations when the backend database becomes a centralized datastore for additional applications and services, and needs to take a more general-purpose role. NDB usually works very well for FreeRADIUS data, but for wider use cases and reporting type applications, InnoDB can be a better storage engine. For users who need to keep their data in InnoDB and still benefit from a highly available clustered datastore, Galera Cluster can be an appropriate alternative.
In this post, we will show you how to deploy FreeRadius both with MySQL Cluster and Galera Cluster to store user and accounting data. All servers are running CentOS 6.4 64bit.
FreeRadius Deployment with Galera
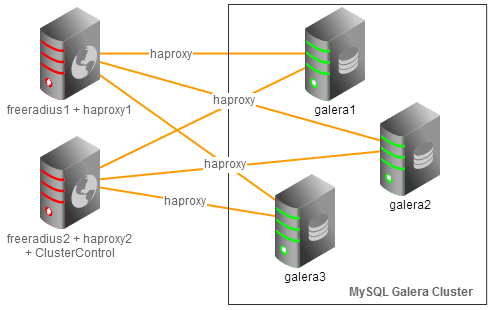
We will deploy a two-node FreeRadius cluster running on dual active mode, communicating to a three-node Galera Cluster through load balancers (HAproxy) with automatic IP failover using virtual IP (Keepalived). Both FreeRadius nodes are able to serve RADIUS queries from clients. Following figure illustrates the architecture:
Our hosts definition in all nodes:
192.168.197.150		virtual_ip
192.168.197.141		freeradius1 haproxy1
192.168.197.142		freeradius2 haproxy2 clustercontrol
192.168.197.151		galera1
192.168.197.152		galera2
192.168.197.153		galera3
Deploying MySQL Galera Cluster, HAproxy and Keepalived (Virtual IP)
1. Use the Galera Configurator to deploy a three-node Galera Cluster. Use galera1, galera2 and galera3 for the MySQL nodes, and freeradius2 (192.168.197.142) for the Clusterc
ontrol node.
Once deployed, enable passwordless SSH from the Clustercontrol node to freeradius1 so Clustercontrol can provision the node:
$ ssh-copy-id -i ~/.ssh/id_rsa.pub 192.168.197.141
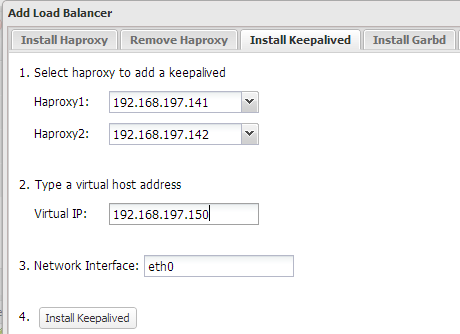
2. Add haproxy1 and haproxy2 into load balancing set by using Add Load Balancer wizard.
3. Install Keepalived and configure an appropriate virtual IP for HAproxy failover, similar to screenshot below:
At the end of the deployment, the top summary bar in the Clustercontrol UI should look like the below:

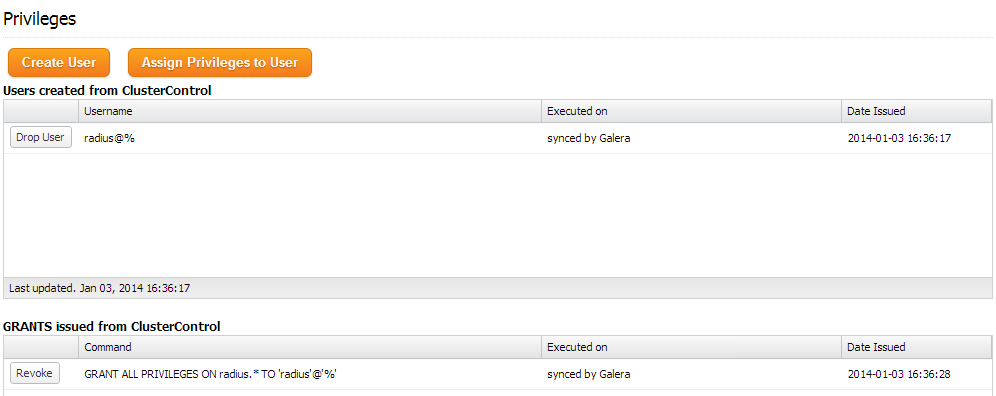
4. Create a schema for FreeRadius by using Manage >> Schema and Users >> Create a database called “radius”. Then assign all privileges to the schema with a wildcard host (‘%’).
At the moment, MySQL Galera Cluster is load balanced with virtual IP, 192.168.197.150 listening on port 33306.
Installing FreeRadius
The following steps should be performed on freeradius1 and freeradius2 unless specified otherwise.
1. Install FreeRadius and mysql client packages on freeradius1:
$ yum install -y freeradius freeradius-mysql freeradius-utils mysql
On freeradius2, install FreeRadius packages without mysql client package (Clustercontrol had it installed already):
$ yum install -y freeradius freeradius-mysql freeradius-utils
2. On freeradius1, import FreeRadius MySQL tables:
$ for i in `ls /etc/raddb/sql/mysql/*.sql`do mysql -f -uradius -pradiuspassword -h virtual_ip -P33306 radius < $idone
3. On freeradius1, connect to the MySQL server to alter some tables to suit Galera Cluster:
$ mysql -uradius -p -h virtual_ip -P33306
We need to convert table cui storage engine to InnoDB and add an auto-increment primary key column in radusergroup table:
ALTER TABLE radius.cui ENGINE='InnoDB'<span>;< span="">
ALTER TABLE radius.radusergroup ADD COLUMN `id` BIGINT PRIMARY KEY AUTO_INCREMENT NOT NULL FIRST<span>;< span=""></span>;<></span>;<>
4. Open /etc/raddb/sql.conf and update the MySQL connection info accordingly:
        # Connection info:
        server = "virtual_ip"
        port = 33306
        login = "radius"
        password = "radiuspassword"
5. Find and uncomment the following line inside /etc/raddb/radiusd.conf under modules section:
$INCLUDE sql.conf
6. Edit /etc/raddb/sites-available/default and /etc/raddb/sites-available/inner-tunnel and uncomment the line containing ‘sql’ in the authorize{}, accounting{} and session{}.
7. Generate a shared secret:
$ openssl rand -hex 10
4aceee54f42a249171ad
And update the secret value in /etc/raddb/clients.conf with the generated shared secret:
secret = 4aceee54f42a249171ad
8. Enable radiusd on boot and start the service:
$ chkconfig radiusd on
$ service radiusd start
That’s it. If you want to test your FreeRadius setup with Galera, scroll down to the ‘Testing’ section of this post.
FreeRadius Deployment with MySQL Cluster (NDB)
We will deploy a two-node FreeRadius cluster running on dual active mode, talking to a four-node MySQL Cluster through load balancers (HAproxy) with automatic IP failover using virtual IP (Keepalived). Both FreeRadius nodes would be able to serve RADIUS queries from clients. The following figure illustrates the architecture:

Our hosts definition in all nodes:
192.168.197.160		virtual_ip
192.168.197.141		freeradius1 haproxy1
192.168.197.142		freeradius2 haproxy2 clustercontrol
192.168.197.161		sql1 mgmd1
192.168.197.162		sql2 mgmd2
192.168.197.163		data1
192.168.197.164		data2
Deploying MySQL Cluster, HAproxy and Keepalived (Virtual IP)
1. Use our MySQL Cluster Configurator to deploy a three-node MySQL Galera Cluster. Once deployed, enable passwordless SSH from Clustercontrol node to freeradius1 so Clustercontrol can provision the node:
$ ssh-copy-id -i ~/.ssh/id_rsa.pub 192.168.197.141
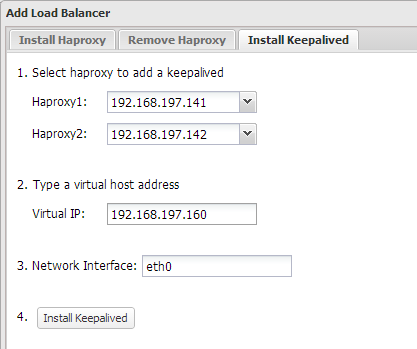
2. Add haproxy1 and haproxy2 into load balancing set by using Add Load Balancer wizard.
3. Install Keepalived and configure an appropriate virtual IP for HAproxy failover, similar to the screenshot below:
At the end of the deployment, the top summary bar in the Clustercontrol UI should look like the below:

4. Create a schema for FreeRadius by using Manage >> Schema and Users >> Create Database called “radius”. Then assign all privileges to the schema with a wildcard host (‘%’).

At the moment, MySQL Cluster is load balanced with virtual IP, 192.168.197.160 listening on port 33306.
Installing FreeRadius
The following steps should be performed on freeradius1 and freeradius2 unless specified.
1. Install FreeRadius and mysql client packages on freeradius1:
$ yum install -y freeradius freeradius-mysql freeradius-utils mysql
On freeradius2, install FreeRadius packages without mysql client package (Clustercontrol had it installed already):
$ yum install -y freeradius freeradius-mysql freeradius-utils
2. On freeradius1, import FreeRadius MySQL tables for NDB:
$ for i in `ls /etc/raddb/sql/ndb/*.sql`do mysql -f -uradius -pradiuspassword -h virtual_ip -P33306 radius < $idone
3. Open /etc/raddb/sql.conf and update the MySQL connection info accordingly:
        # Connection info:
        server = "virtual_ip"
        port = 33306
        login = "radius"
        password = "radiuspassword"
5. Find and uncomment following line inside /etc/raddb/radiusd.conf under modules section:
$INCLUDE sql.conf
6. Edit /etc/raddb/sites-available/default and /etc/raddb/sites-available/inner-tunnel and uncomment the line containing ‘sql’ in the authorize{}, accounting{} and session{}.
7. Generate a shared secret:
$ openssl rand -hex 10
4aceee54f42a249171ad
And edit the secret value in /etc/raddb/clients.conf with the generated secret:
secret = 4aceee54f42a249171ad
8. Enable radiusd on boot and start the service:
$ chkconfig radiusd on
$ service radiusd start
That’s it, we’ve now installed FreeRadius with NDB Cluster. In the following section, we’ll test our setup.
Testing
Let’s have an FTP user and authenticate it with external PAM Radius servers. Connect to MySQL server:
$ mysql -uradius -p -h virtual_ip -P 33306
And create an FTP user called ftp_user with password “myFTPpassword”:
mysql> INSERT INTO radius.radcheck (`username`, `attribute`, `op`, `value`) VALUES ('ftp_user','User-Password',':=','myFTPpassword')<span>;< span=""></span>;<>
To test it locally, use radtest command with the shared secret for localhost (which has been configured under /etc/raddb/clients.conf):
$ radtest ftp_user myFTPpassword localhost 0 4aceee54f42a249171ad
If it succeeds, you should get the Accept-Accept packet as below:
rad_recv: Access-Accept packet from host 127.0.0.1 port 1812, id=0, length=20
1. Install FTP server and PAM Radius module (available in EPEL repository):
$ rpm -Uhv http://dl.fedoraproject.org/pub/epel/6/x86_64/epel-release-6-8.noarch.rpm
$ yum install -y vsftpd ftp pam_radius
2. Define the RADIUS hosts, shared secret and timeout value inside /etc/pam_radius.conf:
127.0.0.1       secret             1
192.168.197.141    4aceee54f42a249171ad       3
192.168.197.142    4aceee54f42a249171ad       3
3. Edit the /etc/pam.d/vsftpd to use PAM RADIUS authentication:
#%PAM-1.0
auth       required     pam_radius_auth.so
account    required     pam_radius_auth.so
session    required     pam_loginuid.so
4. Edit vsftpd configuration file, /etc/vsftpd/vsftpd.conf with following options:
anonymous_enable=NO
local_enable=YES
write_enable=YES
local_umask=022
user_sub_token=$USER
local_root=/var/ftp/$USER
chroot_local_user=YES
hide_ids=YES
guest_enable=YES
dirmessage_enable=YES
xferlog_enable=YES
connect_from_port_20=YES
xferlog_file=/var/log/xferlog
log_ftp_protocol=YES
xferlog_std_format=NO
virtual_use_local_privs=YES
write_enable=YES
listen=YES
pam_service_name=vsftpd
userlist_enable=YES
tcp_wrappers=YES
5. Create a default directory for ftp_user and assign correct permission:
$ mkdir /var/ftp/ftp_user
$ chown ftp.ftp /var/ftp/ftp_user
6. Restart vsftpd daemon:
$ service vsftpd restart
7. Add following lines into /etc/raddb/clients.conf to allow the local network (including FTP server) to query as RADIUS client:
client 192.168.197.0/24 {
        secret         = 4aceee54f42a249171ad
        shortname      = local-network
}
8. Restart radiusd daemon:
$ service radiusd restart
9. Verify that authentication is working:
$ ftp 192.168.197.161
Connected to 192.168.197.161 (192.168.197.161).
220 (vsFTPd 2.2.2)
Name (192.168.197.161:root): ftp_user
331 Please specify the password.
Password:
230 Login successful.
Remote system type is UNIX.
Using binary mode to transfer files.
ftp>
Congratulations, you have now deployed and tested your highly available active-active FreeRadius Cluster!


