blog
Composing the Stack – Simplify Docker Deployment of MySQL Containers

Docker 1.13 introduces a long-awaited feature called compose-file support, which allow us to define our containers with a nice simple config file instead of a single long command. If you have a look at our previous “MySQL on Docker” blog posts, we used multiple long command lines to run containers and services. By using compose-file, containers are easily specified for deployment. This reduces the risk for human error as you do not have to remember long commands with multiple parameters.
In this blog post, we’ll show you how to use compose-file by using simple examples around MySQL deployments. We assume you have Docker Engine 1.13 installed on 3 physical hosts and Swarm mode is configured on all hosts.
Introduction to Compose-File
In the Compose-file, you specify everything in YAML format as opposed to trying to remember all the arguments we have to pass to Docker commands. You can define services, networks and volumes here. The definition will be picked up by Docker and it is very much like passing command-line parameters to “docker run|network|volume” command.
As an introduction, we are going to deploy a simple standalone MySQL container. Before you start writing a Compose file, you first need to know the run command. Taken from our first MySQL on Docker blog series, let’s compose the following “docker run” command:
$ docker run --detach
--name=test-mysql
--publish 6603:3306
--env="MYSQL_ROOT_PASSWORD=mypassword"
-v /storage/docker/mysql-datadir:/var/lib/mysql
mysql
The docker-compose command will look for a default file called “docker-compose.yml” in the current directory. So, let’s first create the required directories beforehand:
$ mkdir -p ~/compose-files/mysql/single
$ mkdir -p /storage/docker/mysql-datadir
$ cd ~/compose-files/mysql/single
In YAML, here is what should be written:
version: '2'

services:
  mysql:
    image: mysql
    container_name: test-mysql
    ports:
      - 6603:3306
    environment:
      MYSQL_ROOT_PASSWORD: "mypassword"
    volumes:
      - /storage/docker/mysql-datadir:/var/lib/mysql
Save the above content into “~/compose-files/mysql/single/docker-compose.yml”. Ensure you are in the current directory ~/compose-files/mysql/single, then fire it up by running the following command:
$ docker-compose up -d
WARNING: The Docker Engine you're using is running in swarm mode.

Compose does not use swarm mode to deploy services to multiple nodes in a swarm. All containers will be scheduled on the current node.

To deploy your application across the swarm, use `docker stack deploy`.

Creating test-mysql
Verify if the container is running in detached mode:
[root@docker1 single]# docker ps
CONTAINER ID        IMAGE               COMMAND                  CREATED             STATUS              PORTS                    NAMES
379d5c15ef44        mysql               "docker-entrypoint..."   8 minutes ago       Up 8 minutes        0.0.0.0:6603->3306/tcp   test-mysql
Congratulations! We have now got a MySQL container running with just a single command.
Deploying a Stack
Compose-file simplifies things, it provides us with a clearer view on how the infrastructure should look like. Let’s create a container stack that consists of a website running on Drupal, using a MySQL instance under a dedicated network and link them together.
Similar to above, let’s take a look at the command line version in the correct order to build this stack:
$ docker volume create mysql_data
$ docker network create drupal_mysql_net --driver=bridge
$ docker run -d --name=mysql-drupal --restart=always -v mysql_data:/var/lib/mysql --net=drupal_mysql_net -e MYSQL_ROOT_PASSWORD="mypassword" -e MYSQL_DATABASE="drupal" mysql
$ docker run -d --name=drupal -p 8080:80 --restart=always -v /var/www/html/modules -v /var/www/html/profiles -v /var/www/html/themes -v /var/www/html/sites --link mysql:mysql --net=drupal_mysql_net drupal
To start composing, let’s first create a directory for our new stack:
$ mkdir -p ~/compose-files/drupal-mysql
$ cd ~/compose-files/drupal-mysql
Then, create write content of docker-compose.yml as per below:
version: '2'

services:
  mysql:
    image: mysql
    container_name: mysql-drupal
    environment:
      MYSQL_ROOT_PASSWORD: "mypassword"
      MYSQL_DATABASE: "drupal"
    volumes:
      - mysql_data:/var/lib/mysql
    restart: always
    networks:
      - drupal_mysql_net

  drupal:
    depends_on:
      - mysql
    image: drupal
    container_name: drupal
    ports:
      - 8080:80
    volumes:
      - /var/www/html/modules
      - /var/www/html/profiles
      - /var/www/html/themes
      - /var/www/html/sites
    links:
      - mysql:mysql
    restart: always
    networks:
      - drupal_mysql_net

volumes:
  mysql_data:

networks:
  drupal_mysql_net:
    driver: bridge
Fire them up:
$ docker-compose up -d
..
Creating network "drupalmysql_drupal_mysql_net" with driver "bridge"
Creating volume "drupalmysql_mysql_data" with default driver
Pulling drupal (drupal:latest)...
..
Creating mysql-drupal
Creating drupal
Docker will perform the deployment as follows:
- Create network
- Create volume
- Pull images
- Create mysql-drupal (since container “drupal” is dependent on it)
- Create the drupal container
At this point, our architecture can be illustrated as follows:
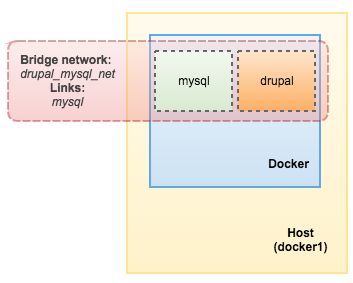
We can then specify ‘mysql’ as the MySQL host in the installation wizard page since both containers are linked together. That’s it. To tear them down, simply run the following command under the same directory:
$ docker-compose downThe corresponding containers will be terminated and removed accordingly. Take note that the docker-compose command is bound to the individual physical host running Docker. In order to run on multiple physical hosts across Swarm, it needs to be treated differently by utilizing “docker stack” command. We’ll explain this in the next section.
Composing a Stack Across Swarm
Firstly, make sure the Docker engine is running on v1.13 and Swarm mode is enabled and in ready state:
$ docker node ls
ID                           HOSTNAME       STATUS  AVAILABILITY  MANAGER STATUS
8n8t3r4fvm8u01yhli9522xi9 *  docker1.local  Ready   Active        Reachable
o1dfbbnmhn1qayjry32bpl2by    docker2.local  Ready   Active        Reachable
tng5r9ax0ve855pih1110amv8    docker3.local  Ready   Active        Leader
In order to use the stack feature for Docker Swarm mode, we have to use the Docker Compose version 3 format. We are going to deploy a setup similar to the above, apart from a 3-node Galera setup as the MySQL backend. We already explained in details in this blog post.
Firstly, create a directory for our new stack:
$ mkdir -p ~/compose-files/drupal-galera
$ cd ~/compose-files/drupal-galera
Then add the following lines into “docker-compose.yml”:
version: '3'

services:

  galera:
    deploy:
      replicas: 3
      restart_policy:
        condition: on-failure
        delay: 30s
        max_attempts: 3
        window: 60s
      update_config:
        parallelism: 1
        delay: 10s
        max_failure_ratio: 0.3
    image: severalnines/pxc56
    environment:
      MYSQL_ROOT_PASSWORD: "mypassword"
      CLUSTER_NAME: "my_galera"
      XTRABACKUP_PASSWORD: "mypassword"
      DISCOVERY_SERVICE: '192.168.55.111:2379,192.168.55.112:2379,192.168.55.207:2379'
      MYSQL_DATABASE: 'drupal'
    networks:
      - galera_net

  drupal:
    depends_on:
      - galera
    deploy:
      replicas: 1
    image: drupal
    ports:
      - 8080:80
    volumes:
      - drupal_modules:/var/www/html/modules
      - drupal_profile:/var/www/html/profiles
      - drupal_theme:/var/www/html/themes
      - drupal_sites:/var/www/html/sites
    networks:
      - galera_net

volumes:
  drupal_modules:
  drupal_profile:
  drupal_theme:
  drupal_sites:

networks:
  galera_net:
    driver: overlay
Note that the Galera image that we used (severalnines/pxc56) requires a running etcd cluster installed on each of the Docker physical host. Please refer to this blog post on the prerequisite steps.
One of the important parts in our compose-file is the max_attempts parameter under restart_policy section. We have to specify a hard limit on the number of restarts in case of failure. This will make the deployment process safer because, by default, the Swarm scheduler will never give up in attempting to restart containers. If this happens, the process loop will fill up the physical host’s disk space with unusable containers when the scheduler cannot bring the containers up to the desired state. This is a common approach when handling stateful services like MySQL. It’s better to bring them down altogether rather than make them run in an inconsistent state.
To start them all, just execute the following command in the same directory where docker-compose.yml resides:
$ docker stack deploy --compose-file=docker-compose.yml my_drupalVerify the stack is created with 2 services (drupal and galera):
$ docker stack ls
NAME       SERVICES
my_drupal  2
We can also list the current tasks in the created stack. The result is a combined version of “docker service ps my_drupal_galera” and “docker service ps my_drupal_drupal” commands:
$ docker stack ps my_drupal
ID NAME IMAGE NODE DESIRED STATE CURRENT STATE ERROR PORTS
609jj9ji6rxt my_drupal_galera.1 severalnines/pxc56:latest docker3.local Running Running 7 minutes ago
z8mcqzf29lbq my_drupal_drupal.1 drupal:latest docker1.local Running Running 24 minutes ago
skblp9mfbbzi my_drupal_galera.2 severalnines/pxc56:latest docker1.local Running Running 10 minutes ago
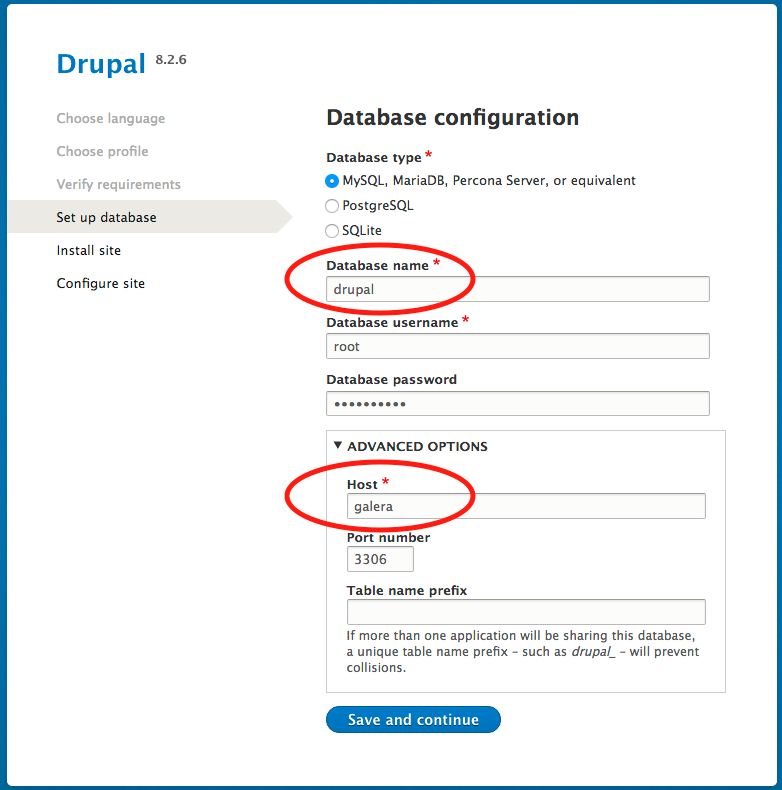
cidn9kb0d62u my_drupal_galera.3 severalnines/pxc56:latest docker2.local Running Running 7 minutes agoOnce we get the CURRENT STATE as RUNNING, we can start the Drupal installation by connecting to any of the Docker host IP address or hostname on port 8080, as in this case we used docker3 (albeit the drupal container is deployed on docker1), http://192.168.55.113:8080/. Proceed with the installation and specify ‘galera’ as the MySQL host and ‘drupal’ as the database name (as defined in the compose-file under MYSQL_DATABASE environment variable):
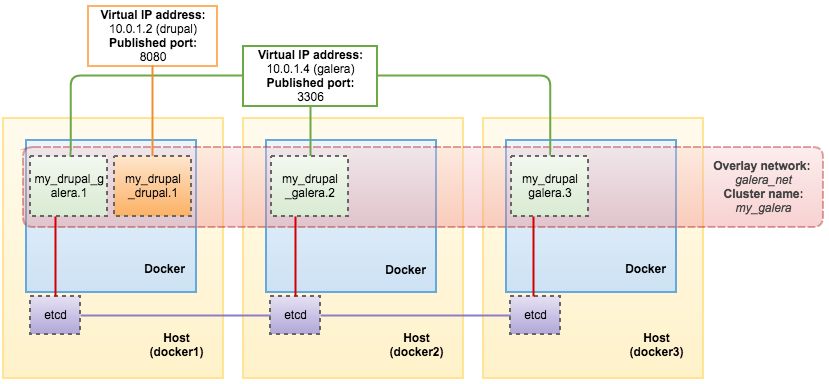
That’s it. The stack deployment was simplified by using Compose-file. At this point, our architecture is looking something like this:
Lastly, to remove the stack, just run the following command:
$ docker stack rm my_drupal
Removing service my_drupal_galera
Removing service my_drupal_drupal
Removing network my_drupal_galera_net
Using compose-file can save you time and reduce the risk for human error, as compared to when working with long command lines. This is a perfect tool for you to master before working with multi-container Docker applications, dealing with multiple deployment environments (e.g dev, test, staging, pre-prod, prod) and handling much more complex services, just like MySQL Galera Cluster. Happy containerizing
!


