blog
Using Automation to Speed up Release Tests on Galera Cluster With ClusterControl

Release tests are typically one of the steps in the whole deployment process. You write the code, and then you verify how it behaves on a staging environment, and then, finally, you deploy the new code on the production. Databases are internal to any kind of application, and, therefore, it is important to verify how the database-related changes alter the application. It is possible to verify it in a couple of ways; one of them would be to use a dedicated replica. Let’s take a look at how it can be done.
Obviously, you don’t want this process to be manual – it should be a part of your company’s CI/CD processes. Depending on the exact application, environment and processes you have in place, you can be using replicas created ad-hoc or replicas that are always a part of the database environment.
The way Galera Cluster works is that it handles schema changes in a specific manner. It is possible to execute a schema change on a single node in the cluster but it is tricky, as it does not support all possible schema changes, and it will affect production if something goes wrong. Such a node would have to be fully rebuilt using SST, which means that one of the remaining Galera nodes will have to act as a donor and transfer all of its data over the network.
An alternative will be to use a replica or even a whole additional Galera Cluster acting as a replica. Obviously, the process has to be automated in order to plug it into the development pipeline. There are many ways to do this: scripts or numerous infrastructure orchestration tools like Ansible, Chef, Puppet or Salt stack. We won’t be describing them in detail, but we would like you to show the steps required for the whole process to work properly, and we’ll leave the implementation in one of the tools to you.
Automating Release Tests
First of all, we want to be able to deploy a new database easily. It should be provisioned with the recent data, and this can be done in many ways – you can copy the data from the production database into the test server; that’s the simplest thing to do. Alternatively, you can use the most recent backup – such an approach has additional benefits of testing the backup restoration. Backup verification is a must-have in any kind of serious deployments, and rebuilding test setups is a great way to double-check your restoration process works. It also helps you time the restore process- knowing how long it takes to restore your backup helps to correctly assess the situation in a disaster recovery scenario.
Once the data is provisioned in the database, you may want to set up that node as a replica of your primary cluster. It has its pros and cons. If you could re-execute all of your traffic to the standalone node, that’d be perfect – in such case, there is no need to set up the replication. Some of the load balancers, like ProxySQL, allow you to mirror the traffic and send its copy to another location. On the other hand, replication is the next best thing. Yes, you cannot execute writes directly on that node which forces you to plan how you will re-execute the queries since the simplest approach of just replying it won’t work. On the other hand, all writes will eventually be executed via the SQL thread, so you only have to plan how to deal with SELECT queries.
Depending on the exact change, you may want to test the schema change process. Schema changes are quite common to be performed, and they may have even serious performance impact on the database. Thus it is important to verify them before applying them to production. We want to look at the time needed to execute the change and verify if the change can be applied on nodes separately or is required to perform the change on the whole topology at the same time. This will tell us what process we should use for a given schema change.
Using ClusterControl to Improve Automation of the Release Tests
ClusterControl comes with a set of features that can be used to help you to automate the release tests. Let’s take a look at what it offers. To make it clear, the features we are going to show are available in a couple of ways. The simplest way is to use UI, but it is unnecessary what you want to do if you have automation on your mind. There are two more ways to do it: Command Line Interface to ClusterControl and RPC API. In both cases, jobs can be triggered from external scripts, allowing you to plug them into your existing CI/CD processes. It will also save you plenty of time, as deploying the cluster can be just a matter of executing one command instead of setting it up manually.
Deploying the test cluster
First and foremost, ClusterControl comes with an option to deploy a new cluster and provision it with the data from the existing database. This feature alone allows you to easily implement provisioning of the staging server.
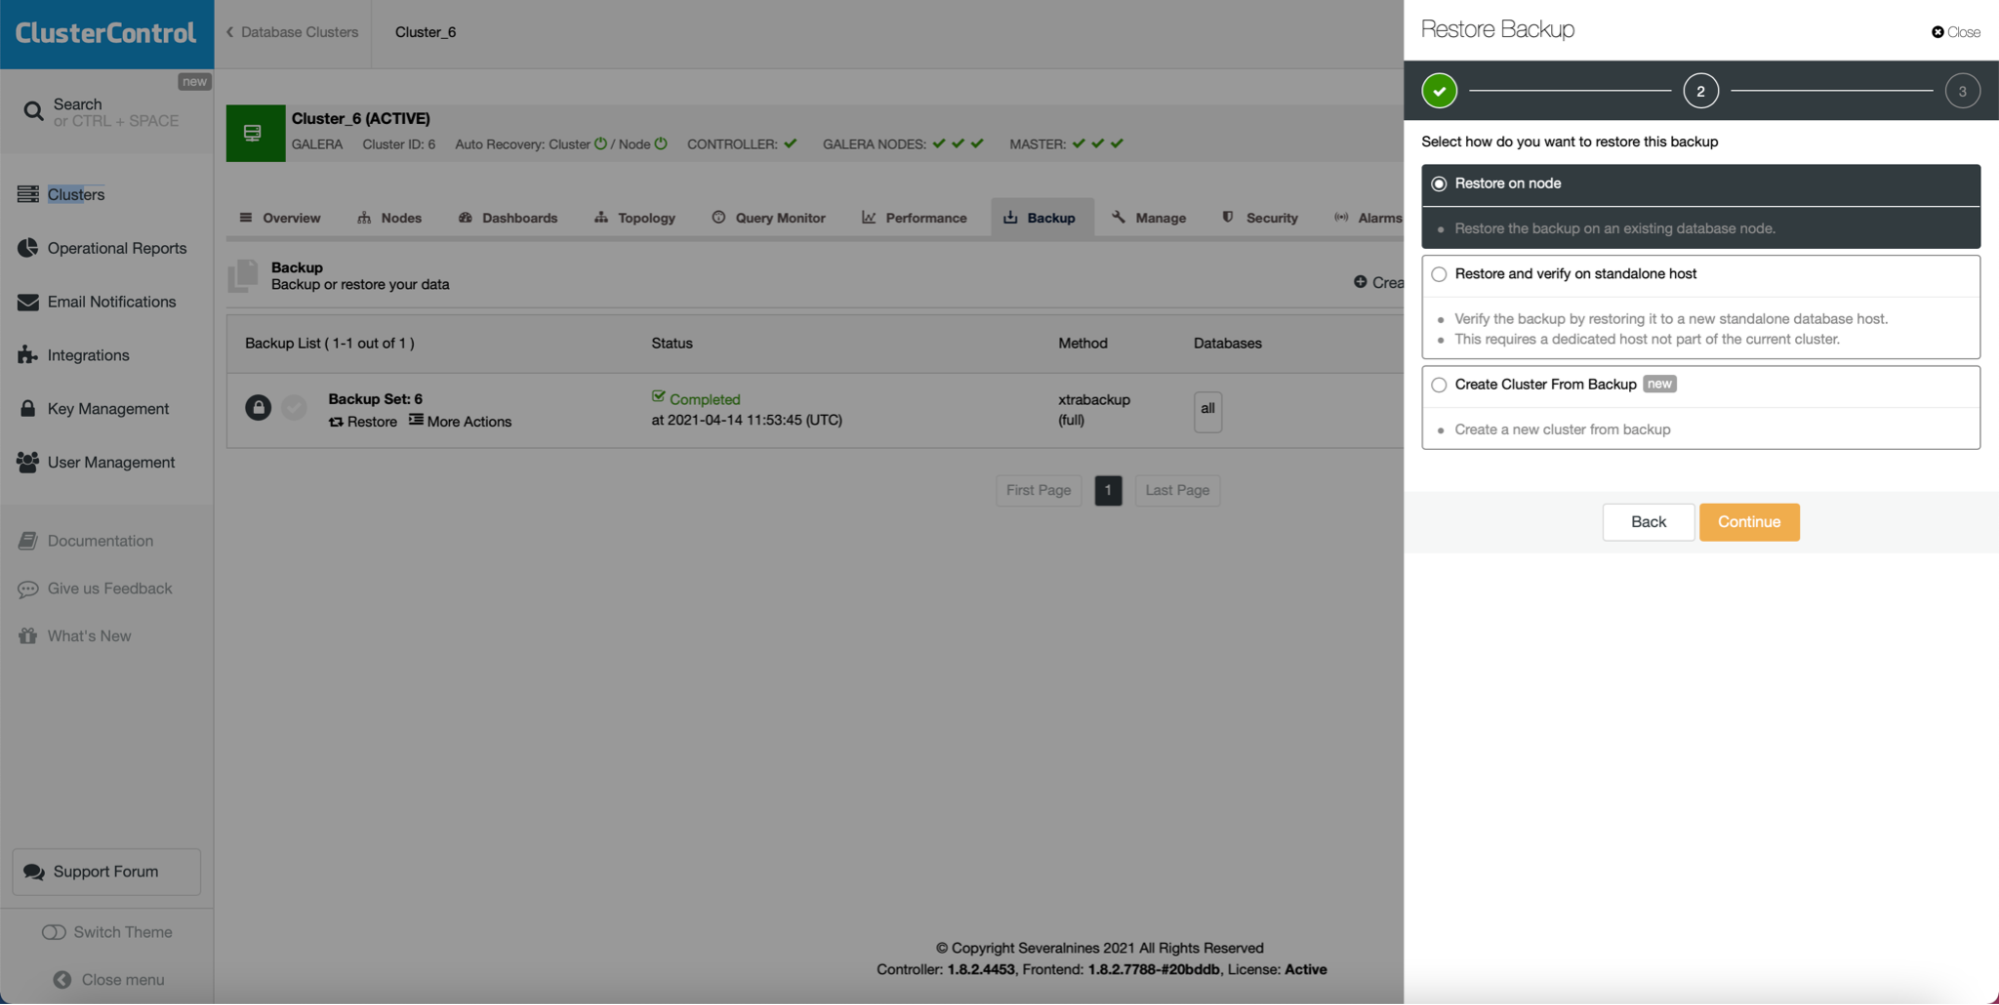
As you can see, as long as you have a backup created, you can create a new cluster and provision it using the data from the backup:
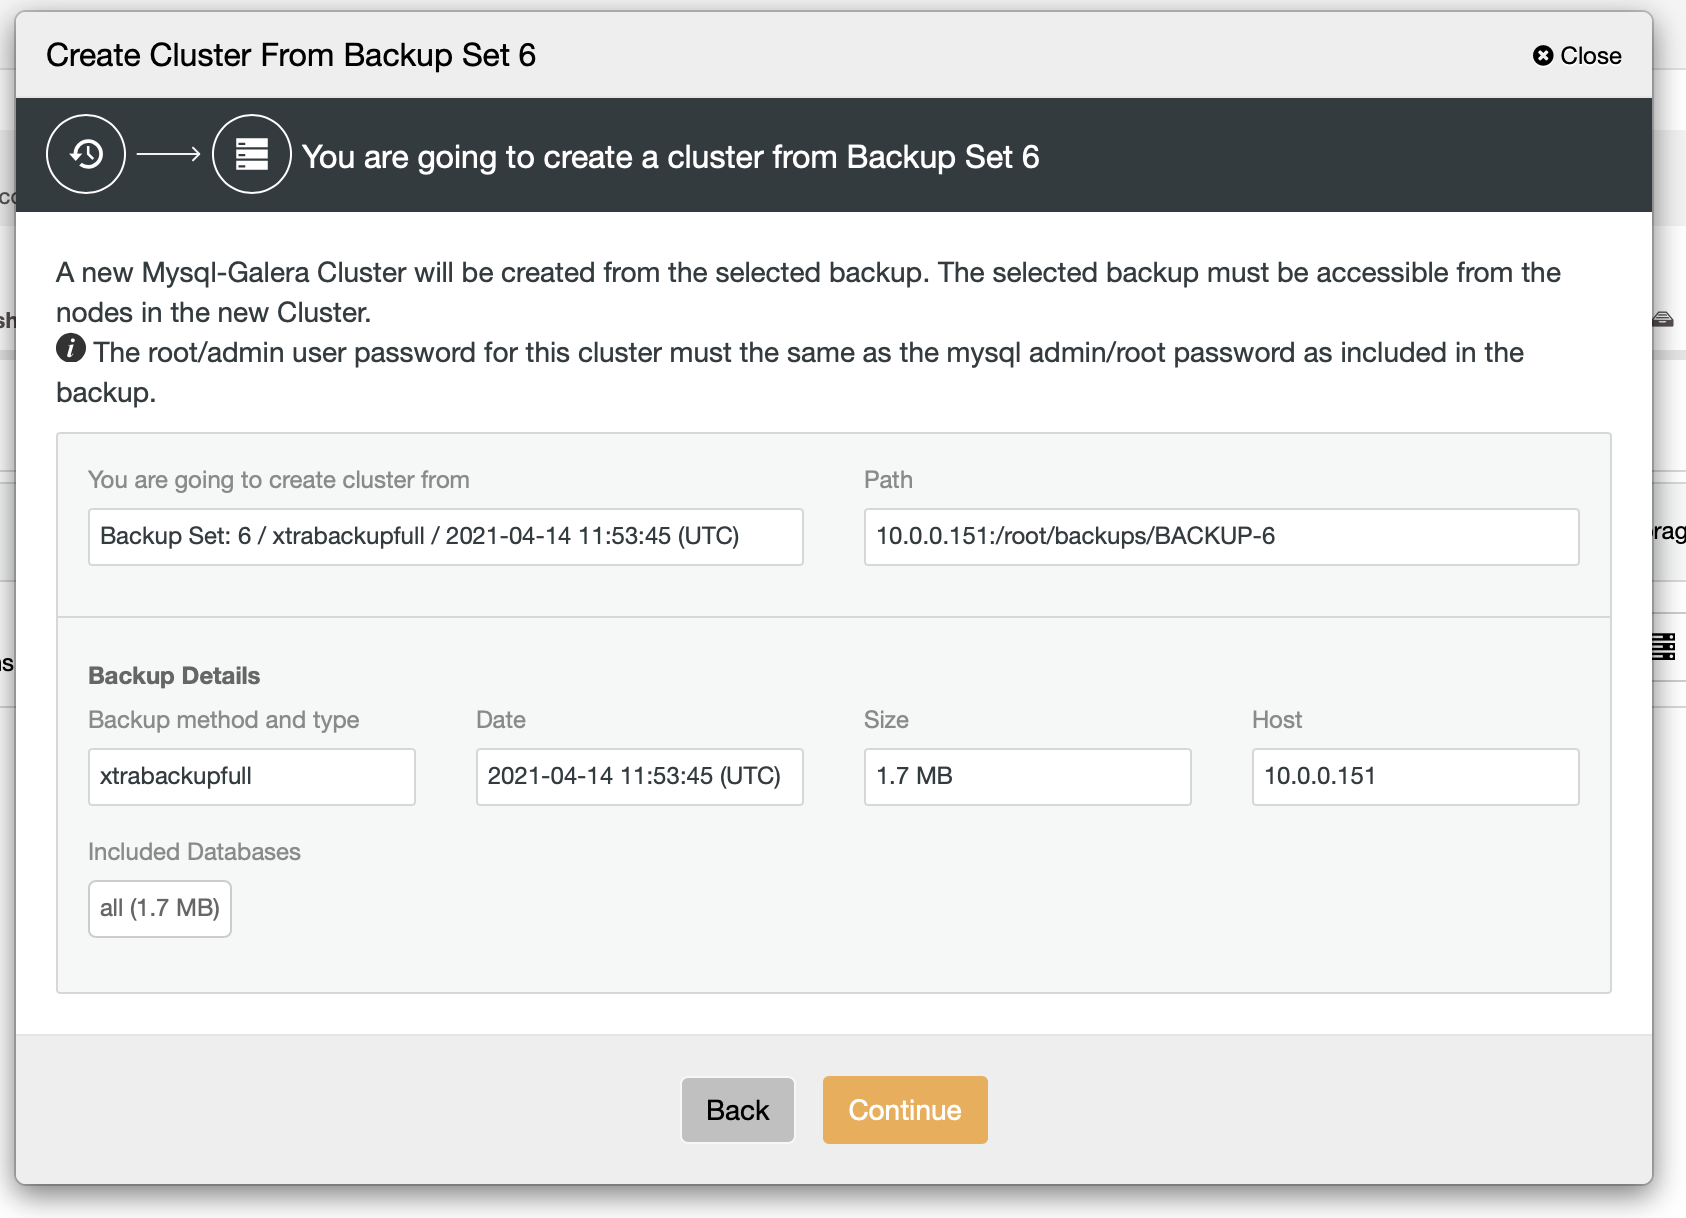
As we can see, there’s a quick summary of what will happen. If you click on Continue, you will proceed further.
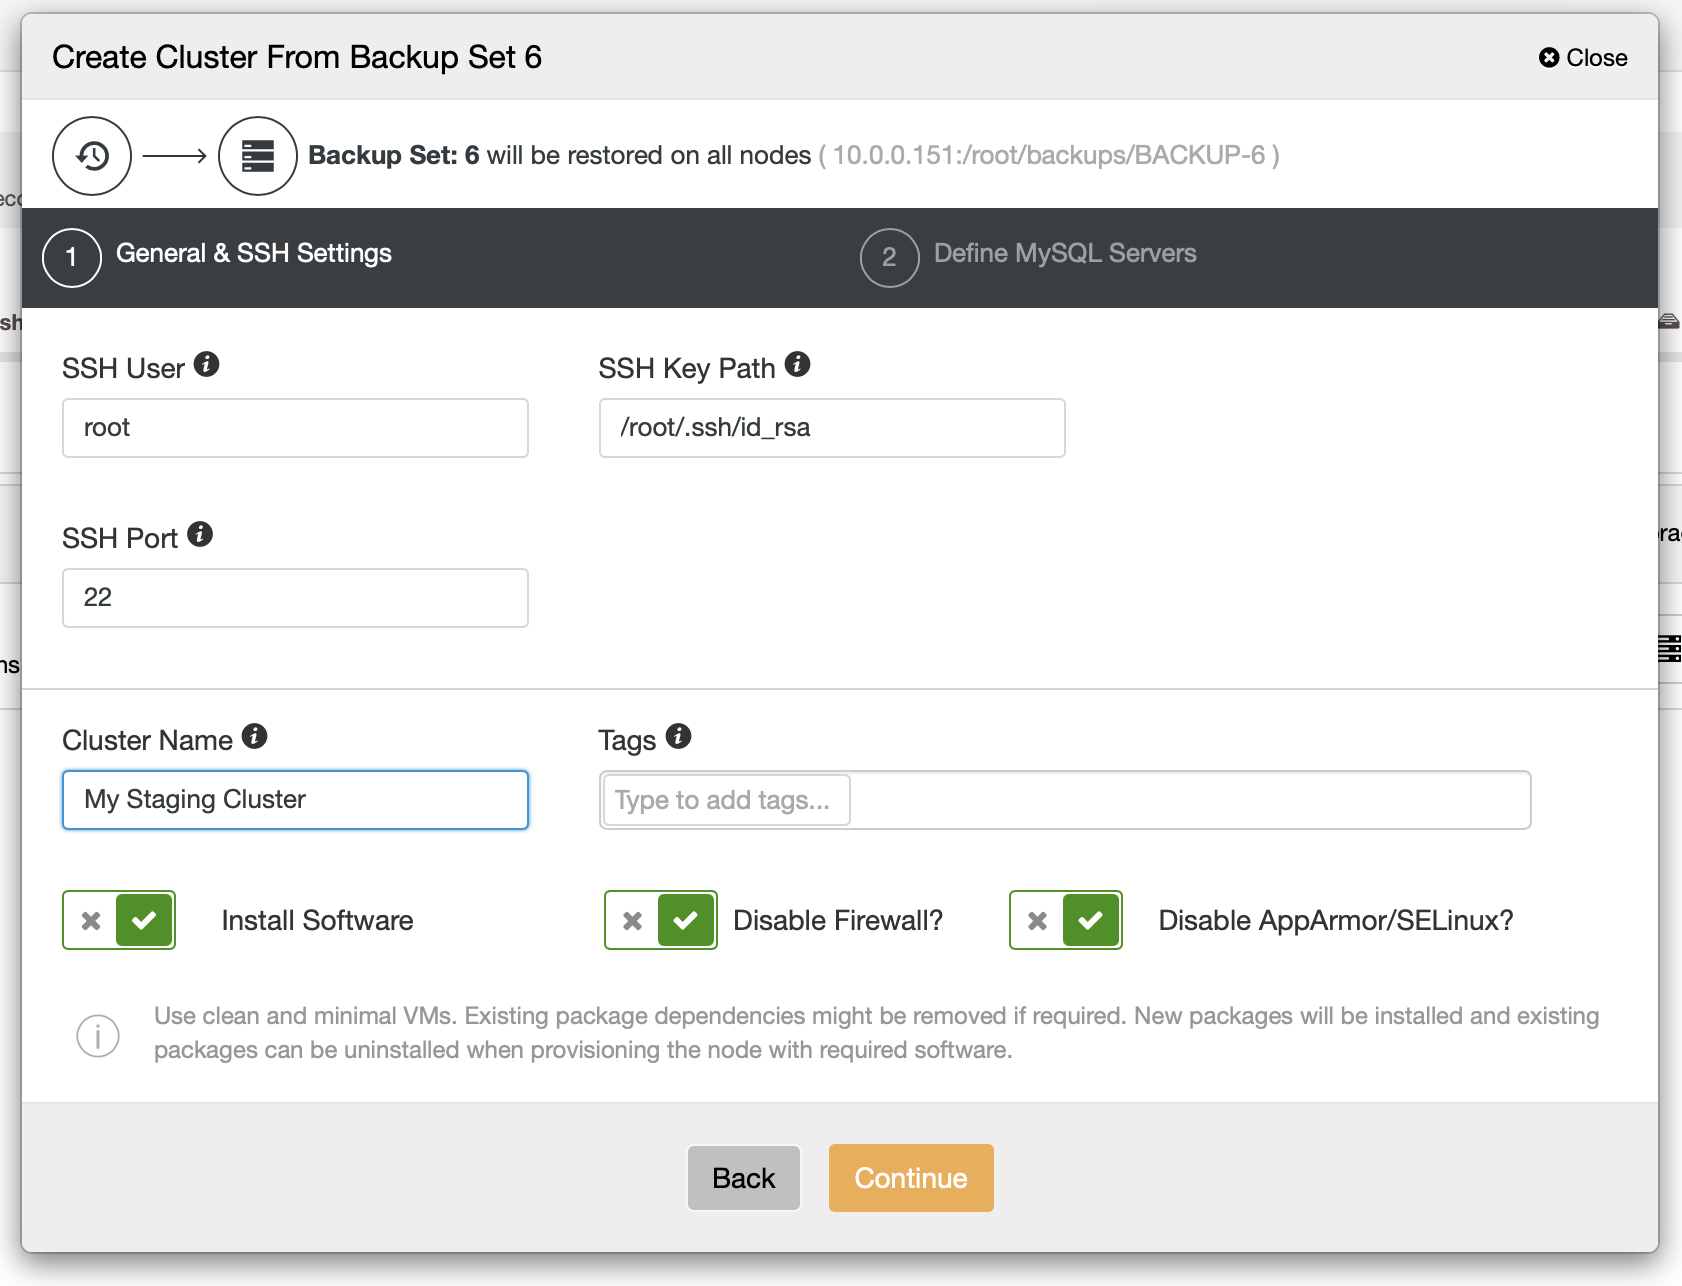
As a next step, you should define the SSH connectivity – it has to be in place before ClusterControl is able to deploy the nodes.
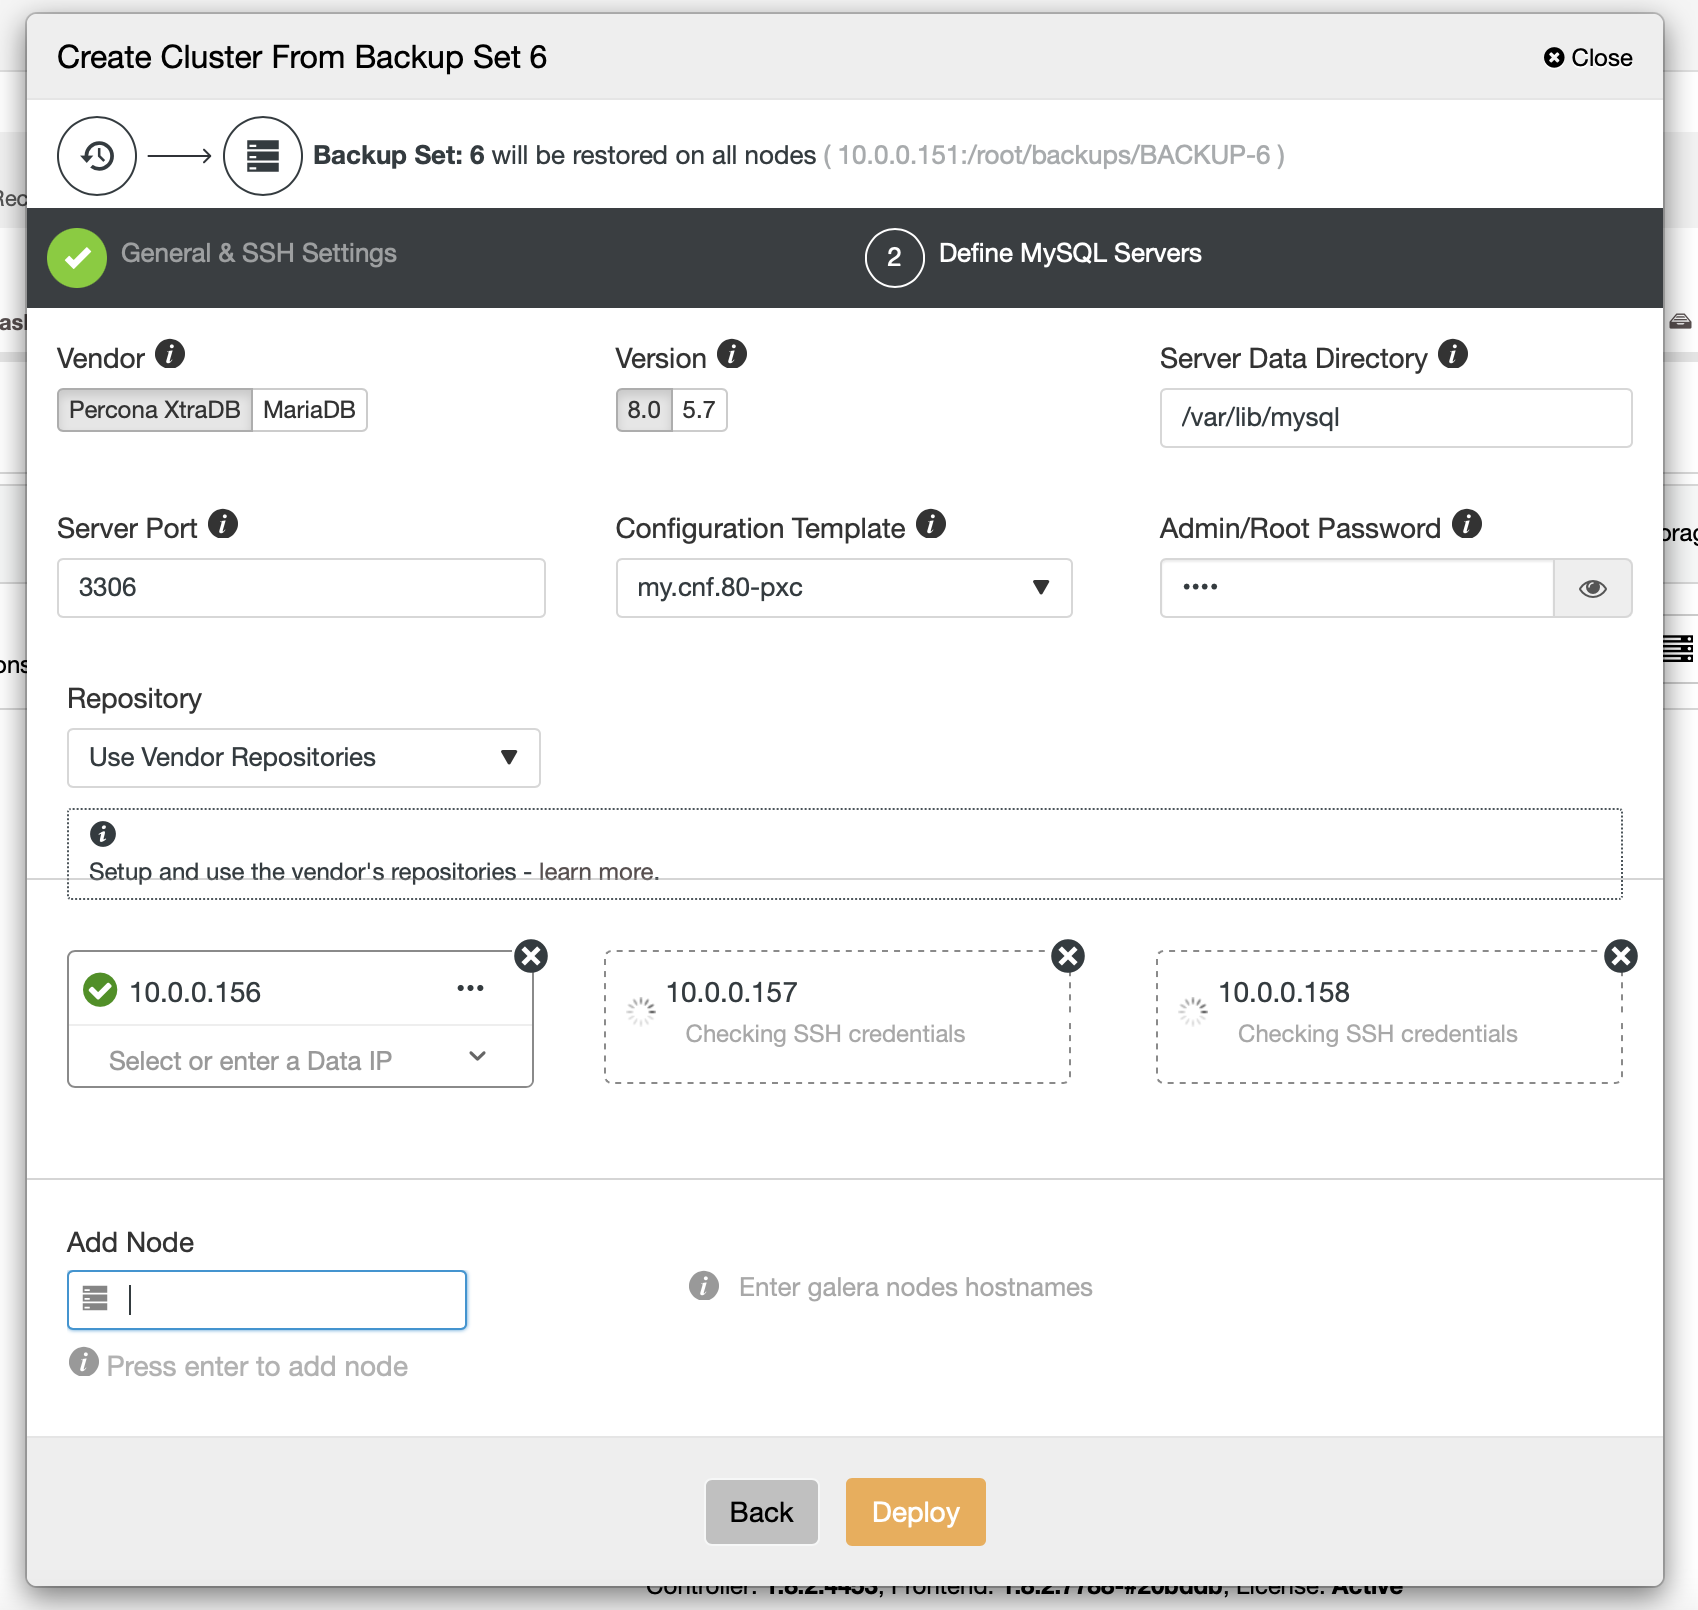
Finally, you have to pick (among others) the vendor, version and hostnames of the nodes that you want to use in the cluster. That’s just it.
The CLI command that would accomplish the same thing looks like this:
s9s cluster --create --cluster-type=galera --nodes="10.0.0.156;10.0.0.157;10.0.0.158" --vendor=percona --cluster-name=PXC --provider-version=8.0 --os-user=root --os-key-file=/root/.ssh/id_rsa --backup-id=6Configuring ProxySQL to mirror the traffic
If we have a cluster deployed, we may want to send the production traffic to it to verify how the new schema handles the existing traffic. One way to do this is by using ProxySQL.
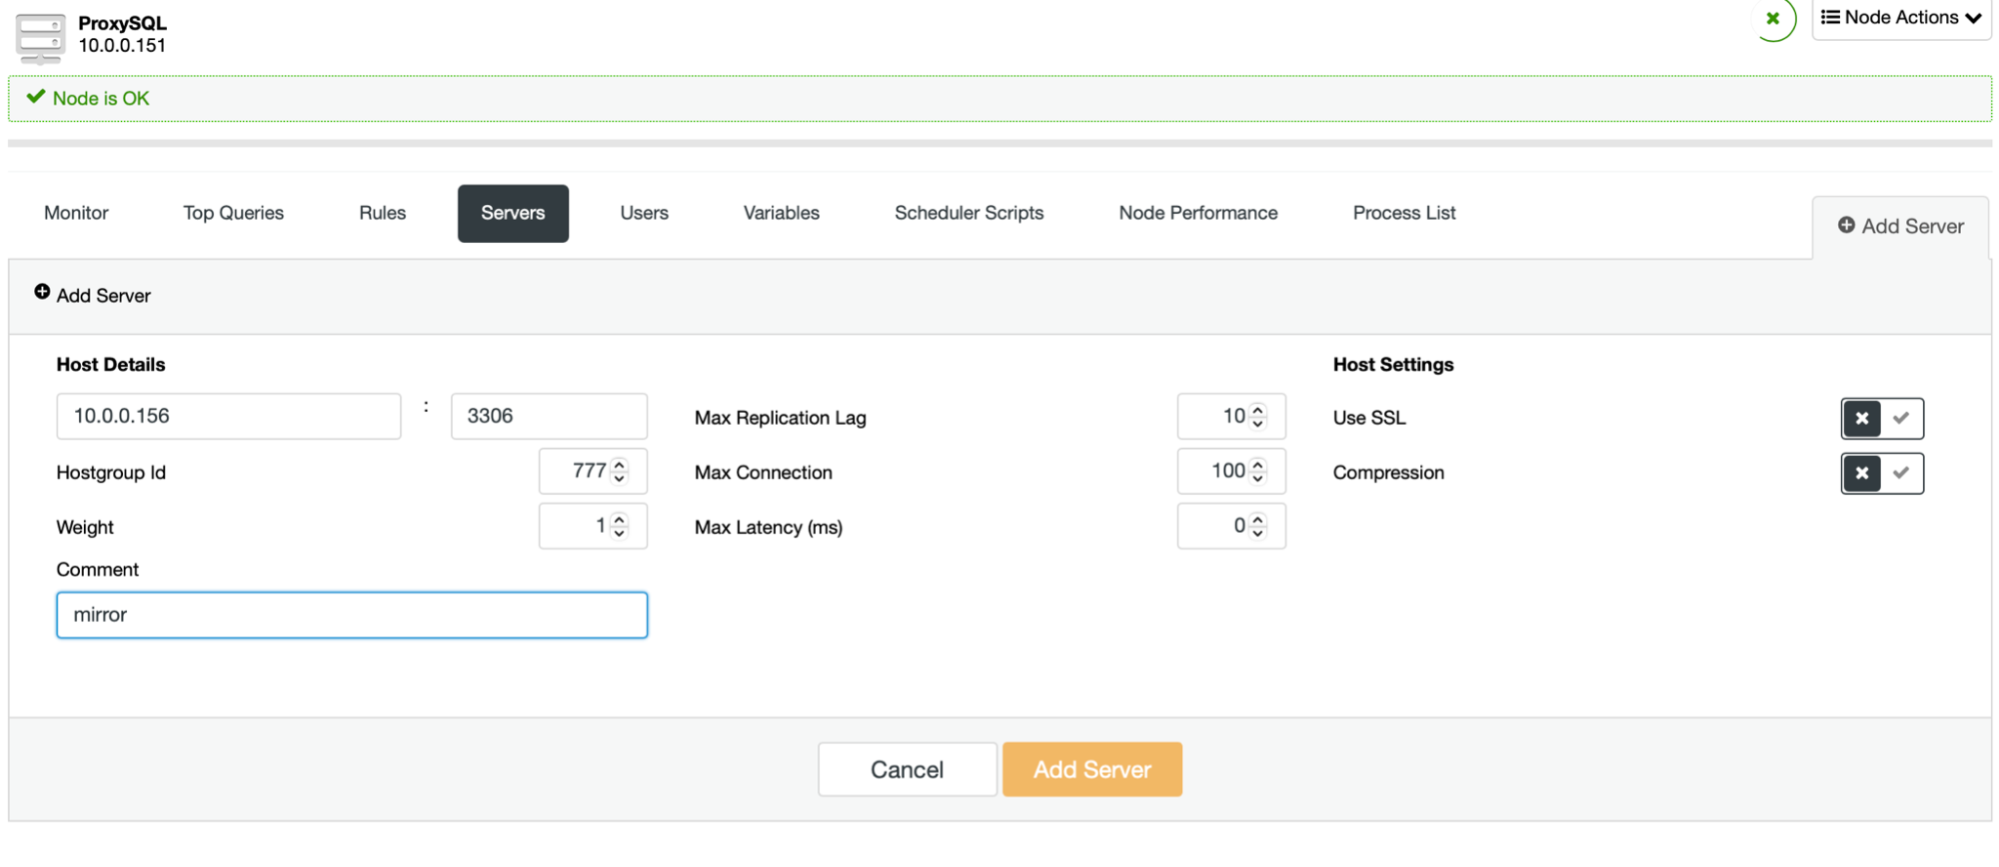
The process is easy. First, you should add the nodes to ProxySQL. They should belong to a separate hostgroup that’s not in use yet. Make sure that ProxySQL monitor user will be able to access them.
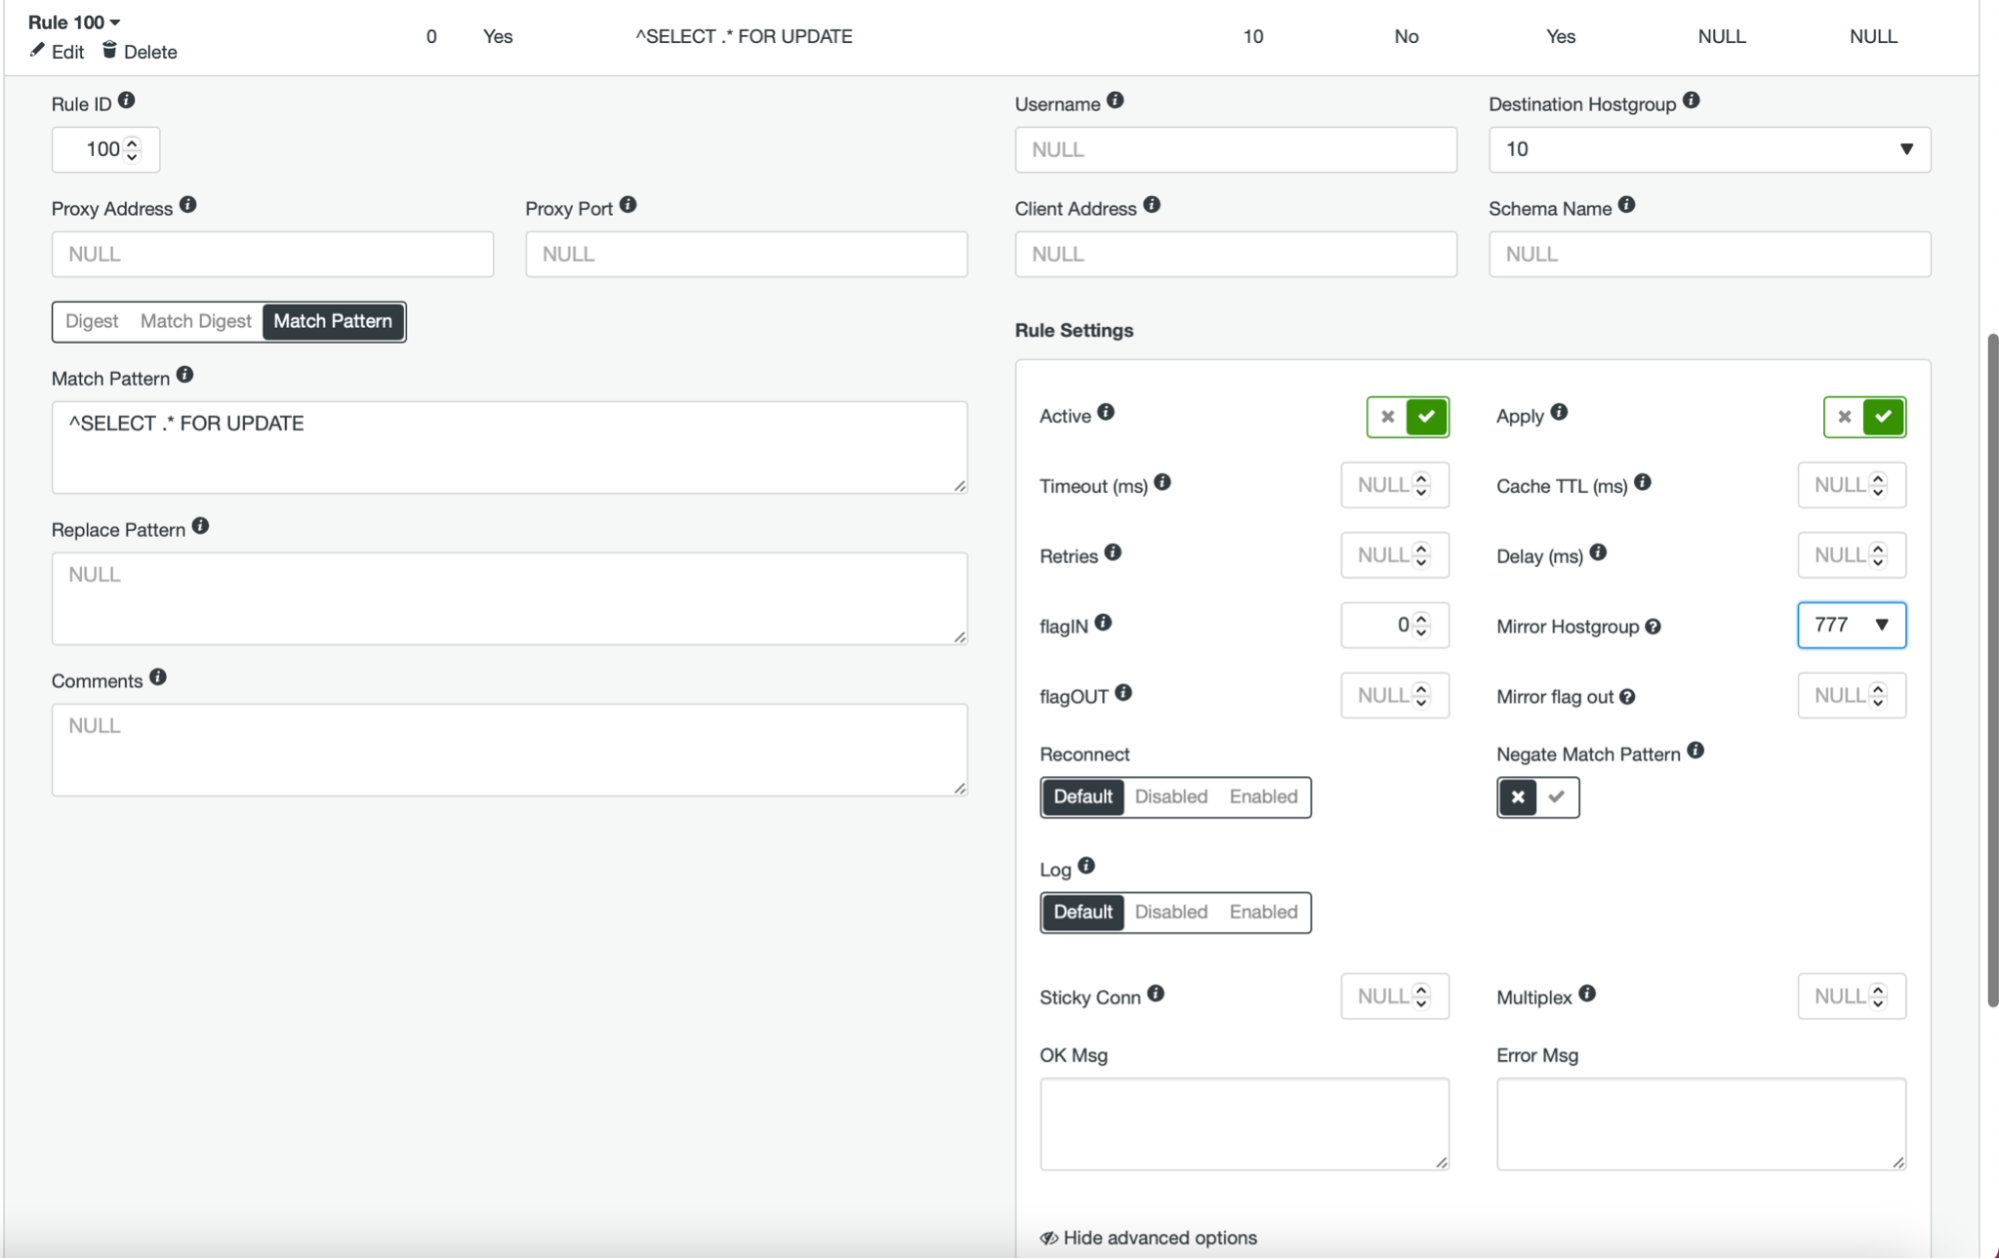
Once this is done and you have all (or some) of your nodes configured in the hostgroup, you can edit the query rules and define the Mirror Hostgroup (it is available in the advanced options). If you want to do it for all of the traffic, you probably want to edit all of your query rules in this manner. If you want to mirror only SELECT queries, you should edit appropriate query rules. After this is done, your staging cluster should start receiving production traffic.
Deploying cluster as a slave
As we discussed earlier, an alternative solution would be to create a new cluster that will be acting as a replica of the existing setup. With such approach we can have all the writes tested automatically, using the replication. SELECTs can be tested using the approach we described above – mirroring through ProxySQL.
The deployment of a slave cluster is pretty straightforward.
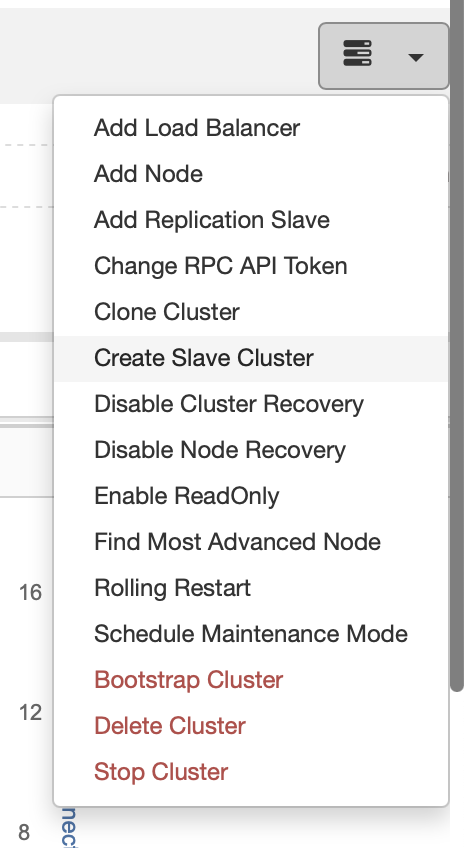
Pick the Create Slave Cluster job.
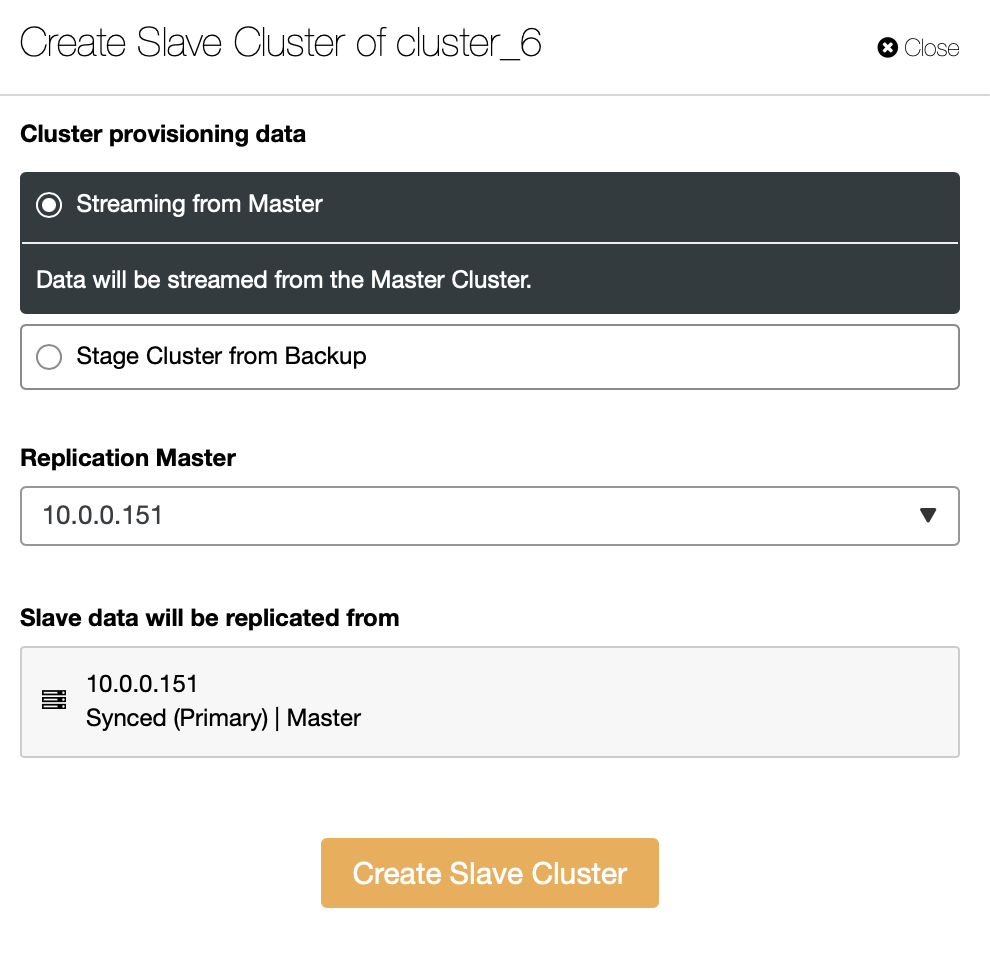
You have to decide how you want to have the replication set. You can have all the data transferred from the master to the new nodes.

As an alternative, you can use existing backup to provision the new cluster. This will help to reduce the workload on the master node – instead of transferring all the data, only transactions that were executed between the time backup has been created and the moment the replication has been set up will have to be transferred.
The rest is to follow the standard deployment wizard, defining SSH connectivity, version, vendor, hosts and so on. Once it is deployed, you will see the cluster on the list.
Alternative solution to the UI is to accomplish this via RPC.
{
  "command": "create_cluster",
  "job_data": {
    "cluster_name": "",
    "cluster_type": "galera",
    "company_id": null,
    "config_template": "my.cnf.80-pxc",
    "data_center": 0,
    "datadir": "/var/lib/mysql",
    "db_password": "pass",
    "db_user": "root",
    "disable_firewall": true,
    "disable_selinux": true,
    "enable_mysql_uninstall": true,
    "generate_token": true,
    "install_software": true,
    "port": "3306",
    "remote_cluster_id": 6,
    "software_package": "",
    "ssh_keyfile": "/root/.ssh/id_rsa",
    "ssh_port": "22",
    "ssh_user": "root",
    "sudo_password": "",
    "type": "mysql",
    "user_id": 5,
    "vendor": "percona",
    "version": "8.0",
    "nodes": [
      {
        "hostname": "10.0.0.155",
        "hostname_data": "10.0.0.155",
        "hostname_internal": "",
        "port": "3306"
      },
      {
        "hostname": "10.0.0.159",
        "hostname_data": "10.0.0.159",
        "hostname_internal": "",
        "port": "3306"
      },
      {
        "hostname": "10.0.0.160",
        "hostname_data": "10.0.0.160",
        "hostname_internal": "",
        "port": "3306"
      }
    ],
    "with_tags": []
  }
}
Moving Forward
If you are interested in learning more about the ways you can integrate your processes with the ClusterControl, we would like to point you towards the documentation, where we have a whole section on developing solutions where ClusterControl plays a significant role:
https://docs.severalnines.com/docs/clustercontrol/developer-guide/cmon-rpc/
https://docs.severalnines.com/docs/clustercontrol/user-guide-cli/
We hope you found this short blog informative and useful. If you have any questions related to integrating ClusterControl into your environment, please reach out to us, and we’ll do our best to help you.


