blog
PGTune Alternatives – ClusterControl PostgreSQL Configuration

If you are new to PostgreSQL the most common challenge you face is about how to tune up your database environment.
When PostgreSQL is installed it automatically produces a basic postgresql.conf file. This configuration file is normally kept inside the data directory depending on the operating system you are using. For example, in Ubuntu PostgreSQL places the configurations (pg_hba.conf, postgresql.conf, pg_ident.conf) inside /etc/postgresql directory. Before you can tune your PostgreSQL database, you first have to locate the postgresql.conf files.
But what are the right settings to use? and what are the values set to initially? Using external tools such as PGTune (and alternative tools like ClusterControl) will help you solve this specific problem.
What is PGTune?
PGTune is a configuration wizard which was originally created by Greg Smith from 2ndQuadrant. It’s based on a Python script which is, unfortunately, no longer supported. (It does not support newer versions of PostgreSQL.) It then transitioned into pgtune.leopard.in.ua (which is based on the original PGTune) and is now a configuration wizard you can use for your PG database configuration settings.
PGTune is used to calculate configuration parameters for PostgreSQL based on the maximum performance for a given hardware configuration. It isn’t a silver bullet though, as many settings depend not only on the hardware configuration, but also on the size of the database, the number of clients and the complexity of queries.
How to Use PGTune
The old version of PGTune was based on python script which you can invoked via shell command (using Ubuntu):
root@debnode4:~/pgtune-master# $PWD/pgtune -L -T Mixed -i /etc/postgresql/9.1/main/postgresql.conf | sed -e '/#.*/d' | sed '/^$/N;/^n/D'

stats_temp_directory = '/var/run/postgresql/9.1-main.pg_stat_tmp'

datestyle = 'iso, mdy'

default_text_search_config = 'pg_catalog.english'

default_statistics_target = 100

maintenance_work_mem = 120MB

checkpoint_completion_target = 0.9

effective_cache_size = 1408MB

work_mem = 9MB

wal_buffers = 16MB

checkpoint_segments = 32

shared_buffers = 480MB
But the new one is much more easier and way convenient since you can just access via browser. Just go to https://pgtune.leopard.in.ua/. A good example is like below:
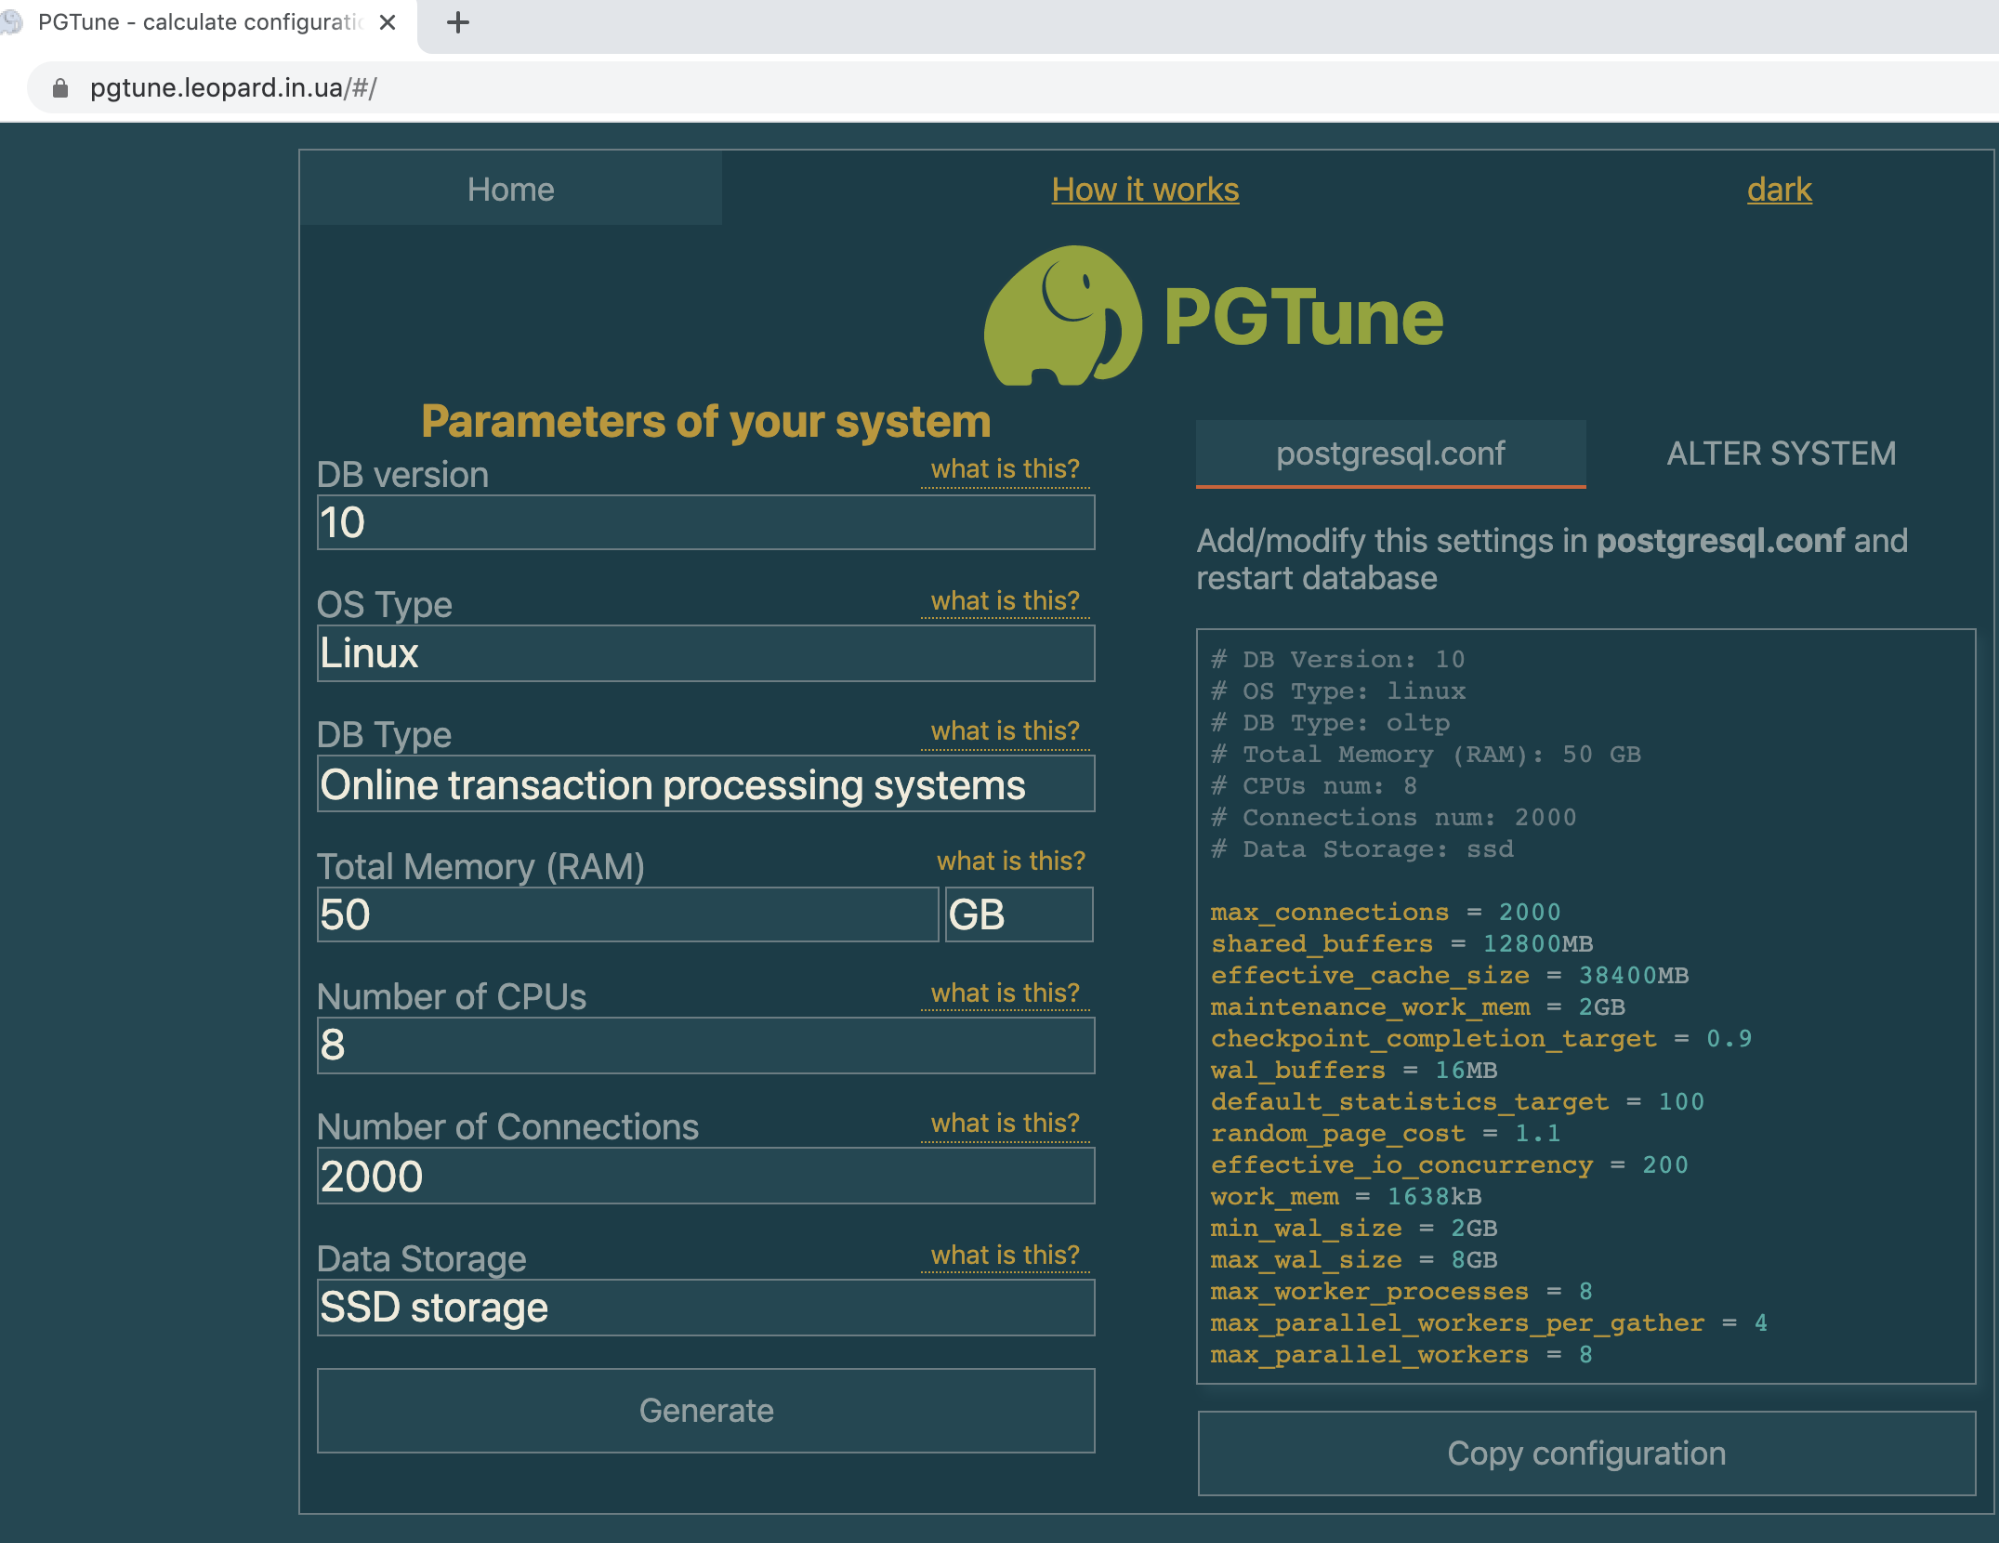
All you need to do is specify the following fields below:
- DB version – the version of your PostgreSQL. It supports versions of PostgreSQL from 9.2, 9.3, 9.4, 9.5, 9.6, 10, 11, and 12.
- OS Type – the type of OS (Linux, OS X, Windows)
- DB Type – the database type which is mainly what kind of transactional processing your database will handle (Web Application, OLTP, Data Warehousing, Desktop Application, Mixed Type of Applications)
- Total Memory (RAM) – The total memory that your PG instance will handle. Need to specify it in GiB.
- Number of CPUs – Number of CPUs, which PostgreSQL can use CPUs = threads per core * cores per socket * sockets
- Number of Connections – Maximum number of PostgreSQL client connections
- Data Storage – Type of data storage device which you can choose from SSD, HDD, or SAN based storage.
Then hit the Generate button. Alternatively, you can also run ALTER SYSTEM statement which generates postgresql.auto.conf, but it won’t take until you hit a PostgreSQL restart.
How Does It Sets The Values
The algorithm for this tool can be basically found here in configuration.js. It does share the same algorithm from the old PGTune starting here pgtune#L477. For example, versions of PostgreSQL < 9.5 supports checkpoint_segments, but PG >= 9.5 uses the min_wal_size and max_wal_size.
Setting the checkpoint_segments or min_wal_size/max_wal_size depends on what type of PostgreSQL version and the DB type of database application transaction. See how in the snippet below:
if (dbVersion < 9.5) {

  return [

    {

      key: 'checkpoint_segments',

      value: ({

        [DB_TYPE_WEB]: 32,

        [DB_TYPE_OLTP]: 64,

        [DB_TYPE_DW]: 128,

        [DB_TYPE_DESKTOP]: 3,

        [DB_TYPE_MIXED]: 32

      }[dbType])

    }

  ]

} else {

  return [

    {

      key: 'min_wal_size',

      value: ({

        [DB_TYPE_WEB]: (1024 * SIZE_UNIT_MAP['MB'] / SIZE_UNIT_MAP['KB']),

        [DB_TYPE_OLTP]: (2048 * SIZE_UNIT_MAP['MB'] / SIZE_UNIT_MAP['KB']),

        [DB_TYPE_DW]: (4096 * SIZE_UNIT_MAP['MB'] / SIZE_UNIT_MAP['KB']),

        [DB_TYPE_DESKTOP]: (100 * SIZE_UNIT_MAP['MB'] / SIZE_UNIT_MAP['KB']),

        [DB_TYPE_MIXED]: (1024 * SIZE_UNIT_MAP['MB'] / SIZE_UNIT_MAP['KB'])

      }[dbType])

    },

    {

      key: 'max_wal_size',

      value: ({

        [DB_TYPE_WEB]: (4096 * SIZE_UNIT_MAP['MB'] / SIZE_UNIT_MAP['KB']),

        [DB_TYPE_OLTP]: (8192 * SIZE_UNIT_MAP['MB'] / SIZE_UNIT_MAP['KB']),

        [DB_TYPE_DW]: (16384 * SIZE_UNIT_MAP['MB'] / SIZE_UNIT_MAP['KB']),

        [DB_TYPE_DESKTOP]: (2048 * SIZE_UNIT_MAP['MB'] / SIZE_UNIT_MAP['KB']),

        [DB_TYPE_MIXED]: (4096 * SIZE_UNIT_MAP['MB'] / SIZE_UNIT_MAP['KB'])

      }[dbType])

    }

  ]

}
Just to explain short, it detects if dbVersion < 9.5, then it determines the suggested values for variables checkpoint_segments or min_wal_size/max_wal_size based on the type of dbType value set during the web UI form.
Basically, you can learn more about the algorithm on how it decides to suggest the values by looking at this script configuration.js.
PostgreSQL Configuration Tuning with ClusterControl
If you are using ClusterControl to create, build, or import a cluster, it automatically does an initial tuning based on the given hardware specs. For example, creating a cluster with the following job specs below,
{

  "command": "create_cluster",

  "group_id": 1,

  "group_name": "admins",

  "job_data": {

    "api_id": 1,

    "cluster_name": "pg_11",

    "cluster_type": "postgresql_single",

    "company_id": "1",

    "datadir": "/var/lib/postgresql/11/",

    "db_password": "dbapgadmin",

    "db_user": "dbapgadmin",

    "disable_firewall": true,

    "disable_selinux": true,

    "generate_token": true,

    "install_software": true,

    "nodes": [

      {

        "hostname": "192.168.30.40",

        "hostname_data": "192.168.30.40",

        "hostname_internal": "",

        "port": "5432"

      },

      {

        "hostname": "192.168.30.50",

        "hostname_data": "192.168.30.50",

        "hostname_internal": "",

        "port": "5432",

        "synchronous": false

      }

    ],

    "port": "5432",

    "ssh_keyfile": "/home/vagrant/.ssh/id_rsa",

    "ssh_port": "22",

    "ssh_user": "vagrant",

    "sudo_password": "",

    "user_id": 1,

    "vendor": "default",

    "version": "11"

  },

  "user_id": 1,

  "user_name": "[email protected]"

}
Provides me the following tuning as shown below:
[root@ccnode ~]# s9s job --log  --job-id 84919 | sed -n '/stat_statements/,/Writing/p'

192.168.30.40:5432: Enabling stat_statements plugin.

192.168.30.40:5432: Setting wal options.

192.168.30.40:5432: Performance tuning.

192.168.30.40: Detected memory: 1999MB.

192.168.30.40:5432: Selected workload type: mixed

Using the following fine-tuning options:

  checkpoint_completion_target: 0.9

  effective_cache_size: 1535985kB

  maintenance_work_mem: 127998kB

  max_connections: 100

  shared_buffers: 511995kB

  wal_keep_segments: 32

  work_mem: 10239kB

Writing file '192.168.30.40:/etc/postgresql/11/main/postgresql.conf'.

192.168.30.50:5432: Enabling stat_statements plugin.

192.168.30.50:5432: Setting wal options.

192.168.30.50:5432: Performance tuning.

192.168.30.50: Detected memory: 1999MB.

192.168.30.50:5432: Selected workload type: mixed

Using the following fine-tuning options:

  checkpoint_completion_target: 0.9

  effective_cache_size: 1535985kB

  maintenance_work_mem: 127998kB

  max_connections: 100

  shared_buffers: 511995kB

  wal_keep_segments: 32

  work_mem: 10239kB

Writing file '192.168.30.50:/etc/postgresql/11/main/postgresql.conf'.
Additionally, it also tunes up your system or kernel parameters such as,
192.168.30.50:5432: Tuning OS parameters.

192.168.30.50:5432: Setting vm.swappiness = 1.
Conclusion
The ClusterControl tuning parameters are also based on the algorithm shared in pgtune#L477. It's not fancy, but you can change it to whatever values you would like. With these setting values, it allows you to have a raw start which is ready enough to handle a production load based on the initial given values.


