blog
Online Migration from MySQL 5.6 Non-GTID to MySQL 5.7 with GTID

In this blog post, we are going to look into how to perform online migration from MySQL 5.6 standalone setup to a new replication set running on MySQL 5.7, deployed and managed by ClusterControl.
The plan is to set up a replication link from the new cluster running on MySQL 5.7 to the master running on MySQL 5.6 (outside of ClusterControl provision), which uses no GTID. MySQL does not support mixing GTID and non-GTID in one replication chain. So we need to do some tricks to switch between non-GTID and GTID modes during the migration.
Our architecture and migration plan can be illustrated as below:
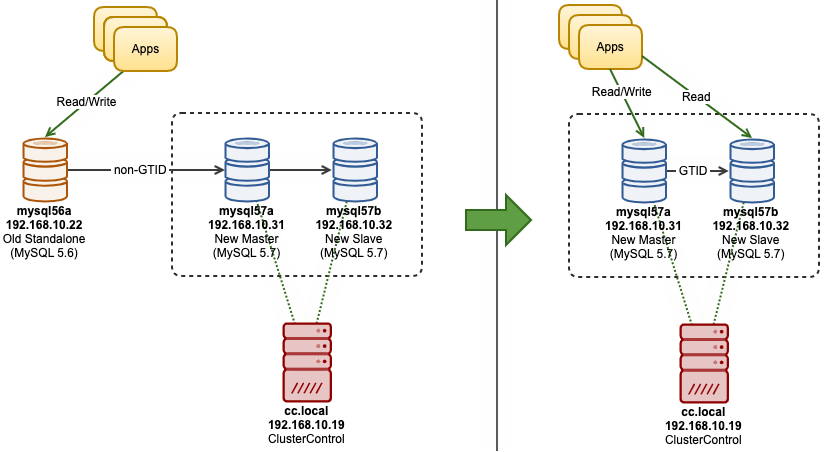
The setup consists of 4 servers, with the following representation:
- mysql56a – Old master – Oracle MySQL 5.6 without GTID
- Slave cluster:
- mysql57a – New master – Oracle MySQL 5.7 with GTID
- mysql57b – New slave – Oracle MySQL 5.7 with GTID
- cc – ClusterControl Server – Deployment/management/monitoring server for the database nodes.
All MySQL 5.7 hosts are running on Debian 10 (Buster), while the MySQL 5.6 is running on Debian 9 (Stretch).
Deploying the Slave Cluster
Firstly, let’s prepare the slave cluster before we set up a replication link from the old master. The final configuration of the slave cluster will be running on MySQL 5.7, with GTID enabled. Install ClusterControl on the ClusterControl server (cc):
$ wget https://severalnines.com/downloads/install-cc
$ chmod 755 install-cc
$ ./install-cc
Follow the instructions until the installation is complete. Then, set up passwordless SSH from ClusterControl to mysql57a and mysql57b:
$ whoami
root
$ ssh-keygen -t rsa # press Enter on all prompts
$ ssh-copy-id root@mysql57a # enter the target host root password
$ ssh-copy-id root@mysql57b # enter the target host root password
Then, log in to ClusterControl UI, fill up the initial form and go to ClusterControl -> Deploy -> MySQL Replication section and fill up the following:
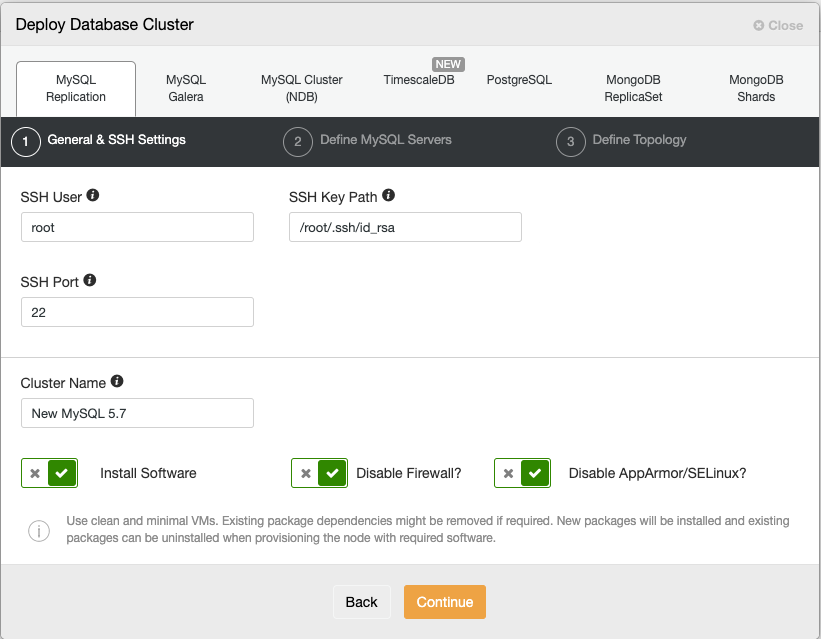
Then click Continue and choose Oracle as the vendor, and 5.7 as the provider version. Then proceed to the topology section and configure it as below:

Wait until the deployment completes and you should see the new cluster as below:
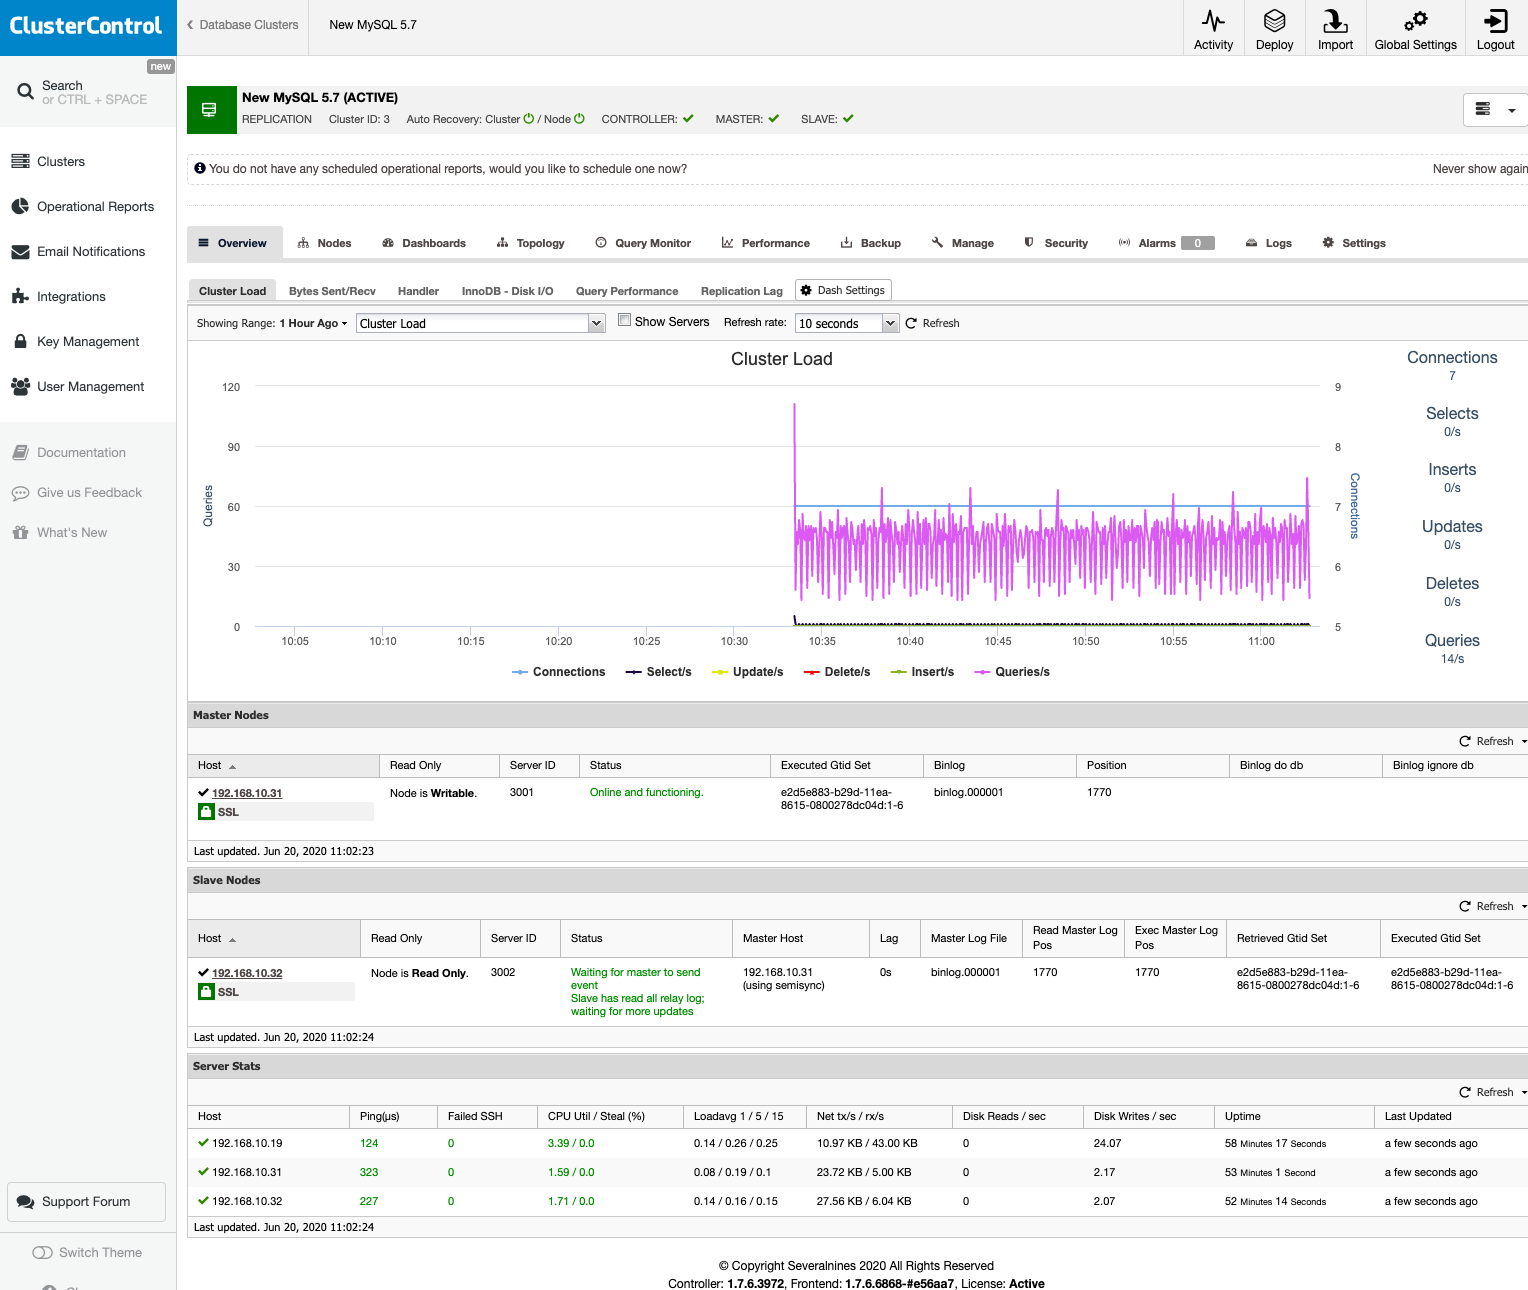
Our slave cluster running on MySQL 5.7 with GTID is now ready.
Preparing the Old Master
The current master that we want to replicate is a standalone MySQL 5.6 (binary log enabled, server-id configured, without GTID) and it is serving production databases. So downtime is not an option for this migration. On the other hand, ClusterControl configures the new MySQL 5.7 with GTID-enabled which means we need to turn off GTID functionality inside the slave cluster to be able to replicate correctly from this standalone master.
The following lines show our current replication-related configuration for the master /etc/mysql/mysql.conf.d/mysqld.cnf under [mysqld] directive:
server_id=1
binlog_format=ROW
log_bin=binlog
log_slave_updates=1
relay_log=relay-bin
expire_logs_days=7
sync_binlog=1
Verify the MySQL server is producing binary log, without GTID:
mysql> SHOW MASTER STATUS;
+---------------+----------+--------------+------------------+-------------------+
| File          | Position | Binlog_Do_DB | Binlog_Ignore_DB | Executed_Gtid_Set |
+---------------+----------+--------------+------------------+-------------------+
| binlog.000007 |   734310 |              |                  |                   |
+---------------+----------+--------------+------------------+-------------------+

1 row in set (0.00 sec)
For non-GTID, the Executed_Gtid_Set is expected to be empty. Note that our new MySQL 5.7 replication cluster deployed by ClusterControl is configured with GTID enabled.
1) Create a replication user to be used by mysql57a:
mysql> CREATE USER 'slave'@'192.168.10.31' IDENTIFIED BY 'slavepassword';
mysql> GRANT REPLICATION SLAVE ON *.* TO 'slave'@192.168.10.31';
2) Disable ClusterControl automatic recovery. Under ClusterControl UI -> pick the cluster -> make sure the Auto Recovery Cluster and Node are turned OFF (red power icons), as shown in the screenshot below:
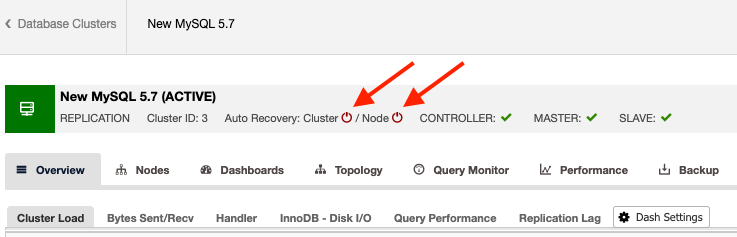
We don’t want ClusterControl to recover the node during this replication configuration.
3) Now we need to create a full mysqldump backup since this is going to be a major version upgrade. Other non-blocking backup tools like Percona Xtrabackup or MySQL Enterprise Backup do not support restoration to a different major version. We also need to preserve the current binary log file and position using –master-data flag:
$ mysqldump -u root -p --single-transaction --master-data=2 --all-databases > mysql56a-fullbackup.sqlNote that the above command will not block any InnoDB tables because of –single-transaction. So if you have MyISAM tables, the tables will be blocked during the period of backups to maintain consistency.
4) Copy the backup from mysql56a to mysql57a and mysql57b:
$ scp mysql56a-fullbackup.sql [email protected]:~
$ scp mysql56a-fullbackup.sql [email protected]:~
Preparing the Slave Cluster
At this phase, we will configure the slave cluster to start replicating from the old master, mysql56a without GTID.
1) Stop the replication between mysql57a and mysql57b, remove all slave-related credentials configured by ClusterControl and disable read-only on mysql57b:
mysql> STOP SLAVE;
mysql> RESET SLAVE ALL;
mysql> SET GLOBAL super_read_only = 0;
mysql> SET GLOBAL read_only = 0;
2) Disable GTID on mysql57a:
mysql> SET GLOBAL gtid_mode = 'ON_PERMISSIVE';
mysql> SET GLOBAL gtid_mode = 'OFF_PERMISSIVE';
mysql> SET GLOBAL gtid_mode = 'OFF';
mysql> SET GLOBAL enforce_gtid_consistency = 'OFF';
3) Disable GTID on mysql57b:
mysql> SET GLOBAL gtid_mode = 'ON_PERMISSIVE';
mysql> SET GLOBAL gtid_mode = 'OFF_PERMISSIVE';
mysql> SET GLOBAL gtid_mode = 'OFF';
mysql> SET GLOBAL enforce_gtid_consistency = 'OFF';
4) Restore the mysqldump backup on mysql57a:
$ mysql -uroot -p < mysql56a-fullbackup.sql5) Restore the mysqldump backup on mysql57b:
$ mysql -uroot -p < mysql56a-fullbackup.sql6) Run MySQL upgrade script on mysql57a (to check and update all tables to the current version):
$ mysql_upgrade -uroot -p7) Run MySQL upgrade script on mysql57b (to check and update all tables to the current version):
$ mysql_upgrade -uroot -pBoth servers on the slave cluster are now staged with the data snapshot from the old master, mysql56a, and are now ready to replicate.
Setting Up Replication for the Slave Cluster
1) Reset binary logs using RESET MASTER on mysql57a, so we don't have to specify the binary file and log positioning later on mysql57b. Also, we remove all existing GTID references that was configured before:
mysql> RESET MASTER;
mysql> SET @@global.gtid_purged='';
2) On mysql57a, retrieve the binlog file and position from the dump file, mysql56a-fullbackup.sql:
$ head -100 mysql56a-fullbackup.sql | grep LOG_POS
-- CHANGE MASTER TO MASTER_LOG_FILE='binlog.000007', MASTER_LOG_POS=4677987;
3) Start replication slave from the old master, mysql56a to the new master mysql57a, by specifying the correct MASTER_LOG_FILE and MASTER_LOG_POS values retrieved on the previous step. On mysql57a:
mysql> CHANGE MASTER TO MASTER_HOST = '192.168.10.22', MASTER_USER = 'slave', MASTER_PASSWORD = 'slavepassword', MASTER_LOG_FILE='binlog.000007', MASTER_LOG_POS=4677987;
mysql> START SLAVE;
mysql> SHOW SLAVE STATUSG
Make sure you see the following lines:
             Slave_IO_Running: Yes
            Slave_SQL_Running: Yes
You probably need to wait until mysql57a catches up with mysql56a by monitoring the "Seconds_Behind_Master" and making sure it turns 0.
4) At this point, mysql57a is replicating data from mysql56a, which means all users created by ClusterControl are now missing from the server (because mysql57a is now following the data on mysql56a). ClusterControl will have a problem to connect to mysql57a and it will appear as "down". It basically means ClusterControl is unable to connect to the MySQL servers because the grants are missing. The missing users are:
- backupuser@localhost
- rpl_user@'{all nodes in one particular cluster}'
- cmon@'{ClusterControl host}'
All of the credentials are stored securely in the ClusterControl and the database server itself. You need to have the root access in order to retrieve the credentials back from the relevant files.
Now, let's recreate the missing users on the new master, mysql57a:
a) Create backup user (password taken from /etc/mysql/secrets-backup.cnf on mysql57a):
mysql> CREATE USER backupuser@localhost IDENTIFIED BY '8S5g2w!wBNZdJFhiw3@9Lb!65%JlNB1z';
mysql> GRANT RELOAD, LOCK TABLES, PROCESS, SUPER, REPLICATION CLIENT ON *.* TO backupuser@localhost;
b) Create replication users, for all DB hosts (password taken from repl_password variable inside /etc/cmon.d/cmon_X.cnf on ClusterControl server, where X is the cluster ID of the slave cluster):
mysql> CREATE USER 'rpl_user'@'192.168.10.31' IDENTIFIED BY '68n61F+bdsW1}J6i6SeIz@kJDVMa}x5J';
mysql> GRANT REPLICATION SLAVE ON *.* TO 'rpl_user'@'192.168.10.31';
mysql> CREATE USER 'rpl_user'@'192.168.10.32' IDENTIFIED BY '68n61F+bdsW1}J6i6SeIz@kJDVMa}x5J';
mysql> GRANT REPLICATION SLAVE ON *.* TO 'rpl_user'@'192.168.10.32';
c) Create two cmon database users (one for IP address and one for hostname) for ClusterControl usage (password taken from mysql_password variable inside /etc/cmon.d/cmon_X.cnf on ClusterControl server, where X is the cluster ID of the slave cluster):
mysql> CREATE USER cmon@'192.168.10.19' IDENTIFIED BY 'My&Passw0rd90';
mysql> GRANT ALL PRIVILEGES ON *.* TO cmon@'192.168.10.19' WITH GRANT OPTION;
mysql> CREATE USER cmon@'cc.local' IDENTIFIED BY 'My&Passw0rd90';
mysql> GRANT ALL PRIVILEGES ON *.* TO cmon@'cc.local' WITH GRANT OPTION;
5) At this point, mysql57a should appear green in ClusterControl. Now, we can set up a replication link from mysql57a to mysql57b. On mysql57b:
mysql> RESET MASTER;
mysql> SET @@global.gtid_purged='';
mysql> CHANGE MASTER TO MASTER_HOST = '192.168.10.31', MASTER_USER = 'rpl_user', MASTER_PASSWORD = '68n61F+bdsW1}J6i6SeIz@kJDVMa}x5J';
mysql> START SLAVE;
mysql> SHOW SLAVE STATUSG
**We don't need to specify MASTER_LOG_FILE and MASTER_LOG_POS because it will always start with a fixed initial position after RESET MASTER at step #1.
Make sure you see the following lines:
             Slave_IO_Running: Yes
            Slave_SQL_Running: Yes
Monitor the replication status and make sure mysql57b keeps up with mysql57a, and mysql57a keeps up with mysql56a. You may need to enable read-only on mysql57b (and/or mysql57a) after that, to protect against accidental writes.
mysql> SET GLOBAL super_read_only = 1;
mysql> SET GLOBAL read_only = 1;
From the ClusterControl UI, you see the current state under the Overview section:
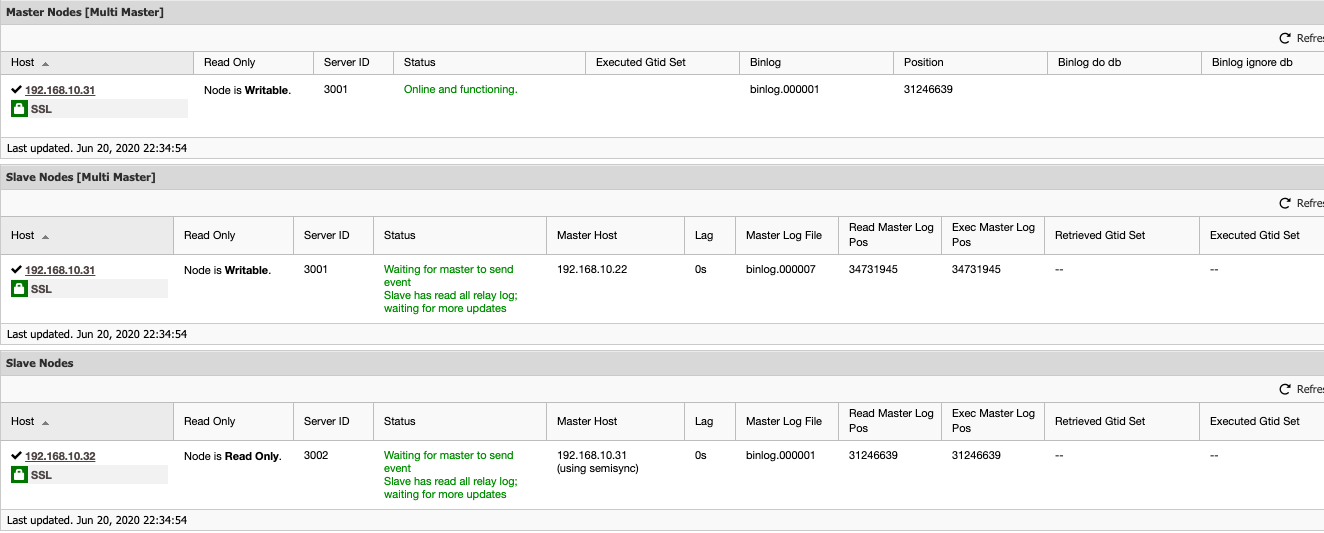
At this point, the new master mysql57a, 192.168.10.31 is replicating from the old standalone host mysql56a, 192.168.10.22, while the new slave mysql57b (read-only) is replicating from mysql57a, 192.168.10.31. All nodes are synced with the replication lag 0.
Alternatively, you can comment out the following lines inside MySQL configuration files under [mysqld] section:
#gtid_mode=ON
#enforce_gtid_consistency=1
Enabling GTID on the Slave Cluster
Note that for MySQL 5.6 and later, ClusterControl does not support the non-GTID implementation on some of its management features anymore like Rebuild Replication Slave and Change Replication Master. So, during the cut-off time (when you point applications to the new cluster) from the standalone MySQL server (mysql56a), it's recommended to enable GTID back on mysql57a and mysql57b with the following steps:
1) Make sure to turn off ClusterControl automatic recovery feature:
2) During the cut-off maintenance window, we have to stop replicating from the old master, mysql56a, remove all slave configuration on mysql57a and enable back GTID. On mysql57a, run the following commands in the correct order:
mysql> SHOW SLAVE STATUSG # Make sure you see "Slave has read all relay log"
mysql> STOP SLAVE;
mysql> RESET SLAVE ALL;
mysql> SET GLOBAL super_read_only = 0;
mysql> SET GLOBAL read_only = 0;
mysql> SET GLOBAL gtid_mode = 'OFF_PERMISSIVE';
mysql> SET GLOBAL gtid_mode = 'ON_PERMISSIVE';
mysql> SET GLOBAL enforce_gtid_consistency = 'ON';
mysql> SET GLOBAL gtid_mode = 'ON';
At this point, it is practically safe for your application to start writing to the new master, mysql57a. The old standalone MySQL is now out of the replication chain and can be shut down.
3) Repeat the same steps for mysql57b. Remember to follow the steps in the correct order:
mysql> SHOW SLAVE STATUSG # Make sure you see "Slave has read all relay log"
mysql> STOP SLAVE;
mysql> RESET SLAVE ALL;
mysql> SET GLOBAL super_read_only = 0;
mysql> SET GLOBAL read_only = 0;
mysql> SET GLOBAL gtid_mode = 'OFF_PERMISSIVE';
mysql> SET GLOBAL gtid_mode = 'ON_PERMISSIVE';
mysql> SET GLOBAL enforce_gtid_consistency = 'ON';
mysql> SET GLOBAL gtid_mode = 'ON';
4) Then, reset master on the new master, mysql57a:
mysql> RESET MASTER;3) Then on the new slave, mysql57b setup the replication link using GTID to mysql57a:
mysql> RESET MASTER;
mysql> CHANGE MASTER TO MASTER_HOST = '192.168.10.31', MASTER_USER = 'rpl_user', MASTER_PASSWORD = '68n61F+bdsW1}J6i6SeIz@kJDVMa}x5J', MASTER_AUTO_POSITION = 1;
mysql> START SLAVE;
mysql> SHOW SLAVE STATUSG
Make sure you see the Retrieved_Gtid_Set and Executed_Gtid_Set fields have its GTID value.
4) At this point, we have restored back the replication configuration as being configured previously by ClusterControl during the cluster deployment stage. We can then enable read-only on the new slave, mysql57b to protect it against accidental writes:
mysql> SET GLOBAL super_read_only = 1;
mysql> SET GLOBAL read_only = 1;
Finally, re-enable ClusterControl automatic recovery for the cluster, by toggling the power icons to green. You can then decommission the old master, mysql56a. We just completed our online migration from MySQL 5.6 to MySQL 5.7 with very minimal downtime. The similar steps should work for migration to MySQL 8.0 as well.