blog
One Security System for Application, Connection Pooling and PostgreSQL – The Case for LDAP

Traditionally, the typical application consists of the following components:
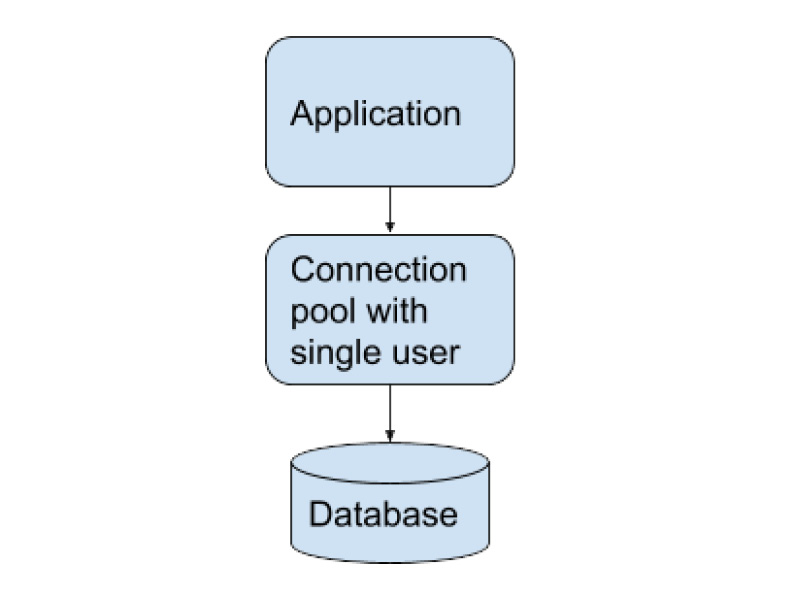
In this simple case, a basic setup would suffice:
- the application uses a simple local authentication mechanism for its users
- the application uses a simple connection pool
- there is a single user defined for database access
However, as the organization evolves and gets larger more components are added:
- more tenant apps or instances of the app accessing the database
- more services and systems accessing the database
- central authentication/authorization (AA) for all (or most) services
- separation of components for easier future scaling
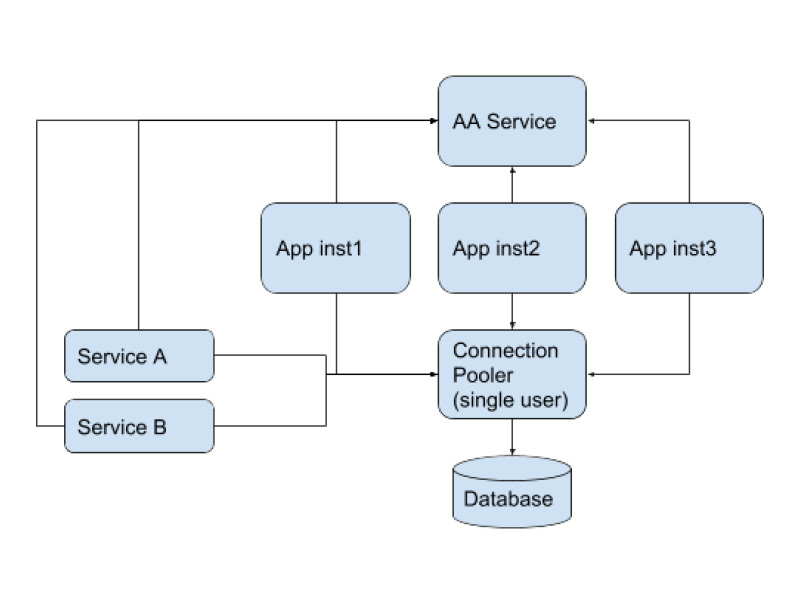
In the above scheme, all concerns are separated into individual components, each component serves a specialized purpose. However, still the connection pool uses a single dedicated database user as in the previous simpler setup we saw above.
Besides the new components, also new requirements arrive:
- better fine grained control of what users can do on the database level
- auditing
- better more useful system logging
We can always implement all three with more application code or more layers in the application, but this is just cumbersome and hard to maintain.
In addition, PostgreSQL offers such a rich set of solutions on the aforementioned areas (security, Row Level Security, auditing, etc) that it makes perfect sense to move all those services to the database layer. In order to take those services directly from the database, we must forget about single user in the database and use real individual users instead.
This takes us to a scheme like the below:
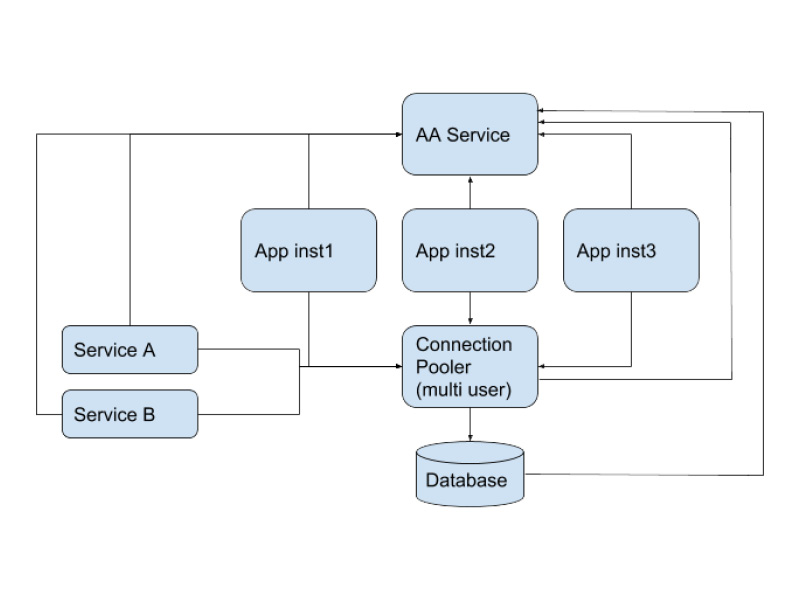
In our use case we will describe a typical enterprise setup consisting of the above scheme where we use:
- Wildfly app server (examples shown for version 10)
- LDAP Authentication/Authorization Service
- pgbouncer connection pooler
- PostgreSQL 10
It seems like a typical setup, since jboss/wildfly has been supporting LDAP authentication and authorization for many years, PostgreSQL has been supporting LDAP for many years.
However pgbouncer only started support for LDAP (and this via PAM) since version 1.8 in late 2017, which means that someone till then could not use the hottest PostgreSQL connection pooler in such an enterprise setup (which did not sound promising by any angle we choose to look at it)!
In this blog, we will describe the setup needed in each layer.
Wildfly 10 Configuration
The data source configuration will have to look like this, I am showing the most important stuff:
<xa-datasource jndi-name="java:/pgsql" pool-name="pgsqlDS" enabled="true" mcp="org.jboss.jca.core.connectionmanager.pool.mcp.LeakDumperManagedConnectionPool">
<xa-datasource-property name="DatabaseName">
yourdbname
</xa-datasource-property>
<xa-datasource-property name="PortNumber">
6432
</xa-datasource-property>
<xa-datasource-property name="ServerName">
your.pgbouncer.server
</xa-datasource-property>
<xa-datasource-property name="PrepareThreshold">
    		0
</xa-datasource-property>
<xa-datasource-class>org.postgresql.xa.PGXADataSource</xa-datasource-class>
<driver>postgresql-9.4.1212.jar</driver>
<new-connection-sql>
SET application_name to 'myapp';
</new-connection-sql>
<xa-pool>
<max-pool-size>400</max-pool-size>
<allow-multiple-users>true</allow-multiple-users>
</xa-pool>
<security>
<security-domain>postgresqluser</security-domain>
</security>
</xa-datasource>
I have put in bold the important parameters and values. Remember to define the IP address (or hostname), the database name and the port according to your pgbouncer server’s setup.
Also, instead of the typical username/password, you’ll have to have a security domain defined, which must be specified in the data source section as shown above. Its definition will look like:
<security-domain name="postgresqluser">
<authentication>
<login-module code="org.picketbox.datasource.security.CallerIdentityLoginModule" flag="required">
<module-option name="managedConnectionFactoryName" value="name=pgsql,jboss.jca:service=XATxCM"/>
</login-module>
</authentication>
</security-domain>
This way wildfly will delegate the security context to pgbouncer.
NOTE: in this blog we cover the basics, i.e. we make no use or mention of TLS, however you are strongly encouraged to use it in your installation.
The wildfly users must authenticate against your LDAP server as follows:
<login-module code="<your login module class>" flag="sufficient">
<module-option name="java.naming.provider.url" value="ldap://your.ldap.server/"/>
<module-option name="java.naming.security.authentication" value="simple"/>
<module-option name="java.naming.factory.initial" value="com.sun.jndi.ldap.LdapCtxFactory"/>
<module-option name="principalDNPrefix" value="uid="/>
<module-option name="uidAttributeID" value="memberOf"/>
<module-option name="roleNameAttributeID" value="cn"/>
<module-option name="roleAttributeID" value="memberOf"/>
<module-option name="principalDNSuffix"
value=",cn=users,cn=accounts,dc=yourorgname,dc=com"/>
<module-option name="userSrchBase" value="dc=yourorgname,dc=com"/>
<module-option name="rolesCtxDN"
value="cn=groups,cn=accounts,dc=yourorgname,dc=com"/>
<module-option name="matchOnUserDN" value="true"/>
<module-option name="unauthendicatedIdentity" value="foousr"/>
<module-option name="com.sun.jndi.ldap.connect.timeout" value="5000"/>
</login-module>
The above configuration files apply to wildfly 10.0, you are advised in any case to consult the official documentation for your environment.
PostgreSQL Configuration
In order to tell PostgreSQL to authenticate (NOTE: not authorise!) against your LDAP server you have to make the appropriate changes to postgresql.conf and pg_hba.conf. The entries of interest are the following:
In postgresql.conf:
listen_addresses = '*'and in pg_hba.conf:
#TYPE  DATABASE    USER        CIDR-ADDRESS                  METHOD
host    all         all         ip.ofYourPgbouncer.server/32 ldap ldapserver=your.ldap.server ldapprefix="uid=" ldapsuffix=",cn=users,cn=accounts,dc=yourorgname,dc=com"
Make sure the LDAP settings defined here match exactly the ones you defined in your app server configuration. There are two modes of operation that PostgreSQL can be instructed to contact the LDAP server:
- simple bind
- search and then bind
The simple bind mode requires only one connection to the LDAP server therefore it is faster but requires a somehow stricter LDAP dictionary organization than the second mode. The search and bind mode allows for greater flexibility. However, for the average LDAP directory, the first mode (simple bind) will work just fine. We must underline certain points about PostgreSQL LDAP authentication:
- This has to do with authentication only (checking passwords).
- Roles membership is still done in PostgreSQL, as usual.
- The users must be created in PostgreSQL (via CREATE user/role) as usual.
There are some solutions to help with synchronization between LDAP and PostgreSQL users (e.g. ldap2pg) or you can simply write your own wrapper that will handle both LDAP and PostgreSQL for adding or deleting users.
PgBouncer Configuration
This is the hardest part of our setup, due to the fact that native LDAP support is still missing from pgbouncer, and the only option is to authenticate via PAM, which means that this depends on the correct local UNIX/Linux PAM setup for LDAP.
So the procedure is broken into two steps.
The first step is to configure and test that pgbouncer works with PAM, and the second step is to configure PAM to work with LDAP.
pgbouncer
pgbouncer must be compiled with PAM support. In order to do so you will have to:
- install libpam0g-dev
- ./configure –with-pam
- recompile and install pgbouncer
Your pgbouncer.ini (or the name of your pgbouncer configuration file) must be configured for pam. Also, it must contain the correct parameters for your database and your application in accordance with the parameters described in the sections above. Things you will have to define or change:
yourdbname = host=your.pgsql.server dbname=yourdbname pool_size=5
listen_addr = *
auth_type = pam
# set pool_mode for max performance
pool_mode = transaction
# required for JDBC
ignore_startup_parameters = extra_float_digits
Of course, you will have to read the pgbouncer docs and tune your pgbouncer according to your needs. In order to test the above setup all you have to do is create a new local UNIX user and try to authenticate to pgbouncer:
# adduser testuser
<answer to all question, including password>
In order for pgbouncer to work with PAM when reading from the local passwd files, pgbouncer executable must be owned by root and with setuid:
# chown root:staff ~pgbouncer/pgbouncer-1.9.0/pgbouncer
# chmod +s ~pgbouncer/pgbouncer-1.9.0/pgbouncer
# ls -l ~pgbouncer/pgbouncer-1.9.0/pgbouncer
-rwsrwsr-x 1 root staff 1672184 Dec 21 16:28 /home/pgbouncer/pgbouncer-1.9.0/pgbouncer
Note: The necessity for root ownership and setuid (which is true for every debian/ubuntu system I have tested) is nowhere documented, neither on the official pgbouncer docs nor anywhere on the net.
Then we login (as pgsql superuser) to the postgresql host (or psql -h your.pgsql.server) and create the new user:
CREATE USER testuser PASSWORD 'same as the UNIX passwd you gave above';then from the pgbouncer host:
psql -h localhost -p 6432 yourdbname -U testuserYou should be able to get a prompt and see the tables as if you were connected directly to your database server. Remember to delete this user from the system and also drop from the database when you are finished with all your tests.
PAM
In order for PAM to interface with the LDAP server, an additional package is needed: libpam-ldap . Its post install script will run a text mode dialog which you will have to answer with the correct parameters for your LDAP server. This package will make the necessary updates in /etc/pam.d files and also create a file named: /etc/pam_ldap.conf. In case something changes in the future you can always go back and edit this file. The most important lines in this file are:
base cn=users,cn=accounts,dc=yourorgname,dc=com
uri ldap://your.ldap.server/
ldap_version 3
pam_password crypt
The name/address of your LDAP server and the search base must be exactly the same as those specified in the PostgreSQL pg_hba.conf and the Wildfly standalone.xml conf files explained above. pam_login_attribute defaults to uid. You are encouraged to take a look at the /etc/pam.d/common-* files and see what changed after the installation of libpam-ldap. Following the docs, you could create a new file named /etc/pam.d/pgbouncer and define all PAM options there, but the default common-* files will suffice. Let’s take a look in /etc/pam.d/common-auth:
auth    [success=2 default=ignore]      pam_unix.so nullok_secure
auth    [success=1 default=ignore]      pam_ldap.so use_first_pass
auth    requisite                                    pam_deny.so
auth    required                                    pam_permit.so
Unix passwd will be checked first, and if this fails then LDAP will be checked, so bear in mind that you will have to erase any local passwords for those users who are defined both to the local linux/unix /etc/passwd and in LDAP. Now it is time to do the final test. Choose a user who is defined in your LDAP server and also created in PostgreSQL, and try to authenticate from the DB (via pgsql -h your.pgsql.server ), then from pgbouncer (also via psql -h your.pgbouncer.server), and finally via your app. You just made having one single security system for app, connection pooler and PostgreSQL a reality!