blog
Multi-Host Networking for MySQL Containers with Calico: Part Two

In the previous post, we looked into the basics of running MySQL containers on multiple Docker hosts managed by Swarm Mode, a native orchestration tool comes with Docker 1.12. However, at the time of writing, Docker Engine Swarm Mode does not support other networking plugins like Calico, Weave or Flannel. If we’d like to run any of these, we must run it outside of Docker Swarm mode and use other tools for orchestration e.g, Kubernetes, Mesos or Docker Swarm.
In this blog post, we are going to look into other networking drivers that support multi-host networking to best fit our MySQL setups. We are going to deploy MySQL Replication on top of three Docker hosts via Calico’s driver on multi-host networking. Weave and Flannel will be covered in the upcoming blog posts.

Calico cannot be treated as an “overlay network” – which means it does not encapsulate one packet inside another packet. It uses pure Layer 3 approach and avoids the packet encapsulation associated with the Layer 2 solution which simplifies diagnostics, reduces transport overhead and improves performance. Calico also implements BGP protocol for routing combined with a pure IP network, thus allows internet scaling for virtual networks.
Consider having 3 physical hosts installed with Docker Engine v1.12.1. All hosts are running on CentOS 7.1. The following is the output of /etc/hosts on each host:
192.168.55.111    docker1.local docker1
192.168.55.112    docker2.local docker2
192.168.55.113    docker3.local docker3
Key-Value Store (etcd)
Etcd is a popular open-source distributed key value store that provides shared configuration and service discovery. A simple use-case is to store database connection details or feature flags in etcd as key value pairs.
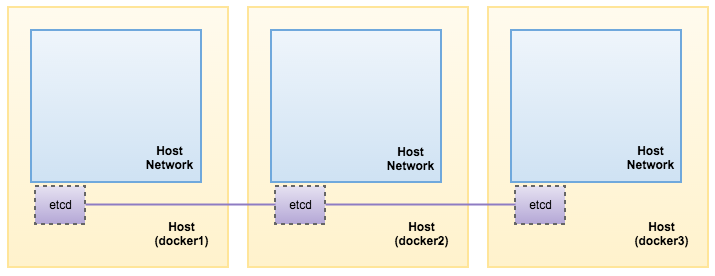
Calico requires etcd to operate. Etcd can be clustered with many instances. In this example, we are going to install etcd on each of the Docker host and form a three-node etcd cluster for better availability.
- Install etcd packages:
$ yum install etcd - Modify the configuration file accordingly depending on the Docker hosts:
$ vim /etc/etcd/etcd.confFor docker1 with IP address 192.168.55.111:
ETCD_NAME=etcd1
ETCD_DATA_DIR="/var/lib/etcd/default.etcd"
ETCD_LISTEN_PEER_URLS="http://0.0.0.0:2380"
ETCD_LISTEN_CLIENT_URLS="http://0.0.0.0:2379"
ETCD_INITIAL_ADVERTISE_PEER_URLS="http://192.168.55.111:2380"
ETCD_INITIAL_CLUSTER="etcd1=http://192.168.55.111:2380,etcd2=http://192.168.55.112:2380,etcd3=http://192.168.55.113:2380"
ETCD_INITIAL_CLUSTER_STATE="new"
ETCD_INITIAL_CLUSTER_TOKEN="etcd-cluster-1"
ETCD_ADVERTISE_CLIENT_URLS="http://0.0.0.0:2379"
For docker2 with IP address 192.168.55.112:
ETCD_NAME=etcd2
ETCD_DATA_DIR="/var/lib/etcd/default.etcd"
ETCD_LISTEN_PEER_URLS="http://0.0.0.0:2380"
ETCD_LISTEN_CLIENT_URLS="http://0.0.0.0:2379"
ETCD_INITIAL_ADVERTISE_PEER_URLS="http://192.168.55.112:2380"
ETCD_INITIAL_CLUSTER="etcd1=http://192.168.55.111:2380,etcd2=http://192.168.55.112:2380,etcd3=http://192.168.55.113:2380"
ETCD_INITIAL_CLUSTER_STATE="new"
ETCD_INITIAL_CLUSTER_TOKEN="etcd-cluster-1"
ETCD_ADVERTISE_CLIENT_URLS="http://0.0.0.0:2379"
For docker3 with IP address 192.168.55.113:
ETCD_NAME=etcd3 ETCD_DATA_DIR="/var/lib/etcd/default.etcd" ETCD_LISTEN_PEER_URLS="http://0.0.0.0:2380" ETCD_LISTEN_CLIENT_URLS="http://0.0.0.0:2379" ETCD_INITIAL_ADVERTISE_PEER_URLS="http://192.168.55.113:2380" ETCD_INITIAL_CLUSTER="etcd1=http://192.168.55.111:2380,etcd2=http://192.168.55.112:2380,etcd3=http://192.168.55.113:2380" ETCD_INITIAL_CLUSTER_STATE="new" ETCD_INITIAL_CLUSTER_TOKEN="etcd-cluster-1" ETCD_ADVERTISE_CLIENT_URLS="http://0.0.0.0:2379" - Start the service on docker1, followed by docker2 and docker3:
$ systemctl start etcd - Verify our cluster status:
[docker3 ]$ etcdctl cluster-health
member 2f8ec0a21c11c189 is healthy: got healthy result from http://0.0.0.0:2379
member 589a7883a7ee56ec is healthy: got healthy result from http://0.0.0.0:2379
member fcacfa3f23575abe is healthy: got healthy result from http://0.0.0.0:2379
cluster is healthy
That’s it. Our etcd is now running as a cluster on three nodes. Our setup now looks like this:
Calico Installation
Ensure etcd is installed as mentioned in the “Key-Value Store (etcd)” section. The following commands should be performed on each Docker host unless specified otherwise:
- Download Calico and make it executable:
$ wget http://www.projectcalico.org/builds/calicoctl -P /usr/local/bin $ chmod +x /usr/local/bin/calicoctl - Create the calico node for docker1. Specify the Docker host’s IP address as below:
[root@docker1 ~]$ calicoctl node --ip=192.168.55.111 --libnetwork Running Docker container with the following command: docker run -d --restart=always --net=host --privileged --name=calico-node -e HOSTNAME=docker1.local -e IP=192.168.55.111 -e IP6= -e CALICO_NETWORKING_BACKEND=bird -e AS= -e NO_DEFAULT_POOLS= -e ETCD_AUTHORITY=127.0.0.1:2379 -e ETCD_SCHEME=http -v /var/log/calico:/var/log/calico -v /lib/modules:/lib/modules -v /var/run/calico:/var/run/calico calico/node:latest Calico node is running with id: 37cf85e600e3fc04b16cdad7dc1c9f3bb7e8ace80b5fef4dbc21155d60440a78 Waiting for successful startup Waiting for etcd connection... Calico node started successfully Calico libnetwork driver is running with id: 4c2c4b3fd5b8155622a656440513680c8da051ed6881a94a33fbdc1e8748c060 - Same goes to docker2, where the host IP address is 192.168.55.112:
[root@docker2 ~]$ calicoctl node --ip=192.168.55.112 --libnetwork Running Docker container with the following command: docker run -d --restart=always --net=host --privileged --name=calico-node -e HOSTNAME=docker2.local -e IP=192.168.55.112 -e IP6= -e CALICO_NETWORKING_BACKEND=bird -e AS= -e NO_DEFAULT_POOLS= -e ETCD_AUTHORITY=127.0.0.1:2379 -e ETCD_SCHEME=http -v /var/log/calico:/var/log/calico -v /lib/modules:/lib/modules -v /var/run/calico:/var/run/calico calico/node:latest Calico node is running with id: 37cf85e600e3fc04b16cdad7dc1c9f3bb7e8ace80b5fef4dbc21155d60440a78 Waiting for successful startup Waiting for etcd connection... Calico node started successfully Calico libnetwork driver is running with id: 4c2c4b3fd5b8155622a656440513680c8da051ed6881a94a33fbdc1e8748c060 - Then, on docker3:
[root@docker3 ~]$ calicoctl node --ip=192.168.55.113 --libnetwork
Running Docker container with the following command:

docker run -d --restart=always --net=host --privileged --name=calico-node -e HOSTNAME=docker3.local -e IP=192.168.55.113 -e IP6= -e CALICO_NETWORKING_BACKEND=bird -e AS= -e NO_DEFAULT_POOLS= -e ETCD_AUTHORITY=127.0.0.1:2379 -e ETCD_SCHEME=http -v /var/log/calico:/var/log/calico -v /lib/modules:/lib/modules -v /var/run/calico:/var/run/calico calico/node:latest

Calico node is running with id: 37cf85e600e3fc04b16cdad7dc1c9f3bb7e8ace80b5fef4dbc21155d60440a78
Waiting for successful startup
Waiting for etcd connection...
Calico node started successfully
Calico libnetwork driver is running with id: 4c2c4b3fd5b8155622a656440513680c8da051ed6881a94a33fbdc1e8748c060
A calico-node service (“calico/node:latest”) runs on each Docker host which handles all of the necessary IP routing, installation of policy rules, and distribution of routes across the cluster of nodes.
- Verify the Calico status:
[root@docker1 ~]$ calicoctl node show +---------------+----------------+-----------+-------------------+--------------+--------------+ | Hostname | Bird IPv4 | Bird IPv6 | AS Num | BGP Peers v4 | BGP Peers v6 | +---------------+----------------+-----------+-------------------+--------------+--------------+ | docker1.local | 192.168.55.111 | | 64511 (inherited) | | | | docker2.local | 192.168.55.112 | | 64511 (inherited) | | | | docker3.local | 192.168.55.113 | | 64511 (inherited) | | | +---------------+----------------+-----------+-------------------+--------------+--------------+ - Configure an IP pool for our Calico network:
[root@docker1 ~]$ calicoctl pool add 192.168.0.0/16Verify the address pool is there:
[root@docker1 ~]$ calicoctl pool show --ipv4 +----------------+---------+ | IPv4 CIDR | Options | +----------------+---------+ | 192.168.0.0/16 | | +----------------+---------+ - Create a new profile so we can group all MySQL Replication containers under the same roof:
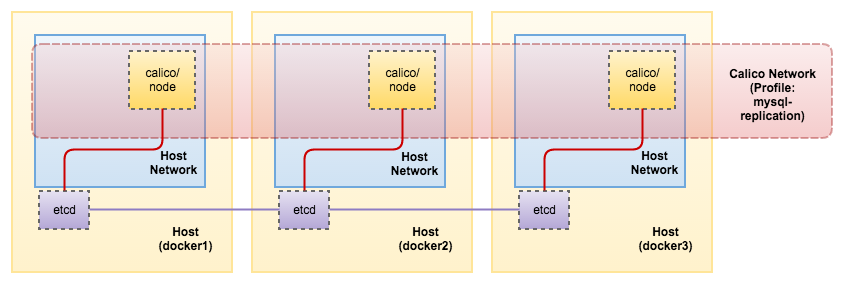
[root@docker1 ~]$ calicoctl profile add mysql-replication
Created profile mysql-replication
With the profile created, we can illustrate our architecture as per below:
Deploying Multi-Host MySQL Replication Containers with Calico
Calico can be configured without having to use the Docker networking commands. Rather than have Docker configure the network, we are going use the “calicoctl” command line tool to add a container into a Calico network – this adds the required interface and routes into the container, and configures Calico with the correct endpoint information.
Calico use profiles to manage container isolation. You can create profiles and append containers with Calico network into different profiles. Only containers in the same profile are able to talk to each other. Containers from different profiles cannot access each other even though they are in the same CIDR subnet. As shown in step #7 in the previous section, we are going to append all containers under the same profile called mysql-replication.
Host docker1 will be running mysql-master container, while mysql-slave1 and mysql-slave2 containers on host docker2 and docker3 respectively.
MySQL Master
The following commands should be performed on docker1.
- Firstly, create a directory to be used by the master:
[root@docker1 ~]$ mkdir -p /opt/Docker/mysql-master/data - Create the MySQL master container:
[root@docker1 ~]$ docker run -d --name mysql-master -v /opt/Docker/mysql-master/data:/var/lib/mysql -e MYSQL_ROOT_PASSWORD=mypassword mysql --gtid_mode=ON --log-bin --log-slave-updates --enforce-gtid-consistency --server-id=1 - Create the slave user to be used by our slaves:
[root@docker1 ~]$ docker exec -ti mysql-master 'mysql' -uroot -pmypassword -vvv -e "GRANT REPLICATION SLAVE ON *.* TO repl@'%' IDENTIFIED BY 'slavepass' - Add Calico’s network interface into the container and assign an IP address in the range of Calico pool:
[root@docker1 ~]$ calicoctl container add mysql-master 192.168.0.50 IP 192.168.0.50 added to mysql-master - Add the container into the profile:
[root@docker1 ~]$ calicoctl container mysql-master profile append mysql-replication
Profile(s) mysql-replication appended.
When each container is added to Calico, an “endpoint” is registered for each container’s interface. Containers are only allowed to communicate with one another when both of their endpoints are assigned the same profile.
MySQL Slave #1
The following commands should be performed on docker2.
- Create a directory to be used by the slave1:
[root@docker2 ~]$ mkdir -p /opt/Docker/mysql-slave1/data - Create the MySQL slave1 container:
[root@docker2 ~]$ docker run -d --name mysql-slave1 -v /opt/Docker/mysql-slave1/data:/var/lib/mysql -e MYSQL_ROOT_PASSWORD=mypassword mysql --gtid_mode=ON --log-bin --log-slave-updates --enforce-gtid-consistency --server-id=101 - Add Calico’s network interface into the container and assign an IP address in the range of Calico pool:
[root@docker2 ~]$ calicoctl container add mysql-slave1 192.168.0.51 IP 192.168.0.51 added to mysql-slave1 - Add the container into the profile:
[root@docker2 ~]$ calicoctl container mysql-slave1 profile append mysql-replication Profile(s) mysql-replication appended. - Change the master and supply the slave credentials as created in mysql-master:
[root@docker2 ~]$ docker exec -ti mysql-slave1 'mysql' -uroot -pmypassword -e 'CHANGE MASTER TO master_host="192.168.0.50", master_user="repl", master_password="slavepass", master_auto_position=1;' -vvv - Start the replication:
[root@docker2 ~]$ docker exec -ti mysql-slave1 'mysql' -uroot -pmypassword -e "START SLAVE;" -vvv - Verify if mysql-slave1 is running:
[root@docker2 ~]$ docker exec -ti mysql-slave1 'mysql' -uroot -pmypassword -e "SHOW SLAVE STATUS G"
...
             Slave_IO_Running: Yes
            Slave_SQL_Running: Yes
...
MySQL Slave #2
The following commands should be performed on docker3.
- Create a directory to be used by the slave2:
[root@docker3 ~]$ mkdir -p /opt/Docker/mysql-slave2/data - Create the MySQL slave2 container:
[root@docker3 ~]$ docker run -d --name mysql-slave2 -v /opt/Docker/mysql-slave2/data:/var/lib/mysql -e MYSQL_ROOT_PASSWORD=mypassword mysql --gtid_mode=ON --log-bin --log-slave-updates --enforce-gtid-consistency --server-id=102 - Add Calico’s network interface into the container and assign an IP address in the range of Calico pool:
[root@docker3 ~]$ calicoctl container add mysql-slave2 192.168.0.52 IP 192.168.0.52 added to mysql-slave2 - Add the container into the profile:
[root@docker3 ~]$ calicoctl container mysql-slave2 profile append mysql-replication Profile(s) mysql-replication appended. - Change the master and supply the slave credentials as created in mysql-master:
[root@docker3 ~]$ docker exec -ti mysql-slave2 'mysql' -uroot -pmypassword -e 'CHANGE MASTER TO master_host="192.168.0.50", master_user="repl", master_password="slavepass", master_auto_position=1;' - Start the replication:
[root@docker3 ~]$ docker exec -ti mysql-slave2 'mysql' -uroot -pmypassword -e "START SLAVE;" - Verify if mysql-slave2 is running:
[root@docker3 ~]$ docker exec -ti mysql-slave2 'mysql' -uroot -pmypassword -e "SHOW SLAVE STATUS G"
...
             Slave_IO_Running: Yes
            Slave_SQL_Running: Yes
...
We can get a summary of all endpoints created by Calico with “–detailed” flag:
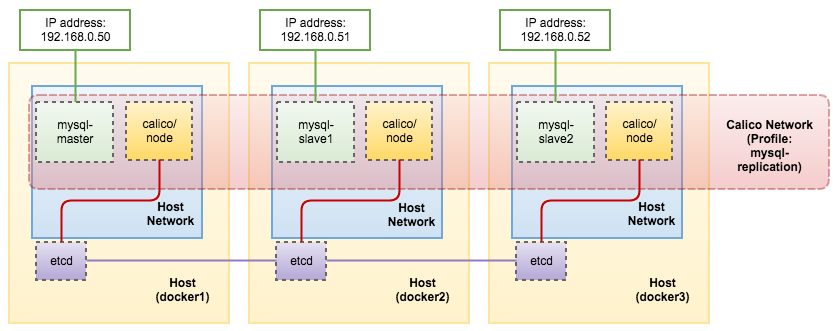
[root@docker1 ~]$ calicoctl endpoint show --detailed
+---------------+-----------------+------------------------------------------------------------------+----------------------------------+-----------------+-------------------+-------------------+--------+
|    Hostname   | Orchestrator ID |                           Workload ID                            |           Endpoint ID            |    Addresses    |        MAC        |      Profiles     | State  |
+---------------+-----------------+------------------------------------------------------------------+----------------------------------+-----------------+-------------------+-------------------+--------+
| docker1.local |      docker     | 89d2ef40918100037e250911e782f71129dd38d7253df274c70d4a31b281de0f | bb3b9fb4870e11e6a88a000c29d498bb | 192.168.0.50/32 | 6a:d1:42:30:05:9a | mysql-replication | active |
| docker2.local |      docker     | ef379f4d46f957165513f86e7859613be9971e82364dc81f1641fd4faae1ec5d | 96aef76c870f11e6b31a000c2903c574 | 192.168.0.51/32 | 3a:d5:08:0c:d9:4a | mysql-replication | active |
| docker3.local |      docker     | 61e9f51a6fb5b36a30e35d2779e1064267604fad0ee28562567cf166a2d90727 | 387c06c0886411e6b2f1000c29bb2913 | 192.168.0.52/32 | da:18:9f:42:68:9c | mysql-replication | active |
+---------------+-----------------+------------------------------------------------------------------+----------------------------------+-----------------+-------------------+-------------------+--------+
Our architecture is now looking like this:
Exposing to the Public
Now we are ready to expose our MySQL Replication to the outside world. To do this, add an inbound rule to port 3306:
[root@docker1 ~]$ calicoctl profile mysql-replication rule add inbound allow tcp to ports 3306Verify the profile’s inbound and outbound rules:
[root@docker1 ~]$ calicoctl profile mysql-replication rule show
Inbound rules:
   1 allow from tag mysql-replication
   2 allow tcp to ports 3306
Outbound rules:
   1 allow
Then, on each of the Docker host, add the DNAT iptables rules respectively. Consider the public IP is listening on interface eth0 of the Docker host.
Docker1 (mysql-master):
[root@docker1 ~]$ iptables -A PREROUTING -t nat -i eth0 -p tcp --dport 3306 -j DNAT --to 192.168.0.50:3306
[root@docker1 ~]$ iptables -A OUTPUT -t nat -p tcp -o lo --dport 3306 -j DNAT --to-destination 192.168.0.50:3306
Docker2 (mysql-slave1):
[root@docker2 ~]$ iptables -A PREROUTING -t nat -i eth0 -p tcp --dport 3306 -j DNAT --to 192.168.0.51:3306
[root@docker2 ~]$ iptables -A OUTPUT -t nat -p tcp -o lo --dport 3306 -j DNAT --to-destination 192.168.0.51:3306
Docker3 (mysql-slave2):
[root@docker3 ~]$ iptables -A PREROUTING -t nat -i eth0 -p tcp --dport 3306 -j DNAT --to 192.168.0.52:3306
[root@docker3 ~]$ iptables -A OUTPUT -t nat -p tcp -o lo --dport 3306 -j DNAT --to-destination 192.168.0.52:3306
Verify that the outside world can reach the MySQL master on docker1:
[host-in-another-galaxy]$ mysql -uroot -pmypassword -h192.168.55.111 -P3306
Welcome to the MariaDB monitor. Commands end with ; or g.
Your MySQL connection id is 11
Server version: 5.7.15-log MySQL Community Server (GPL)
Copyright (c) 2000, 2016, Oracle, MariaDB Corporation Ab and others.
Type 'help;' or 'h' for help. Type 'c' to clear the current input statement.
MySQL [(none)]> show master statusG
*************************** 1. row ***************************
File: 89d2ef409181-bin.000001
Position: 429
Binlog_Do_DB:
Binlog_Ignore_DB:
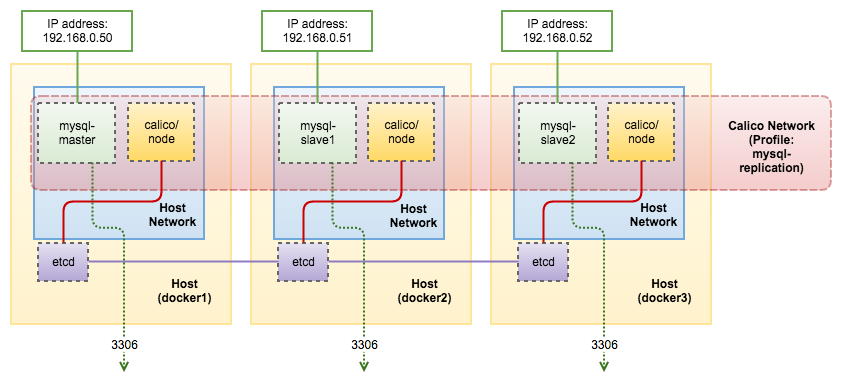
Executed_Gtid_Set: 4f25482e-870d-11e6-bd5b-0242ac110002:1With port 3306 exposed, our final architecture can be illustrated as per below:
That sums up our blog post now. Calico is well-known for its performance. If you wonder how good Calico performs in multi-host containers, you can read this blog post written by Percona’s Vadim Tkachenko. In the next blog post, we are going to look into Weave.


