blog
An Introduction to MongoDB Zone Basics

MongoDB Zones
To understand MongoDB Zones, we must first understand what a Zone is: a group of shards based on a specific set of tags.
MongoDB Zones help in the distribution of chunks based on tags, across shards. All the work (reads and writes) related to documents within a zone are done on shards matching that zone.
There can be different scenarios where sharded clusters (zone-based) can prove to be highly useful. Let’s say:
- An application, which is geographically distributed may require the frontend, as well as the data store
- An application has an n-tier architecture such that some records are fetched from a higher tier (low latency) hardware, whereas other ones could be fetched from a low tier (high latency inducing) hardware
Benefits of Using MongoDB Zones
With the help of MongoDB Zones, DBAs can make tiered storage solutions that support the data lifecycle, with frequently-used data stored in memory, less used data stored on the server, and at the proper time archived data taken offline.
How to Setup Zones
In sharded clusters, you can create zones that represent a group of shards and associate one or more ranges of shard key values to that zone. MongoDB routes all reads and all writes that come into a zone range only to those shards inside of the zone. You can associate each zone with one or more shards in the cluster and a shard can associate with any number of zones.
Some of the most common deployment patterns where zones may be applied are as follows:
- Isolate a specific subset of data on a specific set of shards.
- By ensuring that the most relevant data reside on shards that are geographically closest to the application servers.
- Route data to the shards on the basis of the performance of the shard hardware.
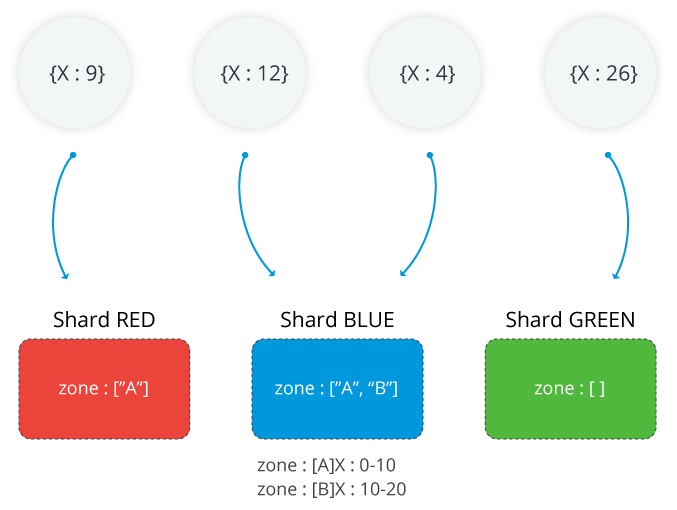
The following image illustrates a sharded cluster with three shards and two zones. The A zone represents a range with a lower bound of 0 and an upper bound of 10. The B zone shows a range with a lower bound of 10 and an upper bound of 20. Shards RED and BLUE have the A zone. Shard BLUE also has the B zone. Shard GREEN has no zones associated with it. The cluster is in a steady state and no chunks violate any of the zones
Range of a MongoDB Zone
Each and every zone covers one or more ranges of shard key values. Each range a zone covers is always inclusive of its lower boundary and exclusive of its upper boundary.
REMEMBER: Zones cannot share ranges and they cannot have overlapping ranges.
Adding Shards to a Zone
sh.addShardTag() method is used to add zones to a shard. A single shard may have multiple zones, and multiple shards may also have the same zone. The following example adds the zone A to one shard.
sh.addShardTag("shard0000", "A")Removing Shards to a Zone
To remove a zone from a shard, the sh.removeShardTag() method is used. The following example removes the zone A from a shard.
sh.removeShardTag("shard0002", "A")Tips for MongoDB Zones
Keep documents simple
MongoDB is a schema-free database. This means there is no predefined schema by default. We can add a predefined schema in newer versions, but it is not mandatory. Don’t underestimate the difficulties which occur when working with documents and arrays, as it can become really difficult to parse your data in the application side/ETL process. Besides, arrays can hurt replication performance: for every change in the array, all the array values are replicated.
Best Hardware is Not Always the Best Option
Using good hardware definitely helps for a good performance. But what could happen in an environment when one instance of a big machine dies? The answer is ‘failover’.
Having multiple small machines (instead of one or two) in a distributed environment can ensure that outages are going to affect only a few parts of the shard with little or no perception by the application. But at the same time, more machines implies a high probability to have a failure. Consider this tradeoff when designing your environment. The right choices affect performance.
Working Set
How big is the working set? Usually, an application doesn’t use all the data. Some data is updated often, while other data isn’t. Does your working dataset fit in RAM? Optimal performance occurs when all the working data set is in RAM.


