blog
How to Use the Failover Mechanism of MaxScale

Ever since ClusterControl 1.2.11 was released in 2015, MariaDB MaxScale has been supported as a database load balancer. Over the years MaxScale has grown and matured, adding several rich features. Recently MariaDB MaxScale 2.2 was released and it introduces several new features including replication cluster failover management.
MariaDB MaxScale allows for master/slave deployments with high availability, automatic failover, manual switchover, and automatic rejoin. If the master fails, MariaDB MaxScale can automatically promote the most up-to-date slave to master. If the failed master is recovered, MariaDB MaxScale can automatically reconfigure it as a slave to the new master. In addition, administrators can perform a manual switchover to change the master on demand.
In our previous blogs we discussed how to Deploy MaxScale Using ClusterControl as well as Deploying MariaDB MaxScale on Docker. For those who are not yet familiar with MariaDB MaxScale, it is an advanced, plug-in, database proxy for MariaDB database servers. Maxscale sits between client applications and the database servers, routing client queries and server responses. It also monitors the servers, quickly noticing any changes in server status or replication topology.
Though Maxscale shares some of the characteristics of other load balancing technologies like ProxySQL, this new failover feature (which is part of its monitoring and autodetection mechanism) stands out. In this blog we’re going to discuss this exciting new function of Maxscale.
Overview of the MariaDB MaxScale Failover Mechanism
Master Detection
The monitor is now less likely to suddenly change the master server, even if another server has more slaves than the current master. The DBA can force a master reselection by setting the current master read-only, or by removing all its slaves if the master is down.
Only one server can have the Master status flag at a time, even in a multimaster setup. Others servers in the multimaster group are given the Relay Master and Slave status flags.
Switchover New Master Autoselection
The switchover command can now be called with just the monitor instance name as parameter. In this case the monitor will automatically select a server for promotion.
Replication Lag Detection
The replication lag measurement now simply reads the Seconds_Behind_Master-field of the slave status output of slaves. The slave calculates this value by comparing the time stamp in the binlog event the slave is currently processing to the slave’s own clock. If a slave has multiple slave connections, the smallest lag is used.
Automatic Switchover After Low Disk Space Detection
With the recent MariaDB Server versions, the monitor can now check the disk space on the backend and detect if the server is running low. When this happens, the monitor can be set to automatically switchover from a master low on disk space. Slaves can also be set to maintenance mode. The disk space is also a factor which is considered when selecting which new master to promote.
See switchover_on_low_disk_space and maintenance_on_low_disk_space for more information.
Replication Reset Feature
The reset-replication monitor command deletes all slave connections and binary logs, and then sets up replication. Useful when data is in sync but gtid’s are not.
Scheduled Events Handling in Failover/Switchover/Rejoin
Server events launched by the event scheduler thread are now handled during cluster modification operations. See handle_server_events for more information.
External Master Support
The monitor can detect if a server in the cluster is replicating from an external master (a server that is not being monitored by the MaxScale monitor). If the replicating server is the cluster master server, then the cluster itself is considered to have an external master.
If a failover/switchover happens, the new master server is set to replicate from the cluster external master server. The username and password for the replication are defined in replication_user and replication_password. The address and port used are the ones shown by SHOW ALL SLAVES STATUS on the old cluster master server. In the case of switchover, the old master also stops replicating from the external server to preserve the topology.
After failover the new master is replicating from the external master. If the failed old master comes back online, it is also replicating from the external server. To normalize the situation, either have auto_rejoin on or manually execute a rejoin. This will redirect the old master to the current cluster master.
How Failover is Useful and Applicable?
Failover helps you minimize downtime, perform daily maintenance, or handle disastrous and unwanted maintenance that can sometimes occur at unfortunate times. With MaxScale’s ability to insulate client applications from backend database servers, it adds valuable functionality that help minimize downtime.
The MaxScale monitoring plugin continuously monitors the state of backend database servers. MaxScale’s routing plugin then uses this status information to always route queries to backend database servers that are in service. It is then able to send queries to the backend database clusters, even if some of the servers of a cluster are going through maintenance or experiencing failure.
MaxScale’s high configurability enables changes in cluster configuration to remain transparent to client applications. For example, if a new server needs to be administratively added to or removed from a master-slave cluster, you can simply add the MaxScale configuration to the server list of monitor and router plugins via the maxadmin CLI console. The client application will be completely unaware of this change and will continue to send database queries to the MaxScale’s listening port.
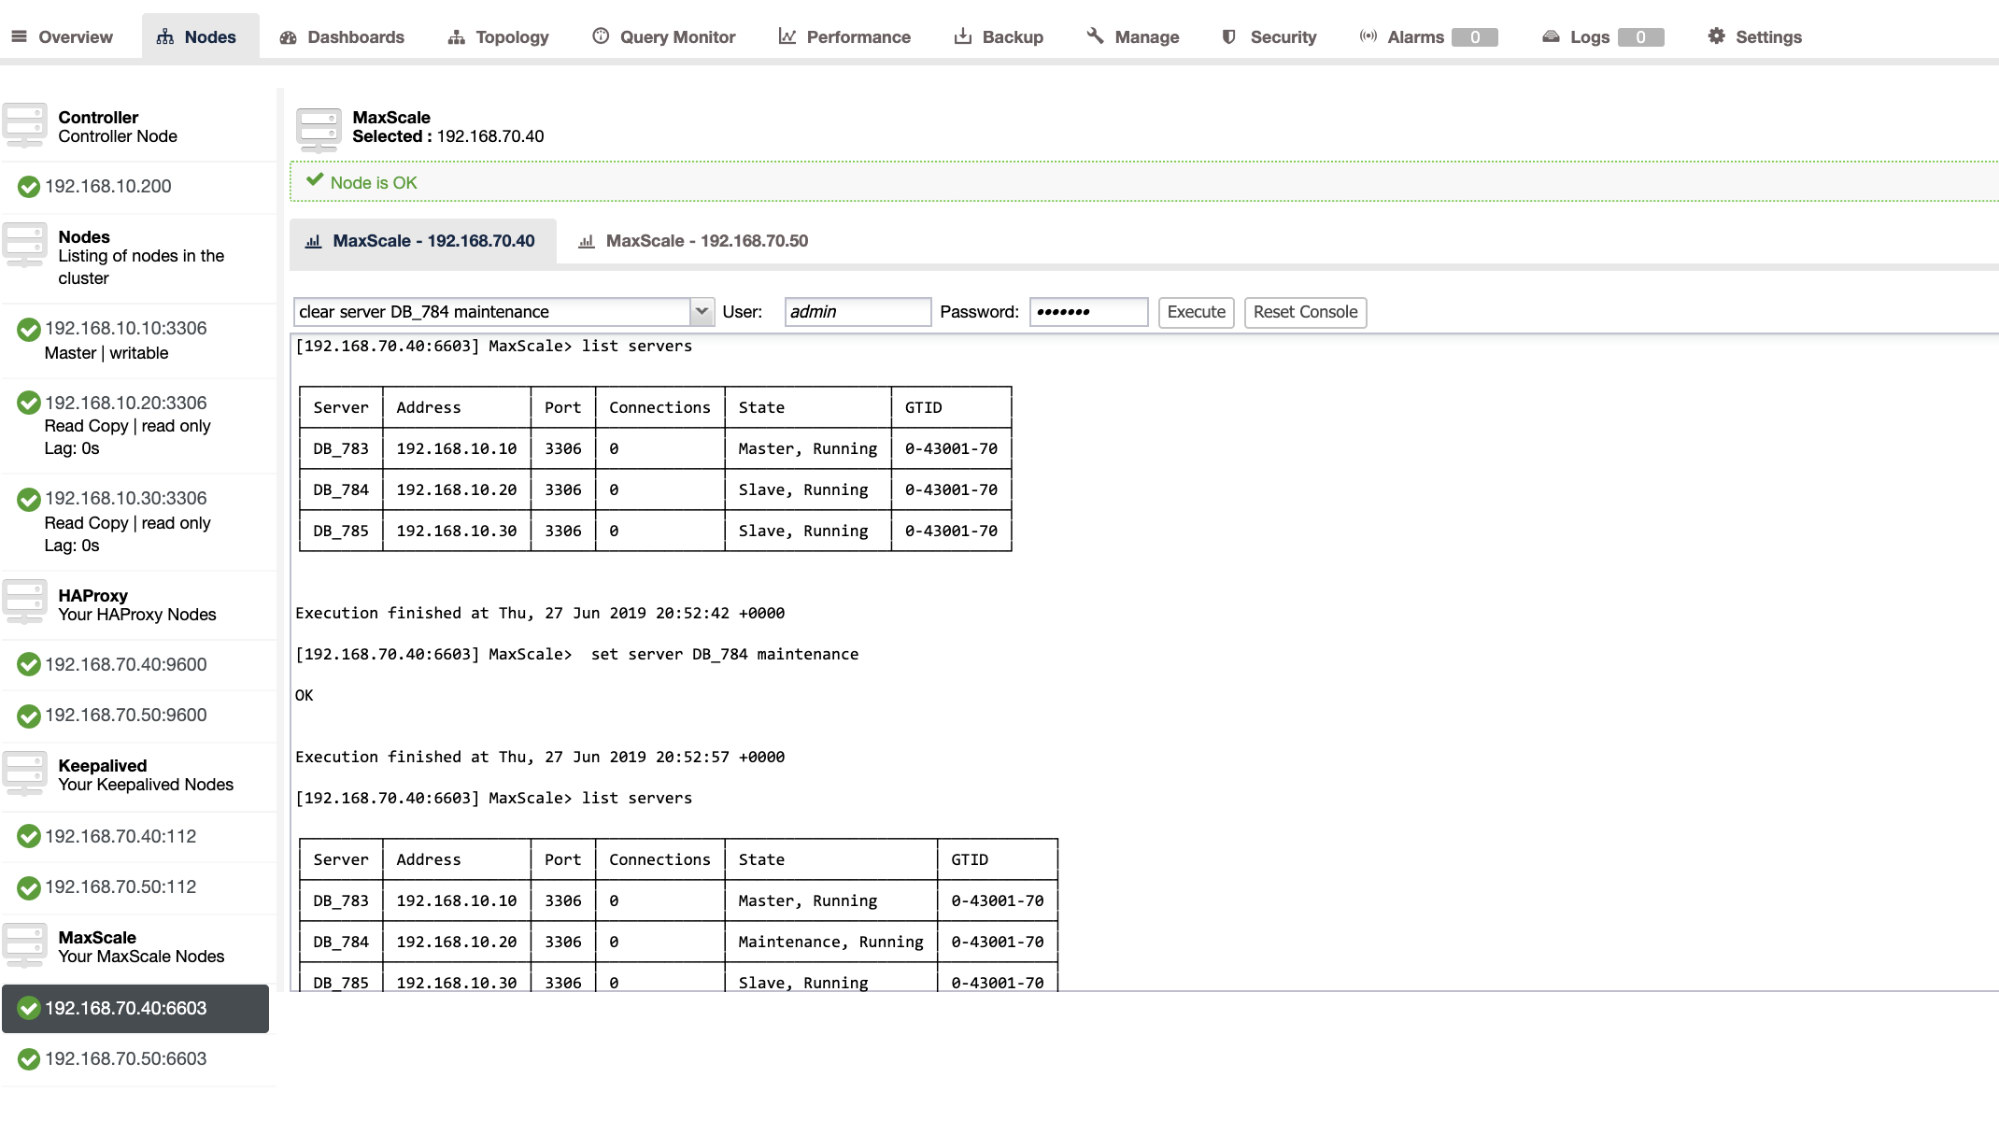
Setting a database server in maintenance is simple and easy. Simply do the following command using maxctrl and MaxScale will stop sending any queries to this server. For example,
 maxctrl: set server DB_785 maintenance
OK
Then checking the servers state as follows,
 maxctrl: list servers
┌────────┬───────────────┬──────┬─────────────┬──────────────────────┬────────────┐
│ Server │ Address       │ Port │ Connections │ State                │ GTID       │
├────────┼───────────────┼──────┼─────────────┼──────────────────────┼────────────┤
│ DB_783 │ 192.168.10.10 │ 3306 │ 0           │ Master, Running      │ 0-43001-70 │
├────────┼───────────────┼──────┼─────────────┼──────────────────────┼────────────┤
│ DB_784 │ 192.168.10.20 │ 3306 │ 0           │ Slave, Running       │ 0-43001-70 │
├────────┼───────────────┼──────┼─────────────┼──────────────────────┼────────────┤
│ DB_785 │ 192.168.10.30 │ 3306 │ 0           │ Maintenance, Running │ 0-43001-70 │
└────────┴───────────────┴──────┴─────────────┴──────────────────────┴────────────┘
Once in maintenance mode, MaxScale will stop routing any new requests to the server. For current requests, MaxScale will not kill these sessions, but rather will allow it to complete its execution and will not interrupt any running queries while in maintenance mode. Also, take note that the maintenance mode is not persistent. If MaxScale restarts when a node is in maintenance mode, a new instance of MariaDB MaxScale will not honor this mode. If multiple MariaDB MaxScale instances are configured to use the node them maintenance mode must be set within each MariaDB MaxScale instance. However, if multiple services within one MariaDB MaxScale instance are using the server then you only need to set the maintenance mode once on the server for all services to take note of the mode change.
Once done with your maintenance, just clear the server with the following command. For example,
 maxctrl: clear server DB_785 maintenance
OK
Checking if it’s set back to normal, just run the command list servers.
You can also apply certain administrative actions through ClusterControl UI as well. See the example screenshot below:
MaxScale Failover In-Action
The Automatic Failover
MariaDB’s MaxScale failover performs very efficiently and reconfigures the slave accordingly as expected. In this test, we have the following configuration file set which was created and managed by ClusterControl. See below:
[replication_monitor]
type=monitor
servers=DB_783,DB_784,DB_785
disk_space_check_interval=1000
disk_space_threshold=/:85
detect_replication_lag=true
enforce_read_only_slaves=true
failcount=3
auto_failover=1
auto_rejoin=true
monitor_interval=300
password=725DE70F196694B277117DC825994D44
user=maxscalecc
replication_password=5349E1268CC4AF42B919A42C8E52D185
replication_user=rpl_user
module=mariadbmon
Take note that, only the auto_failover and auto_rejoin are the variables that I have added since ClusterControl won’t add this by default once you setup a MaxScale load balancer (check out this blog on how to setup MaxScale using ClusterControl). Do not forget that you need to restart MariaDB MaxScale once you have applied the changes in your configuration file. Just run,
systemctl restart maxscaleand you’re good to go.
Before proceeding the failover test, let’s check first the cluster’s health:
 maxctrl: list servers
┌────────┬───────────────┬──────┬─────────────┬─────────────────┬────────────┐
│ Server │ Address       │ Port │ Connections │ State           │ GTID       │
├────────┼───────────────┼──────┼─────────────┼─────────────────┼────────────┤
│ DB_783 │ 192.168.10.10 │ 3306 │ 0           │ Master, Running │ 0-43001-75 │
├────────┼───────────────┼──────┼─────────────┼─────────────────┼────────────┤
│ DB_784 │ 192.168.10.20 │ 3306 │ 0           │ Slave, Running  │ 0-43001-75 │
├────────┼───────────────┼──────┼─────────────┼─────────────────┼────────────┤
│ DB_785 │ 192.168.10.30 │ 3306 │ 0           │ Slave, Running  │ 0-43001-75 │
└────────┴───────────────┴──────┴─────────────┴─────────────────┴────────────┘
Looks great!
I killed the master with just the pure killer command KILL -9 $(pidof mysqld) in my master node and see, to no surprise, the monitor has been quick to notice this and triggers the failover. See the logs as follows:
2019-06-28 06:39:14.306   error  : (mon_log_connect_error): Monitor was unable to connect to server DB_783[192.168.10.10:3306] : 'Can't connect to MySQL server on '192.168.10.10' (115)'
2019-06-28 06:39:14.329   notice : (mon_log_state_change): Server changed state: DB_783[192.168.10.10:3306]: master_down. [Master, Running] -> [Down]
2019-06-28 06:39:14.329   warning: (handle_auto_failover): Master has failed. If master status does not change in 2 monitor passes, failover begins.
2019-06-28 06:39:15.011   notice : (select_promotion_target): Selecting a server to promote and replace 'DB_783'. Candidates are: 'DB_784', 'DB_785'.
2019-06-28 06:39:15.011   warning: (warn_replication_settings): Slave 'DB_784' has gtid_strict_mode disabled. Enabling this setting is recommended. For more information, see https://mariadb.com/kb/en/library/gtid/#gtid_strict_mode
2019-06-28 06:39:15.012   warning: (warn_replication_settings): Slave 'DB_785' has gtid_strict_mode disabled. Enabling this setting is recommended. For more information, see https://mariadb.com/kb/en/library/gtid/#gtid_strict_mode
2019-06-28 06:39:15.012   notice : (select_promotion_target): Selected 'DB_784'.
2019-06-28 06:39:15.012   notice : (handle_auto_failover): Performing automatic failover to replace failed master 'DB_783'.
2019-06-28 06:39:15.017   notice : (redirect_slaves_ex): Redirecting 'DB_785' to replicate from 'DB_784' instead of 'DB_783'.
2019-06-28 06:39:15.024   notice : (redirect_slaves_ex): All redirects successful.
2019-06-28 06:39:15.527   notice : (wait_cluster_stabilization): All redirected slaves successfully started replication from 'DB_784'.
2019-06-28 06:39:15.527   notice : (handle_auto_failover): Failover 'DB_783' -> 'DB_784' performed.
2019-06-28 06:39:15.634   notice : (mon_log_state_change): Server changed state: DB_784[192.168.10.20:3306]: new_master. [Slave, Running] -> [Master, Running]
2019-06-28 06:39:20.165   notice : (mon_log_state_change): Server changed state: DB_783[192.168.10.10:3306]: slave_up. [Down] -> [Slave, Running]
Now let’s have a look at its cluster’s health,
 maxctrl: list servers
┌────────┬───────────────┬──────┬─────────────┬─────────────────┬────────────┐
│ Server │ Address       │ Port │ Connections │ State           │ GTID       │
├────────┼───────────────┼──────┼─────────────┼─────────────────┼────────────┤
│ DB_783 │ 192.168.10.10 │ 3306 │ 0           │ Down            │ 0-43001-75 │
├────────┼───────────────┼──────┼─────────────┼─────────────────┼────────────┤
│ DB_784 │ 192.168.10.20 │ 3306 │ 0           │ Master, Running │ 0-43001-75 │
├────────┼───────────────┼──────┼─────────────┼─────────────────┼────────────┤
│ DB_785 │ 192.168.10.30 │ 3306 │ 0           │ Slave, Running  │ 0-43001-75 │
└────────┴───────────────┴──────┴─────────────┴─────────────────┴────────────┘
The node 192.168.10.10 which was previously the master has been down. I tried to restart and see if auto-rejoin would trigger, and as you noticed in the log at time 2019-06-28 06:39:20.165, it has been so quick to catch the state of the node and then sets up the configuration automatically with no hassle for the DBA to turn it on.
Now, checking lastly on its state, it looks perfectly working as expected. See below:
 maxctrl: list servers
┌────────┬───────────────┬──────┬─────────────┬─────────────────┬────────────┐
│ Server │ Address       │ Port │ Connections │ State           │ GTID       │
├────────┼───────────────┼──────┼─────────────┼─────────────────┼────────────┤
│ DB_783 │ 192.168.10.10 │ 3306 │ 0           │ Slave, Running  │ 0-43001-75 │
├────────┼───────────────┼──────┼─────────────┼─────────────────┼────────────┤
│ DB_784 │ 192.168.10.20 │ 3306 │ 0           │ Master, Running │ 0-43001-75 │
├────────┼───────────────┼──────┼─────────────┼─────────────────┼────────────┤
│ DB_785 │ 192.168.10.30 │ 3306 │ 0           │ Slave, Running  │ 0-43001-75 │
└────────┴───────────────┴──────┴─────────────┴─────────────────┴────────────┘
My ex-Master Has Been Fixed and Recovered and I Want to Switch Over
Switching over to your previous master is no hassle as well. You can operate this with maxctrl (or maxadmin in previous versions of MaxScale) or through ClusterControl UI (as previously demonstrated).
Let’s just refer to the previous state of the replication cluster health earlier, and wanted to switch the 192.168.10.10 (currently slave), back to its master state. Before we proceed, you might need to identify first the monitor you are going to use. You can verify this with the following command below:
 maxctrl: list monitors
┌─────────────────────┬─────────┬────────────────────────┐
│ Monitor             │ State   │ Servers                │
├─────────────────────┼─────────┼────────────────────────┤
│ replication_monitor │ Running │ DB_783, DB_784, DB_785 │
└─────────────────────┴─────────┴────────────────────────┘
Once you have it, you can do the following command below to switch over:
maxctrl: call command mariadbmon switchover replication_monitor DB_783 DB_784
OK
Then check again the state of the cluster,
 maxctrl: list servers
┌────────┬───────────────┬──────┬─────────────┬─────────────────┬────────────┐
│ Server │ Address       │ Port │ Connections │ State           │ GTID       │
├────────┼───────────────┼──────┼─────────────┼─────────────────┼────────────┤
│ DB_783 │ 192.168.10.10 │ 3306 │ 0           │ Master, Running │ 0-43001-75 │
├────────┼───────────────┼──────┼─────────────┼─────────────────┼────────────┤
│ DB_784 │ 192.168.10.20 │ 3306 │ 0           │ Slave, Running  │ 0-43001-75 │
├────────┼───────────────┼──────┼─────────────┼─────────────────┼────────────┤
│ DB_785 │ 192.168.10.30 │ 3306 │ 0           │ Slave, Running  │ 0-43001-75 │
└────────┴───────────────┴──────┴─────────────┴─────────────────┴────────────┘
Looks perfect!
Logs will verbosely show you how it went and its series of action during the switch over. See the details below:
2019-06-28 07:03:48.064   error  : (switchover_prepare): 'DB_784' is not a valid promotion target for switchover because it is already the master.
2019-06-28 07:03:48.064   error  : (manual_switchover): Switchover cancelled.
2019-06-28 07:04:30.700   notice : (create_start_slave): Slave connection from DB_784 to [192.168.10.10]:3306 created and started.
2019-06-28 07:04:30.700   notice : (redirect_slaves_ex): Redirecting 'DB_785' to replicate from 'DB_783' instead of 'DB_784'.
2019-06-28 07:04:30.708   notice : (redirect_slaves_ex): All redirects successful.
2019-06-28 07:04:31.209   notice : (wait_cluster_stabilization): All redirected slaves successfully started replication from 'DB_783'.
2019-06-28 07:04:31.209   notice : (manual_switchover): Switchover 'DB_784' -> 'DB_783' performed.
2019-06-28 07:04:31.318   notice : (mon_log_state_change): Server changed state: DB_783[192.168.10.10:3306]: new_master. [Slave, Running] -> [Master, Running]
2019-06-28 07:04:31.318   notice : (mon_log_state_change): Server changed state: DB_784[192.168.10.20:3306]: new_slave. [Master, Running] -> [Slave, Running]
In the case of a wrong switch over, it will not proceed and hence it will generate an error as shown in the log above. So you’ll be safe and no scary surprises at all.
Making Your MaxScale Highly Available
While it’s a bit off-topic in regards to failover, I wanted to add some valuable points here with regard to high availability and how it related to MariaDB MaxScale failover.
Making your MaxScale highly available is an important part in the event that your system crashes, experience disk corruption, or virtual machine corruption. These situations are inevitable and can affect the state of your automated failover setup when these unexpected maintenance cycles occur.
For a replication cluster type environment, this is very beneficial and highly recommended for a specific MaxScale setup. The purpose of this is that, only one MaxScale instance should be allowed to modify the cluster at any given time. If you have setup with Keepalived, this is where the instances with the status of MASTER. MaxScale itself does not know its state, but with maxctrl (or maxadmin in previous versions) can set a MaxScale instance to passive mode. As of version 2.2.2, a passive MaxScale behaves similar to an active one with the distinction that it won’t perform failover, switchover or rejoin. Even manual versions of these commands will end in error. The passive/active mode differences may be expanded in the future so stay tuned of such changes in MaxScale. To do this, just do the following:
 maxctrl: alter maxscale passive true
OK
You can verify this afterwards by running the command below:
[root@node5 vagrant]#  maxctrl -u admin -p mariadb -h 127.0.0.1:8989 show maxscale|grep 'passive'
│              │     "passive": true,                                         │
If you want to check out how to setup highly available with Keepalived, please check this post from MariaDB.
VIP Handling
Additionally, since MaxScale does not have VIP handling built-in itself, you can use Keepalived to handle that for you. You can just use the virtual_ipaddress assigned to the MASTER state node. This is likely to come up with virtual IP management just like MHA does with master_failover_script variable. As mentioned earlier, check out this Keepalived with MaxScale setup blog post by MariaDB.
Conclusion
MariaDB MaxScale is feature-rich and has lots of capability, not just limited to being a proxy and load balancer, but it also offers the failover mechanism that large organizations are looking for. It’s almost a one-size-fits-all software, but of course comes with limitations that a certain application might need to in contrast other load balancers such as ProxySQL.
ClusterControl also offers an auto-failover and master auto-detection mechanism, plus cluster and node recovery with the ability to deploy Maxscale and other load balancing technologies.
Each of these tools has its diverse features and functionality, but MariaDB MaxScale is well supported within ClusterControl and can be deployed feasibly along with Keepalived, HAProxy to help you speed up for your daily routine task.