blog
How to Perform a Failback Operation for MySQL Replication Setup

MySQL master-slave replication is pretty easy and straightforward to set up. This is the main reason why people choose this technology as the first step to achieve better database availability. However, it comes at the price of complexity in management and maintenance; it is up to the admin to maintain the data integrity, especially during failover, failback, maintenance, upgrade and so on.
There are many articles out there describing on how to perform failover operation for replication setup. We have also covered this topic in this blog post, Introduction to Failover for MySQL Replication – the 101 Blog. In this blog post, we are going to cover the post-disaster tasks when restoring to the original topology – performing failback operation.
Why Do We Need Failback?
The replication leader (master) is the most critical node in a replication setup. It requires good hardware specs to ensure it can process writes, generate replication events, process critical reads and so on in a stable way. When failover is required during disaster recovery or maintenance, it might not be uncommon to find us promoting a new leader with inferior hardware. This situation might be okay temporarily, however for a long run, the designated master must be brought back to lead the replication after it is deemed healthy.
Contrary to failover, failback operation usually happens in a controlled environment through switchover, it rarely happens in panic-mode. This gives the operation team some time to plan carefully and rehearse the exercise for a smooth transition. The main objective is simply to bring back the good old master to the latest state and restore the replication setup to its original topology. However, there are some cases where failback is critical, for example when the newly promoted master did not work as expected and affecting the overall database service.
How to Perform Failback Safely?
After failover happened, the old master would be out of the replication chain for maintenance or recovery. To perform the switchover, one must do the following:
- Provision the old master to the correct state, by making it the most up-to-date slave.
- Stop the application.
- Verify all slaves are caught up.
- Promote the old master as the new leader.
- Repoint all slaves to the new master.
- Start up the application by writing to the new master.
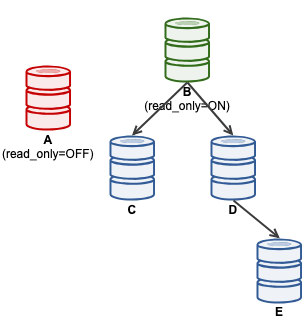
Consider the following replication setup:
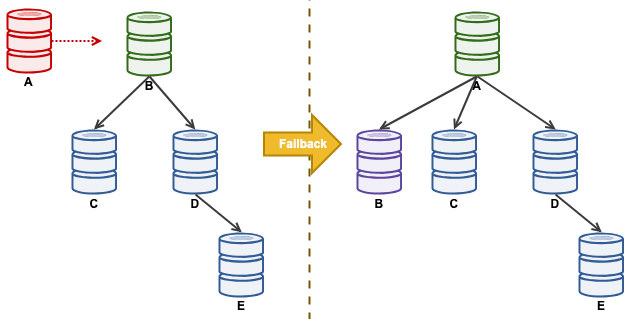
“A” was a master until a disk-full event causing havoc to the replication chain. After a failover event, our replication topology was lead by B and replicates onto C till E. The failback exercise will bring back A as the leader and restore the original topology before the disaster. Take note that all nodes are running on MySQL 8.0.15 with GTID enabled. Different major version might use different commands and steps.
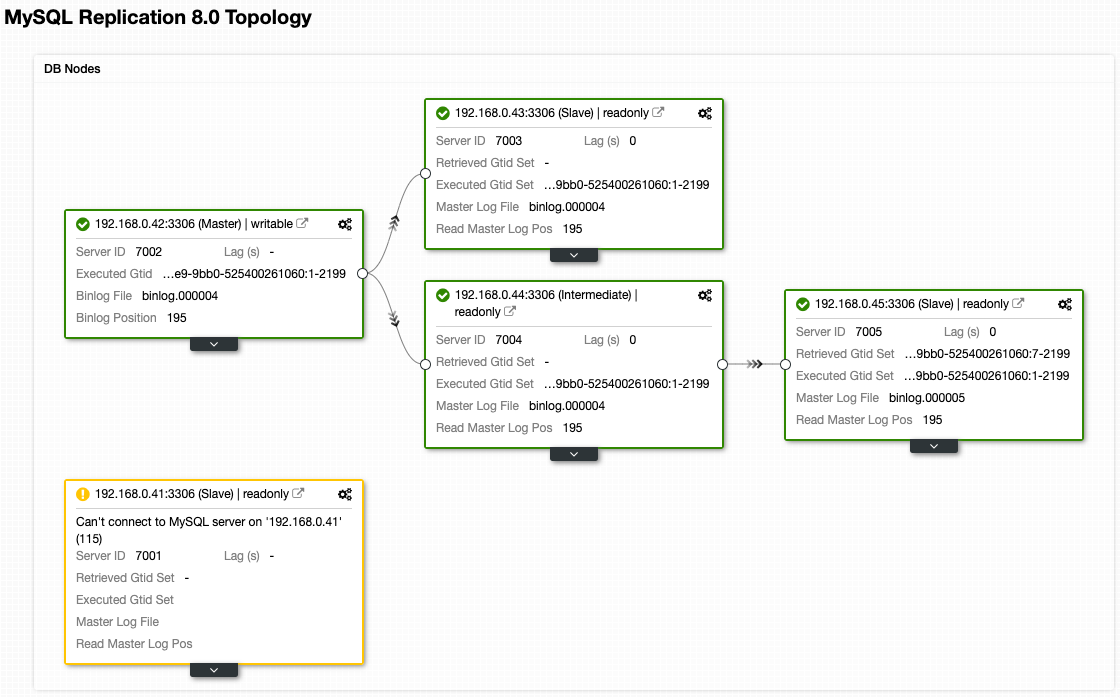
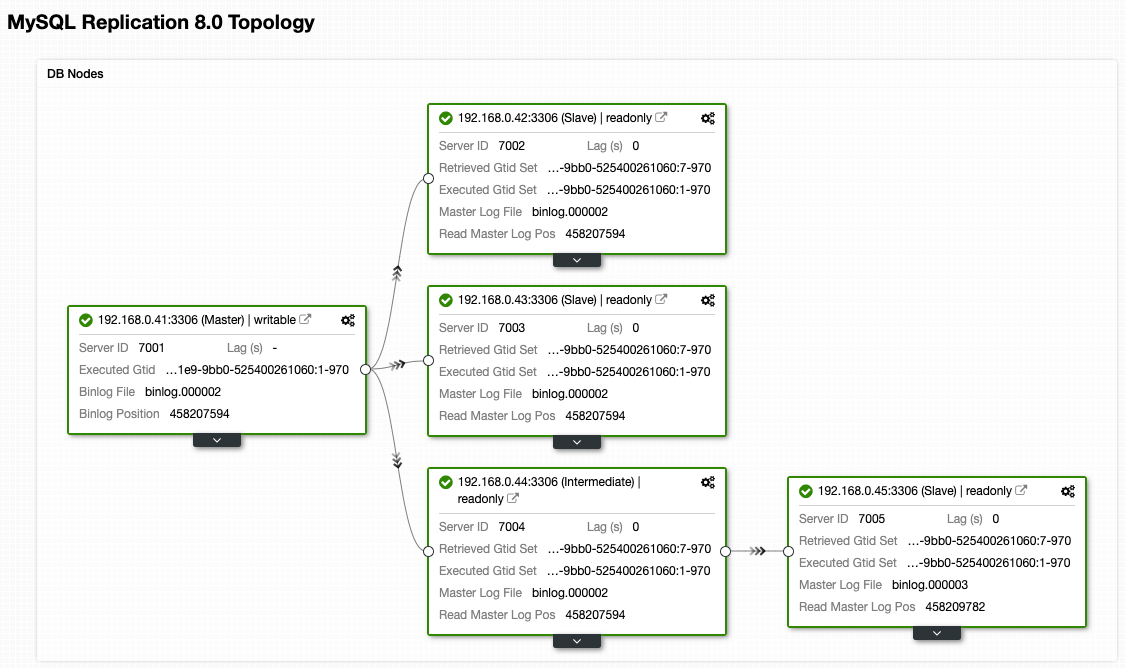
While this is what our architecture looks like now after failover (taken from ClusterControl’s Topology view):
Node Provisioning
Before A can be a master, it must be brought up-to-date with the current database state. The best way to do this is to turn A as slave to the active master, B. Since all nodes are configured with log_slave_updates=ON (it means a slave also produces binary logs), we can actually pick other slaves like C and D as the source of truth for initial syncing. However, the closer to the active master, the better. Keep in mind of the additional load it might cause when taking the backup. This part takes the most of the failback hours. Depending on the node state and dataset size, syncing up the old master could take some time (it could be hours and days).
Once problem on “A” is resolved and ready to join the replication chain, the best first step is to attempt replicating from “B” (192.168.0.42) with CHANGE MASTER statement:
mysql> SET GLOBAL read_only = 1; /* enable read-only */
mysql> CHANGE MASTER TO MASTER_HOST = '192.168.0.42', MASTER_USER = 'rpl_user', MASTER_PASSWORD = 'p4ss', MASTER_AUTO_POSITION = 1; /* master information to connect */
mysql> START SLAVE; /* start replication */
mysql> SHOW SLAVE STATUSG /* check replication status */
If replication works, you should see the following in the replication status:
             Slave_IO_Running: Yes
            Slave_SQL_Running: Yes
If the replication fails, look at the Last_IO_Error or Last_SQL_Error from slave status output. For example, if you see the following error:
Last_IO_Error: error connecting to master '[email protected]:3306' - retry-time: 60 retries: 2Then, we have to create the replication user on the current active master, B:
mysql> CREATE USER [email protected] IDENTIFIED BY 'p4ss';
mysql> GRANT REPLICATION SLAVE ON *.* TO [email protected];
Then, restart the slave on A to start replicating again:
mysql> STOP SLAVE;
mysql> START SLAVE;
Other common error you would see is this line:
Last_IO_Error: Got fatal error 1236 from master when reading data from binary log: ...That probably means the slave is having problem reading the binary log file from the current master. In some occasions, the slave might be way behind whereby the required binary events to start the replication have been missing from the current master, or the binary on the master has been purged during the failover and so on. In this case, the best way is to perform a full sync by taking a full backup on B and restore it on A. On B, you can use either mysqldump or Percona Xtrabackup to take a full backup:
$ mysqldump -uroot -p --all-databases --single-transaction --triggers --routines > dump.sql # for mysqldump
$ xtrabackup --defaults-file=/etc/my.cnf --backup --parallel 1 --stream=xbstream --no-timestamp | gzip -6 - > backup-full-2019-04-16_071649.xbstream.gz # for xtrabackup
Transfer the backup file to A, reinitialize the existing MySQL installation for a proper cleanup and perform database restoration:
$ systemctl stop mysqld # if mysql is still running
$ rm -Rf /var/lib/mysql # wipe out old data
$ mysqld --initialize --user=mysql # initialize database
$ systemctl start mysqld # start mysql
$ grep -i 'temporary password' /var/log/mysql/mysqld.log # retrieve the temporary root password
$ mysql -uroot -p -e 'ALTER USER root@localhost IDENTIFIED BY "p455word"' # mandatory root password update
$ mysql -uroot -p < dump.sql # restore the backup using the new root password
Once restored, setup the replication link to the active master B (192.168.0.42) and enable read-only. On A, run the following statements:
mysql> SET GLOBAL read_only = 1; /* enable read-only */
mysql> CHANGE MASTER TO MASTER_HOST = '192.168.0.42', MASTER_USER = 'rpl_user', MASTER_PASSWORD = 'p4ss', MASTER_AUTO_POSITION = 1; /* master information to connect */
mysql> START SLAVE; /* start replication */
mysql> SHOW SLAVE STATUSG /* check replication status */
For Percona Xtrabackup, please refer to the documentation page on how to restore to A. It involves a prerequisite step to prepare the backup first before replacing the MySQL data directory.
Once A has started replicating correctly, monitor the Seconds_Behind_Master in the slave status. This will give you an idea on how far the slave has left behind and how long you need to wait before it catches up. At this point, our architecture looks like this:
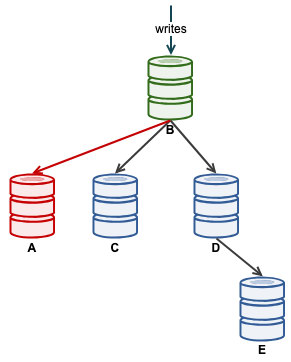
Once Seconds_Behind_Master falls back to 0, that's the moment when A has caught up as an up-to-date slave.
If you are using ClusterControl, you have the option to resync the node by restoring from an existing backup or create and stream the backup directly from the active master node:
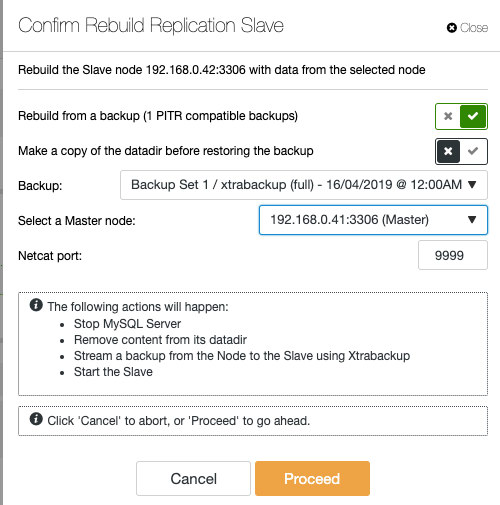
Staging the slave with existing backup is the recommended way to do in order to build the slave, since it doesn't bring any impact the active master server when preparing the node.
Promote the Old Master
Before promoting A as the new master, the safest way is to stop all writes operation on B. If this is not possible, simply force B to operate in read-only mode:
mysql> SET GLOBAL read_only = 'ON';
mysql> SET GLOBAL super_read_only = 'ON';
Then, on A, run SHOW SLAVE STATUS and check the following replication status:
Read_Master_Log_Pos: 45889974
Exec_Master_Log_Pos: 45889974
Seconds_Behind_Master: 0
Slave_SQL_Running_State: Slave has read all relay log; waiting for more updates
The value of Read_Master_Log_Pos and Exec_Master_Log_Pos must be identical, while Seconds_Behind_Master is 0 and the state must be 'Slave has read all relay log'. Make sure that all slaves have processed any statements in their relay log, otherwise you will risk that the new queries will affect transactions from the relay log, triggering all sorts of problems (for example, an application may remove some rows which are accessed by transactions from relay log).
On A, stop the replication and use RESET SLAVE ALL statement to remove all replication-related configuration and disable read only:
mysql> STOP SLAVE;
mysql> RESET SLAVE ALL;
mysql> SET GLOBAL read_only = 'OFF';
mysql> SET GLOBAL super_read_only = 'OFF';
At this point, A is ready to accept writes (read_only=OFF), however slaves are not connected to it, as illustrated below:
For ClusterControl users, promoting A can be done by using "Promote Slave" feature under Node Actions. ClusterControl will automatically demote the active master B, promote slave A as master and repoint C and D to replicate from A. B will be put aside and user has to explicitly choose "Change Replication Master" to rejoin B replicating from A at a later stage.
Slave Repointing
It's now safe to change the master on related slaves to replicate from A (192.168.0.41). On all slaves except E, configure the following:
mysql> STOP SLAVE;
mysql> CHANGE MASTER TO MASTER_HOST = '192.168.0.41', MASTER_USER = 'rpl_user', MASTER_PASSWORD = 'p4ss', MASTER_AUTO_POSITION = 1;
mysql> START SLAVE;
If you are a ClusterControl user, you may skip this step as repointing is being performed automatically when you decided to promote A previously.
We can then start our application to write on A. At this point, our architecture is looking something like this:

From ClusterControl topology view, we have restored our replication cluster to its original architecture which looks like this:
Take note that failback exercise is much less risky if compared to failover. It's important to schedule this exercise during off-peak hours to minimize the impact to your business.
Final Thoughts
Failover and failback operation must be performed carefully. The operation is fairly simple if you have a small number of nodes but for multiple nodes with complex replication chain, it could be a risky and error-prone exercise. We also showed how ClusterControl can be used to simplify complex operations by performing them through the UI, plus the topology view is visualized in real-time so you have the understanding on the replication topology you want to build.


