blog
How to Manage Your PostgreSQL Databases From the ClusterControl CLI

Did you know that apart from the ClusterControl web UI, you can also use a command line interface to manage your PostgreSQL instances?
ClusterControl supports PostgreSQL streaming replication (both asynchronous and synchronous replication) as well as standalone PostgreSQL instance. We have put our best effort to make the command line interface to be close to the UI in terms of functionality available.
Why would you want to use the CLI?
It allows you to deploy an entire replication setup in one command, or perform a failover, or add new nodes to the setup. This integrates very well with your existing infrastructure automation code written in Ansible, Chef or Puppet.
This blog post provides a walkthrough on how to manage a PostgreSQL streaming replication cluster using ClusterControl CLI, or s9s.
Take note that most of the functionalities shown in this blog post requires you to have ClusterControl installed and running with a valid subscription, either commercial license or free trial license (valid up to 30-day after ClusterControl installation).
Cluster Deployment and Import
Deploying a new Cluster
Before deploying a new cluster, or importing an existing PostgreSQL cluster into ClusterControl, ensure passwordless SSH from ClusterControl node to all database nodes is configured beforehand. Supposed we would want to deploy a new three-node PostgreSQL streaming replication, run the following commands on ClusterControl node:
$ whoami
root
$ ssh-keygen -t rsa # if you haven't generated SSH key
$ ssh-copy-id 192.168.0.91 # PostgreSQL1
$ ssh-copy-id 192.168.0.92 # PostgreSQL2
$ ssh-copy-id 192.168.0.93 # PostgreSQL3
On ClusterControl node, verify if you can the following command without password:
$ ssh 192.168.0.91 "ls /root"If you can see the directory content, you are in a good shape. Next, use ClusterControl CLI with –create flag to deploy the cluster:
$ s9s cluster
--create
--cluster-type=postgresql
--nodes="192.168.0.91?master;192.168.0.92?slave;192.168.0.93?slave"
--provider-version='11'
--db-admin='postgres'
--db-admin-passwd='s3cr3tP455'
--os-user=root
--os-key-file=/root/.ssh/id_rsa
--cluster-name='PostgreSQL 11 Streaming Replication'
--wait
Creating PostgreSQL Cluster
 Job 259 RUNNING    [█▋        ]  15% Installing helper packages
We specified the first node, 192.168.0.91 as the master and the rest are slaves. Since we already configured passwordless SSH via root user, we specified the OS user as “root” together with the corresponding SSH key file using –os-key-file flag. The –wait flag means the job will wait and report the progress until the it finishes.
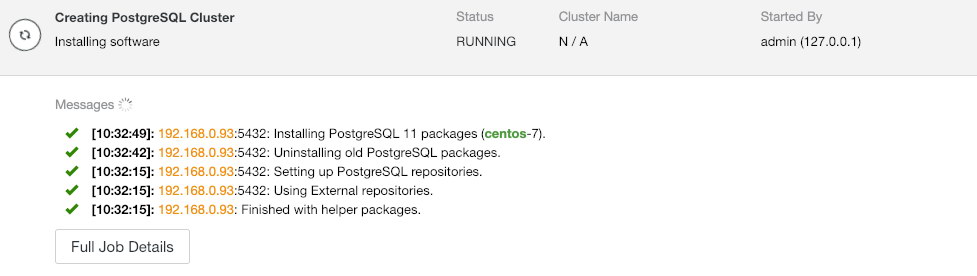
You can also monitor the deployment progress from ClusterControl UI under Activity > Jobs > Creating PostgreSQL Cluster:
Once the deployment completes, we can see the summary of the running cluster by using the –stat flag:
$ s9s cluster --stat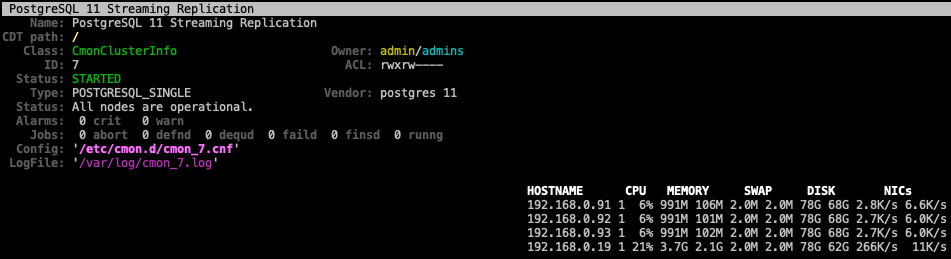
Importing an Existing Cluster
If let’s say you already have a PostgreSQL streaming replication cluster deployed manually, you can import it into ClusterControl using the –register flag as shown in the following command:
$ s9s cluster
--register
--cluster-type=postgresql
--nodes="192.168.0.91;192.168.0.92;192.168.0.93"
--provider-version='11'
--db-admin='postgres'
--db-admin-passwd='s3cr3tP455'
--os-user=root
--os-key-file=/root/.ssh/id_rsa
--cluster-name="PostgreSQL 11"
--wait
Register PostgreSQL
- Job 263 RUNNING    [        █ ] ---% Importing Cluster
ClusterControl will then connect to the specified nodes, discover the topology and register the cluster into ClusterControl. You can verify with ‘s9s cluster –stat’ command as shown above.
Node and Cluster Management
Service Control
To perform a rolling restart of a cluster, specify the cluster ID and use –rolling-restart flag:
$ s9s cluster --rolling-restart --cluster-id=8 --wait
Rolling Restart
- Job 264 RUNNING    [██▊       ]  27% Waiting for 192.168.0.91
Use the –stop flag for component “cluster” to stop a cluster. To see the job output instead of progress bar, we can use –log flag instead:
$ s9s cluster --stop --cluster-id=8 --log
This is an RPC V2 job (a job created through RPC V2).
The job owner is 'admin'.
Accessing '/.runtime/jobs/jobExecutor' to execute...
Access ok.
Setting cluster to 'SHUTTING_DOWN' state.
192.168.0.91:5432: Stopping PostgreSQL service.
192.168.0.91:5432: Waiting PostgreSQL top stop.
192.168.0.92:5432: Stopping PostgreSQL service.
192.168.0.92:5432: Waiting PostgreSQL top stop.
192.168.0.93:5432: Stopping PostgreSQL service.
192.168.0.93:5432: Waiting PostgreSQL top stop.
Setting cluster to 'STOPPED' state.
It will report the same job messages as the web UI. Similar to the above, to start a cluster, simply use the –start flag (we use –wait flag instead to see the progress instead of the job logs):
$ s9s cluster --start --cluster-id=8 --wait
Starting Cluster
 Job 272 RUNNING    [     █    ] ---% Start Cluster
To restart the PostgreSQL service on a database node, we use the “node” component and –restart flag:
$ s9s node
--restart
--cluster-id=8
--nodes=192.168.0.92
--log
Preparing to restart host.
192.168.0.92:5432: Stopping PostgreSQL service.
192.168.0.92:5432: Waiting to stop.
192.168.0.92:5432: Starting PostgreSQL.
192.168.0.92:5432: The postgresql service was started.
192.168.0.92:5432: Waiting to start.
To stop and start a PostgreSQL node, simply apply the same command with –stop or –start flag, as shown below:
$ s9s node --stop --cluster-id=8 --nodes=192.168.0.92
$ s9s node --start --cluster-id=8 --nodes=192.168.0.92
Take note that those actions will not reboot the system.
Scaling Node
To remove a node from a cluster, use the –remove-node flag:
$ s9s cluster
--remove-node
--nodes=192.168.0.93
--cluster-id=8
--log
Removing node 192.168.0.93: checking job parameters.
192.168.0.93:5432: Stopping PostgreSQL service.
192.168.0.93:5432: Waiting to stop.
192.168.0.93:5432: removed PostgreSQL Server
Updating load balancers.
Adding a new node works similarly, but you must ensure the node is accessible via passwordless SSH beforehand. Configure it first and then add the node using the –add-node flag:
$ s9s cluster
--add-node
--nodes=192.168.0.93
--cluster-id=8
--log
addNode: Verifying job parameters.
Found a master candidate: 192.168.0.91:5432, adding 192.168.0.93:5432 as a slave.
Verifying job parameters.
192.168.0.93:5432: Disabling SELinux/Apparmor.
192.168.0.93: Checking firewall.
192.168.0.93: Disabling firewalld.
192.168.0.93: Flushing iptables.
192.168.0.93:5432: Installing new node.
192.168.0.93:5432: Using the master's data directory '/var/lib/pgsql/11/data'.
192.168.0.91: Checking size of '/var/lib/pgsql/11/data'.
192.168.0.91: /var/lib/pgsql/11/data size is 103.00 MiB.
192.168.0.93: Checking free space in '/var/lib/pgsql/11/data'.
192.168.0.93: /var/lib/pgsql/11/data has 34.19 GiB free space.
192.168.0.93:5432: Setting SELinux in permissive mode.
192.168.0.93:5432: Disabling firewall.
192.168.0.93:5432: Tuning OS parameters.
192.168.0.93:5432: Setting vm.swappiness = 1.
192.168.0.93:5432: Installing helper packages.
192.168.0.93: Upgrading nss.
192.168.0.93: Upgrading ca-certificates.
192.168.0.93: Installing net-tools.
192.168.0.93: Installing netcat.
192.168.0.93: Installing nc.
192.168.0.93: Installing socat.
192.168.0.93: Installing perl-Data-Dumper.
192.168.0.93: Installing which.
192.168.0.93: Installing perl-Data-Dumper-Names.
192.168.0.93: Installing psmisc.
192.168.0.93: Installing rsync.
192.168.0.93: Installing libaio.
192.168.0.93: Installing libevent.
192.168.0.93: Installing wget.
192.168.0.93: Installing curl.
192.168.0.93: Installing gnupg2.
192.168.0.93: Installing pigz.
192.168.0.93: Installing bzip2.
192.168.0.93: Installing iproute2.
192.168.0.93: Installing tar.
192.168.0.93: Installing openssl.
192.168.0.93: Upgrading openssl openssl-libs.
192.168.0.93: Finished with helper packages.
192.168.0.93:5432: Using External repositories.
192.168.0.93:5432: Setting up PostgreSQL repositories.
192.168.0.93:5432: Uninstalling old PostgreSQL packages.
192.168.0.93:5432: Installing PostgreSQL 11 packages (centos-7).
192.168.0.93:5432: PostgreSQL installed, init-name: postgresql-11.
192.168.0.93: Updating PostgreSQL port (5432) and directory.
192.168.0.93:5432: Granting remote access to PostgreSQL server.
192.168.0.93:5432: Granting controller (10.0.2.15,192.168.0.19).
192.168.0.93:5432: Updating configuration.
192.168.0.93:5432: Enabling stat_statements plugin.
192.168.0.93:5432: Setting wal options.
192.168.0.93:5432: Performance tuning.
192.168.0.93:5432: Selected workload type: mixed
Detected system memory: 991.18 MiB
Using the following fine-tuning options:
  checkpoint_completion_target: 0.9
  effective_cache_size: 761229kB
  maintenance_work_mem: 63435kB
  max_connections: 100
  shared_buffers: 253743kB
  wal_keep_segments: 32
  work_mem: 5074kB
Writing file '192.168.0.93:/var/lib/pgsql/11/data/postgresql.conf'.
192.168.0.93:5432: Restarting PostgreSQL service
192.168.0.93:5432: Testing connection (attempt #1).
192.168.0.93:5432: Connected ok.
192.168.0.93:5432: Using the master's data directory '/var/lib/pgsql/11/data'.
192.168.0.91:5432(master): Verifying PostgreSQL version.
Setting up replication 192.168.0.91:5432->192.168.0.93:5432
Collecting server variables.
192.168.0.91:5432: Using the pg_hba.conf contents for the slave.
192.168.0.93:5432: Updating slave configuration.
Writing file '192.168.0.93:/var/lib/pgsql/11/data/postgresql.conf'.
192.168.0.93:5432: GRANT new node on members to do pg_basebackup.
192.168.0.91:5432: granting 192.168.0.93:5432.
192.168.0.93:5432: Stopping slave.
192.168.0.93:5432: Cleaning up slave data directory: /var/lib/pgsql/11/data
192.168.0.93:5432: detected version: 11.1
192.168.0.93:5432: Doing initial sync (pg_basebackup) from 192.168.0.91:5432.
192.168.0.93:5432: Synchronizing pg_hba.conf from master.
Writing file '192.168.0.93:/var/lib/pgsql/11/data/postgresql.conf'.
192.168.0.93:5432: Creating '/var/lib/pgsql/11/data/recovery.conf': Setting 192.168.0.91:5432 as master.
192.168.0.93:5432: Successfully created '/var/lib/pgsql/11/data/recovery.conf'.
192.168.0.93:5432: Restarting PostgreSQL
192.168.0.93:5432: Grant cluster members on the new node (for failover).
Grant connect access for new host in cluster.
Adding grant on 192.168.0.91:5432.
Adding grant on 192.168.0.92:5432.
192.168.0.93:5432: Waiting until service starts.
192.168.0.93:5432: Registering node.
192.168.0.93:5432: Verifying configuration.
192.168.0.93:5432: Checking 'listen_addresses'.
192.168.0.93:5432: Checking variables.
192.168.0.93:5432: Detected PostgreSQL 11.1.
192.168.0.93:5432: Registering host with host manager.
192.168.0.93:5432: Added host to cluster.
Replication slave job finished.
192.168.0.93: Installing cronie.
192.168.0.91:5432: [postgres] Pulling '/var/lib/pgsql/11/data/postgresql.conf'.
192.168.0.92:5432: [postgres] Pulling '/var/lib/pgsql/11/data/postgresql.conf'.
192.168.0.93:5432: [postgres] Pulling '/var/lib/pgsql/11/data/postgresql.conf'.
From the job logs, we can see that since the cluster already has a master running (192.168.0.91), the new node will be deployed as a slave to the master. ClusterControl will then perform all necessary actions and prepare the new node as the given role accordingly.
Switchover to a new Master
To perform the switchover, pick one of the slave to become the new master with –promote-slave flag:
$ s9s cluster
--promote-slave
--nodes=192.168.0.92
--cluster-id=8
--log
192.168.0.92:5432: Promoting server to master.
192.168.0.92:5432: Current master is 192.168.0.91:5432.

SERVER           HOST_STATUS            STATUS            ROLE RECEIVE/REPLAY
192.168.0.91     CmonHostOnline   NODE_CONNECTED         master 0/9000EF0; 0/9000EF0
192.168.0.92     CmonHostOnline   NODE_CONNECTED         slave  0/9000EF0; 0/9000EF0
192.168.0.93     CmonHostOnline   NODE_CONNECTED         slave  0/9000EF0; 0/9000EF0

Switching over to 192.168.0.92:5432 (previous master is 192.168.0.91:5432)
192.168.0.91:5432: Stopping the current master.
192.168.0.91:5432: Stopping PostgreSQL service.
192.168.0.91:5432: Waiting to stop.
192.168.0.92:5432: Failover, using file.
192.168.0.92:5432: Waiting to become a master.
192.168.0.92:5432: Became master, ok.
Switching slaves to the new master.
192.168.0.93:5432: Stopping PostgreSQL service.
192.168.0.93:5432: Waiting to stop.
192.168.0.92:5432: Granting host (192.168.0.93:5432).
Running /usr/pgsql-11/bin/pg_rewind --target-pgdata=/var/lib/pgsql/11/data --source-server="host=192.168.0.92 port=5432 user=cmon password=***** dbname=postgres"
192.168.0.93: servers diverged at WAL location 0/9000F60 on timeline 1
no rewind required
192.168.0.93:5432: Creating '/var/lib/pgsql/11/data/recovery.conf': Setting 192.168.0.92:5432 as master.
192.168.0.93:5432: Successfully created '/var/lib/pgsql/11/data/recovery.conf'.
192.168.0.93:5432: Starting PostgreSQL.
192.168.0.93:5432: The postgresql service was started.
192.168.0.93:5432: Waiting to start.
192.168.0.93:5432: Restarted with new master.
192.168.0.91:5432: Stopping PostgreSQL service.
192.168.0.91:5432: Waiting to stop.
192.168.0.92:5432: Granting host (192.168.0.91:5432).
Running /usr/pgsql-11/bin/pg_rewind --target-pgdata=/var/lib/pgsql/11/data --source-server="host=192.168.0.92 port=5432 user=cmon password=***** dbname=postgres"
192.168.0.91: servers diverged at WAL location 0/9000F60 on timeline 1
no rewind required
192.168.0.91:5432: Creating '/var/lib/pgsql/11/data/recovery.conf': Setting 192.168.0.92:5432 as master.
192.168.0.91:5432: Successfully created '/var/lib/pgsql/11/data/recovery.conf'.
192.168.0.91:5432: Starting PostgreSQL.
192.168.0.91:5432: The postgresql service was started.
192.168.0.91:5432: Waiting to start.
192.168.0.91:5432: Restarted with new master.
Servers after promote:
SERVER           HOST_STATUS            STATUS            ROLE RECEIVE/REPLAY
192.168.0.91     CmonHostOnline   NODE_CONNECTED         slave  0/9001F90; 0/9001F90
192.168.0.92     CmonHostOnline   NODE_CONNECTED         master 0/9001F90; 0/9001F90
192.168.0.93     CmonHostOnline   NODE_CONNECTED         slave  0/9001F90; 0/9001F90

192.168.0.92:5432: promote finished (this is the new master).
Successfully promoted a new master.
The job messages show that ClusterControl will first discover the current topology and stop all nodes in the cluster. Then, it configures the new master and gets the other nodes to replicate from it. It will also attempt to run pg_rewind to re-synchronise the PGDATA of the downgraded master with a new base backup. At the end of the job, ClusterControl reports the current topology and the state of the promotion.
We can then verify by listing out all nodes for cluster ID 8:
$ s9s node --list --cluster-id=8 --long
STAT VERSION    CID CLUSTER       HOST         PORT COMMENT
coC- 1.7.1.2985   8 PostgreSQL 11 192.168.0.19 9500 Up and running.
poS- 11.1         8 PostgreSQL 11 192.168.0.91 5432 Up and running.
poM- 11.1         8 PostgreSQL 11 192.168.0.92 5432 Up and running.
poS- 11.1         8 PostgreSQL 11 192.168.0.93 5432 Up and running.
The state “poM-” on the leftmost column carries the following meaning:
- p – PostgreSQL node
- o – online
- M – master
Database Management
To list out all databases found on the cluster, use the –list-database flag on component cluster:
$ s9s cluster
--list-database
--long
--cluster-id=8
SIZE      #TBL #ROWS   OWNER  GROUP  CLUSTER                          DATABASE
  7340032    0       0 system admins PostgreSQL Streaming Replication postgres
  7340032    0       0 system admins PostgreSQL Streaming Replication template1
  7340032    0       0 system admins PostgreSQL Streaming Replication template0
382730240   12 1156642 system admins PostgreSQL Streaming Replication sbtest
Take note that if the cluster has a lot of databases, this option might not show some of them. Sampling a huge number of databases would generate high load and so the controller has an upper limit built into it.
If you want to create a new database for the cluster, simply do:
$ s9s cluster
--create-database
--cluster-id=8
--db-name=my_shopping_db
To create a new database user, together with a database associated with it (using the same database name), use the –create-account with –with-database flag:
$ s9s cluster
--create-account
--cluster-id=1
--account=mysystem:[email protected]
--with-database
Account 'mysystem' created.
192.168.0.91:5432: Allowing connections from 192.168.0.15.
192.168.0.92:5432: Allowing connections from 192.168.0.15.
192.168.0.93:5432: Allowing connections from 192.168.0.15.
Database 'mysystem' created.
Access for 'mysystem' to 'mysystem' granted.
ClusterControl will perform the necessary actions to create the database and user account with proper privileges and allow it on all database nodes.
Backup Management
ClusterControl supports two backup methods for PostgreSQL:
- pgdump – Alias to pg_dumpall, a utility for writing out all PostgreSQL databases of a cluster into one script file.
- pg_basebackup – A utility to create a full, file system-level backup of a PostgreSQL database.
Creating a Backup
To create a new backup using pg_dumpall, pick one database node and specify “pgdump” in the –backup-method flag:
$ s9s backup
--create
--backup-method=pgdump
--cluster-id=8
--nodes=192.168.0.92
--backup-directory=/storage/backups
    --on-controller
The –on-controller flag indicates that we would want the created backup to be stored under /storage/backups directory on the ClusterControl node. Omit the flag if you want to store it on the database node itself. The same command can be applied to create pg_basebackup backup. Just replace “pgdump” with “pg_basebackup” would do.
To list out the backup, simply use the –list and –cluster-id flags:
$ s9s backup --list --long --cluster-id=8
ID PI CID V I STATE     OWNER          HOSTNAME     CREATED  SIZE    TITLE
 8  -   8 - F COMPLETED admin          192.168.0.92 08:42:47    1204 Untitled Backup Record
 9  -   8 - F COMPLETED admin          192.168.0.92 08:45:52 3865462 Untitled Backup Record
Scheduling a Backup
Scheduling a backup is similar to the command we used to create a backup, with additional –recurrence flag:
$ s9s backup
--create
--backup-method=pg_basebackup
--cluster-id=8
--nodes=192.168.0.92
--backup-directory=/storage/backups
--on-controller
--recurrence='30 0 * * *'
The value of recurrence must be enclosed with quote and in crontab format.
Restoring a backup
To restore a backup to a cluster, use the –restore flag and point out the backup ID that you want to use:
$ s9s backup
--restore
--cluster-id=8
--backup-id=9
--log
192.168.0.19: Checking 'socat' availability.
Stop slaves as restoring offline backup to master.
192.168.0.91:5432: Stopping PostgreSQL service.
192.168.0.91:5432: Waiting to stop.
192.168.0.93:5432: Stopping PostgreSQL service.
192.168.0.93:5432: Waiting to stop.
192.168.0.92:5432: Stopping node for restoring a base-backup.
192.168.0.92:5432: Stopping PostgreSQL service.
192.168.0.92:5432: Waiting to stop.
192.168.0.92:5432: Backing up the current datadir.
192.168.0.92: Mount point of '/var/lib/pgsql/11/data': '/'
192.168.0.92: Creating copy of datadir (using 'mv'): /var/lib/pgsql/11/data_bak
192.168.0.92: Checking 'socat' availability.
192.168.0.92: Starting: su - postgres -c 'socat -u tcp-listen:9999,reuseaddr stdout | tar -C/var/lib/pgsql/11/data -xzf-' 2>&1 > /tmp/netcat.pg.log
192.168.0.92: socat/nc is started.
192.168.0.92: Restoring from '192.168.0.19':'/storage/backups/BACKUP-9/base.tar.gz'
192.168.0.92:5432: Starting node after restored a base-backup.
192.168.0.92:5432: Starting PostgreSQL.
192.168.0.92:5432: The postgresql service was started.
192.168.0.92:5432: Waiting to start.
You may now rebuild your slaves.
Finished restoring.
Checking the cluster.
Setting cluster to 'STARTING' state.
192.168.0.91:5432: Starting PostgreSQL.
192.168.0.91:5432: The postgresql service was started.
192.168.0.93:5432: Starting PostgreSQL.
192.168.0.93:5432: The postgresql service was started.
Cluster is successfully started.
Cluster status is STARTED.
Take note that for pg_basebackup’s backup, the restore operation requires database downtime. All PostgreSQL nodes will be stopped prior to the restoration and the restoration takes place on the last known master. This master will be brought up first (followed by all slaves) after the restoration completes.
Verifying a Backup
To restore and verify the backup, use –verify flag and specify the destination server using the –test-server flag:
$ s9s backup
--verify
--cluster-id=8
--backup-id=9
--test-server=192.168.0.99
--log
The test server must not be part of the cluster and must be accessible via passwordless SSH from ClusterControl node. ClusterControl will first install the target server with the same PostgreSQL version, stream and restore the backup on that node. The backup verification looks for the last exit code after restoration. If the backup is restorable, ClusterControl will then stop the test server and remove it from ClusterControl (but ClusterControl won’t shut it down). You should see the following once the job completes:
Backup 9 was successfully verified.Create Cluster from Backup
ClusterControl introduced a new feature in v1.7.1, where one can create a new cluster based on a backup taken by an existing cluster. This can be very useful to test out your database on a different platform or database version. In this example, we would like to deploy a two-node PostgreSQL 9.6 cluster based on backup ID 214:
$ s9s cluster
--create
--cluster-type=postgresql
--nodes="192.168.0.101?master;192.168.0.102?slave"
--provider-version=9.6
--db-admin=postgres
--db-admin-passwd='s3cr3tP455'
--os-user=root
--os-key-file=/root/.ssh/id_rsa
--cluster-name="PostgreSQL 9.6 - Test"
--backup-id=214
--wait
Take note that the the admin user password for the new cluster must be identical with the PostgreSQL admin password as included in the backup. Basically, ClusterControl performs the deployment job based on the following order:
- Install necessary softwares and dependencies on all PostgreSQL nodes.
- Start the first node.
- Stream and restore backup on the first node (with auto-restart flag).
- Configure and add the rest of the nodes.
You can then verify the cluster list by using the following command:
$ s9s cluster --statConfiguration Management
To list out the PostgreSQL configuration of a node, use the –list-config flag:
$ s9s node --list-config --cluster-id=8 --nodes=192.168.0.92
GROUP OPTION NAME                  VALUE
-     data_directory               '/var/lib/pgsql/11/data'
-     listen_addresses             '*'
-     port                         5432
-     max_connections              100
-     shared_buffers               253743kB
-     work_mem                     5074kB
-     maintenance_work_mem         63435kB
-     dynamic_shared_memory_type   posix
-     wal_level                    hot_standby
-     full_page_writes             on
-     wal_log_hints                on
-     max_wal_size                 1GB
-     min_wal_size                 80MB
-     checkpoint_completion_target 0.9
-     max_wal_senders              16
-     wal_keep_segments            32
-     hot_standby                  on
-     effective_cache_size         761229kB
-     log_destination              'stderr'
-     logging_collector            on
-     log_directory                'log'
-     log_filename                 'postgresql-%a.log'
-     log_truncate_on_rotation     on
-     log_rotation_age             1d
-     log_rotation_size            0
-     log_line_prefix              '%m [%p] '
-     log_timezone                 'UTC'
-     track_activity_query_size    2048
-     datestyle                    'iso, mdy'
-     timezone                     'UTC'
-     lc_messages                  'en_US.UTF-8'
-     lc_monetary                  'en_US.UTF-8'
-     lc_numeric                   'en_US.UTF-8'
-     lc_time                      'en_US.UTF-8'
-     default_text_search_config   'pg_catalog.english'
-     shared_preload_libraries     'pg_stat_statements'
-     pg_stat_statements.track     all
ClusterControl returns the output of OPTION NAME and VALUE accordingly. The GROUP column is not applicable in PostgreSQL thus you should see ‘-‘ value.
To change a configuration option, use –change-config flag and specify the parameter and value using –opt-name and –opt-value respectively:
$ s9s node
--change-config
--nodes=192.168.0.92
--opt-name=min_wal_size
--opt-value='100MB'
192.168.0.92:5432: Changed a read-only parameter. Node restart is required for change to take effect.
You should see ClusterControl return the configuration modification status and advise the follow-up procedure to make sure the configuration change takes affect. You may then use the “s9s node –restart” command to restart the particular node.
Final Thoughts
ClusterControl offers great flexibility when it comes to managing and monitoring your PostgreSQL database cluster. You have the choice of web UI, which is fairly simple and straightforward plus command line interface, which empowers you to achieve full database automation via scripting. Happy managing!


