blog
How to Go Into Production With MongoDB – Top Ten Tips

After the successful development of the application and prior to dedicating yourself to the production of MongoDB, reckon with these quick guidelines in order to ensure a smooth and efficient flow as well as to achieve optimal performance.
1) Deployment Options
Selection of Right Hardware
For optimal performance, it’s preferable to use SSD rather than the HDD. It is necessary to take care whether your storage is local or remote and take measures accordingly. It’s better to use RAID for protection of hardware defects and recovery scheme, but don’t rely completely on it, as it doesn’t offer any protection against adverse failures. For execution on disks, RAID-10 is a good fit in terms of performance and availability which lacks often in other RAID levels. The right hardware is the building block for your application for optimized performance and to avoid any major debacle.
Cloud Hosting
A range of cloud vendors is available which offer pre-installed MongoDB database hosts. The selection of best choice is the founding step for your application to grow and make first impressions on the target market. MongoDB Atlas is one of the possible choices which offers a complete solution for cloud interface with features like deployment of your nodes and a snapshot of your data stored in Amazon S3. ClusterControl is another good available option for easy deployment and scaling. Which offers a variety of features like easy addition and removal of nodes, resize instances, and cloning of your production cluster. You can try ClusterControl here without being charged. Other available options are RackSpace ObjectRocket and MongoStitch.
2) RAM
Frequently accessed items are cached in RAM, so that MongoDB can provide optimal response time. RAM usually depends on the amount of data you are going to store, the number of collections, and indexes. Make sure you have enough RAM to accommodate your indexes otherwise it will drastically affect your application performance on production. More RAM means less page fault and better response time.
3) Indexing
For applications which include chronic write requests, indexing plays an imperative role. According to MongoDB docs:
“If a write operation modifies an indexed field, MongoDB updates all indexes that have the modified field as a key”
So, be careful while choosing indexes as it may affect your DB performance.
Indexing Example: Sample entry in the restaurant database
{
  "address": {
     "building": "701",
     "street": "Harley street",
     "zipcode": "71000"
  },
  "cuisine": "Bakery",
  "grades": [
     { "date": { "$date": 1393804800000 }, "grade": "A", "score": 2 },
     { "date": { "$date": 1378857600000 }, "grade": "A", "score": 6 },
     { "date": { "$date": 1358985600000 }, "grade": "A", "score": 10 },
     { "date": { "$date": 1322006400000 }, "grade": "A", "score": 9 },
     { "date": { "$date": 1299715200000 }, "grade": "B", "score": 14 }
  ],
  "name": "Bombay Bakery",
  "restaurant_id": "187521"
}-
Creating Index on Single Field
> db.restaurants.createIndex( { "cuisine": 1 } );
{
     "createdCollectionAutomatically" : false,
     "numIndexesBefore" : 1,
     "numIndexesAfter" : 2,
     "ok" : 1
}
In above example ascending order index is created on cuisine field.
-
Creating Index on Multiple Fields
> db.restaurants.createIndex( { "cuisine": 1 , "address.zipcode": -1 } );
{
        "createdCollectionAutomatically" : false,
        "numIndexesBefore" : 2,
        "numIndexesAfter" : 3,
        "ok" : 1
}
Here compound index is created on cuisine and zip code fields. The -ve number defines descending order.
4) Be Prepared for Sharding
MongoDB partitions the data into different machines using a mechanism known as sharding. It is not advised to add sharding in the beginning unless you are expecting hefty datasets. Do remember to keep your application performance in line you need a good sharding key, according to your data patterns as it directly affects your response time. Balancing of data across shards is automatic. However, it’s better to be prepared and have a proper plan. So you can consolidate whenever your application demands.
5) Best Practices for OS Configuration
- XFS File System
- It’s highly scalable, high performance 64-bit journaling file system. Revamps I/O performance by permitting fewer and larger I/O operations.
- Put file descriptor limit.
- Disable transparent huge pages and Nonuniform Access Memory (NUMA).
- Change the default TCP keepalive time to 300 seconds (for Linux) and 120 seconds (for Azure).
Try these commands for changing default keepalive time;
For Linux
sudo sysctl -w net.ipv4.tcp_keepalive_time=For Windows
Type this command in Command Prompt as an Administrator, where
reg add HKLMSYSTEMCurrentControlSetServicesTcpipParameters /t REG_DWORD /v KeepAliveTime /d 6) Ensuring High Availability using Replication
Going on production without replication can cause your app sudden down failures. Replication takes care of the problem if a node fails. Manage read, write operations for your secondary MongoDB instances according to your application needs.
Keep these things in mind while Replicating:
- For high availability, deploy your replica set into a minimum of three data centers.
- Ensure that MongoDB instances have 0 or 1 votes.
- Ensure full bi-directional network connectivity between all MongoDB instances.
Example of creating a replica set with 4 local MongoDB instances:
-
Creating 4 local MongoDB instances
First, create data directories
mkdir -p /data/m0 mkdir -p /data/m1 mkdir -p /data/m2 mkdir -p /data/m3 -
Start 4 local instances
mongod --replSet cluster1 --port 27017 --dbpath /data/m0 mongod --replSet cluster2 --port 27018 --dbpath /data/m1 mongod --replSet cluster1 --port 27019 --dbpath /data/m2 mongod --replSet cluster1 --port 27020 --dbpath /data/m3 -
Add the instances to the cluster and initiate
mongo myhost:34014
myConfig = {_id: ‘cluster1’, members: [
    {_id: 0, host: ‘myhost1:27017’},
    {_id: 1, host: ‘myhost2:27018’},
    {_id: 2, host: ‘myhost3:27019’},
    {_id: 3, host: ‘myhost4:27020’}]
}
rs.initiate(myConfig);
Security Measures
7) Secure Machines
Open ports on machines hosting MongoDB are vulnerable to various malicious attacks. More than 30 thousand MongoDB databases had been compromised in a ransomware attack due to lag in proper security configuration. While going on production close your public ports of MongoDB server. However, You should keep one port open for SSh purpose.
Enabling Authentication on MongoDB instance:
-
Launch mongod.conf file in your favorite editor.
-
Append these lines at the end of the config file.
security: authorization: enabled -
Append these lines at the end of the config file.
service mongod restart -
Confirm the status
service mongod status
Restraining external access
Open mongod.conf file again to set limited IPs access your server.
bind_ip=127.0.0.1By adding this line, it means you can only access your server through 127.0.0. (which is localhost). You can also add multiple IPs in bind option.
bind_ip=127.0.0.1,168.21.200.200It means you can access from localhost and your private network.
8) Password Protection
To add an extra security layer to your machines enable access control and enforce authentication. Despite the fact that you have restrained MongoDB server to accept connections from the outside world, there is still a possibility of any malicious scripts to get into your server. So, don’t be reluctant to set a username/password for your database and assign required permissions. Enabled access control will allow users only to perform actions determined by their roles.
Here are the steps to create a user and assigning database access with specific roles.
In the first place we will create a user (in this case, it’s admin) for managing all users and databases and then we will create specific database owner having only read and write privileges on one MongoDB database instance.
Create an admin user for managing others users for database instances
-
Open your Mongo shell and switch to the admin database:
use admin -
Create a user for admin database
db.createUser({ user: "admin", pwd: "admin_password", roles: [{ role: "userAdminAnyDatabase", db: "admin" }] }) -
Authenticate newly created user
db.auth("admin", "admin_password") -
Creating specific instance user:
use database_1 db.createUser({ user: "user_1", pwd: "your_password", roles: [{ role: "dbOwner", db: "database_1" }] }) -
Now verify, if a user has been successfully created or not.
db.auth("user_1", "your_password")
show collections
That’s it! You have successfully secured your database instances with proper authentication. You can add as many users as you want following the same procedure.
9) Encryption and Protection of Data
If you are using Wiredtiger as a storage engine then you can use it’s encryption at rest configuration to encrypt your data. If not, then encryption should be performed on the host using a file system, devices or physical encryption.
10) Monitor Your Deployment
Once you have finished the deployment of MongoDB into production, then you must track the performance activity to prevent early possible problems. There is a range of strategies you can adapt to monitor your data performance in the production environment.
-
MongoDB includes utilities, which return statistics about instance performance and activity. Utilities are used to pinpoint issues and analyze normal operations.
-
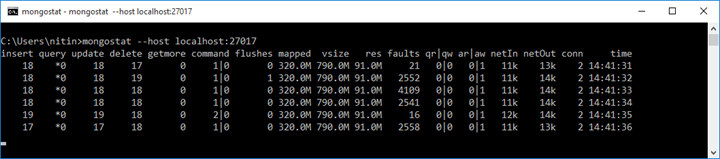
Use mongostat to apprehend arrangement of operation types and capacity planning.
-
For tracking reports and read-write activities, mongotop is recommended.
mongotop 15This command will return output after every 15 seconds.
                     ns    total    read    write          2018-04-22T15:32:01-05:00
   admin.system.roles      0ms     0ms      0ms
 admin.system.version      0ms     0ms      0ms
             local.me      0ms     0ms      0ms
       local.oplog.rs      0ms     0ms      0ms
   local.replset.minvalid  0ms     0ms      0ms
    local.startup_log      0ms     0ms      0ms
 local.system.indexes      0ms     0ms      0ms
  local.system.namespaces  0ms     0ms      0ms
 local.system.replset      0ms     0ms      0ms
                     ns    total    read    write          2018-04-22T15:32:16-05:00
   admin.system.roles      0ms     0ms      0ms
 admin.system.version      0ms     0ms      0ms
             local.me      0ms     0ms      0ms
       local.oplog.rs      0ms     0ms      0ms
   local.replset.minvalid  0ms     0ms      0ms
    local.startup_log      0ms     0ms      0ms
 local.system.indexes      0ms     0ms      0ms
  local.system.namespaces  0ms     0ms      0ms
 local.system.replset      0ms     0ms      0ms
MongoDB Monitoring Service (MMS) is another available option that monitors your MongoDB cluster and makes it convenient for you to have a sight of production deployment activities.
And of course there is ClusterControl by Severalnines, the automation and management system for open source databases. ClusterControl enables easy deployment of clusters with automated security settings and makes it simple to troubleshoot your database by providing easy-to-use management automation that includes repair and recovery of broken nodes, automatic upgrades, and more. You can get started with its (free forever) Community Edition, with which you can deploy and monitor MongoDB as well as create custom advisors in order to tune your monitoring efforts to those aspects that are specific to your setup. Download it free here.


