blog
How to Deploy the Open edX MongoDB Database for High Availability

Open edX is a platform that provides the massively scalable learning software technology behind edX. The Open edX project is a web-based platform for creating, delivering, and analyzing online courses. It is the software that powers edx.org and many other online education sites.
We have blogged previously about deploying a High Availability for MySQL database on the Open edX platform. As said previously, it is a complex platform as it covers multiple components, and part of this huge platform it is covered by multiple services:
- eCommerce: https://github.com/edx/ecommerce
- Catalog: https://github.com/edx/course-discovery
- LMS / Studio: https://github.com/edx/edx-platform
- Credentials: https://github.com/edx/credentials
- Insights: https://github.com/edx/edx-analytics-dashboard
- Analytics API: https://github.com/edx/edx-analytics-data-api
Essentially, the Open Edx is perfect for online courses amidst pandemic and online training as what you might have tried and taken already especially if you are acquiring a product certification.
Brief Architectural Overview
The centerpiece of the Open edX architecture is edx-platform, which contains the learning management and course authoring applications (LMS and Studio, respectively). Besides its edx-platform, the technical services comprising the whole platform comprises various technologies involved which covers up a whole complex level of this software. See the diagram below taken from edX Team presentation last December.
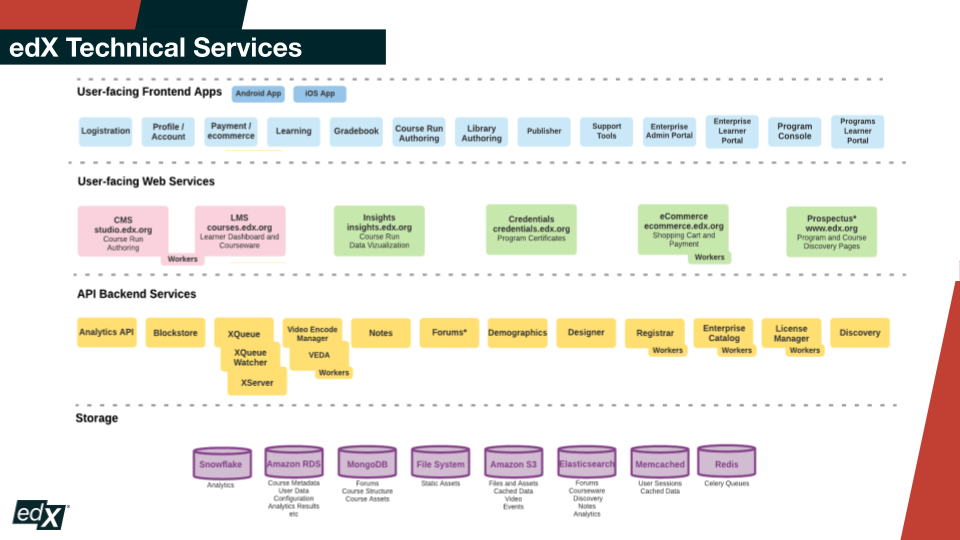
You have Snowflake, Amazon RDS, MongoDB, Amazon S3, Elasticsearch, Memcached, and Redis as the technologies embodying this rich platform. Yet it’s even hard to install and setup Open edX but I managed to put up a simple development environment to understand a bit of this platform.
Whilst, let’s focus on MongoDB which is used to store contents for Forums, Course Structure, and Course Assets. Per-learner data is stored in MySQL, so if you want to know and have high availability for your MySQL with Open edX, read it here.
Storing Content For MongoDB
MongoDB is the database of choice by Open edX for storing large files which are text files, PDFs, audio/video clips, tarballs, etc. If you are familiar with Open edX and have used it especially as an author for the LMS or Studio, data is stored if you upload assets to your Open edX setup. These uploads are so called “contentstore” is basically a MongoDB-backed GridFS instance. Open edX uses MongoDB GridFS in order to store file data in chunks within a MongoDB instance and are able to store files greater than 16 MB in size. It can also serve portions of large files instead of the whole file.
An asset can be uploaded as “locked” or “unlocked”. A locked asset is only available to students taking a particular course – the edx-platform checks the user’s role before serving the file. Unlocked assets are served to any user upon request. When a student in a course requests an asset, the entire asset is served from GridFS.
Setting up a High Availability For your Open edX MongoDB Database
Let’s admit that installing or setting up your Open edX platform is a great challenge. It’s tough especially that you are new to this platform or software but it has a very great architectural design. However, it is possible that your setup with your MongoDB is a one-node Replica Set stand as a primary. On the other hand, it is best that your Replica Set must have at least a secondary or multiple secondary nodes aside from the Primary. This serves your high availability setup in case your Primary goes kaput, your Secondary replica node will take over the primary role.
Setup a Replica Set with Secondary Replicas
Doing this, you just have to add and setup at least two secondary replicas. The ideal is that, at least, in a replica set, you have 3 nodes for which one is your Primary, then the other two nodes are your secondaries replicating to the primary. This allows the MongoDB Replica set to proceed an election in case primary loses connectivity with its secondaries. This gives you reliability, redundancy, and of course high availability. It is a simple setup that you can have to achieve a high available environment with MongoDB.
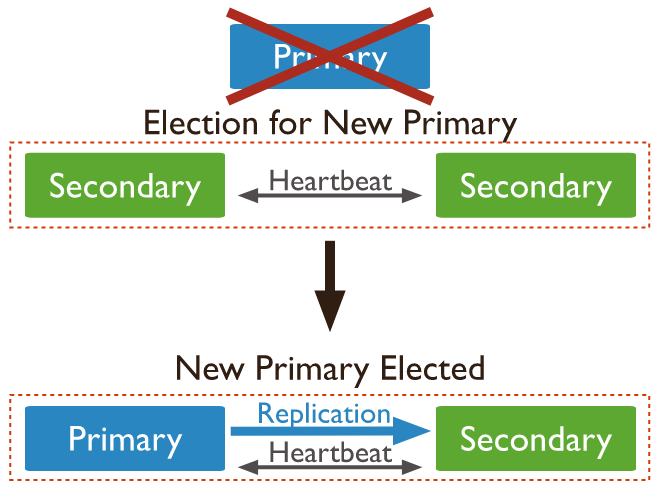
Why does this provide high availability? A Replica Set in MongoDB is a group of mongod processes that maintain the same data set. MongoDB Replica sets use elections to determine which set member will become primary to the event that primary goes down or terminated abnormally or some configuration changes. Replica sets can trigger an election in response to a variety of events, such as:
- Adding a new node to the replica set,
- initiating a replica set,
- performing replica set maintenance using methods such as rs.stepDown() or rs.reconfig(), and
- the secondary members losing connectivity to the primary for more than the configured timeout (10 seconds by default).
Take this example diagram which visualizes how the election works.
Additionally, you can use the other secondary replicas as your read preference but this depends on the setup based on your client’s connection. You can learn more by reading the read preference options for connection or check the Read Preference here.
Now, this looks great but dealing with your application client endpoint such as changing the hostname or IP address requires a manual change. It’s not ideal if you have a load balancer on top of your Replica Set just like HaProxy since MongoDB Replica Set performs the election internally of MongoDB.
Setup A Sharded Cluster
Sharded cluster is ideal if you are dealing with a large size of data sets. Although it doesn’t mean that you have to design a sharded cluster, it has to be dealing with large data sets. MongoDB offers mongos, which is a utility that shall act as a routing service for MongoDB shard configurations that processes queries from the application layer then determines the location of this data in the sharded cluster identified through its shard key in order to complete its transactions or database operations. Basically, just think that mongos instances behave identically to any other MongoDB instance.
So why having a mongos in front of your application? In times that your Replica set Primary hostname or IP changes after the election, from the application perspective, that means you also need to change the endpoint. With mongos, just point your application client to one of our mongos instances. Your application client only interfaces with the mongos instance and that’s all it matters. The mongos will be the one to handle your query requests or transactions utilizing its purpose and function for your MongoDB Shard setup. That means, in your Open edx configuration files, there’s no changes to be done. You don’t need to restart your application servers in order to catch up with the changes from your MongoDB Replica Sets.
How to Setup High Availability
For example, using ClusterControl. Using ClusterControl can be achieved simply and efficiently as this can be done over the UI avoiding those manual configurations and installations for a very complex setup.
Let’s consider you have an existing MongoDB instance with Open edX database existing,
rs0:PRIMARY> show dbs;

admin                0.000GB

cs_comments_service  0.000GB

edxapp               0.087GB

local                0.118GB


rs0:PRIMARY> rs.status()

{

        "set" : "rs0",

        "date" : ISODate("2021-01-22T14:46:51.398Z"),

        "myState" : 1,

        "term" : NumberLong(17),

        "heartbeatIntervalMillis" : NumberLong(2000),

        "members" : [

                {

                        "_id" : 0,

                        "name" : "192.168.40.10:27017",

                        "health" : 1,

                        "state" : 1,

                        "stateStr" : "PRIMARY",

                        "uptime" : 133,

                        "optime" : {

                                "ts" : Timestamp(1611326680, 1),

                                "t" : NumberLong(17)

                        },

                        "optimeDate" : ISODate("2021-01-22T14:44:40Z"),

                        "electionTime" : Timestamp(1611326679, 1),

                        "electionDate" : ISODate("2021-01-22T14:44:39Z"),

                        "configVersion" : 2,

                        "self" : true

                }

        ],

        "ok" : 1

}
You can simply import this as an existing database to ClusterControl and take a backup using ClusterControl’s backup feature. Alternatively, you can use mongodump or try using the Percona Backup for MongoDB.
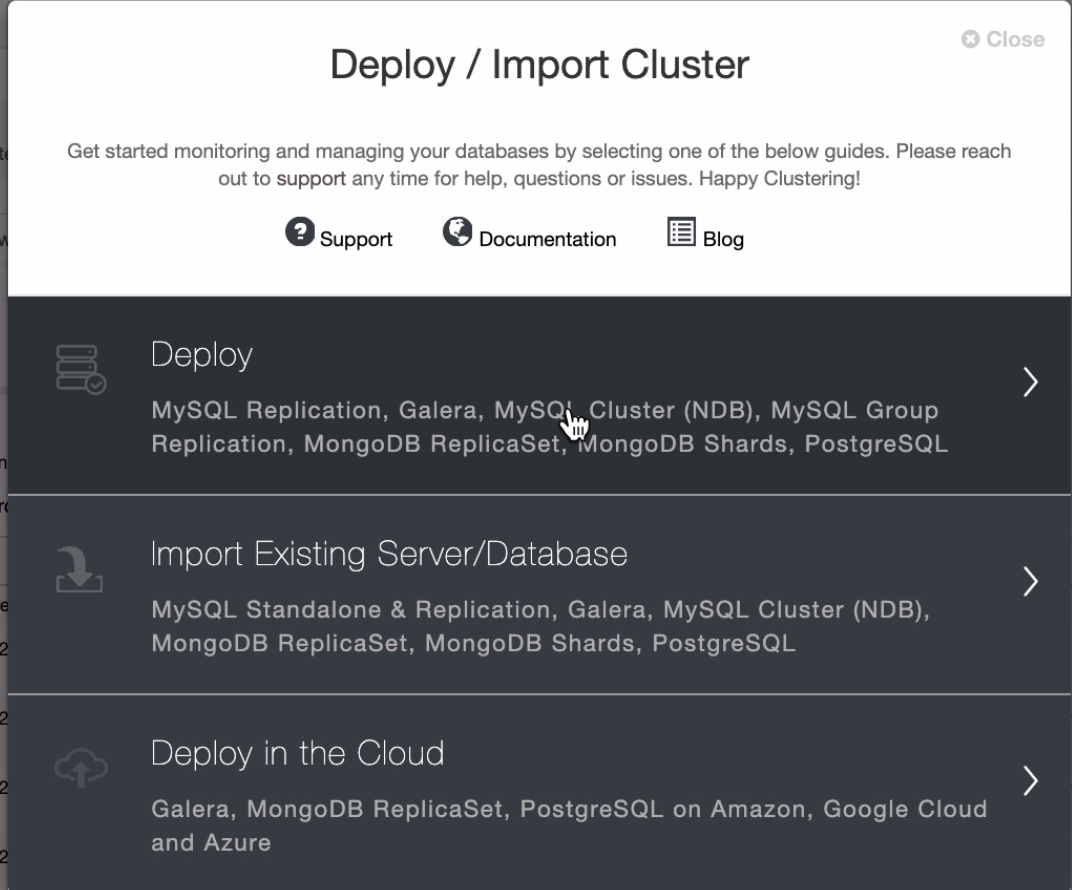
Now, in ClusterControl, create a MongoDB Shard as a new deployment. This can be done by the following steps:
-
Deploy a new MongoDB Shard in the deployment wizard dialog.
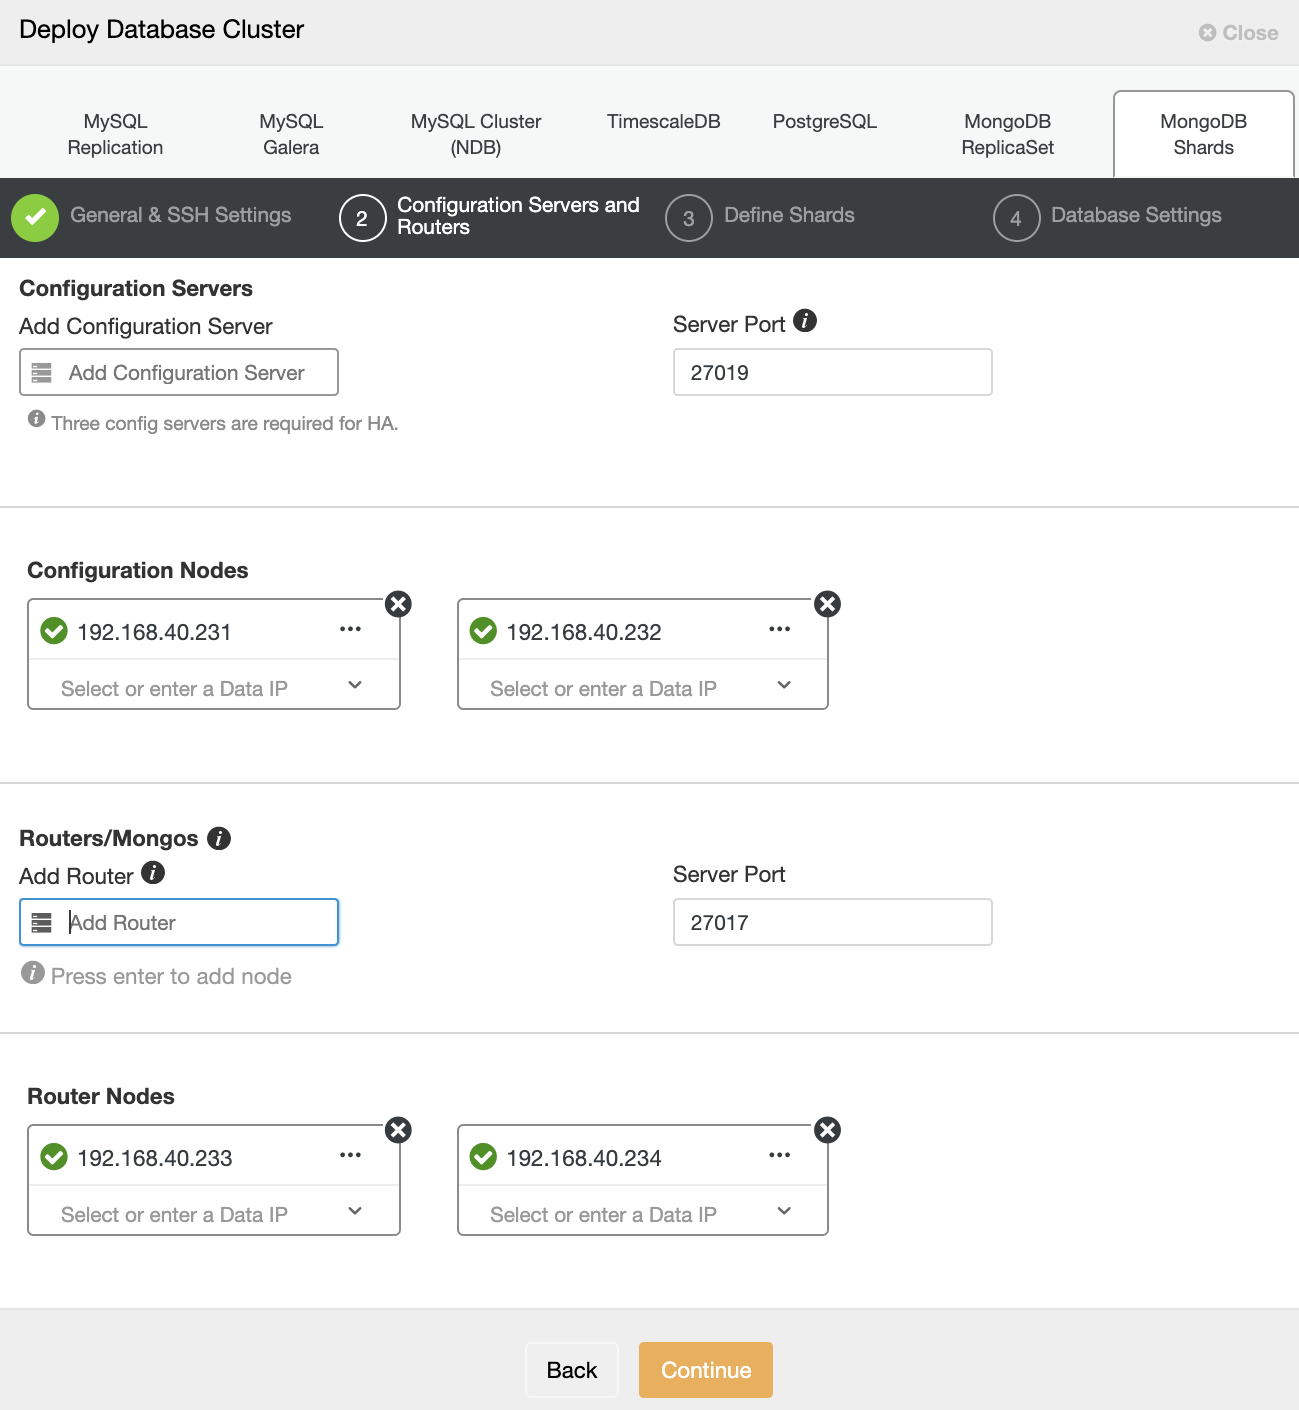
-
Setup the SSH Settings and its Configuration Servers and Routers. This is where your mongos instances shall be aside from your configuration servers.
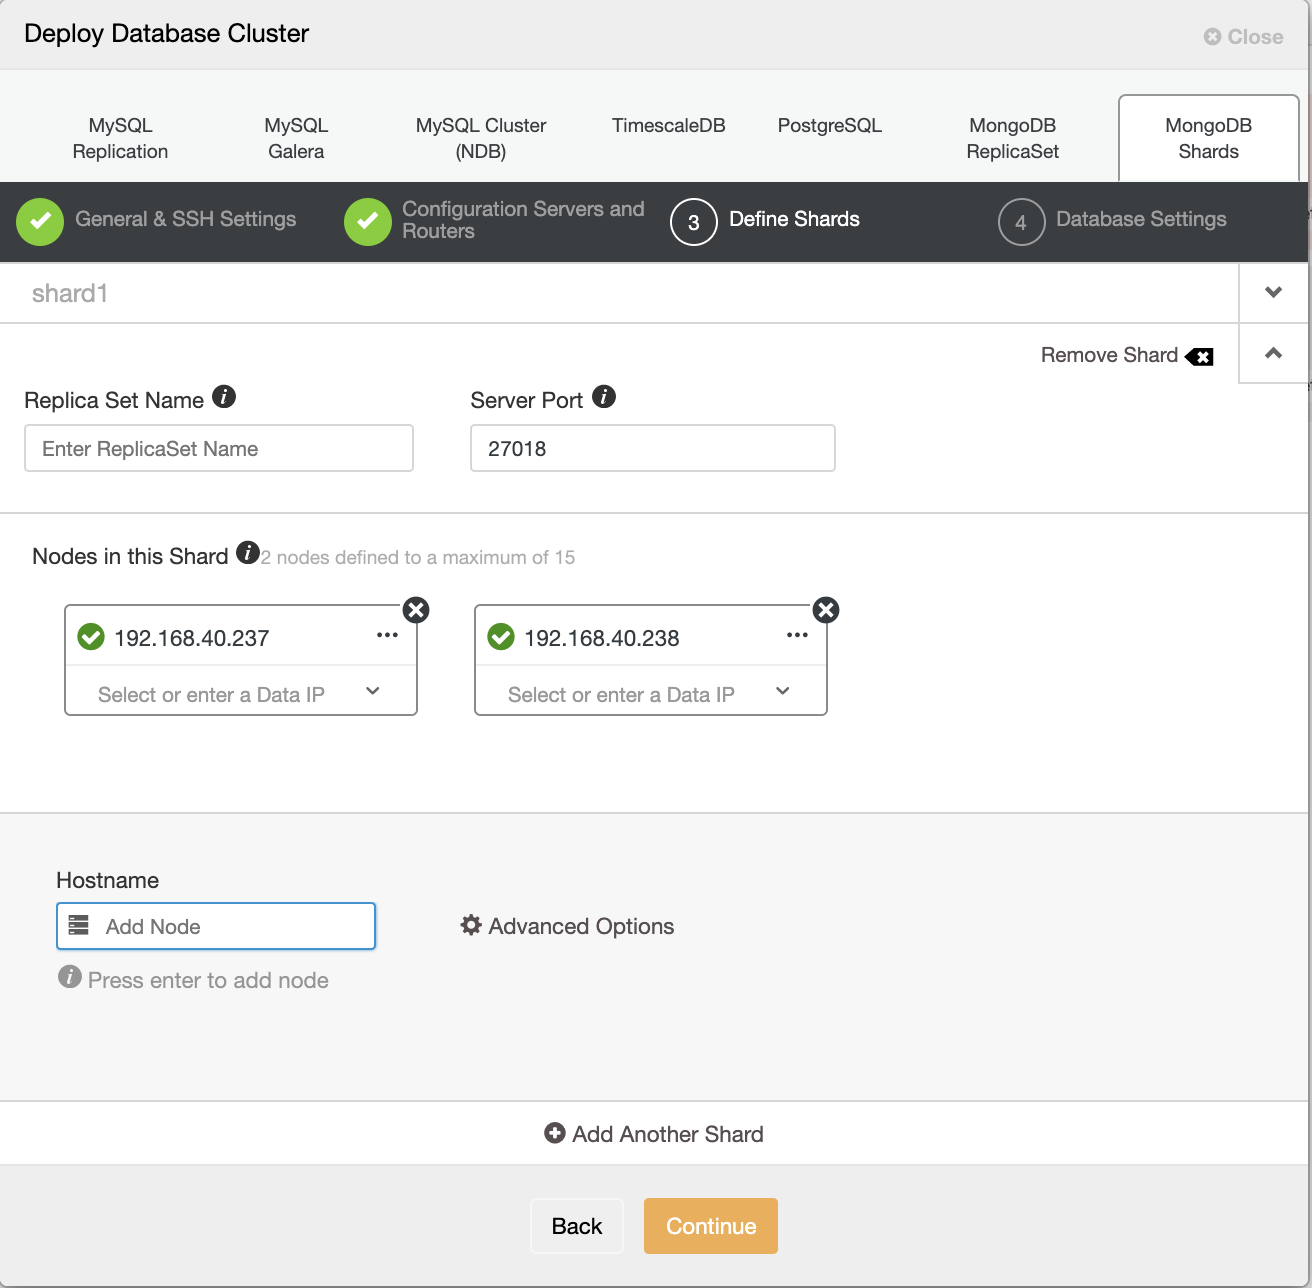
-
Define your Shards. These are your Replica Set shard(s). Depending on your need. For example, in this deployment I deployed two shards but you can just use one shard to begin with especially for small deployments.
-
Define your database settings
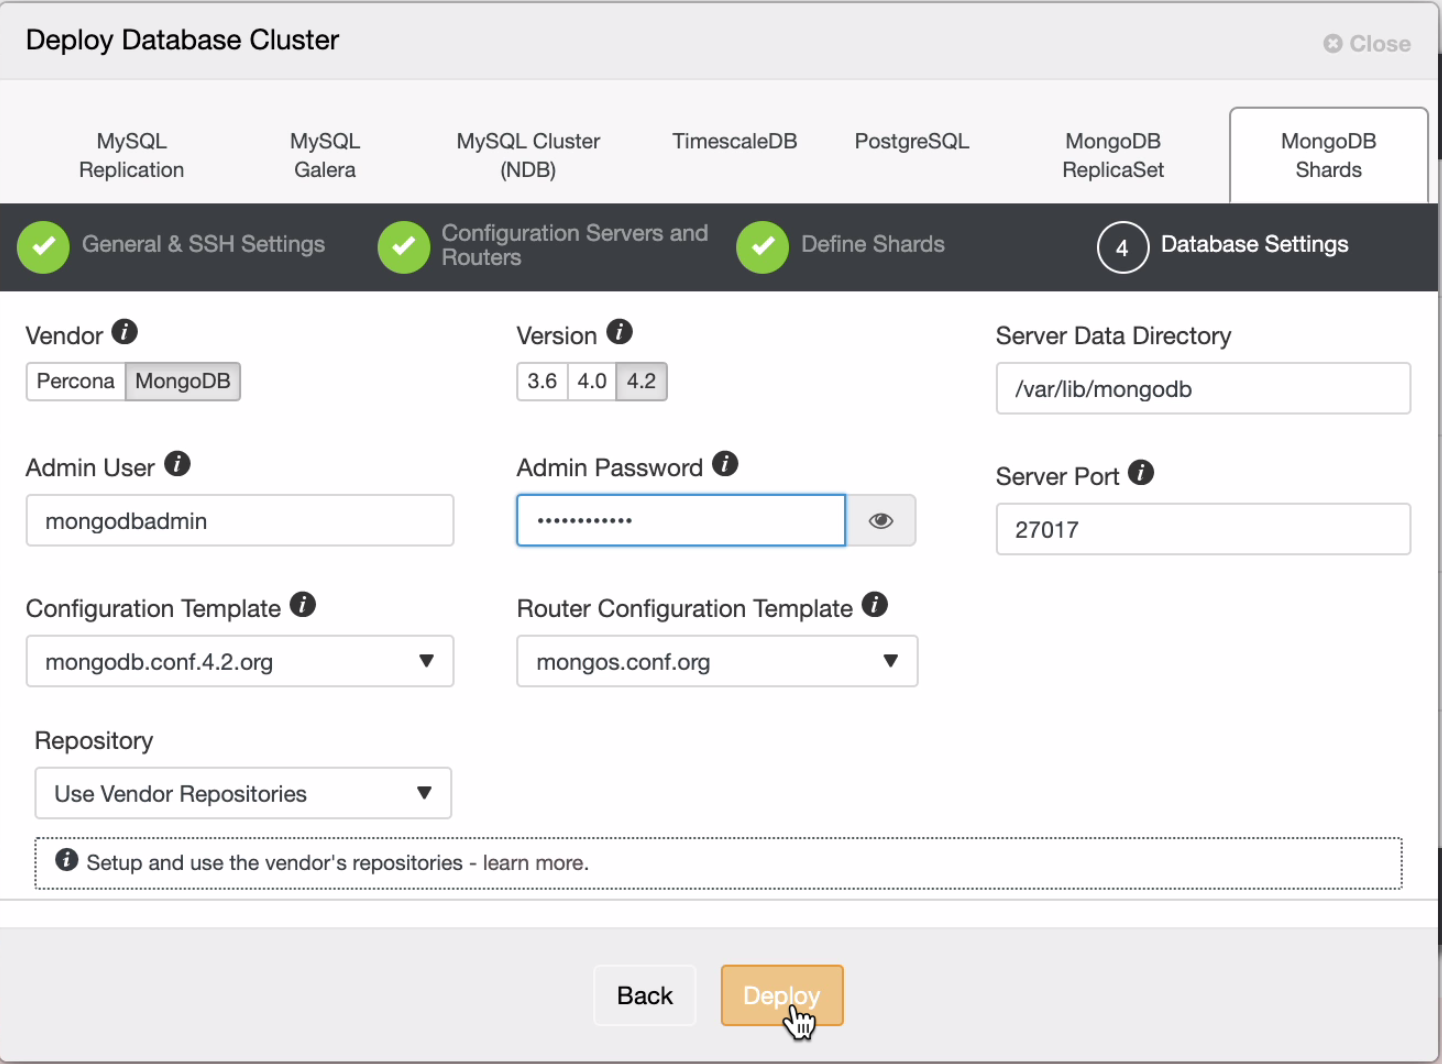
At this point, hit the deploy button and just wait as the job is processed by ClusterControl.
-
Once finished, you can now restore the backup you have taken from mongodump. For example, I took a backup using ClusterControl and then used this as my source backup. When using mongorestore command, make sure that your destination host is one of your mongos instances. For this example deployment, I have 192.168.40.233 host.
$ mongorestore --host 192.168.40.233 --port 27017 --username  --password  --gzip  --archive=BACKUP-2/rs0.gz --authenticationDatabase=admin

2021-01-22T11:17:06.335+0000    preparing collections to restore from

2021-01-22T11:17:06.336+0000    don't know what to do with subdirectory "cs_comments_service", skipping...

2021-01-22T11:17:06.336+0000    don't know what to do with subdirectory "edxapp", skipping...

2021-01-22T11:17:06.337+0000    don't know what to do with subdirectory "admin", skipping...

2021-01-22T11:17:06.337+0000    don't know what to do with subdirectory "", skipping...

2021-01-22T11:17:06.372+0000    restoring to existing collection edxapp.modulestore.definitions without dropping

2021-01-22T11:17:06.372+0000    reading metadata for edxapp.modulestore.definitions from archive 'BACKUP-2/rs0.gz'

2021-01-22T11:17:06.373+0000    restoring edxapp.modulestore.definitions from archive 'BACKUP-2/rs0.gz'

2021-01-22T11:17:06.387+0000    restoring to existing collection edxapp.fs.chunks without dropping

2021-01-22T11:17:06.387+0000    reading metadata for edxapp.fs.chunks from archive 'BACKUP-2/rs0.gz'

…

…… -
Now, you’re ready and then make some changes to your Open edX configuration files. In my installation setup, you can update the /edx/etc/studio.yml and /edx/etc/lms.yml. You might have to change as well the files in /edx/app/edxapp/lms.auth.json and /edx/app/edxapp/cms.auth.json files and replace them with the correct hostname of your mongos instance.
-
Verify in your mongos and check if the databases are loaded and can be accessible,
[email protected]:~# mongo --host "mongodb://edxapp:[email protected]:27017/?authSource=admin"

MongoDB shell version v4.2.11

connecting to: mongodb://192.168.40.233:27017/?authSource=admin&compressors=disabled&gssapiServiceName=mongodb

Implicit session: session { "id" : UUID("00a3a395-3531-4381-972e-502478af38d1") }

MongoDB server version: 4.2.11

mongos> show dbs

admin                0.000GB

config               0.002GB

cs_comments_service  0.000GB

edxapp               0.104GB
Now you’re set!!!
In the web view also of ClusterControl, once the ClusterControl finishes the deployment, you’ll have a topology that shall look like this,
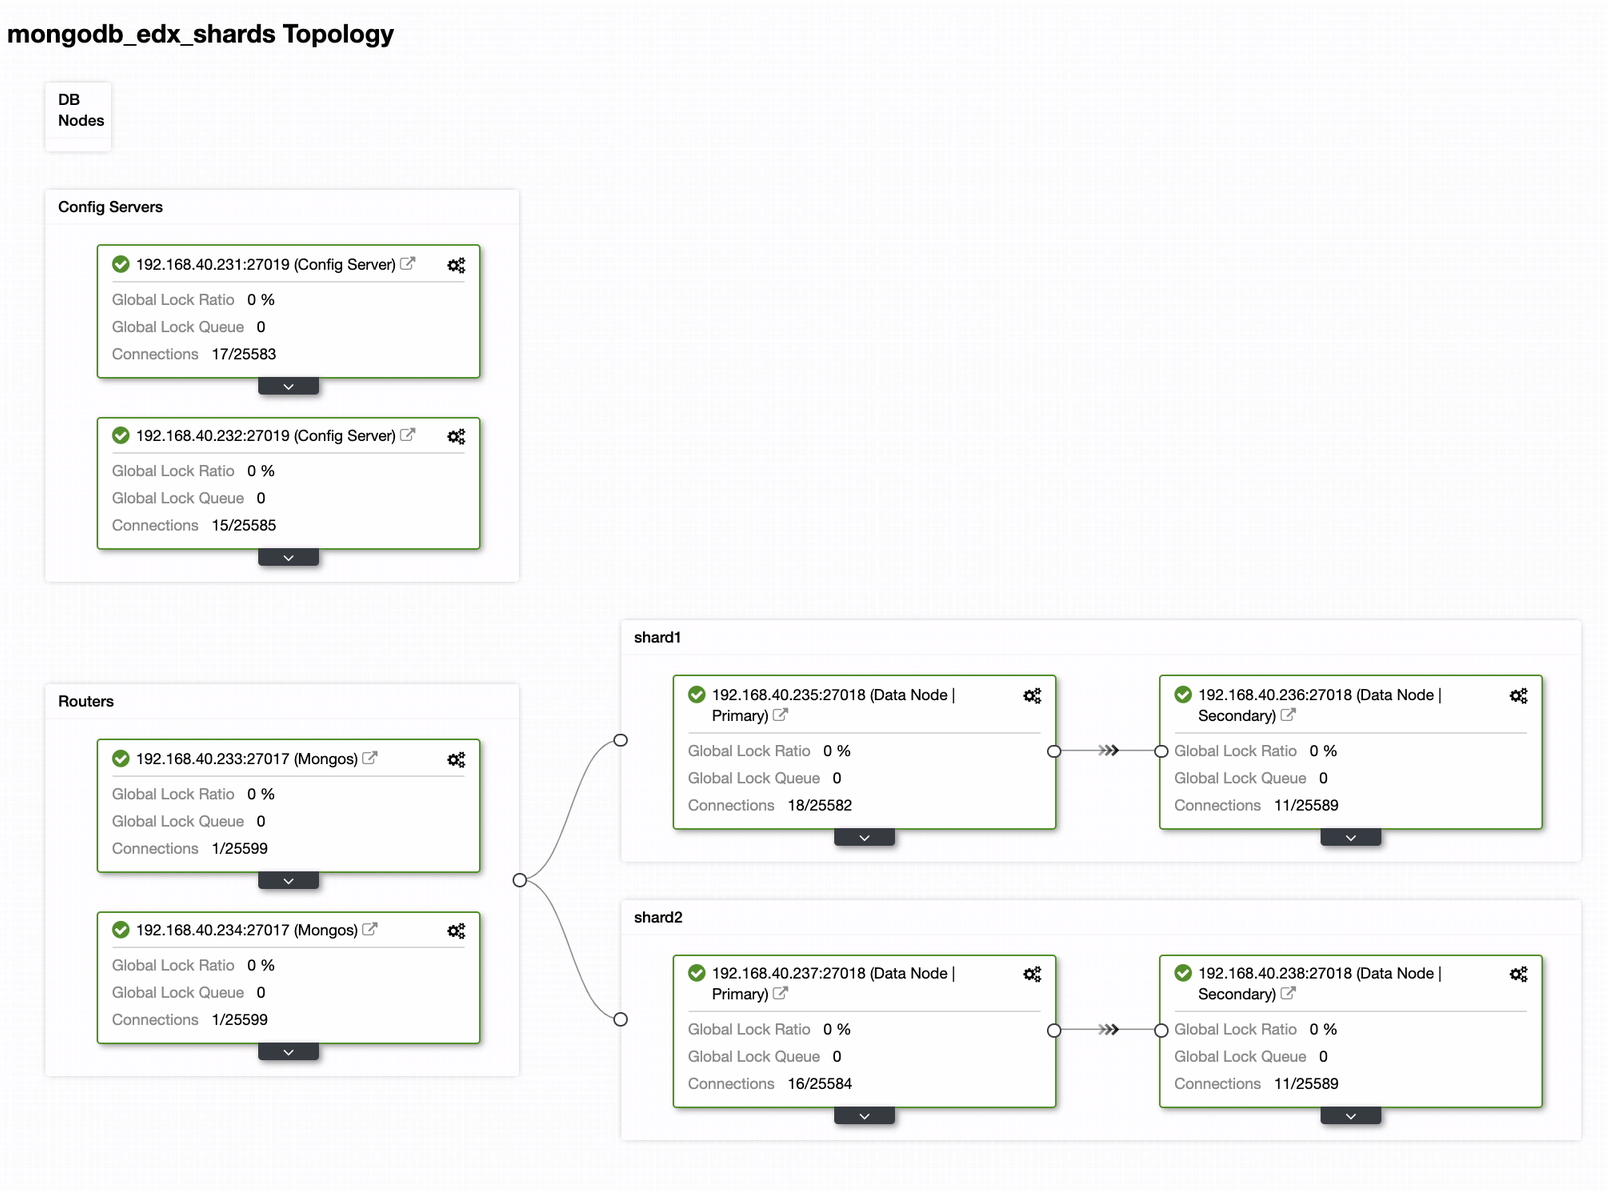
Once done, you’re all good to manage your Open edX and manage your courses!