blog
How to Achieve PostgreSQL High Availability with pgBouncer

In the database world, there are many common concepts like High Availability, Failover, and Connection pooling. All of them are useful things to implement on any system, and even a must in some cases.
A connection pooling is a method of creating a pool of connections and reuse them avoiding opening new connections to the database all the time, which will increase the performance of your applications considerably. PgBouncer is a popular connection pooler designed for PostgreSQL, but it is not enough to achieve PostgreSQL High Availability by itself as it doesn’t have multi-host configuration, failover, or detection.
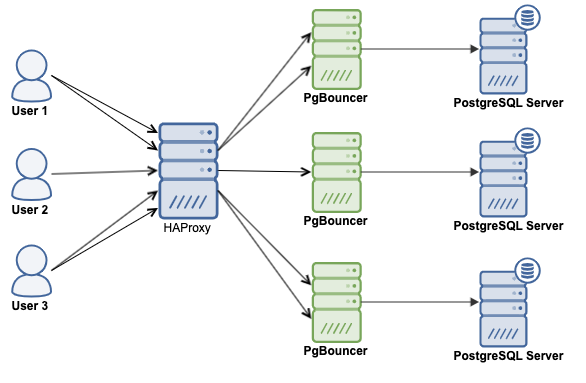
Using a Load Balancer is a way to have High Availability in your database topology. It could be useful for redirecting traffic to healthy database nodes, distribute the traffic across multiple servers to improve performance, or just to have a single endpoint configured in your application for an easier configuration and failover process. For this, HAProxy is a good option to complement your connection pooler, as it is an open-source proxy that can be used to implement high availability, load balancing, and proxying for TCP and HTTP based applications.
In this blog, we will use both concepts, Load Balancer and Connection pooling (HAProxy + PgBouncer), to deploy a High Availability environment for your PostgreSQL database.
How PgBouncer Works
PgBouncer acts as a PostgreSQL server, so you just need to access your database using the PgBouncer information (IP Address/Hostname and Port), and PgBouncer will create a connection to the PostgreSQL server, or it will reuse one if it exists.
When PgBouncer receives a connection, it performs the authentication, which depends on the method specified in the configuration file. PgBouncer supports all the authentication mechanisms that the PostgreSQL server supports. After this, PgBouncer checks for a cached connection, with the same username+database combination. If a cached connection is found, it returns the connection to the client, if not, it creates a new connection. Depending on the PgBouncer configuration and the number of active connections, it could be possible that the new connection is queued until it can be created, or even aborted.
The PgBouncer behavior depends on the pooling mode configured:
- session pooling (default): When a client connects, a server connection will be assigned to it for the whole duration the client stays connected. When the client disconnects, the server connection will be put back into the pool.
- transaction pooling: A server connection is assigned to a client only during a transaction. When PgBouncer notices that the transaction is over, the server connection will be put back into the pool.
- statement pooling: The server connection will be put back into the pool immediately after a query completes. Multi-statement transactions are disallowed in this mode as they would break.
To balance queries between several servers, on the PgBouncer side, it may be a good idea to make server_lifetime smaller and also turn server_round_robin on. By default, idle connections are reused by the LIFO algorithm, which may work not so well when a load-balancer is used.
How to Install PgBouncer
We will assume you have your PostgreSQL cluster and HAProxy deployed, and it is up and running, otherwise, you can follow this blog post to easily deploy PostgreSQL for High Availability.
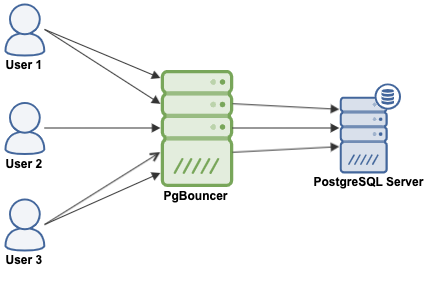
You can install PgBouncer on each database node or on an external machine, in any case, you will have something like this:
To get the PgBouncer software you can go to the PgBouncer download section, or use the RPM or DEB repositories. For this example, we will use CentOS 8 and will install it from the official PostgreSQL repository.
First, download and install the corresponding repository from the PostgreSQL site (if you don’t have it in place yet):
$ wget https://download.postgresql.org/pub/repos/yum/reporpms/EL-8-x86_64/pgdg-redhat-repo-latest.noarch.rpm

$ rpm -Uvh pgdg-redhat-repo-latest.noarch.rpm
Then, install the PgBouncer package:
$ yum install pgbouncerVerify the installation:
$ pgbouncer --version

PgBouncer 1.14.0

libevent 2.1.8-stable

adns: c-ares 1.13.0

tls: OpenSSL 1.1.1c FIPS  28 May 2019
When it is completed, you will have a new configuration file located in /etc/pgbouncer/pgbouncer.ini:
[databases]

[users]

[pgbouncer]

logfile = /var/log/pgbouncer/pgbouncer.log

pidfile = /var/run/pgbouncer/pgbouncer.pid

listen_addr = 127.0.0.1

listen_port = 6432

auth_type = trust

auth_file = /etc/pgbouncer/userlist.txt

admin_users = postgres

stats_users = stats, postgres
Let’s see these parameters one by one:
- Databases section [databases]: This contains key=value pairs where the key will be taken as a database name and the value as a libpq connection string style list of key=value pairs.
- User section [users]: This contains key=value pairs where the key will be taken as a user name and the value as a libpq connection string style list of key=value pairs of configuration settings specific for this user.
- logfile: Specifies the log file. The log file is kept open, so after rotation kill -HUP or on console RELOAD; should be done.
- pidfile: Specifies the PID file. Without the pidfile set, the daemon is not allowed.
- listen_addr: Specifies a list of addresses where to listen for TCP connections. You may also use * meaning “listen on all addresses”. When not set, only Unix socket connections are accepted.
- listen_port: Which port to listen on. Applies to both TCP and Unix sockets. The default port is 6432.
- auth_type: How to authenticate users.
- auth_file: The name of the file to load usernames and passwords from.
- admin_users: Comma-separated list of database users that are allowed to connect and run all commands on the console.
- stats_users: Comma-separated list of database users that are allowed to connect and run read-only queries on the console.
This is just a sample of the default configuration file, as the original has 359 lines, but the rest of the lines are commented out by default. To get all the available parameters, you can check the official documentation.
How to Use PgBouncer
Now, let’s see a basic configuration to make it work.
The pgbouncer.ini configuration file:
$ cat /etc/pgbouncer/pgbouncer.ini

[databases]

world = host=127.0.0.1 port=5432 dbname=world

[pgbouncer]

logfile = /var/log/pgbouncer/pgbouncer.log

pidfile = /var/run/pgbouncer/pgbouncer.pid

listen_addr = *

listen_port = 6432

auth_type = md5

auth_file = /etc/pgbouncer/userlist.txt

admin_users = admindb
And the authentication file:
$ cat /etc/pgbouncer/userlist.txt

"admindb" "root123"
So, in this case, I have installed PgBouncer in the same database node, listening in all IP addresses, and it connects to a PostgreSQL database called “world”. I am also managing the allowed users in the userlist.txt file with a plain-text password that can be encrypted if needed.
To start the PgBouncer service, you just need to run the following command:
$ pgbouncer -d /etc/pgbouncer/pgbouncer.iniWhere -d means “daemon”, so it will run in the background.
$ netstat -pltn

Proto Recv-Q Send-Q Local Address           Foreign Address         State       PID/Program name

tcp        0      0 0.0.0.0:6432            0.0.0.0:*               LISTEN      4274/pgbouncer

tcp6       0      0 :::6432                 :::*                    LISTEN      4274/pgbouncer
As you can see, PgBouncer is up and waiting for connections in the port 6432. To access the PostgreSQL database, run the following command using your local information (port, host, username, and database name):
$ psql -p 6432 -h 127.0.0.1 -U admindb world

Password for user admindb:

psql (12.4)

Type "help" for help.


world=#
Keep in mind that the database name (world) is the database configured in your PgBouncer configuration file:
[databases]

world = host=127.0.0.1 port=5432 dbname=world
Monitoring and Managing PgBouncer
Instead of accessing your PostgreSQL database, you can connect directly to PgBouncer to manage or monitor it. For this, use the same command that you used previously, but change the database to “pgbouncer”:
$ psql -p 6432 -h 127.0.0.1 -U admindb pgbouncer

Password for user admindb:

psql (12.4, server 1.14.0/bouncer)

Type "help" for help.


pgbouncer=# SHOW HELP;

NOTICE:  Console usage

DETAIL:

SHOW HELP|CONFIG|DATABASES|POOLS|CLIENTS|SERVERS|USERS|VERSION

SHOW FDS|SOCKETS|ACTIVE_SOCKETS|LISTS|MEM

SHOW DNS_HOSTS|DNS_ZONES

SHOW STATS|STATS_TOTALS|STATS_AVERAGES|TOTALS

SET key = arg

RELOAD

PAUSE []

RESUME []

DISABLE

ENABLE

RECONNECT []

KILL

SUSPEND

SHUTDOWN


SHOW
Now, you can run different PgBouncer commands to monitor it:
SHOW STATS_TOTALS:
pgbouncer=# SHOW STATS_TOTALS;

 database  | xact_count | query_count | bytes_received | bytes_sent | xact_time | query_time | wait_time

-----------+------------+-------------+----------------+------------+-----------+------------+-----------

 pgbouncer |          1 |           1 |              0 |          0 |         0 |          0 |         0

 world     |          2 |           2 |             59 |     234205 |      8351 |       8351 |      4828

(2 rows)
SHOW SERVERS:
pgbouncer=# SHOW SERVERS;

 type |  user   | database | state  |   addr    | port | local_addr | local_port |      connect_time       |      request_time

| wait | wait_us | close_needed |      ptr       |      link      | remote_pid | tls

------+---------+----------+--------+-----------+------+------------+------------+-------------------------+-------------------------

+------+---------+--------------+----------------+----------------+------------+-----

 S    | admindb | world    | active | 127.0.0.1 | 5432 | 127.0.0.1  |      45052 | 2020-09-09 18:31:57 UTC | 2020-09-09 18:32:04 UTC

|    0 |       0 |            0 | 0x55b04a51b3d0 | 0x55b04a514810 |       5738 |

(1 row)
SHOW CLIENTS:
pgbouncer=# SHOW CLIENTS;

 type |  user   | database  | state  |   addr    | port  | local_addr | local_port |      connect_time       |      request_time

  | wait | wait_us | close_needed |      ptr       |      link      | remote_pid | tls

------+---------+-----------+--------+-----------+-------+------------+------------+-------------------------+-----------------------

--+------+---------+--------------+----------------+----------------+------------+-----

 C    | admindb | pgbouncer | active | 127.0.0.1 | 46950 | 127.0.0.1  |       6432 | 2020-09-09 18:29:46 UTC | 2020-09-09 18:55:11 UT

C | 1441 |  855140 |            0 | 0x55b04a5145e0 |                |          0 |

 C    | admindb | world     | active | 127.0.0.1 | 47710 | 127.0.0.1  |       6432 | 2020-09-09 18:31:41 UTC | 2020-09-09 18:32:04 UT

C |    0 |       0 |            0 | 0x55b04a514810 | 0x55b04a51b3d0 |          0 |

(2 rows)
SHOW POOLS:
pgbouncer=# SHOW POOLS;

 database  |   user    | cl_active | cl_waiting | sv_active | sv_idle | sv_used | sv_tested | sv_login | maxwait | maxwait_us | pool_

mode

-----------+-----------+-----------+------------+-----------+---------+---------+-----------+----------+---------+------------+------

-----

 pgbouncer | pgbouncer |         1 |          0 |         0 |       0 |       0 |         0 |        0 |       0 |          0 | state

ment

 world     | admindb   |         1 |          0 |         1 |       0 |       0 |         0 |        0 |       0 |          0 | sessi

on

(2 rows)
And to manage it…
RELOAD:
pgbouncer=# RELOAD;

RELOAD
PAUSE:
pgbouncer=# PAUSE world;

PAUSE
RESUME:
pgbouncer=# RESUME world;

RESUME
Those commands are just an example. For a complete list of commands, please refer to the official documentation.
Conclusion
Using a combination of PgBouncer + HAProxy + PostgreSQL is a good way to achieve High Availability for your PostgreSQL cluster improving your database performance at the same time.
As you can see, if you have your PostgreSQL environment in place, which you can deploy using ClusterControl in just a few clicks, you can easily add PgBouncer to take advantage of having a connection pooler for your systems.


