blog
Deploying & Configuring MongoDB Shards with Ansible

Database systems work better when there is a distributed workload among a number of running instances or rather data is categorized in an easy manner. MongoDB utilizes sharding such that data in a given database is grouped in accordance to some key. Sharding enhances horizontal scaling which consequently results in better performance and increased reliability. In general, MongoDB offers horizontal and vertical scaling as opposed to SQL DBMS for example MySQL that only promotes vertical scaling.
MongoDB has a looser consistency model whereby a document in a collection may have an additional key that would be absent from other documents in the same collection.
Sharding
Sharding is basically partitioning data into separate chunks and then defining a range of chunks to different shard servers. A shard key which is often a field that is present in all the documents in the database to be sharded is used to group the data. Sharding works hand in hand with replication to fasten the read throughput by ensuring a distributed workload among a number of servers rather than depending on a single server. Besides, replication ensures copies of the written data are available.
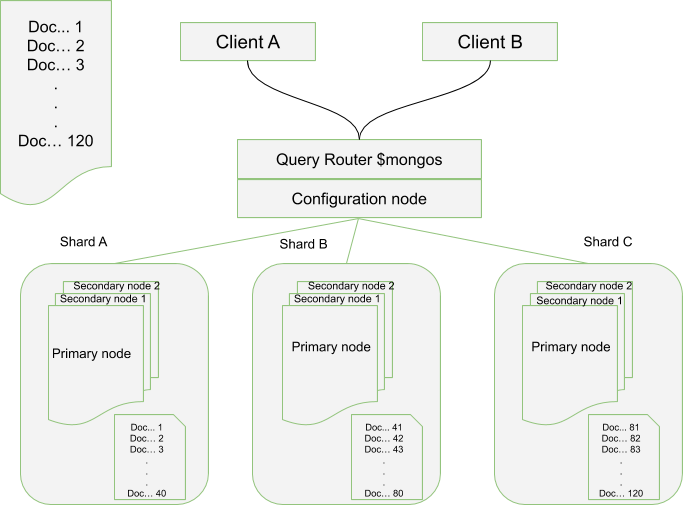
Let’s say we have 120 docs in a collection, these data can be sharded such that we have 3 replica sets and each has 40 docs as depicted in the configuration setup below. If two clients send requests, one to fetch a document that is in index 35 and the other whose index is at 92, the request is received by the query router (a mongos process) that in turn contacts the configuration node which keeps a record of how the ranges of chunks are distributed among the shards. When the specified document identity is found, it is then fetched from the associated shard. For example above, the first client’s document will be fetched from Shard A and for client B, the document will be fetched from Shard C. In general there will be a distributed workload which is defined as horizontal scaling.
For the given shards, if the size of a collection in a shard exceeds the chunk_size, the collection will be split and balanced across the shards automatically using the defined shard key. In the deployment setup, for the example below we will need 3 replica sets each with a primary and some secondaries. The primary nodes act as the sharding servers too.
The minimum recommended configuration for a MongoDB production deployment will be at least three shard servers each with a replica set. For best performance, the mongos servers are deployed on separate servers while the configuration nodes are integrated with the shards.
Deploying MongoDB Shards with Ansible
Configuring shards and replica sets of a cluster separately is a cumbersome undertaking hence we resolve into simple tools like Ansible to achieve the required results with a lot of ease. Playbooks are used to write the required configurations and tasks that Ansible software will be executing.
The systematic playbook process should be:
- Install mongo base packages (no-server, pymongo and command line interface)
- Install mongodb server. Follow this guide to get started.
- Set up mongod instances and there correspondent replica sets.
- Configure and set up the config servers
- Configure and set up the Mongos routing service.
- Add the shards to your cluster.
The top-level playbook should look like this
- name: install mongo base packages include: mongod.yml
  tags: - mongod

- name: configure config server
  include: configServer.yml
  when: inventory_hostname in groups['mongoc-servers']
  tags:
  - cs

- name: configure mongos server
  include: configMongos.yml
  when: inventory_hostname in groups['mongos-server'] tags:
  - mongos

- name: add shards
  include: addShards.yml
  when: inventory_hostname in groups['mongos-servers']
  tags:
  - mongos
  - shards
We can save the file above as mongodbCluster.yml.
A simple mongodb.yml file will look like:
---
- hosts: ansible-test
  remote_user: root
  become: yes
  tasks:
  - name: Import the public key used by the package management system
    apt_key: keyserver=hkp://keyserver.ubuntu.com:80 id=7F0CEB10 state=present
  - name: Add MongoDB repository
    apt_repository: repo='deb http://downloads-distro.mongodb.org/repo/ubuntu-upstart dist 10gen' state=present
  - name: install mongodb
    apt: pkg=mongodb-org state=latest update_cache=yes
    notify:
    - start mongodb
  handlers:
    - name: start mongodb
      service: name=mongod state=started
To the general parameters required in the deployment of a replica set, we need these two more in order to add the shards.
- shard: by default it is null, This is a shard connection string which should be in a format of
/host:port. For example replica0/siteurl1.com:27017 - state: by default the value is present which dictates that the shard should be present, otherwise one can set it to be absent.
After deploying a replica set as explained in this blog, you can proceed to add the shards.
# add a replicaset shard named replica0 with a member running on port 27017 on mongodb0.example.net
- mongodb_shard:
    login_user: admin
    login_password: root
    shard: "replica0/mongodb1.example.net:27017"
    state: present

# add a standalone mongod shard running on port 27018 of mongodb2.example.net
- mongodb_shard:
    login_user: admin
    login_password: root
    shard: "mongodb2.example.net:27018"
    state: present

# Single node shard running on localhost
- name: Ensure shard replica0 exists
  mongodb_shard:
    login_user: admin
    login_password: root
    shard: "replica0/localhost:3001"
    state: present

# Single node shard running on localhost
- name: Ensure shard replica0 exists
  mongodb_shard:
    login_user: admin
    login_password: root
    shard: "replica0/localhost:3002"
    state: present
After setting up all these configurations we run the playbook with the command
ansible-playbook -i hosts mongodbCluster.ymlOnce the playbook completes, we can log into any of the mongos servers and issue the command sh.status(). If the output is something like below, the shards have been deployed. Besides you can see the key mongodb_shard if it has been valued success.
mongos> sh.status()
    --- Sharding Status ---
      sharding version: { "_id" : 1, "version" : 3 }
      shards:
        {  "_id" : "shardA",  "host" : "locahhost1/web2:2017,locahhost3:2017" }
        {  "_id" : "shardB",  "host" : "locahhost3/web2:2018,locahhost3:2019" }
{  "_id" : "shardC",  "host" : "locahhost3/web2:2019,locahhost3:2019" }

    databases:
        {  "_id" : "admin",  "partitioned" : false,  "primary" : "config" }
To remove a shard called replica0
- mongodb_shard:
    login_user: admin
    login_password: root
    shard: replica0
    state: absent
Conclusion
Ansible has played a major role in making the deployment process easy since we only need to define the tasks that need to be executed. Imagine for example if you had 40 replica set members and you need to add shards to each. Going the normal way will take you ages and is prone to a lot of human errors. With ansible you just define these tasks in a simple file called playbook and ansible will take care of the tasks when the file is executed.


