blog
Simple Backup Management of Galera Cluster Using s9s_backup

Percona XtraBackup is a great backup tool with lots of nice features to make online and consistent backups, although the variety of options can be a bit overwhelming. s9s_backup tries to make it simpler for users, it creates an easy to use interface for XtraBackup features such as full backups, incremental backups, streaming/non-streaming, and parallel compression.
![]()
Backups are organized into backup sets, consisting of a full backup and zero or more incremental backups. s9s_backup manages the LSNs (Log Sequence Number) of the XtraBackups. The backup set can then be restored as one single unit using just one command.
In earlier posts, we covered various ways on restoring your backup files onto a Galera Cluster, including point-in-time recovery and a Percona XtraBackup vs mysqldump comparison. In this post, we will show you how to restore your backup using s9s_backup, which comes with every ClusterControl installation. It is located under /usr/bin directory and can be called directly from your terminal environment.
s9s_backup vs s9s_backupc
The difference between the two utilities is the location where the backup data is stored. s9s_backupc will store the backup on the controller and it will be initiated from the ClusterControl server, while s9s_backup initiates and stores the backup locally on the database node. However, for restoring the backup, you can use any of the utilities regardless of your backup storage location. They will perform just the same.
If the backup is to be stored on the Galera node, s9s_backup and s9s_backup_wd will be copied over to the target node so they are initiated locally. s9s_backup_wd is a watchdog process to check that XtraBackup does not terminate and there is no error in the XtraBackup log file.
ClusterControl currently does not support partial backups, it performs a backup against all databases and tables in the cluster. Backups created by ClusterControl can be restored either using s9s_backup/s9s_backupc utilities, or manually. It is recommended to update the s9s_backup/s9s_backupc scripts to the latest version:
$ git clone https://github.com/severalnines/s9s-admin
$ cp cluster/s9s_backup* /usr/bin
mysqldump
ClusterControl generates a set of three mysqldump files with the following suffixes:
- _data – all schemas’ data
- _schema – all schemas’ structure
- _mysqldb – mysql system database
The last output of the backup file would be a gunzip compressed file. ClusterControl executes the following commands for every backup job respectively:
$ gunzip [compressed mysqldump file]
$ mysql -u [user] -p [password] < [mysqldump file]
The restore process is pretty straightforward for mysqldump files. You can just redirect the dump contents to a mysql client and the statements will be executed by the MySQL server:
$ cd /root/backups/mysqldump
$ gunzip *.gz
$ mysql -u root -p < mysqldump_2014-12-03_042604_schema.sql
$ mysql -u root -p < mysqldump_2014-12-03_042604_data.sql
$ mysql -u root -p < mysqldump_2014-12-03_042604_mysqldb.sql #optional
Percona XtraBackup
For XtraBackup, you need to prepare the data before you can restore it. The restoration process will restore the database to the state it was when the backup was taken. If you want to restore at a certain point-in-time, you need to have binary logging enabled as described in this blog post.
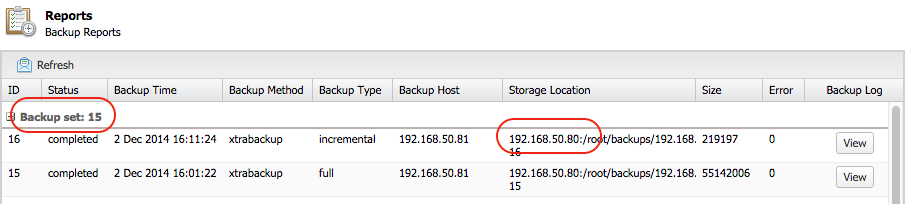
To restore XtraBackup, locate the backup set ID from ClusterControl > Backups > Reports and together with the backup location. If the storage location is on ClusterControl host, you can directly use s9s_backup/s9s_backupc script to restore. Else, you need to copy the backup files to the ClusterControl host under [backup directory]/BACKUP-[backup set ID], e.g: /root/backups/BACKUP-17.
Next, start the restoration process by running the following command on the ClusterControl node:
$ s9s_backupc --restore -i [cluster ID] -b [backup set ID] -t [full path of restoration directory]
For example, to prepare restoration data from a full backup:
$ mkdir /root/restore
$ s9s_backupc --restore -i 1 -b 13 -t /root/restore/
You can also exclude some of the backup IDs in case you just want to restore up to a certain point. For example, the following backup list contains a backup set consists of backup ID 19 to 23:
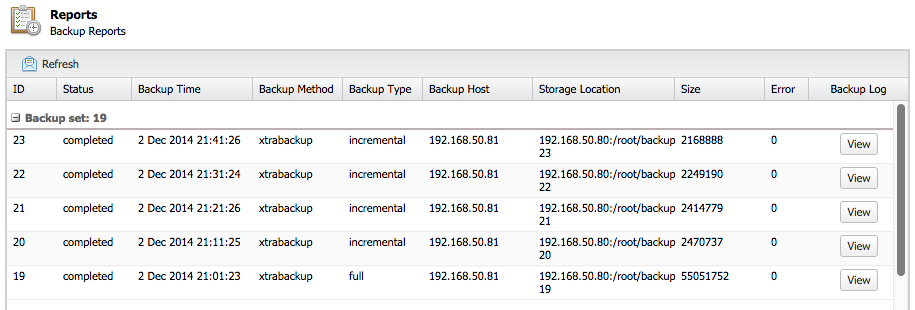
To restore up to incremental backup ID 21, you can invoke the -e [backup ID] following command:
$ s9s_backupc --restore -i 1 -b 19 -t /root/restore -e 21
This will instruct ClusterControl to prepare the restoration data from backup ID 19, 20 and 21 and skip all backups with ID higher than 21.
Following is the expected outcome for s9s_backupc:
141202 23:33:20  innobackupex: completed OK!
Restore OK
To copy back the restored data into your datadir of mysqld do:
* Shutdown the cmon controller to prevent automatic recovery
* Shutdown the cmon agent on this host to prevent automatic recovery (if any)
* Shutdown all the mysql servers in the cluster
* Copy /root/restore/19/ to all the mysql servers in the cluster, e.g:
scp -r /root/restore/19 @:~
* On the target_server:
innobackupex --copy-back 19/
* and don't forget to:
chown mysql:mysql -R
* Start up the cluster again.
As per the instructions, we then need to perform the pre-restoration steps:
$ s9s_galera --stop-cluster -i 1
$ service cmon stop
$ scp -r /root/restore/19 root@galera1:~/root/
$ scp -r /root/restore/19 root@galera2:~/root/
$ scp -r /root/restore/19 root@galera3:~/root/
SSH into galera1, galera2, galera3 and restore the prepared data to the active MySQL data directory using the copy-back command:
$ rm -rf /var/lib/mysql/*
$ innobackupex --copy-back /root/19
$ chown mysql:mysql -R /var/lib/mysql
Finally, on the ClusterControl node, start the Galera cluster and the ClusterControl CMON controller service:
$ s9s_galera --start-cluster -i 1 -d 192.168.50.81
$ service cmon start
That’s it!


