blog
Redis High Availability Architecture with Sentinel

Redis Sentinel is a dedicated process to automate and simplify the Redis replication failover and switchover. Without Sentinel, you could also manage your Redis replication manually, by using the SLAVEOF or REPLICAOF command. Sentinel requires a number of instances, and works as a group of decision-makers, before deciding which node is up or down and when the failover should be triggered. In simple words, Sentinel is the replication failover manager for Redis.
In this example, we are going to deploy a simple highly available Redis architecture with Sentinel, as illustrated in the following diagram:
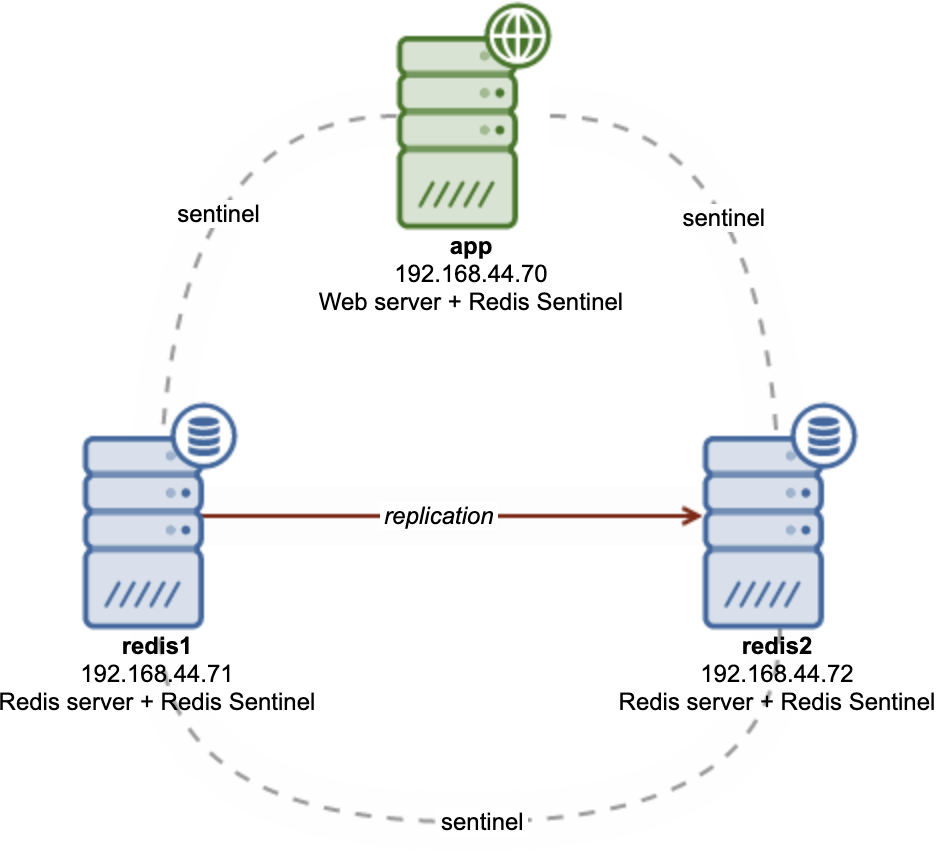
We will have two Redis instances on two different nodes – 1 master and 1 replica (or slave). Sentinel will be co-located on those 2 nodes, plus an additional node on one of our web servers.
Redis Replication Deployment
Commonly, one would co-locate a Redis instance on the web/application server and access it via localhost or through a UNIX socket file. This can be considered the most straightforward way to incorporate Redis into the application.
For a scalable and highly available setup app, Redis should be deployed in a centralized approach, or into a different tier called a cache tier. This allows Redis instances to work together as a dedicated cache provider for the applications, decoupling the applications from the local Redis dependencies.
Before deploying Redis Sentinel, we have to deploy a Redis replication consisting of two or more Redis instances. Let’s start by installing Redis on both servers, redis1 and redis2:
sudo add-apt-repository ppa:redislabs/redis
sudo apt-get -y update
sudo apt-get -y install redis redis-sentinel net-tools
Next, we need to make sure the following configuration lines exist inside /etc/redis/redis.conf:
For redis1 (master):
bind 127.0.0.1 192.168.44.71
protected-mode no
supervised systemd
masterauth SuperS3cr3tP455
masteruser masteruser
user masteruser +@all on >SuperS3cr3tP455
For redis2 (replica):
bind 127.0.0.1 192.168.44.72
protected-mode no
supervised systemd
replicaof 192.168.44.71 6379
masterauth SuperS3cr3tP455
masteruser masteruser
user masteruser +@all on >SuperS3cr3tP455
Some explanations:
-
bind: List all the IP addresses that you want Redis to listen to. For Sentinel to work properly, Redis must be reachable remotely. Therefore we have to list out the interface the Sentinel will communicate with.
-
protected-mode: This must be set to “no” to allow Redis to serve remote connections. This is required for Sentinel as well.
-
supervised: We use the default systemd unit files provided by the installer package. For Ubuntu 20.04, it uses systemd as the service manager so we specify systemd here.
-
replicaof: This is only for the slave node. For the original topology, we will make redis2 as the replica and redis1 as the master.
-
masterauth: The password for user masteruser.
-
masteruser: The username of the master user.
-
user: We create the master user here. The user shall have no limit (+@all) and a password. This user will be used for Redis to manage replication and failover by Sentinel.
Restart Redis to apply the changes and enable it on boot:
$ sudo systemctl restart redis-server
$ sudo systemctl enable redis-server
Verify that Redis is running on port 6379 on both interfaces. The following example is the output from redis2:
$ sudo netstat -tulpn | grep -i redis
tcp        0      0 192.168.44.72:6379      0.0.0.0:*               LISTEN      15992/redis-server
tcp        0      0 127.0.0.1:6379          0.0.0.0:*               LISTEN      15992/redis-server
Verify the replication is working. On redis1:
(redis1) $ redis-cli info replication
# Replication
role:master
connected_slaves:1
slave0_ip=192.168.44.72,port=6379,state=online,offset=154,lag=1
master_failover_state:no-failover
master_replid:e1a86d60fe42b41774f186528661ea6b8fc1d97a
master_replid2:0000000000000000000000000000000000000000
master_repl_offset:154
second_repl_offset:-1
repl_backlog_active:1
repl_backlog_size:1048576
repl_backlog_first_byte_offset:1
repl_backlog_histlen:154
Pay attention to the role, connected_slaves and slave{i} keys. This indicates that redis1 is the master. Also, note that a replica can be a master of another replica – this is also known as chained replication.
While on the redis2:
(redis2) $ redis-cli info replication
# Replication
role:slave
master_host:192.168.44.71
master_port:6379
master_link_status:up
master_last_io_seconds_ago:2
master_sync_in_progress:0
slave_repl_offset:140
slave_priority:100
slave_read_only:1
replica_announced:1
connected_slaves:0
master_failover_state:no-failover
master_replid:e1a86d60fe42b41774f186528661ea6b8fc1d97a
master_replid2:0000000000000000000000000000000000000000
master_repl_offset:140
second_repl_offset:-1
repl_backlog_active:1
repl_backlog_size:1048576
repl_backlog_first_byte_offset:1
repl_backlog_histlen:140
Pay attention to the role, master_host, master_link_status and master_repl_offset. The replication delay between these two nodes can be determined by the master_repl_offset value on both servers.
Redis Sentinel Deployment
Redis Sentinel is basically the same redis-server process running with the “–sentinel” flag and different configuration files and ports. For production usage, it is strongly recommended to have at least 3 Sentinel instances for an accurate observation when performing the automatic failover. Therefore, we will install Sentinel on those 2 Redis nodes that we have, plus one of our web servers, 192.168.44.70 (shown in the architecture diagram).
Install the redis-sentinel package on the selected web server (Sentinel is already installed on our Redis hosts):
$ sudo add-apt-repository ppa:redislabs/redis
$ sudo apt-get -y update
$ sudo apt-get -y install redis-sentinel net-tools
By default, the Sentinel configuration file is located at /etc/redis/sentinel.conf. Make sure the following configuration lines are set:
App server, 192.168.44.70:
bind 192.168.44.70
port 26379
sentinel monitor mymaster 192.168.44.71 6379 2
sentinel auth-pass mymaster SuperS3cr3tP455
sentinel auth-user mymaster masteruser
sentinel down-after-milliseconds mymaster 10000
redis1, 192.168.44.71:
bind 192.168.44.71
port 26379
sentinel monitor mymaster 192.168.44.71 6379 2
sentinel auth-pass mymaster SuperS3cr3tP455
sentinel auth-user mymaster masteruser
sentinel down-after-milliseconds mymaster 10000
redis2, 192.168.44.72:
bind 192.168.44.72
port 26379
sentinel monitor mymaster 192.168.44.71 6379 2
sentinel auth-pass mymaster SuperS3cr3tP455
sentinel auth-user mymaster masteruser
sentinel down-after-milliseconds mymaster 10000
Restart the redis-sentinel daemon to apply the changes:
$ sudo systemctl restart redis-sentinel
$ sudo systemctl enable redis-sentinel
Make sure redis-sentinel is running on port 26379. On redis2, you should see something like this:
$ sudo netstat -tulpn | grep -i redis
tcp        0      0 192.168.44.72:26379     0.0.0.0:*               LISTEN      20093/redis-sentine
tcp        0      0 192.168.44.72:6379      0.0.0.0:*               LISTEN      15992/redis-server
tcp        0      0 127.0.0.1:6379          0.0.0.0:*               LISTEN      15992/redis-server
Verify if the Sentinel is observing our Redis replication link by looking at the log file, /var/log/redis/redis-sentinel.log. Make sure you see the following lines:
20093:X 19 Jun 2021 12:06:39.780 # oO0OoO0OoO0Oo Redis is starting oO0OoO0OoO0Oo
20093:X 19 Jun 2021 12:06:39.780 # Redis version=6.2.4, bits=64, commit=00000000, modified=0, pid=20093, just started
20093:X 19 Jun 2021 12:06:39.780 # Configuration loaded
20093:X 19 Jun 2021 12:06:39.781 * monotonic clock: POSIX clock_gettime
20093:X 19 Jun 2021 12:06:39.781 * Running mode=sentinel, port=26379.
20093:X 19 Jun 2021 12:06:39.784 # Sentinel ID is 0f84e662fc3dd580721ce56f6a409e0f70ed341c
20093:X 19 Jun 2021 12:06:39.784 # +monitor master mymaster 192.168.44.71 6379 quorum 2
20093:X 19 Jun 2021 12:06:39.786 * +slave slave 192.168.44.72:6379 192.168.44.72 6379 @ mymaster 192.168.44.71 6379
20093:X 19 Jun 2021 12:06:41.163 * +sentinel sentinel 6484e8281246c950d31e779a564c29d7c43aa68c 192.168.44.71 26379 @ mymaster 192.168.44.71 6379
20093:X 19 Jun 2021 12:07:20.205 * +sentinel sentinel 727151aabca8596dcc723e6d1176f8aa01203ada 192.168.44.70 26379 @ mymaster 192.168.44.71 6379
We can get more information on the Sentinel process by using the redis-cli and connect to the Sentinel port 26379:
(app)$ redis-cli -h 192.168.44.72 -p 26379 sentinel masters
1)  1) "name"
    2) "mymaster"
    3) "ip"
    4) "192.168.44.71"
    5) "port"
    6) "6379"
    7) "runid"
    8) "a9158eb1d25a8291b3808e5ddfe87bd24cceb550"
    9) "flags"
   10) "master"
   11) "link-pending-commands"
   12) "0"
   13) "link-refcount"
   14) "1"
   15) "last-ping-sent"
   16) "0"
   17) "last-ok-ping-reply"
   18) "80"
   19) "last-ping-reply"
   20) "80"
   21) "down-after-milliseconds"
   22) "10000"
   23) "info-refresh"
   24) "10063"
   25) "role-reported"
   26) "master"
   27) "role-reported-time"
   28) "90348"
   29) "config-epoch"
   30) "0"
   31) "num-slaves"
   32) "1"
   33) "num-other-sentinels"
   34) "2"
   35) "quorum"
   36) "2"
   37) "failover-timeout"
   38) "180000"
   39) "parallel-syncs"
   40) "1"
Pay attention to the “num-slaves” value which is 1 and “num-other-sentinels” value which is 2, indicating that we have a total number of 3 Sentinel nodes (one for this node + two other nodes). At this point, our Redis Sentinel configuration is complete.
Failover Testing
We can now test the failover by simply shutting down the Redis service on redis1(master):
$ sudo systemctl stop redis-serverAfter 10 seconds (down-after-milliseconds value), you should see the following output in the /var/log/redis/redis-sentinel.log file:
20093:X 19 Jun 2021 13:07:43.581 # +sdown master mymaster 192.168.44.71 6379
20093:X 19 Jun 2021 13:07:43.644 # +odown master mymaster 192.168.44.71 6379 #quorum 2/2
20093:X 19 Jun 2021 13:07:43.644 # +new-epoch 1
20093:X 19 Jun 2021 13:07:43.645 # +try-failover master mymaster 192.168.44.71 6379
20093:X 19 Jun 2021 13:07:43.646 # +vote-for-leader 0f84e662fc3dd580721ce56f6a409e0f70ed341c 1
20093:X 19 Jun 2021 13:07:43.650 # 6484e8281246c950d31e779a564c29d7c43aa68c voted for 0f84e662fc3dd580721ce56f6a409e0f70ed341c 1
20093:X 19 Jun 2021 13:07:43.651 # 727151aabca8596dcc723e6d1176f8aa01203ada voted for 0f84e662fc3dd580721ce56f6a409e0f70ed341c 1
20093:X 19 Jun 2021 13:07:43.705 # +elected-leader master mymaster 192.168.44.71 6379
20093:X 19 Jun 2021 13:07:43.705 # +failover-state-select-slave master mymaster 192.168.44.71 6379
20093:X 19 Jun 2021 13:07:43.758 # +selected-slave slave 192.168.44.72:6379 192.168.44.72 6379 @ mymaster 192.168.44.71 6379
20093:X 19 Jun 2021 13:07:43.758 * +failover-state-send-slaveof-noone slave 192.168.44.72:6379 192.168.44.72 6379 @ mymaster 192.168.44.71 6379
20093:X 19 Jun 2021 13:07:43.842 * +failover-state-wait-promotion slave 192.168.44.72:6379 192.168.44.72 6379 @ mymaster 192.168.44.71 6379
20093:X 19 Jun 2021 13:07:44.728 # +promoted-slave slave 192.168.44.72:6379 192.168.44.72 6379 @ mymaster 192.168.44.71 6379
20093:X 19 Jun 2021 13:07:44.728 # +failover-state-reconf-slaves master mymaster 192.168.44.71 6379
20093:X 19 Jun 2021 13:07:44.827 # +failover-end master mymaster 192.168.44.71 6379
20093:X 19 Jun 2021 13:07:44.827 # +switch-master mymaster 192.168.44.71 6379 192.168.44.72 6379
20093:X 19 Jun 2021 13:07:44.827 * +slave slave 192.168.44.71:6379 192.168.44.71 6379 @ mymaster 192.168.44.72 6379
20093:X 19 Jun 2021 13:07:54.874 # +sdown slave 192.168.44.71:6379 192.168.44.71 6379 @ mymaster 192.168.44.72 6379
At this point, our only slave, 192.168.44.72, has been promoted to a master. Once our old master (redis1) comes back online, you should see something like this reported by Sentinel:
20093:X 19 Jun 2021 13:10:23.859 * +convert-to-slave slave 192.168.44.71:6379 192.168.44.71 6379 @ mymaster 192.168.44.72 6379The above indicates the old master has been converted to slave and now replicating from the current master, redis2. We can confirm this by checking the replication info on redis2:
(redis2)$ redis-cli info replication
# Replication
role:master
connected_slaves:1
slave0_ip=192.168.44.71,port=6379,state=online,offset=1041068,lag=1
master_failover_state:no-failover
master_replid:9db31b3b1010100cf187a316cfdf7ed92577e60f
master_replid2:e1a86d60fe42b41774f186528661ea6b8fc1d97a
master_repl_offset:1041350
second_repl_offset:991011
repl_backlog_active:1
repl_backlog_size:1048576
repl_backlog_first_byte_offset:1
repl_backlog_histlen:1041350
If we want to promote redis1 to a master status again, we can simply bring down redis2 or use the Sentinel failover command as below:
(app)$ redis-cli -h 192.168.44.70 -p 26379 sentinel failover mymaster
OK
Once the failover is triggered, Sentinel will report the master promotion as below:
20093:X 19 Jun 2021 13:13:34.608 # +new-epoch 2
20093:X 19 Jun 2021 13:13:35.716 # +config-update-from sentinel 727151aabca8596dcc723e6d1176f8aa01203ada 192.168.44.70 26379 @ mymaster 192.168.44.72 6379
20093:X 19 Jun 2021 13:13:35.716 # +switch-master mymaster 192.168.44.72 6379 192.168.44.71 6379
20093:X 19 Jun 2021 13:13:35.717 * +slave slave 192.168.44.72:6379 192.168.44.72 6379 @ mymaster 192.168.44.71 6379
20093:X 19 Jun 2021 13:13:45.756 * +convert-to-slave slave 192.168.44.72:6379 192.168.44.72 6379 @ mymaster 192.168.44.71 6379
The former slave, redis1, has been promoted as the new master (+switch-master) and redis2 has been converted to slave (+convert-to-slave). We are now back to the original topology as we started.
Final Thoughts
Redis Sentinel is a must-have tool if you want a highly available Redis replication setup. It simplifies and automates the replication failover and switchover for Redis and it is fairly easy to set up. However, if you are not using Redis and since we have also mentioned database nodes, your database infrastructure including database nodes can also be monitored by using ClusterControl.