blog
PostgreSQL Version Control with Atlassian Bitbucket

In systems engineering, communication is a key element to achieving success on any project. This is because it’s critical to the entire cycle of development; starting from collecting requirements to delivering a minimum viable product.
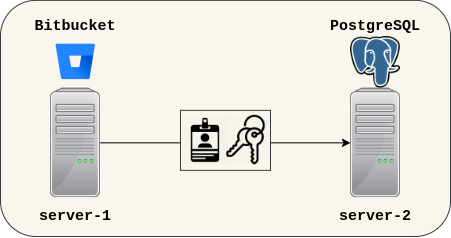
Using a distributed version control system (like Git – an industry standard), developers can submit small pieces of code and work together with services like Bitbucket built around it. Hosting Bitbucket is possible when the data generated by its users have a database to stay, just like PostgreSQL, but integrating both requires additional configurations for executing in different machines.
Networking Overview
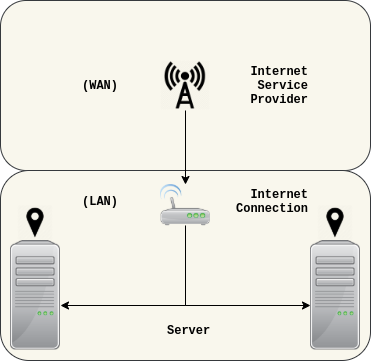
A local area network can pass the information between the programs without the need of exposing it to the outside network, depending on where the users would be.
With the separation of concerns, Bitbucket and PostgreSQL can talk to each other for achieving its common objective, providing a distributed version control system platform.
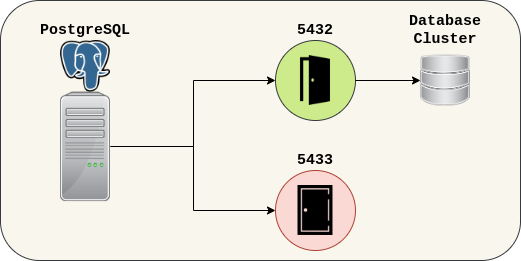
PostgreSQL relies upon a socket provided by the operating system, so the data of the cluster is kept behind a door protected by firewall rules.
Getting Started
There is not much to say as this is a pretty simple process. PostgreSQL will need to be set up with a new user and database ready for Bitbucket.
PostgreSQL
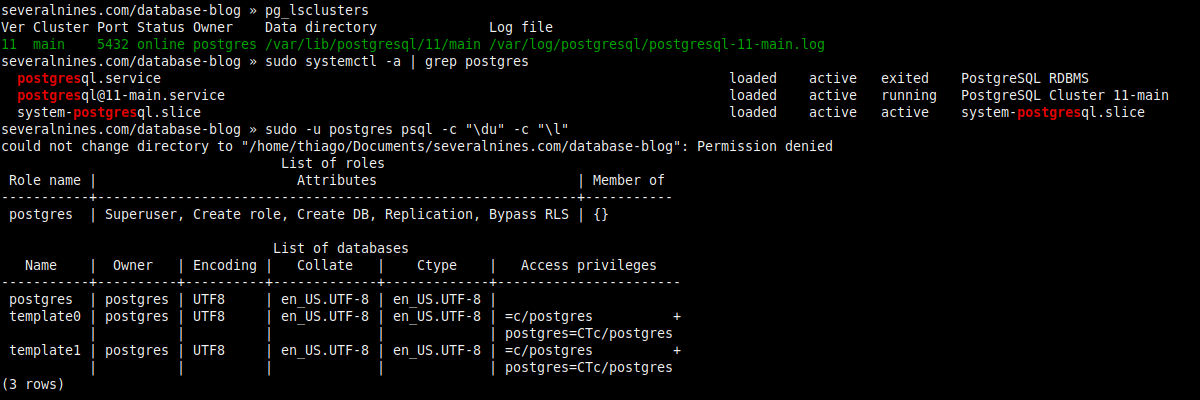
# Part 1: Preparing the database.

$ pg_lsclusters

$ sudo systemctl -a | grep postgres

$ sudo -u postgres psql -c "du" -c "l"
# Part 2: Creating a new user (role) and database.

$ sudo -u postgres psql -c "create role thiago with createdb login password 'Th14g0_P4ssw0rd'"

$ psql -d postgres -c "create database bitbucket_db"

$ psql -d bitbucket_db -c "du" -c "l"

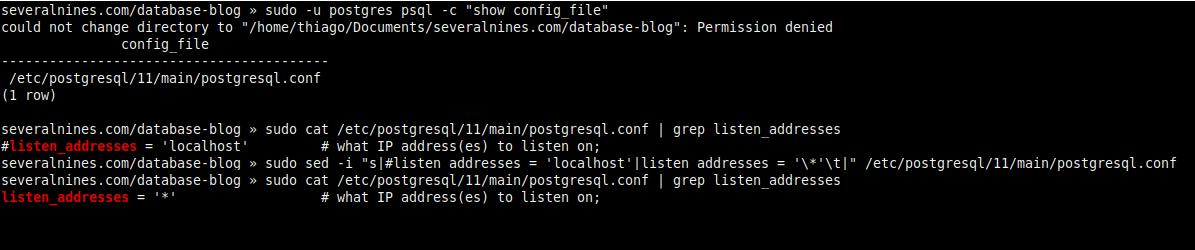
# Part 3: Changing the cluster configuration (postgresql.conf).

$ sudo -u postgres psql -c "show config_file"

$ sudo cat /etc/postgresql/11/main/postgresql.conf | grep listen_addresses

$ sudo sed -i "s|#listen_addresses = 'localhost'|listen_addresses = '*'t|" /etc/postgresql/11/main/postgresql.conf

$ sudo cat /etc/postgresql/11/main/postgresql.conf | grep listen_addresses
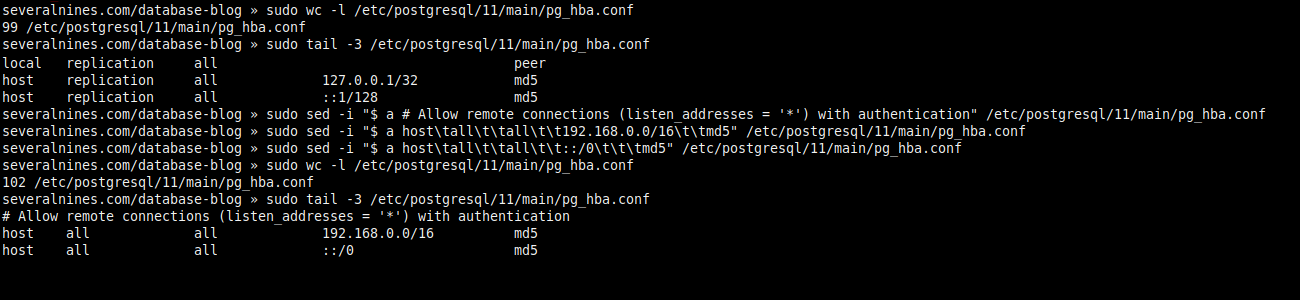
# Part 4: Changing the cluster configuration (pg_hba.conf).

$ sudo wc -l /etc/postgresql/11/main/pg_hba.conf

$ sudo tail -3 /etc/postgresql/11/main/pg_hba.conf

$ sudo sed -i "$ a # Allow remote connections (listen_addresses = '*') with authentication" /etc/postgresql/11/main/pg_hba.conf

$ sudo sed -i "$ a hosttallttalltt192.168.0.0/16ttmd5" /etc/postgresql/11/main/pg_hba.conf

$ sudo sed -i "$ a hosttallttalltt::/0tttmd5" /etc/postgresql/11/main/pg_hba.conf

$ sudo wc -l /etc/postgresql/11/main/pg_hba.conf

$ sudo tail -3 /etc/postgresql/11/main/pg_hba.conf
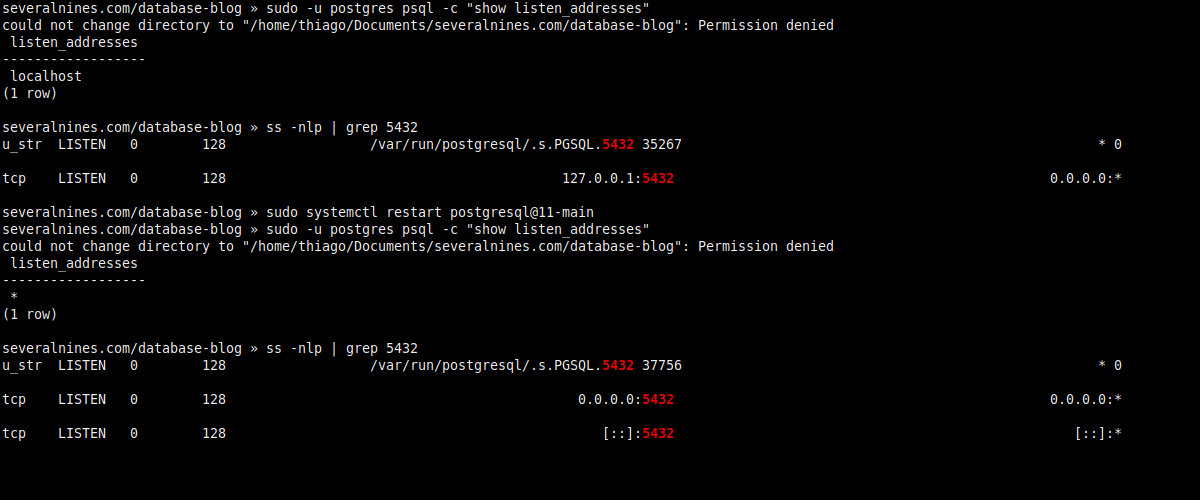
# Part 5: Restarting the cluster.

$ sudo -u postgres psql -c "show listen_addresses"

$ ss -nlp | grep 5432

$ sudo systemctl restart postgresql@11-main

$ sudo -u postgres psql -c "show listen_addresses"

$ ss -nlp | grep 5432
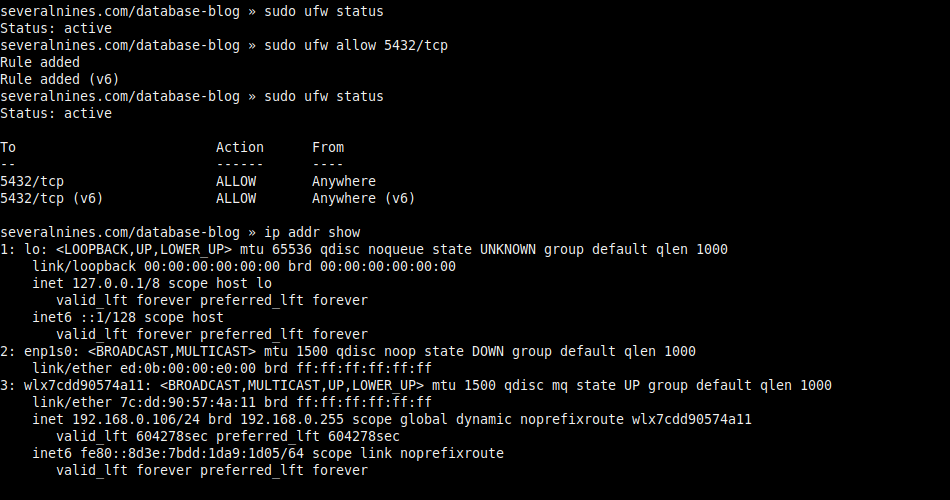
# Part 6: Opening the door.

$ sudo ufw status

$ sudo ufw allow 5432/tcp

$ sudo ufw status

$ ip addr show
# Part 7: Set a password for the superuser role.

$ sudo -u postgres psql -c "password"

Bitbucket
Here is what you will need to then do on the Bitbucket side.
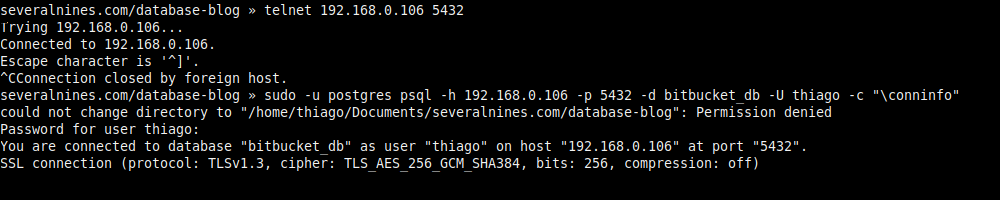
# Part 1: Verifying if the earlier set up was correct.

$ telnet 192.168.0.106 5432

# (Optional) Using psql.

$ sudo -u postgres psql -h 192.168.0.106 -p 5432 -d bitbucket_db -U thiago -c "conninfo"
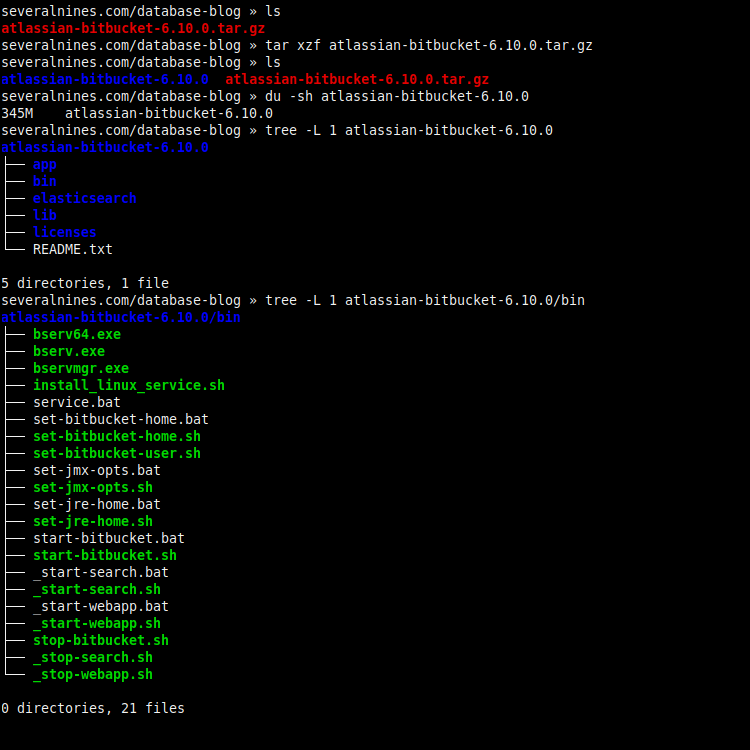
# Part 2: Extracting the Bitbucket Server.

$ ls

$ tar xzf atlassian-bitbucket-6.10.0

$ ls

$ du -sh atlassian-bitbucket-6.10.0

$ tree -L 1 atlassian-bitbucket-6.10.0

$ tree -L 1 atlassian-bitbucket-6.10.0/bin
# Part 3: Modifying the script (set-bitbucket-home.sh).

$ mkdir bitbucket-home

$ echo $(pwd)/bitbucket-home

$ cat atlassian-bitbucket-6.10.0/bin/set-bitbucket-home.sh | grep BITBUCKET_HOME=$

$ sed -i 's|BITBUCKET_HOME=$|BITBUCKET_HOME=/home/thiago/Documents/severalnines.com/database-blog/bitbucket-home|' atlassian-bitbucket-6.10.0/bin/set-bitbucket-home.sh

$ cat atlassian-bitbucket-6.10.0/bin/set-bitbucket-home.sh | grep BITBUCKET_HOME=/

# Part 4: Modifying the script (set-jre-home.sh).

$ readlink -f $(which java)

$ cat atlassian-bitbucket-6.10.0/bin/set-jre-home.sh | grep JRE_HOME=$

$ sed -i 's|JRE_HOME=$|JRE_HOME=/usr/lib/jvm/java-11-openjdk-amd64|' atlassian-bitbucket-6.10.0/bin/set-jre-home.sh

$ cat atlassian-bitbucket-6.10.0/bin/set-jre-home.sh | grep JRE_HOME=/

# Part 5: Checking the hardware.

$ cat /proc/cpuinfo | grep processor | wc -l

$ free -h

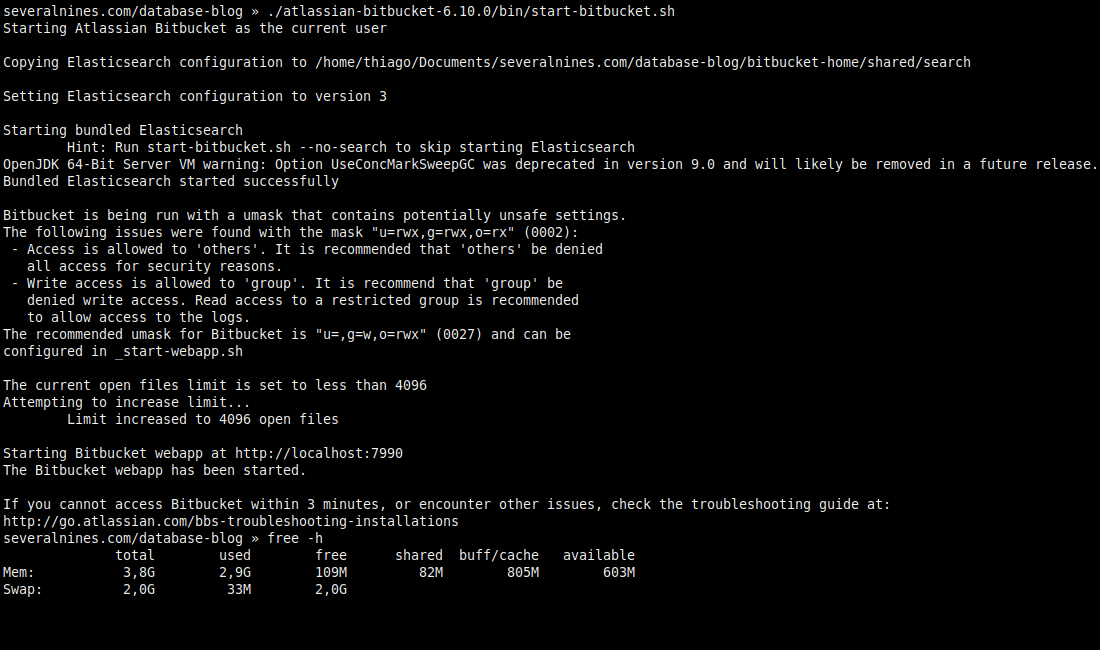
# Part 6: Running the Bitbucket Server with Elasticsearch.

$ ./atlassian-bitbucket/bin/start-bitbucket.sh

$ free -h
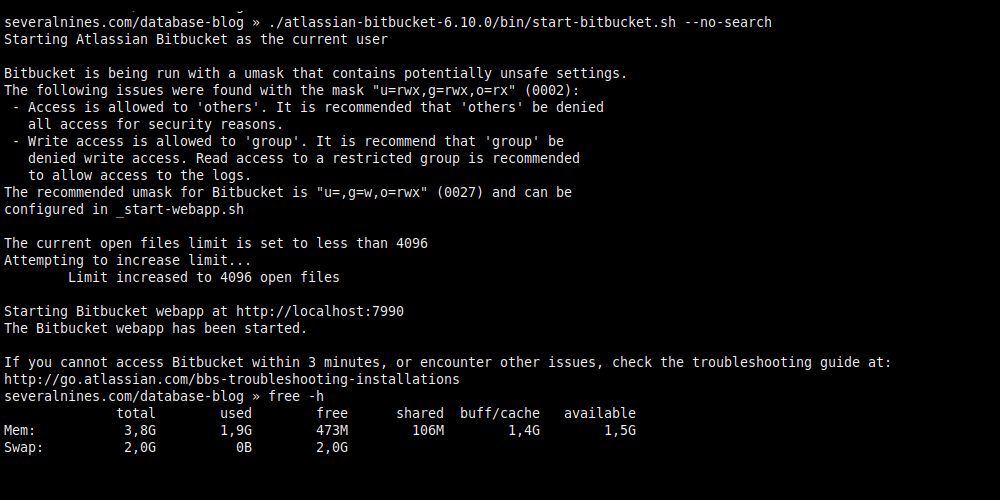
# Part 7: Running the Bitbucket Server without Elasticsearch.

$ ./atlassian-bitbucket/bin/start-bitbucket.sh --no-search

$ free -h
# Part 8: Quick look at BITBUCKET_HOME.

$ du -sh bitbucket-home

$ tree -L 1 bitbucket-home

Integrating PostgreSQL & Bitbucket
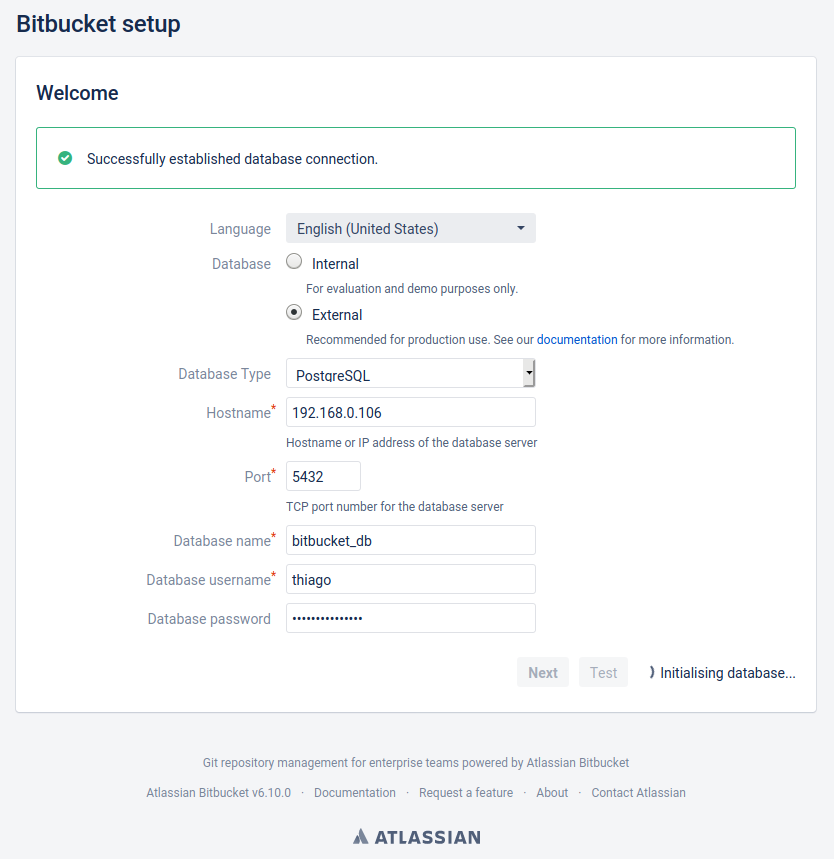
After configuring PostgreSQL and Bitbucket, their integration must be done through the browser (http://localhost:7990/).
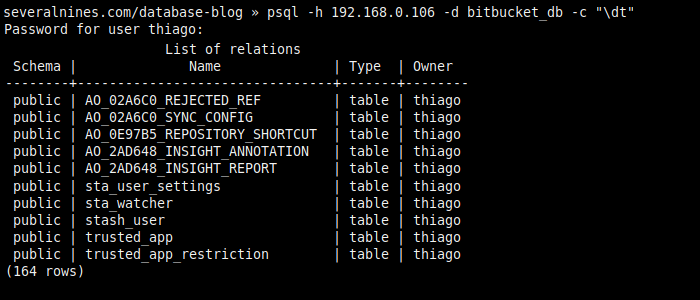
# Displaying tables

$ psql -h 192.168.0.106 -d bitbucket_db -c "dt"

You can now setup Bitbucket to use Java Persistence API, with Hibernate as the implementation, for creating the domain model in the database, using the PostgreSQL JDBC driver.
# Displaying tables (again)

$ psql -h 192.168.0.106 -d bitbucket_db -c "dt"
# Verifying the connection pool.

$ psql -h 192.168.0.106 -d bitbucket_db -c "select pid,usename,application_name,state from pg_stat_activity where datname = 'bitbucket_db'"

Conclusion
Keep in mind that if your network is using DHCP, it’s a good idea to configure the IP address to static in your router, or Bitbucket may fail trying to find PostgreSQL later on.
Most of this blog has made use of regular expressions for changing configuration files without opening text editors, but they can be used as well on web browsers for debugging purposes, try searching for the error message “could not change directory to ?: Permission denied” with double quotes, or any other issue you may find, replacing the computer specific path with wildcard ‘?’.