blog
An Overview of Volume Level Replication for PostgreSQL Using DRBD

Replication is the sharing of transactional data across multiple servers to ensure consistency between redundant database nodes. A master will take inserts or updates, and apply them to its data set, while the slaves will alter their data in accordance to the changes made to the master data set. The master is commonly referred to as a primary and it records the changes made in a Write Ahead Log (WAL). On the other hand, slaves are referred to as secondaries and they replicate their data from the REDO logs – in this case the WAL.
There are at least 3 replication approaches in PostgreSQL:
Builtin Replication or Streaming Replication.
In this approach, data is replicated from the primary node to the secondary node. However, it comes with a number of setbacks which are:
- Difficulties in introducing a new secondary. It will require that you replicate the entire state, which can be resource intensive.
- Lack of built-in monitoring and failover. A secondary has to be promoted to a primary in case of the latter failure. Often this promotion may result in data inconsistency during the primary’s absence.
Reconstructing From WAL
This approach somehow employs the streaming replication approach since the secondaries are reconstructed from a backup made by the primary. The primary undertakes a full database backup after each day besides an incremental backup for every 60 seconds. The advantage with this approach is that no additional load is subjected to the primary until the secondaries are close enough to the primary such that they start streaming the Write Ahead Log (WAL) in order to catch up with it. With this approach, you can add or remove replicas without impacting the performance of your PostgreSQL database.
Volume Level Replication for PostgreSQL (Disk Mirroring)
This is a generic approach that not only applies to PostgreSQL, but also all relational databases. We’ll make use of Distributed Replicated Block Device (DRBD), a distributed replicated storage system for Linux. It is meant to operate by mirroring the contents stored in one server’s storage to another. A simple illustration of the structure is shown below.
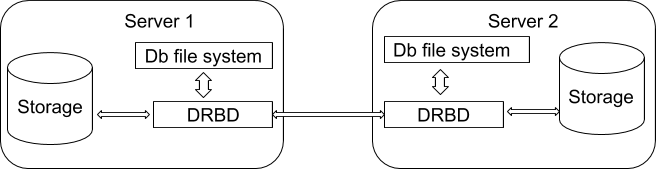
DRBD can be considered as an abstraction from the disk device which hosts the PostgreSQL database, but the operating system will never know that its data is located in another server as well. Using this approach, not only can you share the data but also the file system to more than 1 server. Writes to the DRBD are therefore distributed among all servers whereby each server will write information to a local physical hard disk (block device). When a write operation is applied to the primary, it is thereafter recorded to the DRBD and then distributed to the secondary DRBD servers. On the other hand, if the secondary receives the write operations through the DRBD, they are then written to the local physical device. In case of failover support, the DRBD provides high-availability of data since the information is shared among a primary and many secondary nodes which are lined synchronously at block level.
The DRBD configuration would require an additional resource known as the Heartbeat, which we will discuss in another article, in order to enhance support for automatic failover. The package basically manages the interface on the multiple servers and automatically configures one of the secondary servers to primary in an event of failure.
Installation and Configuration of the DRBD
The preferred method in installing DRBD is to use the pre-build binary installation packages. Ensure that the kernel version of the packages matches your active current kernel.
The configuration files for all nodes that are primary or secondary should be identical. Also if it is necessary for you to upgrade your kernel version, ensure the corresponding kernel-module-drdb is available for your new kernel version.
DRBD Setup for Primary Node
This is the first step where you will need to create a DRBD block device and a file system with which you can store your data. The configuration file can be found at /etc/drbd.conf. The file defines a number of parameters for the DRBD configuration which include: block sizes, security information definition of the DRBD devices that you want to create and frequency of updates. The configurations can be constrained to being global or tied to a certain resource. The steps involved are:
-
Rate of synchronization which defines the rate at which devices are synchronously linked in the background after a disk replacement, failure or initial setup. This can be set by editing the rate parameter in the syncer block:
syncer{ rate 15M } -
Authentication setup for ensuring that only hosts with the same shared secret are able to join the DRBD node group. The password is a hash exchange mechanism supported in the DRBD.
cram-hmac-alg “sha1” shared-secret “hash-password-string” -
Configuring host information. The node information such as the host can be found in each of the nodes’ drbd.conf file. Some of the parameters to be configured are:
- Address: IP address and port number of the host that holds the DRBD device.
- Device: The path of the logical block device created by the DRBD.
- Disk: It refers to the block device storing the data.
- Meta-disk: It stores the metadata of the DRBD device. Its size can be up to 128MB. You can set it to be the internal disk so the DRBD uses physical block device to store this information in the last sections of the disk.
A simple configuration for the primary:
on drbd-one {
device /dev/drbd0;
disk /dev/sdd1;
address 192.168.103.40:8080;
meta-disk internal;
}
The configuration has to be repeated with the secondaries with the IP address matching its correspondent host.
on drbd-two { device /dev/drbd0; disk /dev/sdd1; address 192.168.103.41:8080; meta-disk internal; } -
Creating the metadata for the devices using this command:
$ drbdadm create create-md allThis process is mandatory before you start the primary node.
- Start the DRBD with this command:
$ /etc/init.d/drbd startThis enables the DRBD to start, initialize and create the DRBD defined devices.
- Mark the new device as the primary and initialize the device using this command:
$ drbdadm -- --overwrite-data-of-peer primary allMake a file system on the block device in order to make a standard block device created by the DRBD usable.
- Make the primary ready for use by mounting the file system. This commands should prepare it for you:
$ mkdir /mnt/drbd
$ mount /dev/drbd0 /mnt/drbd
$ echo “DRBD Device” > /mnt/drbd/example_file
DRBD Setup for the Secondary Node
You can use the same steps above except for creating the file system on a secondary node since the information is automatically transferred from the primary node.
-
Copy the /etc/drbd.conf file from the primary node to the secondary node. This file contains the information and configuration needed.
-
On the underlying disk device create the DRBD metadata using the command:
$ drbdadm create-md all -
Start the DRBD with the command:
$ /etc/init.d/drbd startDRBD will start to copy data from the primary node to the secondary node, and the time depends on the size of data to be transferred. If you view the /proc/drbd file you can view the progress.
$ cat /proc/drbd version: 8.0.0 (api:80/proto:80) SVN Revision: 2947 build by root@drbd-one, 2018-08-24 16:43:05 0: cs:SyncSource st:Primary/Secondary ds:UpToDate/Inconsistent C r--- ns:252284 nr:0 dw:0 dr:257280 al:0 bm:15 lo:0 pe:7 ua:157 ap:0 [==>.................] sync'ed: 12.3% (1845088/2097152)K finish: 0:06:06 speed: 4,972 (4,580) K/sec resync: used:1/31 hits:15901 misses:16 starving:0 dirty:0 changed:16 act_log: used:0/257 hits:0 misses:0 starving:0 dirty:0 changed:0 -
Monitor the synchronization using the watch command at specific intervals
$ watch -n 10 ‘cat /proc/drbd‘
DRBD Installation Management
To keep track of the DRBD device status we use the /proc/drbd.
You can set the state of all local devices to be primary using the command
$ drbdadm primary allMake a primary device secondary
$ drbdadm secondary allTo disconnect DRBD nodes
$ drbdadm disconnect allReconnect the DRBD nodes
$ drbd connect allConfiguring PostgreSQL for DRBD
This involves selecting a device for which the PostgreSQL will store data. For a new installation, you can select to install the PostgreSQL entirely onto the DRBD device or a data directory to be located on the new file system and must be in the primary node. This is because the primary node is the only one allowed to mount a DRBD device file system as read/write. The Postgres data files are often archived in /var/lib/pgsql whereas the configuration files are stored in /etc/sysconfig/pgsql.
Setting up PostgreSQL to Use the New DRBD Device
-
If you have any running PostgreSQL, stop them with this command:
$ /etc/init.d/postgresql -9.0 -
Update the DRBD device with the configuration files using the commands:
$ mkdir /mnt/drbd/pgsql/sysconfig $ cp /etc/sysconfig/pgsql/* /mnt/drbd/pgsql/sysconfig -
Update the DRBD with PostgreSQL data directory and system files using:
$ cp -pR /var/lib/pgsql /mnt/drbd/pgsql/data -
Create a symbolic link to the new configuration directory on the DRBD device file system from /etc/sysconfig/pgsql using the command:
$ ln -s /mnt/drbd/pgsql/sysconfig /etc/sysconfig/pgsql -
Remove /var/lib/pgsql directory, unmount /mnt/drbd/pgsql and mount the drbd device to /var/lib/pgsql.
-
Start the PostgreSQL with the command:
$ /etc/init.d/postgresql -9.0 start
The PostgreSQL data should be now present on the file system running on your DRBD device under the configured device. The content of the databases is also copied to the secondary DRBD node but it cannot be accessed since the DRBD device working in the secondary node may be absent.
Important Features with the DRBD Approach
- The tuning parameters are highly customizable.
- Existing deployments can easily be configured with DRBD without any data loss.
- Read requests are equally balanced
- The shared-secret authentication secures the configuration and its data.


