blog
MySQL on Docker: Building the Container Image

Building a docker image for MySQL is essential if you’d like to customize MySQL to suit your needs. The image can then be used to quickly start running MySQL containers, which can be operated individually. In our previous post, we covered the basics of running MySQL as container. For that purpose, we used the MySQL image from the official Docker repository. In this blog post, we’ll show you how to build your own MySQL image for Docker.
What is a container image?
A container requires an image to run. A container image is like a virtual machine template. It has all the required stuff to run the container. That includes operating system, software packages, drivers, configuration files and helper scripts packed in one bundle.
When running MySQL on a physical host, here is what you would normally do:
- Prepare a host with proper networking
- Install operating system of your choice
- Install MySQL packages via package repository
- Modify the MySQL configuration to suit your needs
- Start the MySQL service
Running a MySQL Docker image would look like this:
- Install Docker engine on the physical host
- Download a MySQL image from public (Docker Hub) or private repository, or build your own MySQL image
- Run the MySQL container based on the image, which is similar to starting the MySQL service
As you can see, the Docker approach contains less deployment steps to get MySQL up and running. 99% of the time, the MySQL service running in container will usually work in any kind of environment as long as you have the Docker engine running. Building a MySQL container image requires process flow, since Docker expects only one process per container.
Consider the following:
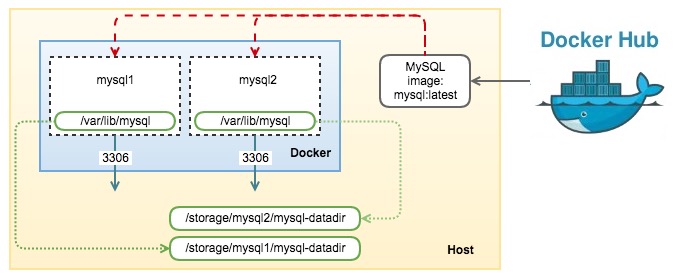
The above illustrates the following actions:
-
The image is pulled from Docker Hub on the machine host by using:
$ docker pull mysql -
Spin up two MySQL containers and map them with their respective volume:
$ docker run -d --name=mysql1 -e MYSQL_ROOT_PASSWORD=’mypassword’ -v /storage/mysql1/mysql-datadir:/var/lib/mysql mysql
$ docker run -d --name=mysql2 -e MYSQL_ROOT_PASSWORD=’mypassword’ -v /storage/mysql2/mysql-datadir:/var/lib/mysql mysql
How to build a MySQL image?
Take note that in this exercise, we are going to extend an existing MySQL image by adding Percona Xtrabackup onto it. We will then publish our image to Docker Hub and setup an automated build.
Base Image
To build a MySQL container image, we’ll start by pulling a base image. You can pull an image which contains a vanilla operating system of your choice, and start building the MySQL image from scratch:
$ docker pull debian
Using default tag: latest
Trying to pull repository docker.io/library/debian ... latest: Pulling from library/debian

17bd2058e0c6: Pull complete
f854eed3f31f: Pull complete
Digest: sha256:ff779f80153d8220904ec3ec6016ac6dd51bcc77e217587689feffcd7acf96a0
Status: Downloaded newer image for docker.io/debian:latest
However, this is perhaps not best practice. There are tons of MySQL container images available on Docker Hub that we can re-use and enhance with more functionality. For example, the MySQL image created by the Docker team may not contain things that we need, e.g., Percona Xtrabackup (PXB). PXB needs to have access to the local file system in order to perform hot backups. Thus, we have to install PXB on top of the MySQL container images created by Docker. Inheriting this MySQL image allows us to leverage the work done by the Docker team. We do not need to maintain the MySQL server parts, especially when a new version is released.
For now, let’s pull the MySQL image of our choice to the machine host. We are going to use MySQL 5.6 as the base image:
$ docker pull mysql:5.6
Trying to pull repository docker.io/library/mysql ... 5.6: Pulling from library/mysql

3153a44fc5c3: Pull complete
ac82a224055d: Pull complete
e3ce3c9ce67d: Pull complete
57c790472a9d: Pull complete
49772bf40877: Pull complete
73f07a1d187e: Pull complete
3446fa8ab4bb: Pull complete
70c40ffe6275: Pull complete
54672d2ddb6f: Pull complete
Digest: sha256:03646869dfecf96f443640f8b9040fbde78a96269aaf47bbfbb505a4c1adcad9
Status: Downloaded newer image for docker.io/mysql:5.6
Let’s verify what images we do have now:
$ docker images
REPOSITORY                    TAG                 IMAGE ID            CREATED             VIRTUAL SIZE
docker.io/debian              latest              f854eed3f31f        5 days ago          125.1 MB
docker.io/mysql               latest              b0e2c14c7e92        3 weeks ago         378.4 MB
docker.io/mysql               5.6                 54672d2ddb6f        3 weeks ago         329 MB
There are three Docker images available in the host, debian:latest, mysql:latest (MySQL 5.7) and mysql:5.6 (MySQL 5.6).
There are two different ways to build a new image, we’ll cover this in the next section.
Building the image
Essentially, there are two ways to build the image:
- Make changes to the base image and commit
- Use Dockerfile – A text file that contains all the commands to build an image
1) Change & Commit
By using this approach, you make the changes directly into the container image and commit. The commit operation will not include any data contained in volumes mounted inside the container. By default, the container being committed and its processes will be paused while the image is committed. This reduces the likelihood of encountering data corruption during the process of creating the commit.
Let’s run a MySQL container with a volume. Create a volume directory on the machine host and spin a MySQL instance based on the MySQL 5.6 image we have downloaded:
$ mkdir -p /storage/test-mysql/datadir
$ docker run -d --name=test-mysql -e MYSQL_ROOT_PASSWORD=’mypassword’ -v /storage/test-mysql/datadir:/var/lib/mysql mysql:5.6
Verify if the container is running:
$ docker ps
CONTAINER ID        IMAGE               COMMAND                  CREATED             STATUS              PORTS               NAMES
4e75117289ea        mysql:5.6           "docker-entrypoint.sh"   5 seconds ago       Up 5 seconds        3306/tcp            test-mysql
Enter the container’s interactive shell:
$ docker exec -it test-mysql /bin/bash
root@4e75117289ea:/#
This is a Debian 8 (Jessie) image with minimal installation. Some common commands like wget are not available and we need to install these beforehand:
$ apt-get update && apt-get install wgetInstall the appropriate Percona apt repository and install the latest PXB 2.3:
$ wget https://repo.percona.com/apt/percona-release_0.1-3.jessie_all.deb
$ dpkg -i percona-release_0.1-3.jessie_all.deb
$ apt-get update
$ apt-get install percona-xtrabackup-23
$ mkdir -p /backup/xtrabackups
$ exit
That’s it. Those were changes we’ve made to the container. Let’s commit this container as another image so we can use it later. First, retrieve the container ID:
$ docker ps
CONTAINER ID        IMAGE               COMMAND                  CREATED             STATUS              PORTS               NAMES
4e75117289ea        mysql:5.6           "docker-entrypoint.sh"   12 minutes ago      Up 12 minutes       3306/tcp            test-mysql
Then, commit and push the changes to another image called “local/mysql-pxb:5.6”:
$ docker commit 4e75117289ea mysql-pxb:5.6
830fea426cfb27d4a520c25f90de60517b711c607dda576fca93ff3a5b03c48f
We can now see that our new image is ready:
$ docker images
REPOSITORY                    TAG                 IMAGE ID            CREATED             VIRTUAL SIZE
local/mysql-pxb               5.6                 830fea426cfb        9 seconds ago       589.7 MB
docker.io/debian              latest              f854eed3f31f        5 days ago          125.1 MB
docker.io/mysql               latest              b0e2c14c7e92        3 weeks ago         378.4 MB
docker.io/mysql               5.6                 54672d2ddb6f        3 weeks ago         329 MB
This is just an example to show you how to create an image. We are not going to test this image further, nor upload it to the Docker Hub. Instead, we’ll use Dockerfile as described in the next section.
2) Dockerfile
Contrary to the change and commit approach, another way is to compile all the necessary steps that we used above in a text file called Dockerfile. Generally, it is better to use Dockerfiles to manage your images in a documented and maintainable way. We are not going to cover each of the syntax used in Dockerfile, you can refer to the Docker documentation for details.
Let’s start by creating a directory to place the Dockerfile:
$ mkdir -p ~/docker/severalnines/mysql-pxb
$ cd ~/docker/severalnines/mysql-pxb
Create a new file called Dockerfile:
$ vim DockerfileAnd add the following lines:
## MySQL 5.6 with Percona Xtrabackup

## Pull the mysql:5.6 image
FROM mysql:5.6

## The maintainer name and email
MAINTAINER Ashraf Sharif

## List all packages that we want to install
ENV PACKAGE percona-xtrabackup-23

# Install requirement (wget)
RUN apt-get update && apt-get install -y wget

# Install Percona apt repository and Percona Xtrabackup
RUN wget https://repo.percona.com/apt/percona-release_0.1-3.jessie_all.deb &&
    dpkg -i percona-release_0.1-3.jessie_all.deb &&
    apt-get update &&
    apt-get install -y $PACKAGE

# Create the backup destination
RUN mkdir -p /backup/xtrabackups

# Allow mountable backup path
VOLUME ["/backup/xtrabackup"]
Save the file. What we are doing here is exactly the same with “change and commit” approach, where we extend the functionality of the existing MySQL image downloaded from Docker Hub by installing Percona apt repository and Percona Xtrabackup into it.
We can now build a new image from this Dockerfile:
$ docker build --rm=true -t severalnines/mysql-pxb:5.6 .We saved the image with a proper naming format “username/image_name:tag”, which is required by Docker Hub if you would like to push and store the image there.
Let’s take a look on what we have now:
$ docker images
REPOSITORY TAG IMAGE ID CREATED VIRTUAL SIZE
severalnines/mysql-pxb 5.6 c619042c5b91 18 minutes ago 591.4 MB
local/mysql-pxb 5.6 830fea426cfb 15 hours ago 589.7 MB
docker.io/debian latest f854eed3f31f 6 days ago 125.1 MB
docker.io/mysql latest b0e2c14c7e92 3 weeks ago 378.4 MB
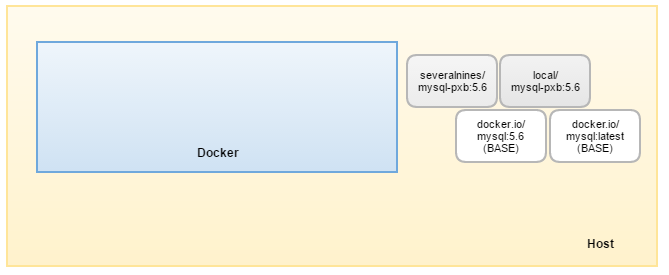
docker.io/mysql 5.6 54672d2ddb6f 3 weeks ago 329 MBThere are two same images, “local/mysql-pxb” and “severalnines/mysql-pxb”, where the latter was built by using Dockerfile. e are going to push it into Docker Hub.
This is what we have now in our machine host:
Next, we are going to test the image and make further modifications if necessary.
Testing
Let’s run a MySQL container and perform a backup using innobackupex. Create volume path directories on the machine host beforehand:
$ mkdir -p /storage/mysql-pxb/datadir
$ mkdir -p /storage/backups
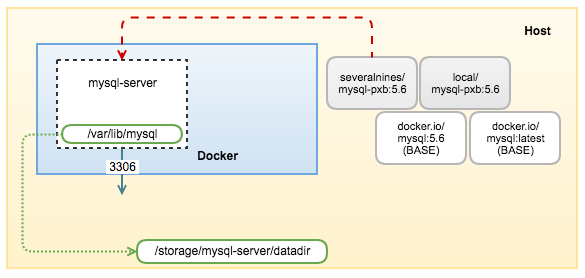
$ docker run -d
--name mysql-server
-v /storage/mysql-server/datadir:/var/lib/mysql
-e MYSQL_ROOT_PASSWORD=mypassword
severalnines/mysql-pxb:5.6The above command runs a MySQL container called “mysql-server” from the newly built image, severalnines/mysql-pxb:5.6, which can be illustrated as below:
From Percona Xtrabackup documentation, the simplest innobackupex command is:
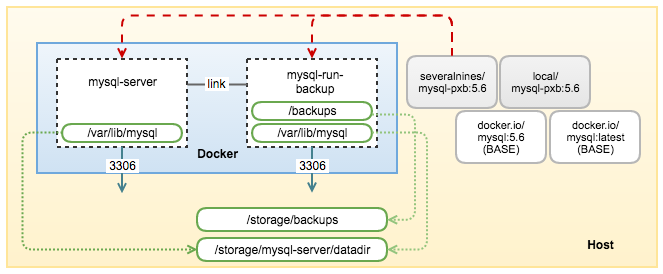
$ innobackupex --user=”[user]” --password=”[password]” [backup path]Based on the above, we can execute the backup command in another container (mysql-run-backup), link it to the running MySQL container (mysql-server) and take advantage of the environment variables available for linked containers. By doing this, we don’t have to specify the credentials like host, port, username and password when running the innobackupex command.
Let’s run a linked container and perform the backup by using Docker’s environment variable:
$ docker run -it
--link mysql-server:mysql
--name=mysql-run-backup
-v /storage/mysql-server/datadir:/var/lib/mysql
-v /storage/backups:/backups
--rm=true
severalnines/mysql-pxb:5.6
sh -c 'exec innobackupex --host="$MYSQL_PORT_3306_TCP_ADDR" --port="$MYSQL_PORT_3306_TCP_PORT" --user=root --password="$MYSQL_ENV_MYSQL_ROOT_PASSWORD" /backups'
Our both containers are now working together like this:
However, the “run” command was pretty long and not very user friendly. We can simplify this by using a bash script. Create a bash script under the same path as the Dockerfile:
$ cd ~/docker/severalnines/mysql-pxb
$ vim run_backup.sh
And add the following lines:
# Run innobackupex
BACKUP_PATH=/backups

innobackupex --host="$MYSQL_PORT_3306_TCP_ADDR"
--port="$MYSQL_PORT_3306_TCP_PORT"
--user=root
--password="$MYSQL_ENV_MYSQL_ROOT_PASSWORD"
$BACKUP_PATH
Give the script an executable permission:
$ chmod 755 run_backup.shThen, use the ADD command to copy the bash script into the image when building it. Our final version of Dockerfile is now:
## MySQL 5.6 with Percona Xtrabackup

## Pull the mysql:5.6 image
FROM mysql:5.6

## The maintainer name and email
MAINTAINER Your Name

## List all packages that we want to install
ENV PACKAGE percona-xtrabackup-22

# Install requirement (wget)
RUN apt-get update && apt-get install -y wget

# Install Percona apt repository and Percona Xtrabackup
RUN wget https://repo.percona.com/apt/percona-release_0.1-3.jessie_all.deb &&
        dpkg -i percona-release_0.1-3.jessie_all.deb &&
        apt-get update &&
        apt-get install -y $PACKAGE

# Create backup directory
RUN mkdir -p /backups

# Copy the script to simplify backup command
ADD run_backup.sh /run_backup.sh

# Mountable backup path
VOLUME ["/backups"]
Rebuild the image:
$ docker build --rm=true -t severalnines/mysql-pxb:5.6 .Run a new container with the new simplified command “/run_backup.sh”:
$ docker run -it
--link mysql-server:mysql
--name=mysql-run-backup
-v /storage/mysql-server/datadir:/var/lib/mysql
-v /storage/backups:/backups
--rm=true
severalnines/mysql-pxb:5.6
sh -c 'exec /run_backup.sh'
You should see Xtrabackup output on the screen. Ensure you get the “completed OK” line indicating the backup is successfully created:
...
innobackupex: Backup created in directory '/backups/2016-06-17_17-07-54'
160617 17:07:57  innobackupex: Connection to database server closed
160617 17:07:57  innobackupex: completed OK!
The container will then exit (we ran the image in foreground without –detach parameter) and automatically removed by Docker since we specified “–rm=true” in the “run” command line. On the machine host, we can see the backups are there:
$ ls -1 /storage/backups/
2016-06-17_13-01-58
2016-06-17_13-07-28
2016-06-17_14-02-50
Now our Dockerfile and the image is ready to be published.
Upload to Docker Hub
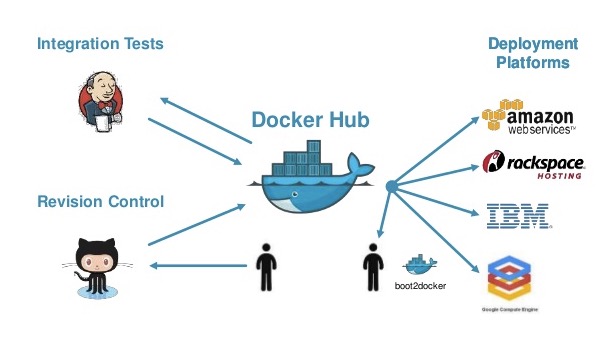
Docker Hub greatly facilitates Docker image distribution and collaboration. It comes with a bunch of great features like image storage, automatic build and test, link to code repositories and integration with Docker Cloud. It also supports private image repository for those who don’t want to publish the images to the public.
In order to share the images onto Docker Hub, you must first register. After an account is created, run the following command on the machine host to authenticate to the site:
$ docker login
Username: severalnines
Password:
Email: [email protected]
WARNING: login credentials saved in /root/.docker/config.json
Login Succeeded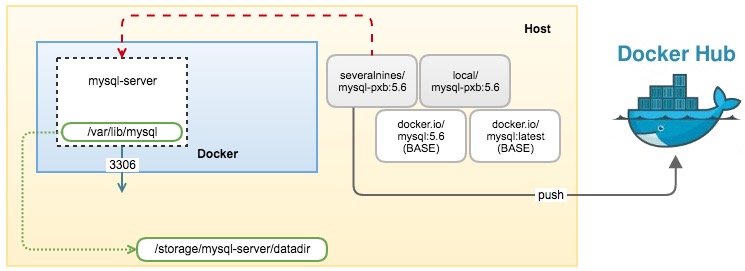
Now you can push this repository to the registry designated by its name or tag:
$ docker push severalnines/mysql-pxb:5.6

Do you really want to push to public registry? [y/n]: y
The push refers to a repository [docker.io/severalnines/mysql-pxb] (len: 1)
c619042c5b91: Pushed
cb679f373840: Pushed
29db1ab3b7c2: Pushed
eadfe1149bcf: Pushed
73f07a1d187e: Pushed
d574478a62d8: Pushed
9acd57cae939: Pushed
b14dd0099b51: Pushed
c03269bf1687: Pushed
f50b60617e9c: Pushed
ed751d9dbe3b: Pushed
23286f48d129: Pushed
5.6: digest: sha256:5cf2d7c339a9902ac3059b9ddac11beb4abac63e50fc24e6dfe0f6687cdfa712 size: 20156
Once completed, the image will be available publicly in Docker Hub for user “severalnines”:
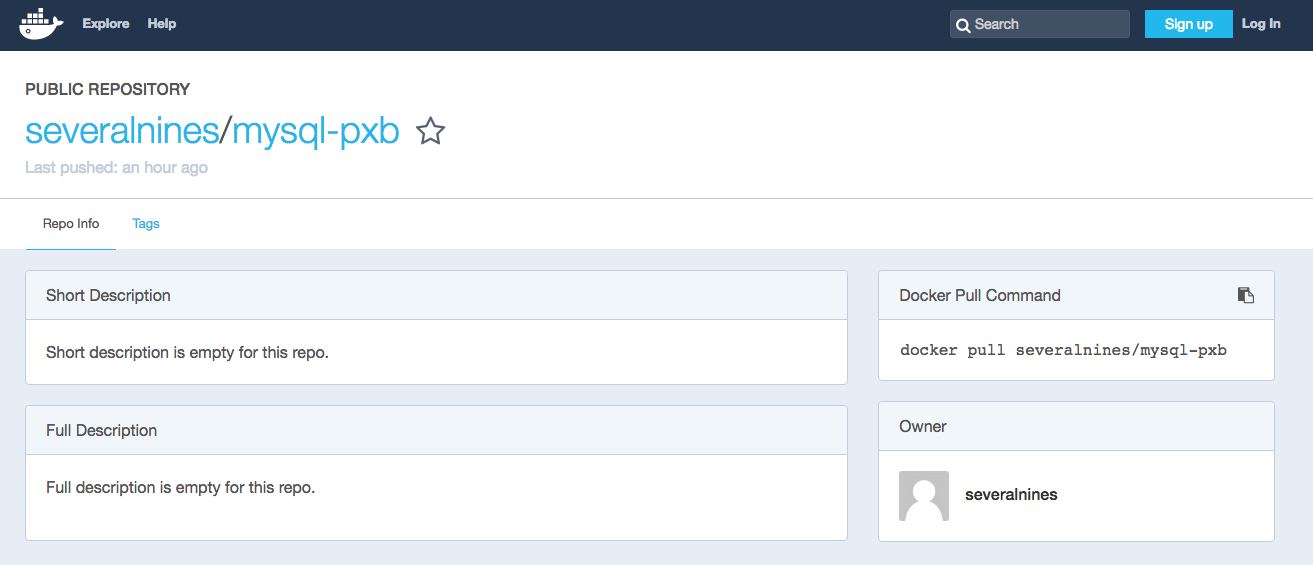
Great! Our image is now live and hosted on the Docker Hub where the community can start pulling it.
Automated Build
It’s great to have Docker Hub store the image for you, for free. But, what if a newer version of Percona Xtrabackup is available and you want the image to have it? Or, what if we just want to make a slight modification to our Dockerfile? Should we repeat the building steps over and over again? The answer is no – if you make use of the automated build. Just tell Docker Hub where the code repository is (Github or BitBucket), it will keep an eye for any changes in the revision control of the repository and trigger the build process automatically
Automated builds have several advantages:
- Images built in this way are built exactly as specified.
- The Dockerfile is available to anyone with access to your Docker Hub repository.
- Your repository is kept up-to-date with code changes automatically.
In this example, we use Github. Firstly, create a Github repository. Clone the Github repository into the machine host, and then push the Dockerfile and the run_backup.sh script into Github repository:
$ git clone severalnines/docker-mysql-pxb
$ cd severalnines/docker-mysql-pxb
$ git add *
$ git commit -m ‘first release’
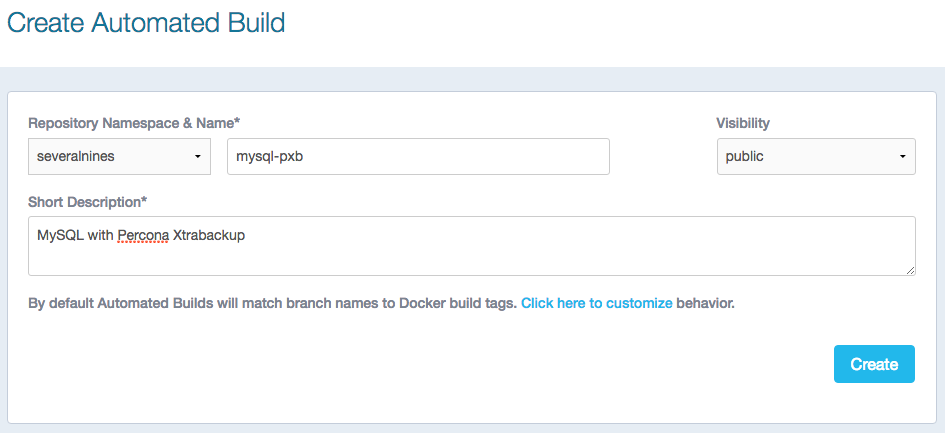
$ git push origin masterNext, link your Docker account with the Github repository. Refer to the instructions here. Once linked, go to Docker Hub > Create Automated Build > Create Auto-build Github > choose the repository and then specify the Docker repository name “mysql-pxb” and add a short description of the repository, similar to the following screenshot:
Then, configure the Build Settings according to the code branch, Dockerfile location and image tag:
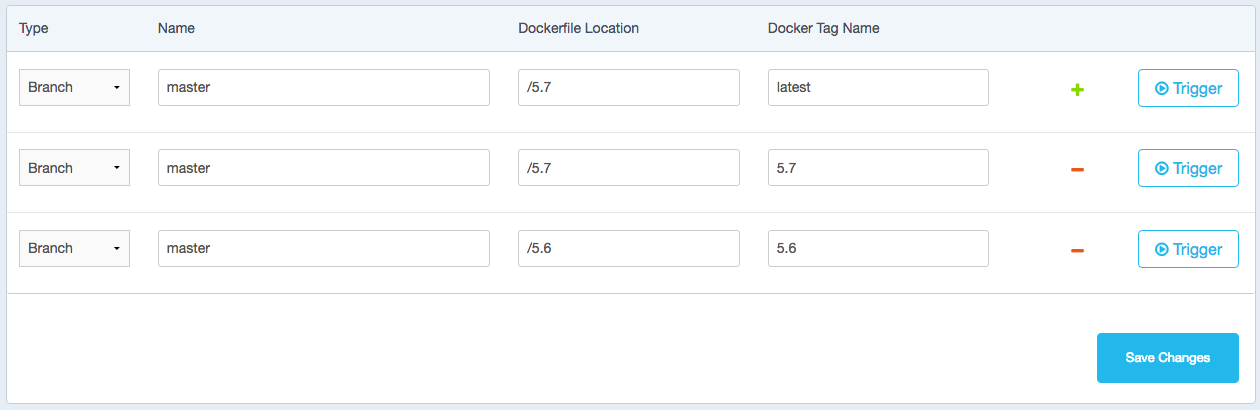
In the above example, we also created a Dockerfile for MySQL 5.7 and set it as the default using the “latest” tag. Click on the “Trigger” button to immediately trigger a build job. Docker Hub will then put it in a queue and build the image accordingly.
Here is the final look of the Docker Hub page once you have linked the account and configured automated build:
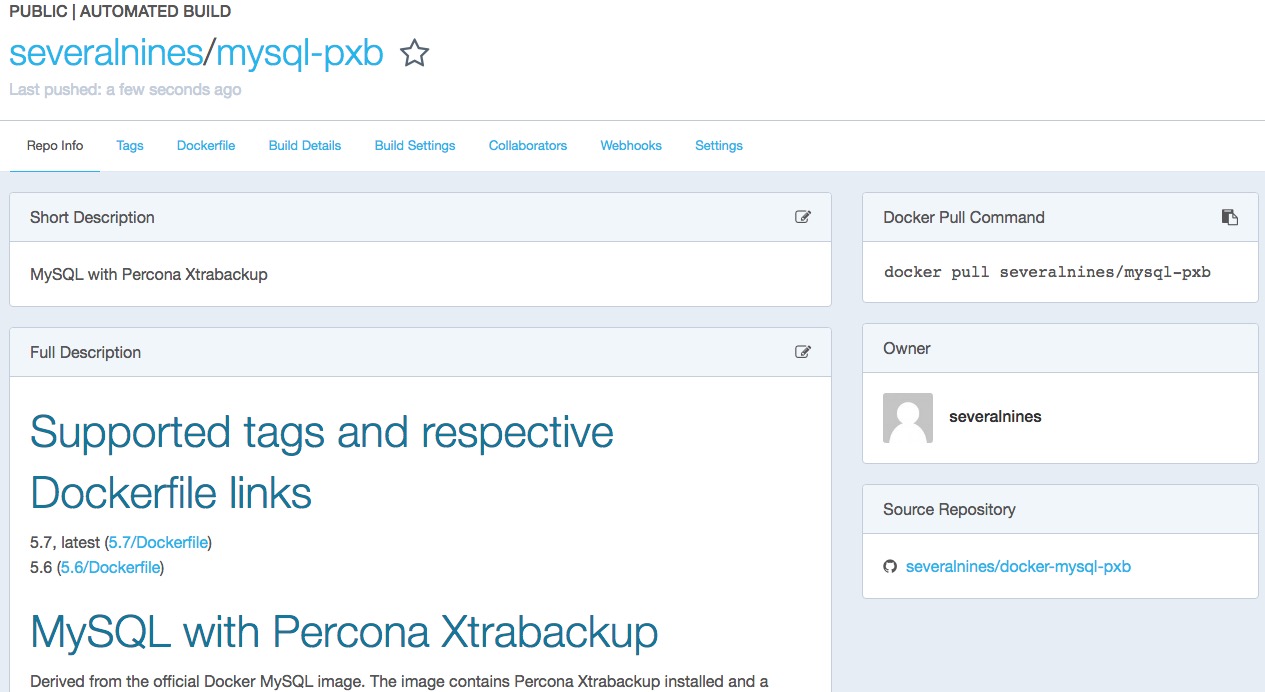
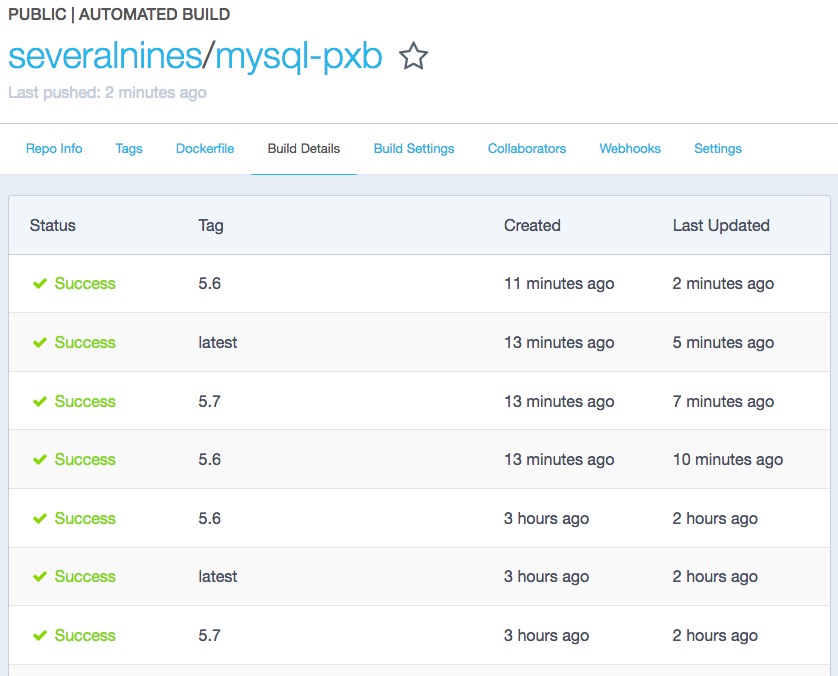
That’s all. Now what you have to do is just make a change and commit to the Github repository, then Docker will re-build the image for you automatically. If you have a README.md file inside the Github repository, Docker Hub will also pull the content of it into the “Full Description” section of the Docker repository page. Here is what the build status should look like under “Build Details” tab:
We strongly suggest you to have a look at the Best Practice for Writing Dockerfiles. In fact, if you’re creating an official Image, you must stick to those practices.
That concludes this blog post. In the next post, we will look into Docker internetworking for MySQL containers.


