blog
MongoDB Database Automation Basics Using Chef

Managed environments grow over time, often as a result of the increased data involvement or maybe due to the need of increasing performance through shared workload. Because of this there is a need to add members. For instance, with MongoDB one can decide to do replication and sharding which consequently will require one to add more members to the cluster. Configuring and deploying these environments with time becomes hectic, time consuming, prone to human errors and so many associated setbacks which finally pose operational expenses. Take an example of a replica set with 50 members in MongoDB and you want to shard a certain collection in each of the members, doing this manually for each is time consuming, we thus need a centralized system from which you can easily configure all the members. With a centralized systems you write some code which in tern configure the connected members. The code is therefore human readable, versionable and testable to remove possible errors before deployment.
What is Chef Software?
Chef is an automation software written in the Ruby language that is used to streamline the task of configuring and maintaining cloud machines or on prem servers. It does so by ensuring that all connected members get the required resources, the resources are well configured and corrects any resources that are not in the desired state. So, Chef basically ensures files and software resources expected to be in a certain machine are present, configured correctly and working properly as intended.
The Components of Chef
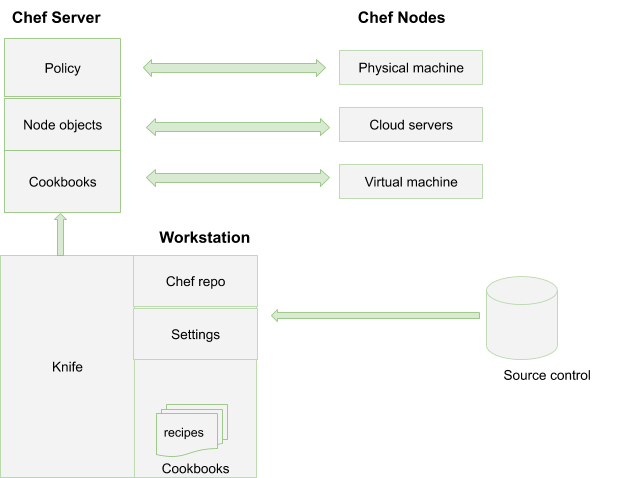
Chef Server
This is the central controlling system that houses the configuration data. The data is written in a ‘recipe’ and if many of these recipes are involved they form a cookbook. The central system also contains metadata describing each of the nodes as outlined in chef-client.
All changes made in recipes pass here for validation before deployment. The server also ensures that the workstation and the connected nodes are paired using authorization keys before allowing communication between them and applying the changes.
Chef Client Node
The Chef client node registers and validates nodes and builds the node objects. It essentially holds the current state of a given node and its metadata.
Node
This is the physical, virtual or cloud machine to be configured and each should have the client node installed.
Workstation
The workstation provides an interface for communication between the server and the client nodes. It provides a platform for writing, testing and deploying the cookbooks. This is where the roles are also defined
Test Kitchen
This is where the code is validated.
Chef Knife
Interacts the nodes.
Cookbooks
Contains recipes written in Ruby language and are used to define the tasks that are to be carried out. The recipes specify resources and order of implementation on the defined tasks.
- attributes are used to override the default settings.
- files used to transfer files from specific path to chef-client.
- metadata resource defines the node information as described in the client-node.
How Chef Works
Chef has two ways of operation that is, client/server or in a standalone mode known as ‘chef-solo’.
The Chef-server receives various attributes regarding a certain node from the Chef-client. These attributes are then indexed using Elasticsearch by the server which then provides an Application Program Interface (API) from where the client-nodes can query these data. The returned results are then used by the client-nodes to configure the relevant machines and transform them to the desired state.
The server hubs all operations where changes are to be stored
Chef managed servers are evaluated from time to time against some desired state ensuring that any changes in configurations are automatically corrected and applied universally. With this approach, there is a consistent configuration at scale.
Getting Started with Chef
You can download the chef-workstation from this site and install it. Make a folder named cookbooks and inside this folder run the command:
$ chef generate cookbook first_cookbookThis will generate a directory named first_cookbook with some sub-folders and files.
Navigate to cookbooks/first_cookbook/recipes/ and update the default.rb recipe with the contents
file "test.txt" do

  content 'This is my first recipe file'

end
We then execute this file using the command
$ chef-client --local-mode --override-runlist first_cookbook.OR, inside the recipe folder, you can run the file with the command
$ chef-apply default.rbIf you navigate to your recipe folder, you will definitely see the test.txt file with the content This is my first recipe file. It’s that easy. In the next section we will be creating recipes to do some specific tasks regarding MongoDB
Installing and Configuring MongoDB with Chef
You can install MongoDB by creating an install recipe MongoDBInstall.rb and populate it with the contents
package "mongodb" do

 action :install

 version '4.0.3'

end
In this case our package name is mongodb and we are going to install version 4.0.3
What we have is a basic recipe but in many cases we will need an advanced cookbook to do our configuration in MongoDB. To easen the task, there are developed cookbooks such as SC-MongoDB that generally make the configuration precise.
SC-MongoDB Cookbook
The cookbook provides mongodb_instance that enhances one to configure MongoDB params, replica set and a sharded cluster.
To install the cookbook just run the command
$ knife supermarket download sc-mongodbYou can then use the defined attributes in this site to reconfigure some of the default MongoDB attributes.