blog
How to configure SELinux for MongoDB Replica Sets

By 2025, the world will store approximately 200 zettabytes of data. That data will be stored either in public, private, on-premises or cloud storage, PCs, laptops, smartphones and also Internet-of-Things (IoT) devices. On projection, the number of internet-connected devices is also expected to increase to almost 75 billion in 2025. For some of us or people with less IT background, those numbers are nothing. But for security enthusiasts, this is worrying because more and more data is at risk.
In the world of open-source technology and databases, security is one of the important topics. Every now and then there will be a lot of new inventions and developments associated with security. One of them is Security-Enhanced Linux or (SELinux) for short, which was developed nearly 21 years ago by the United States National Security Agency (NSA). Even though this has been introduced so many years ago, it has evolved rapidly and extensively used as one of the security measures for the Linux system. While it’s fairly not easy to find information on how to configure it with a database, MongoDB has taken advantage of this. In this blog post, we will go through SELinux and how to configure it in MongoDB replica sets.
For this purpose, we are going to use 3 CentOS 8 VMs for our test environment and use MongoDB 4.4. Before we get going, let’s dive a little deeper into SELinux.
Enforcing, Permissive and Disabled Mode
These are the three modes that SELinux can run at any given time. Of course, all of them have their own function and purpose in terms of the security policy. We will go through it one by one.
When in enforcing mode, any configured policy will be enforced on the system and every single unauthorized access attempt both by users or processes are denied by SELinux. Not only that, those access denied actions also will be recorded in the related log files. While this is the most recommended mode, most of the Linux systems nowadays do not have this mode enabled by the system administrator due to various reasons like the complexity of the SELinux itself.
For permissive mode, we can safely say that SELinux is in a semi-enabled state. In this mode, no policy will be applied by SELinux, at the same time no access will be denied. Despite that, any policy violation is still recorded and logged in the audit logs. Typically, this mode is used to test SELinux before finalizing and proceeding to enforce it.
For the last mode which is disabled, no enhanced security is running on the system. Do you know what SELinux mode your system runs now? Simply run the following command to see:
$ sestatus
SELinux status:                 enabled
SELinuxfs mount:                /sys/fs/selinux
SELinux root directory:         /etc/selinux
Loaded policy name:             targeted
Current mode:                   enforcing
Mode from config file:          enforcing
Policy MLS status:              enabled
Policy deny_unknown status:     allowed
Memory protection checking:     actual (secure)
Max kernel policy version:      33
For our test systems, SELinux has been enabled and configured as enforcing so that we could proceed with the rest of the guide. In case SELinux is disabled or permissive in your system, you may follow the steps below to enable it and change to enforcing.
-
Edit /etc/selinux/config file to change the directive to enforcing
vi /etc/sysconfig/selinux
...
SELINUX=enforcing
…
You need to make sure the above directive is set to enforcing.
-
Reboot the system to apply the setting
$ reboot
Once the system is online, we need to confirm that SELinux has been configured correctly and the change has taken place. Run the following command to check, this is another way to check it apart from the first one that I mentioned earlier (sestatus).
$ getenforceEnforcing
Once we see the word “Enforcing”, we can now confirm this is good to go. Since we are going to use a replica set, we need to make sure the SELinux has been configured on all MongoDB nodes. I believe this is the most important part that we should cover before we proceed with configuring SELinux for MongoDB.
Recommended “ulimit” Settings
In this example, we assume that MongoDB 4.4 has been installed on 3 nodes. The installation is very simple and easy, to save our time we are not going to show you the steps but here is the link to the documentation.
In some cases, “ulimit” of the system will cause a few issues if the limits have a low default value. In order to make sure MongoDB runs correctly, we highly recommend setting the “ulimit” as per MongoDB recommendation here. While every deployment may have its unique requirements or settings, it’s best to follow the following “ulimit” settings:
-f (file size): unlimited
-t (cpu time): unlimited
-v (virtual memory): unlimited
-l (locked-in-memory size): unlimited
-n (open files): 64000
-m (memory size): unlimited
-u (processes/threads): 64000
To change the “ulimit” value, simply issue the following command, for example, changing the value for “-n” (open files):
$ ulimit -n 64000After all the limits are changed, the mongod instance has to be restarted to ensure the new limit changes take place:
$ sudo systemctl restart mongodConfiguring SELinux
According to the MongoDB documentation, the current SELinux Policy does not allow the MongoDB process to access /sys/fs/cgroup, which is required to determine the available memory on your system. So for our case, in which SELinux is in enforcing mode, the following adjustment has to be made.
Permit Access to cgroup
The first step is to ensure that our system has the “checkpolicy” package installed:
$ sudo yum install checkpolicy

yum install checkpolicy

Last metadata expiration check: 2:13:40 ago on Fri 11 Jun 2021 05:32:10 AM UTC.

Package checkpolicy-2.9-1.el8.x86_64 is already installed.

Dependencies resolved.

Nothing to do.

Complete!
Next, we need to create a custom policy file for “mongodb_cgroup_memory.te”:
cat > mongodb_cgroup_memory.te <<EOF
module mongodb_cgroup_memory 1.0;
require {
      type cgroup_t;
      type mongod_t;
      class dir search;
      class file { getattr open read };
}
#============= mongod_t ==============
allow mongod_t cgroup_t:dir search;
allow mongod_t cgroup_t:file { getattr open read };
EOF
After the policy file is created, the last steps are to compile and load the custom policy module by running these three commands:
$ checkmodule -M -m -o mongodb_cgroup_memory.mod mongodb_cgroup_memory.te
$ semodule_package -o mongodb_cgroup_memory.pp -m mongodb_cgroup_memory.mod
$ sudo semodule -i mongodb_cgroup_memory.pp
The last command should take a while and once it’s done, the MongoDB process should be able to access the correct files with SELinux enforcing mode.
Permit Access to netstat for FTDC
/proc/net/netstat is required for Full Time Diagnostic Data Capture (FTDC). FTDC in short is a mechanism to facilitate analysis of the MongoDB server. The data files in FTDC are compressed, not human-readable, and inherit the same file access permission as the MongoDB data files. Due to this, only users with access to the FTDC data files can transmit the data.
The steps to configure it are almost identical to the previous one. It’s just that the custom policy is different.
$ sudo yum install checkpolicy
Create a custom policy file “mongodb_proc_net.te”:
cat > mongodb_proc_net.te <
The last steps are to compile and load the custom policy:
$ checkmodule -M -m -o mongodb_proc_net.mod mongodb_proc_net.te
$ semodule_package -o mongodb_proc_net.pp -m mongodb_proc_net.mod
$ sudo semodule -i mongodb_proc_net.pp
Custom MongoDB Directory Path
One important thing to note is that if you installed MongoDB in the custom directory, you will need to customize the SELinux policy as well. The steps are slightly different from the previous one but it’s not too complex.
First, we need to update the SELinux policy to allow the mongod service to use the new directory, it’s worth to note that we need to make sure to include the .* at the end of the directory :
$ sudo semanage fcontext -a -t -
mongod_var_lib_t for data directory
-
mongod_log_t for log file directory
-
mongod_var_run_t for pid file directory
Then, update the SELinux user policy for the new directory:
$ sudo chcon -Rv -u system_u -t -
mongod_var_lib_t for data directory
-
mongod_log_t for log directory
-
mongod_var_run_t for pid file directory
The last step is to apply the updated SELinux policies to the directory:
restorecon -R -v Since MongoDB is using the default path for both data and log files, we can take a look at the following examples on how to apply it:
For non-default MongoDB data path of /mongodb/data:
$ sudo semanage fcontext -a -t mongod_var_lib_t '/mongodb/data.*'
$ sudo chcon -Rv -u system_u -t mongod_var_lib_t '/mongodb/data'
$ restorecon -R -v '/mongodb/data'
For non-default MongoDB log directory of /mongodb/log (e.g. if the log file path is /mongodb/log/mongod.log):

$ sudo semanage fcontext -a -t mongod_log_t '/mongodb/log.*'
$ sudo chcon -Rv -u system_u -t mongod_log_t '/mongodb/log'
$ restorecon -R -v '/mongodb/log'
Custom MongoDB Port
For some situations, some of the MongoDB installations are using a different port number other than the default one which is 27017. In this particular case, we need to configure SELinux as well and the command is pretty simple:
$ sudo semanage port -a -t mongod_port_t -p tcp
For example, we are using port 37017:
$ sudo semanage port -a -t mongod_port_t -p tcp 37017
Deploying MongoDB SELinux Enabled With ClusterControl
With ClusterControl, you have the option to enable SELinux during the deployment of your MongoDB replica set. However, you still need to change the mode to enforcing since ClusterControl only sets it to permissive. To enable it during deployment, you may untick “Disable AppArmor/SELinux” as per the screenshot below.
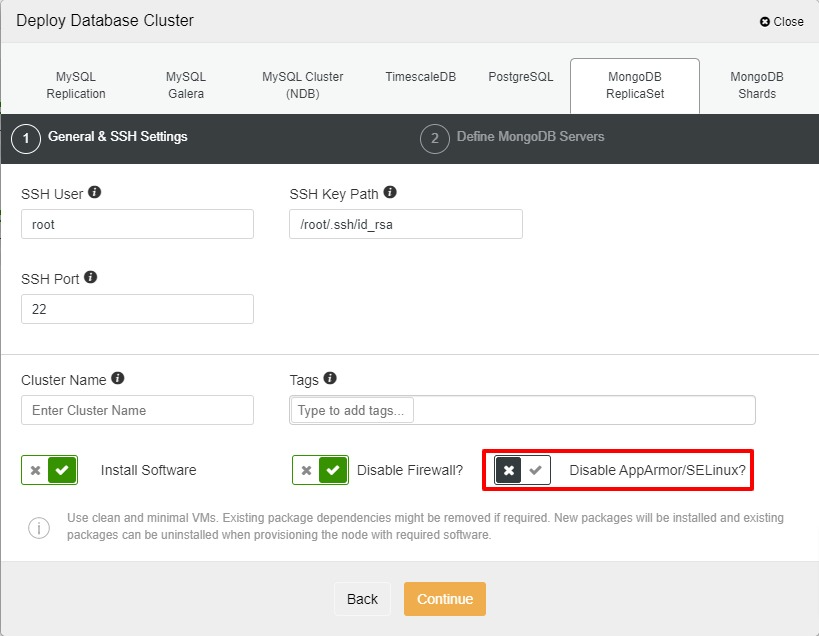
After that, you may continue and add the nodes for your MongoDB replica set and start the deployment. In ClusterControl, we are using version 4.2 for MongoDB.

Once the cluster is ready, we need to change the SELinux to enforcing for all nodes and proceed with configuring it by referring to the steps that we went through just now.
Conclusion
There are 3 modes of SELinux available for any Linux system. For SELinux enforcing mode, there are a few steps that need to be followed in order to make sure MongoDB runs without any issues. It’s also worth noting that some of the “ulimit” settings need to be changed as well to suit the system requirements as well as specs.
With ClusterControl, SELinux can be enabled during the deployment, however you still need to change to enforcing mode and configure the policy after the replica set is ready.
We hope that this blog post will help you setting up SELinux for your MongoDB servers