blog
High Availability File Sync and Share – Deploying ownCloud with Galera Cluster for MySQL and GlusterFS

Cloud storage is hot. Dropbox, Apple iCloud, Google Drive, Microsoft SkyDrive and Amazon Cloud Drive all offer cloud sharing platforms where you can store documents in the cloud and access them from all your devices. For enterprises who require full control, ownCloud is an open source solution that allows files to be stored on-premises and/or a backend cloud.
In this blog post, we’ll show you how to deploy a high availability setup using ownCloud Community Edition. We will need to set up redundancy in each of the following layers:
- file storage
- web server
- database server
- load balancer
We will use five servers. ownCloud will run on three separate servers with MySQL Galera Cluster 5.6 and GlusterFS running on RHEL 6.5 64bit. ownCloud supports GlusterFS as primary storage. ClusterControl will be co-located with one of the two load balancers to monitor and manage Galera Cluster and HAProxy.
The following diagram illustrates our setup:
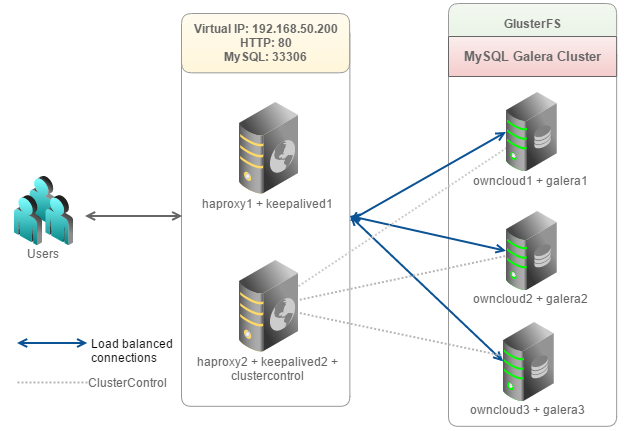
Our setup consists of 5 servers or nodes:
- owncloud1: web server + database server
- owncloud2: web server + database server
- owncloud3: web server + database server
- haproxy1: load balancer (master) + keepalived
- haproxy2: load balancer (backup) + keepalived + ClusterControl
Our main steps would be:
- Prepare 5 hosts
- Deploy MySQL Galera Cluster onto owncloud1, owncloud2 and oncloud3 from haproxy2
- Configure GlusterFS clustered file system
- Configure Apache and PHP on owncloud1, owncloud2 and owncloud3
- Configure Keepalived and HAProxy for web and database load balancing with auto failover
- Install ownCloud and connect it to the Web/DB cluster via the load balancer
Preparing Hosts
Add the following hosts definition in /etc/hosts of all nodes:
10.0.0.200		virtual-ip owncloud
10.0.0.201		owncloud1 web1 mysql1
10.0.0.202		owncloud2 web2 mysql2
10.0.0.203		owncloud3 web3 mysql3
10.0.0.211		haproxy1
10.0.0.212		haproxy2 clustercontrol
To simplify the deployment process, we will turn off SElinux and iptables on all hosts:
$ setenforce 0
$ service iptables stop
$ sed -i 's|SELINUX=enforcing|SELINUX=disabled|g' /etc/selinux/config
$ chkconfig iptables off
Deploying Galera Cluster for MySQL
** The deployment of the database cluster will be done from haproxy2, i.e., the ClusterControl node.
1. To set up MySQL Galera Cluster, go to the Galera Configurator to generate a deployment package. In the wizard, we used the following values when configuring our database cluster:
Vendor                   : Codership
MySQL Version            : MySQL 5.6.x
Infrastructure           : none/on-premises
Operating System         : RHEL6 - Redhat 6.4/Fedora/Centos 6.4/OLN 6.4/Amazon AMI
Number of Galera Servers : 3
OS user                  : root
ClusterControl Server    : 10.0.0.212
Database Servers         : 10.0.0.201 10.0.0.202 10.0.0.203
At the end of the wizard, a deployment package will be generated and emailed to you.
2. Download the deployment package and run deploy.sh:
$ tar -xzf s9s-galera-codership-3.5.0-rpm.tar.gz
$ cd s9s-galera-codership-3.5.0-rpm/mysql/scripts/install/
$ bash ./deploy.sh 2>&1 | tee cc.log
3. The deployment will take about 15 minutes, and once completed, the ClusterControl UI is accessible at https://10.0.0.212/clustercontrol. You will now see your MySQL Galera Cluster in the UI.

Load Balancer and Failover
Since HAProxy and ClusterControl are co-located on the same server, we need to change the Apache default port to another port, for example port 8080. ClusterControl will run on port 8080 while HAProxy will take over port 80 to perform web load balancing.
1. On haproxy2, open the Apache configuration file at /etc/httpd/conf/httpd.conf and make the following changes:
Listen 8080Restart Apache web server to apply changes:
$ service httpd restartAt this point ClusterControl is accessible via port 8080 on HTTP at http://10.0.0.212:8080/clustercontrol or you can connect through the default HTTPS port at https://10.0.0.212/clustercontrol.
2. Change the Cluster Registration details to the new ClusterControl API URL that runs on port 8080. You can get the ClusterControl API Token from the email you received. Ensure that the previous defined API URL has been revoked:
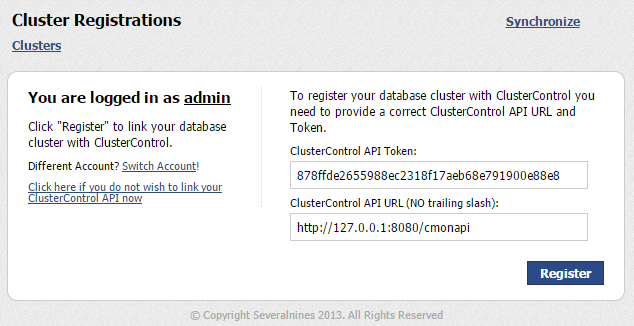
** You can also use https://127.0.0.1/cmonapi as the ClusterControl API URL. The HTTPS port does not change for this exercise.
3. Before we start to deploy the load balancers, make sure haproxy1 is accessible using passwordless SSH from ClusterControl/haproxy2. On haproxy2, copy the SSH keys to 10.0.0.211:
$ ssh-copy-id -i ~/.ssh/id_rsa [email protected]4. Login to ClusterControl, drill down to the database cluster and click Add Load Balancer button. Deploy HAProxy on haproxy1 and haproxy2 similar to below:

** Take note that for RHEL, ensure you check Build from source? to install HAProxy from source. This will install the latest version of HAProxy.
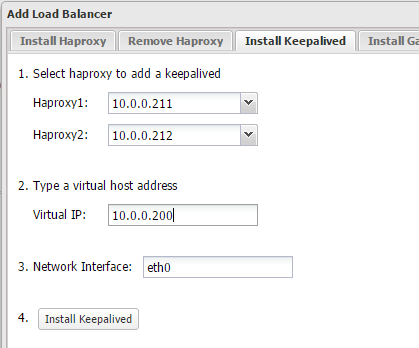
5. Install Keepalived on haproxy1(master) and haproxy2(backup) with 10.0.0.200 as virtual IP:
6. The load balancer nodes have now been installed, and are integrated with ClusterControl. You can verify this by checking out the ClusterControl summary bar:

7. By default, our script will configure the MySQL reverse proxy service to listen on port 33306. We will need to add HTTP load balancing capabilities to the newly installed load balancers. On haproxy1 and haproxy2, open /etc/haproxy/haproxy.cfg and add the following lines:
frontend http-in
    bind *:80
    default_backend web_farm
backend web_farm
    balance source
    server owncloud1 10.0.0.201:80 maxconn 32 check
    server owncloud2 10.0.0.202:80 maxconn 32 check
    server owncloud3 10.0.0.203:80 maxconn 32 check
8. Restart HAProxy to apply changes:
$ service haproxy restartOr, you can just kill the haproxy process and let ClusterControl recover it.
Configuring GlusterFS
* The following steps should be performed on owncloud1, owncloud2 and owncloud3 unless otherwise specified.
1. Get the Gluster YUM repository file and save it into /etc/yum.repos.d:
$ wget http://download.gluster.org/pub/gluster/glusterfs/LATEST/RHEL/glusterfs-epel.repo -P /etc/yum.repos.d2. Install GlusterFS:
$ yum install -y glusterfs glusterfs-fuse glusterfs-server3. Create a directory called brick under /storage partition:
$ mkdir -p /storage/brick4. Start gluster daemon:
$ service glusterd start
$ chkconfig glusterd on
5. On owncloud1, probe the other nodes:
$ gluster peer probe 10.0.0.202
$ gluster peer probe 10.0.0.203
You can verify the peer status with the following command:
$ gluster peer status
Number of Peers: 2
Hostname: 10.0.0.202
Uuid: d8c23f23-518a-48f7-9124-476c105dbe91
State: Peer in Cluster (Connected)
Hostname: 10.0.0.203
Uuid: 32a91fda-7ab8-4956-9f50-9b5ad59e0770
State: Peer in Cluster (Connected)
6. On owncloud1, create a replicated volume on probed nodes:
$ gluster volume create rep-volume replica 3 10.0.0.201:/storage/brick 10.0.0.202:/storage/brick 10.0.0.203:/storage/brick
volume create: rep-volume: success: please start the volume to access data
7. Start the replicated volume on owncloud1:
$ gluster volume start rep-volume8. Ensure the replicated volume and processes are online:
$ gluster volume status
Status of volume: rep-volume
Gluster process                                         Port    Online  Pid
------------------------------------------------------------------------------
Brick 10.0.0.201:/storage/brick                         49152   Y       3679
Brick 10.0.0.202:/storage/brick                         49152   Y       5253
Brick 10.0.0.203:/storage/brick                         49152   Y       6140
NFS Server on localhost                                 2049    Y       3730
Self-heal Daemon on localhost                           N/A     Y       3710
NFS Server on 10.0.0.202                                2049    Y       5267
Self-heal Daemon on 10.0.0.202                          N/A     Y       5272
NFS Server on 10.0.0.203                                2049    Y       6162
Self-heal Daemon on 10.0.0.203                          N/A     Y       6157
Task Status of Volume rep-volume
------------------------------------------------------------------------------
There are no active volume tasks
9. We’ll mount the replicated volume on /var/www/html. Create the directory:
$ mkdir -p /var/www/html10. Add following line into /etc/fstab to allow auto-mount:
localhost:/rep-volume /var/www/html glusterfs defaults,_netdev 0 011. Mount the GlusterFS to /var/www/html:
$ mount -aApache and PHP
* The following steps should be performed on owncloud1, owncloud2 and owncloud3.
1. ownCloud is recommended to run on PHP 5.4. To simplify the installation, install Remi YUM repository:
$ rpm -Uvh http://rpms.famillecollet.com/enterprise/remi-release-6.rpm2. Install all required packages with remi repository enabled:
$ yum install -y --enablerepo=remi httpd php php-mysql php-xml php-gd php-dom php-mbstring3. Start Apache web server and enable it on boot:
$ service httpd start
$ chkconfig httpd on
Install ownCloud
The following steps should be performed on owncloud1.
1. Download ownCloud Community version from here and extract it under /var/www/html:
$ wget https://download.owncloud.org/community/owncloud-7.0.4.tar.bz2
$ tar -xjf owncloud-7.0.4.tar.bz2 -C /var/www/html
2. Assign correct ownership to ownCloud directory:
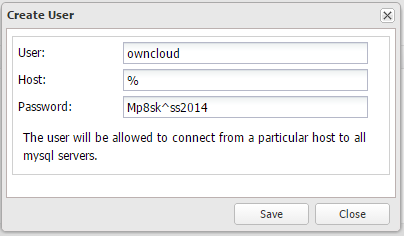
$ chown apache.apache -R /var/www/html/owncloud3. Before we proceed with the ownCloud installation, we need to prepare the owncloud schema. From ClusterControl, go to Manage > Schema and Users > Create Database and create a database called ‘owncloud’.
4. Create the database user under Privileges tab:
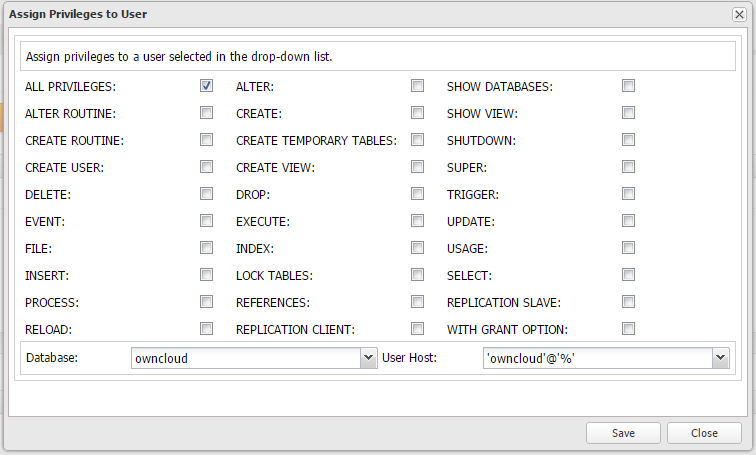
5. Assign the correct privileges for owncloud db user on database owncloud:
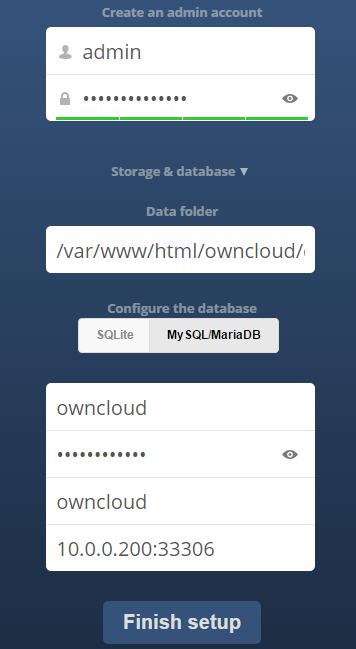
6. Open the browser and navigate to http://10.0.0.201/owncloud/ . You should see ownCloud installation page. Specify the configuration details for database to use MySQL/MariaDB with the created database name and user through virtual IP 10.0.0.200 port 33306:
After completion, you should see the welcome page as below:
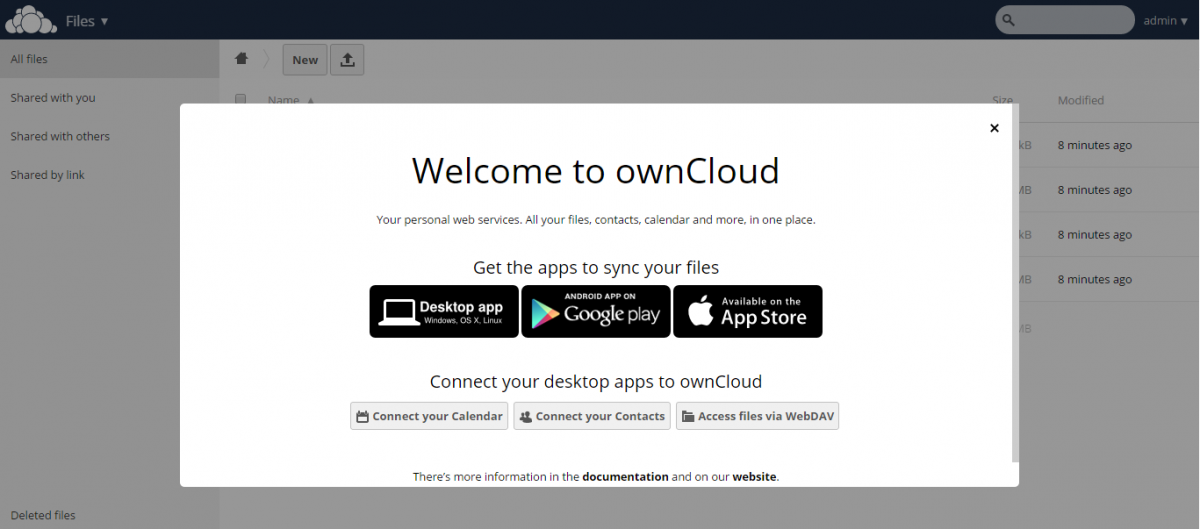
ownCloud installation is now complete! You can now access the website using virtual IP, http://10.0.0.200/owncloud with auto-failover and load-balanced connections.
Verify the Architecture
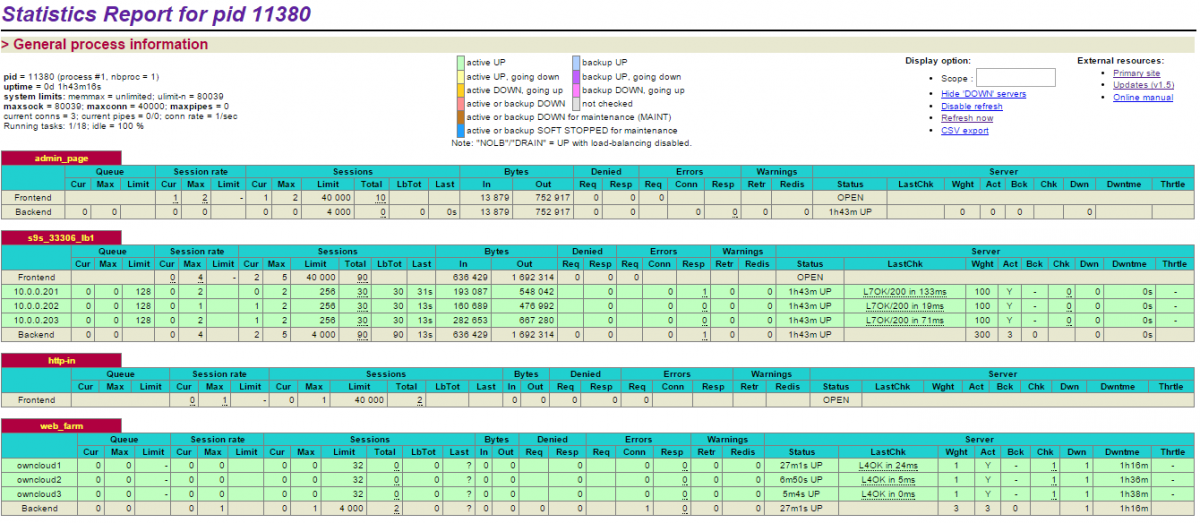
1. Check the HAProxy statistics by logging into the HAProxy admin page at haproxy1 host port 9600. The default username/password is admin/admin. You should see some bytes in and out on the web_farm and s9s_33306_production sections:
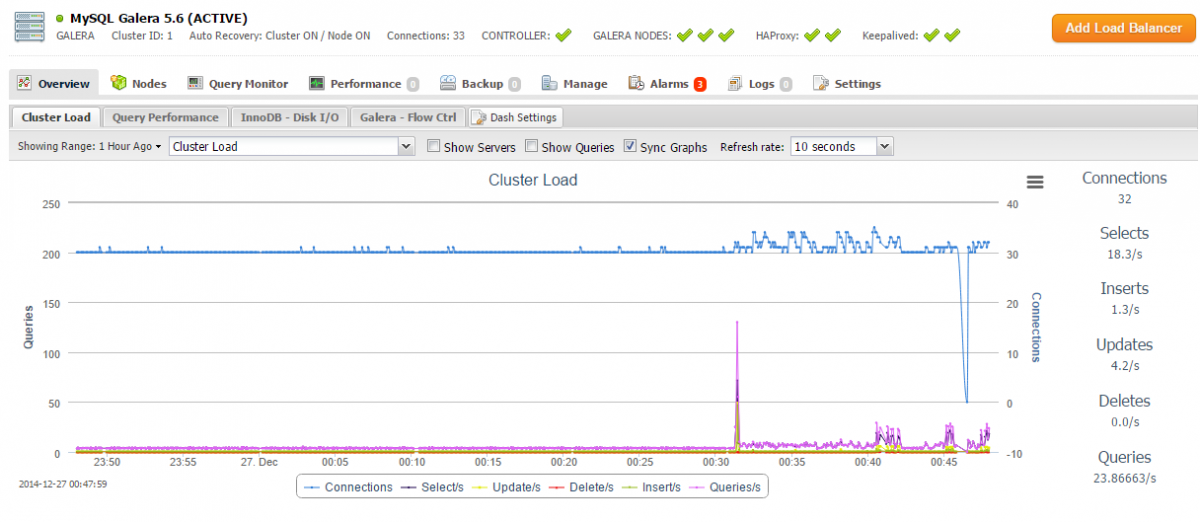
2. Check and observe the traffic on your database cluster from the ClusterControl overview page at https://10.0.0.212/clustercontrol:
Congratulations, you have now deployed your highly available ownCloud infrastructure by clustering the load balancer, web, database and file system layers.


