blog
Deploying MariaDB Sharding with Spider using ClusterControl

MariaDB offers built-in multi-host sharding capabilities with the Spider storage engine. Spider supports partitioning and XA transactions and allows remote tables of different MariaDB instances to be handled as if they were on the same instance. The remote table can be of any storage engine. The table linking is achieved by the establishment of the connection from a local MariaDB server to a remote MariaDB server, and the link is shared for all tables that are part of the same transaction.
In this blog post, we are going to walk you through the deployment of a cluster of two MariaDB shards using ClusterControl. We are going to deploy a handful of MariaDB servers (for redundancy and availability) to host a partitioned table based on a range of a selected shard key. The chosen shard key is basically a column that stores values with a lower and upper limit, as in this case, integer values between 0 to 1,000,000, making it the best candidate key to balance data distribution between two shards. Therefore, we will divide the ranges into two partitions:
-
0 – 499999: Shard 1
-
500000 – 1000000: Shard 2
The following diagram illustrates our high-level architecture of what we are going to deploy:
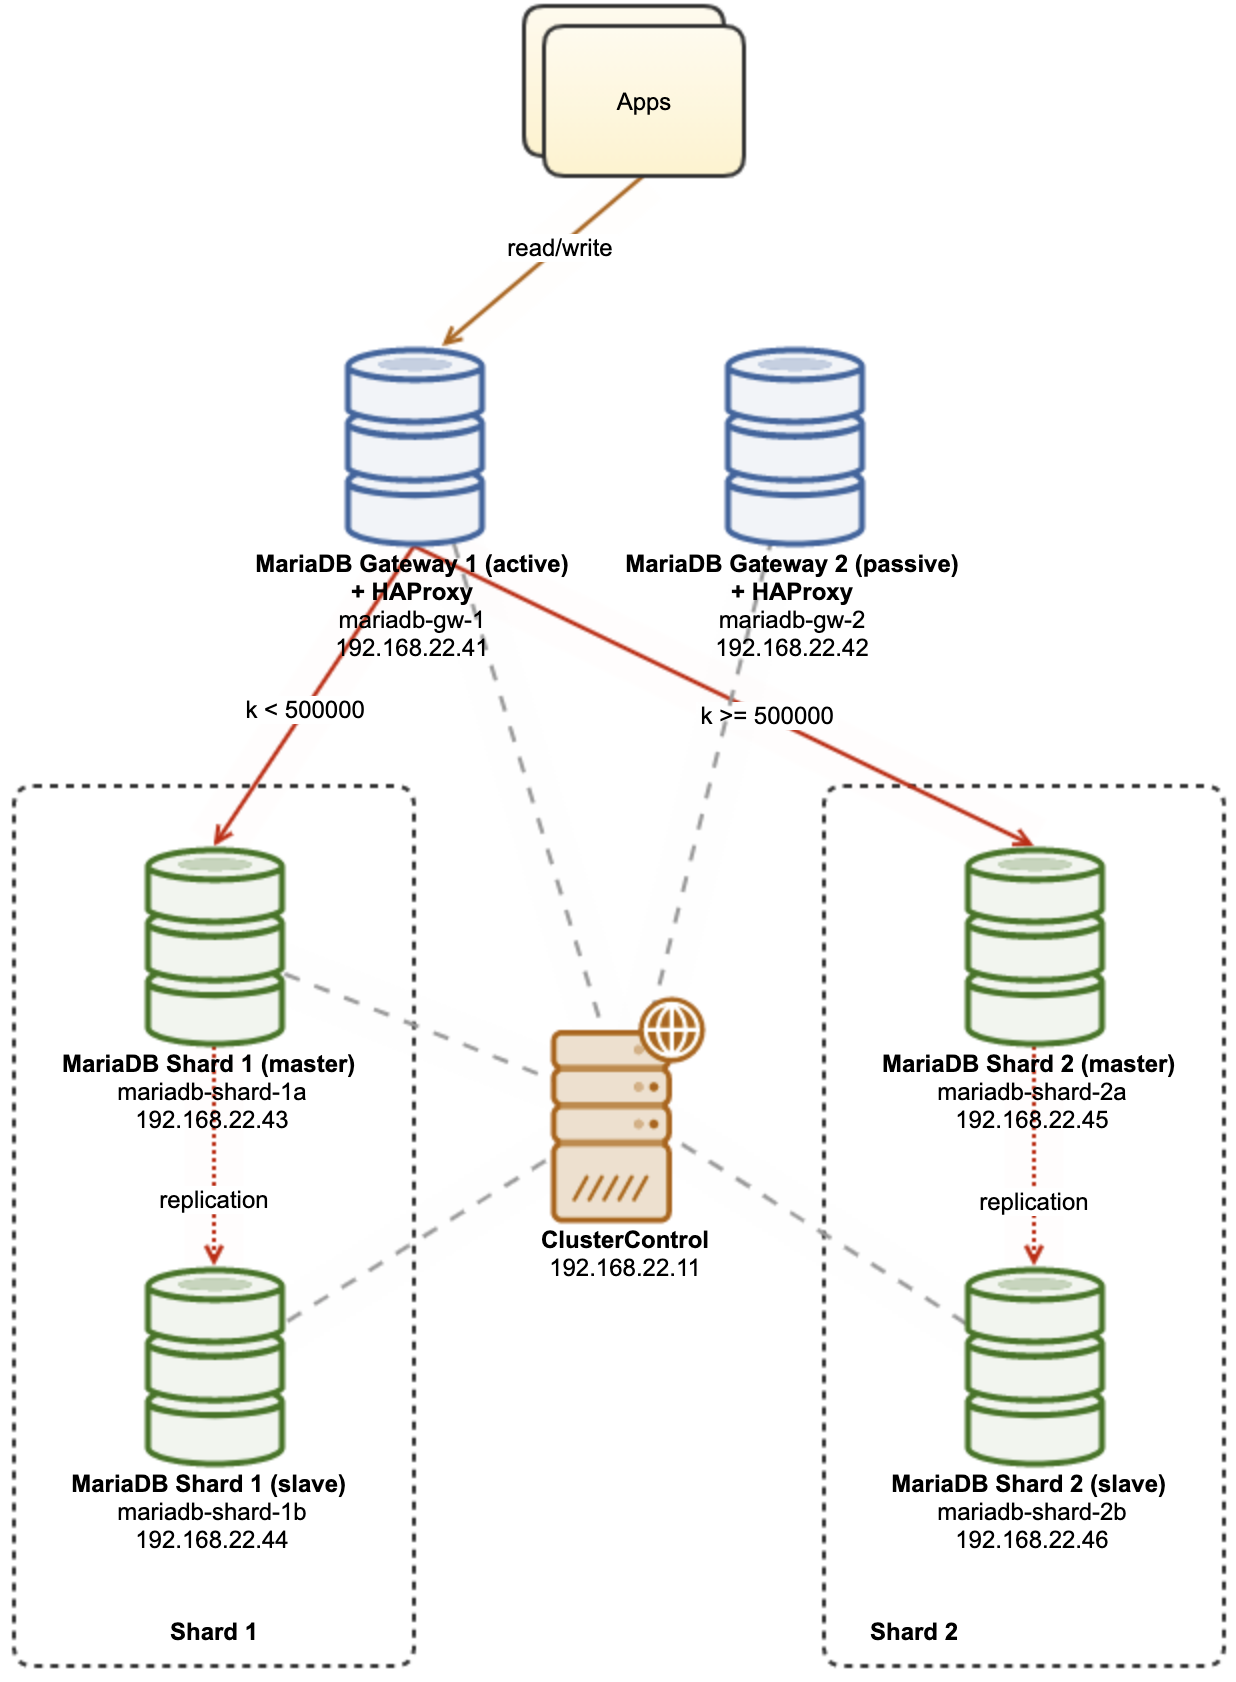
Some explanations of the diagram:
-
mariadb-gw-1: MariaDB instance that runs Spider storage engine, acts like a shard router. We give a name to this host as MariaDB Gateway 1 and this is going to be the primary (active) MariaDB server to reach the shards. The application will connect to this host like a standard MariaDB connection. This node connects to the shards via HAProxy listening on 127.0.0.1 ports 3307 (shard1) and 3308 (shard2).
-
mariadb-gw-2: MariaDB instance that runs Spider storage engine, acts like a shard router. We give a name to this host as MariaDB Gateway 2 and this is going to be the secondary (passive) MariaDB server to reach the shards. It will have the same setup as mariadb-gw-1. The application will connect to this host only if the primary MariaDB is down. This node connects to the shards via HAProxy listening on 127.0.0.1 ports 3307 (shard1) and 3308 (shard2).
-
mariadb-shard-1a: MariaDB master that serves as the primary data node for the first partition. MariaDB gateway servers should only write to the shard’s master.
-
mariadb-shard-1b: MariaDB replica that serves as secondary data node for the first partition. It shall take over the master role in case the shard’s master goes down (automatic failover is managed by ClusterControl).
-
mariadb-shard-2a: MariaDB master that serves as primary data node for the second partition. MariaDB gateway servers only write to the shard’s master.
-
mariadb-shard-2b: MariaDB replica that serves as secondary data node for the second partition. It shall take over the master role in case the shard’s master goes down (automatic failover is managed by ClusterControl).
-
ClusterControl: A centralized deployment, management and monitoring tool for our MariaDB shards/clusters.
Deploying Database Clusters using ClusterControl
ClusterControl is an automation tool to manage the lifecycle of your open-source database management system. We are going to use ClusterControl as a centralized tool for cluster deployments, topology management and monitoring for the purpose of this blog post.
1) Install ClusterControl.
2) Configure the passwordless SSH from ClusterControl server to all database nodes. On the ClusterControl node:
(clustercontrol)$ whoami
root
$ ssh-keygen -t rsa
$ ssh-copy-id [email protected]
$ ssh-copy-id [email protected]
$ ssh-copy-id [email protected]
$ ssh-copy-id [email protected]
$ ssh-copy-id [email protected]
$ ssh-copy-id [email protected]
3) Since we are going to deploy 4 sets of clusters, it is a good idea to use the ClusterControl CLI tool for this particular task to expedite and simplify the deployment process. Let’s first verify if we can connect with the default credentials by running the following command (default credential is auto-configured at /etc/s9s.conf):
(clustercontrol)$ s9s cluster --list --long
Total: 0
If we don’t get any errors and see a similar output as above, we are good to go.
4) Note that steps 4,5,6 and 7 can be executed at once since ClusterControl supports parallel deployment. We will start by deploying the first MariaDB Gateway server using ClusterControl CLI:
(clustercontrol)$ s9s cluster --create
        --cluster-type=mysqlreplication
        --nodes="192.168.22.101?master"
        --vendor=mariadb
        --provider-version=10.5
        --os-user=root
        --os-key-file=/root/.ssh/id_rsa
        --db-admin="root"
        --db-admin-passwd="SuperS3cr3tPassw0rd"
        --cluster-name="MariaDB Gateway 1"
5) Deploy the second MariaDB Gateway server:
(clustercontrol)$ s9s cluster --create
        --cluster-type=mysqlreplication
        --nodes="192.168.22.102?master"
        --vendor=mariadb
        --provider-version=10.5
        --os-user=root
        --os-key-file=/root/.ssh/id_rsa
        --db-admin="root"
        --db-admin-passwd="SuperS3cr3tPassw0rd"
        --cluster-name="MariaDB Gateway 2"
6) Deploy a 2-node MariaDB Replication for the first shard:
(clustercontrol)$ s9s cluster --create
        --cluster-type=mysqlreplication
        --nodes="192.168.22.111?master;192.168.22.112?slave"
        --vendor=mariadb
        --provider-version=10.5
        --os-user=root
        --os-key-file=/root/.ssh/id_rsa
        --db-admin="root"
        --db-admin-passwd="SuperS3cr3tPassw0rd"
        --cluster-name="MariaDB - Shard 1"
7) Deploy a 2-node MariaDB Replication for the second shard:
(clustercontrol)$ s9s cluster --create
--cluster-type=mysqlreplication
--nodes="192.168.22.121?master;192.168.22.122?slave"
--vendor=mariadb
--provider-version=10.5
--os-user=root
--os-key-file=/root/.ssh/id_rsa
--db-admin="root"
--db-admin-passwd="SuperS3cr3tPassw0rd"
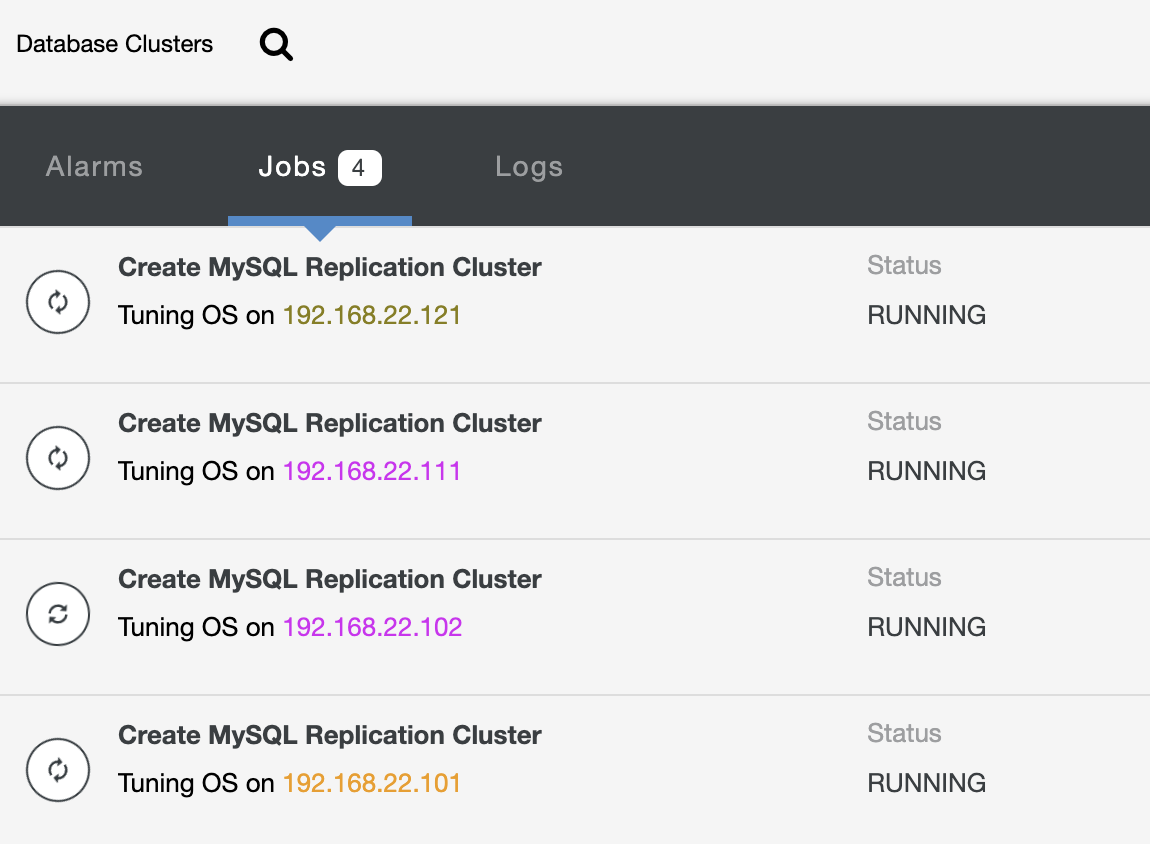
--cluster-name="MariaDB - Shard 2"While the deployment is ongoing, we can monitor the job output from CLI:
(clustercontrol)$ s9s job --list --show-running
ID CID STATE   OWNER GROUP  CREATED  RDY TITLE
25   0 RUNNING admin admins 07:19:28  45% Create MySQL Replication Cluster
26   0 RUNNING admin admins 07:19:38  45% Create MySQL Replication Cluster
27   0 RUNNING admin admins 07:20:06  30% Create MySQL Replication Cluster
28   0 RUNNING admin admins 07:20:14  30% Create MySQL Replication Cluster
And also from the ClusterControl UI:
Once the deployment is complete, you should see something the database clusters are listed like this in the ClusterControl dashboard:
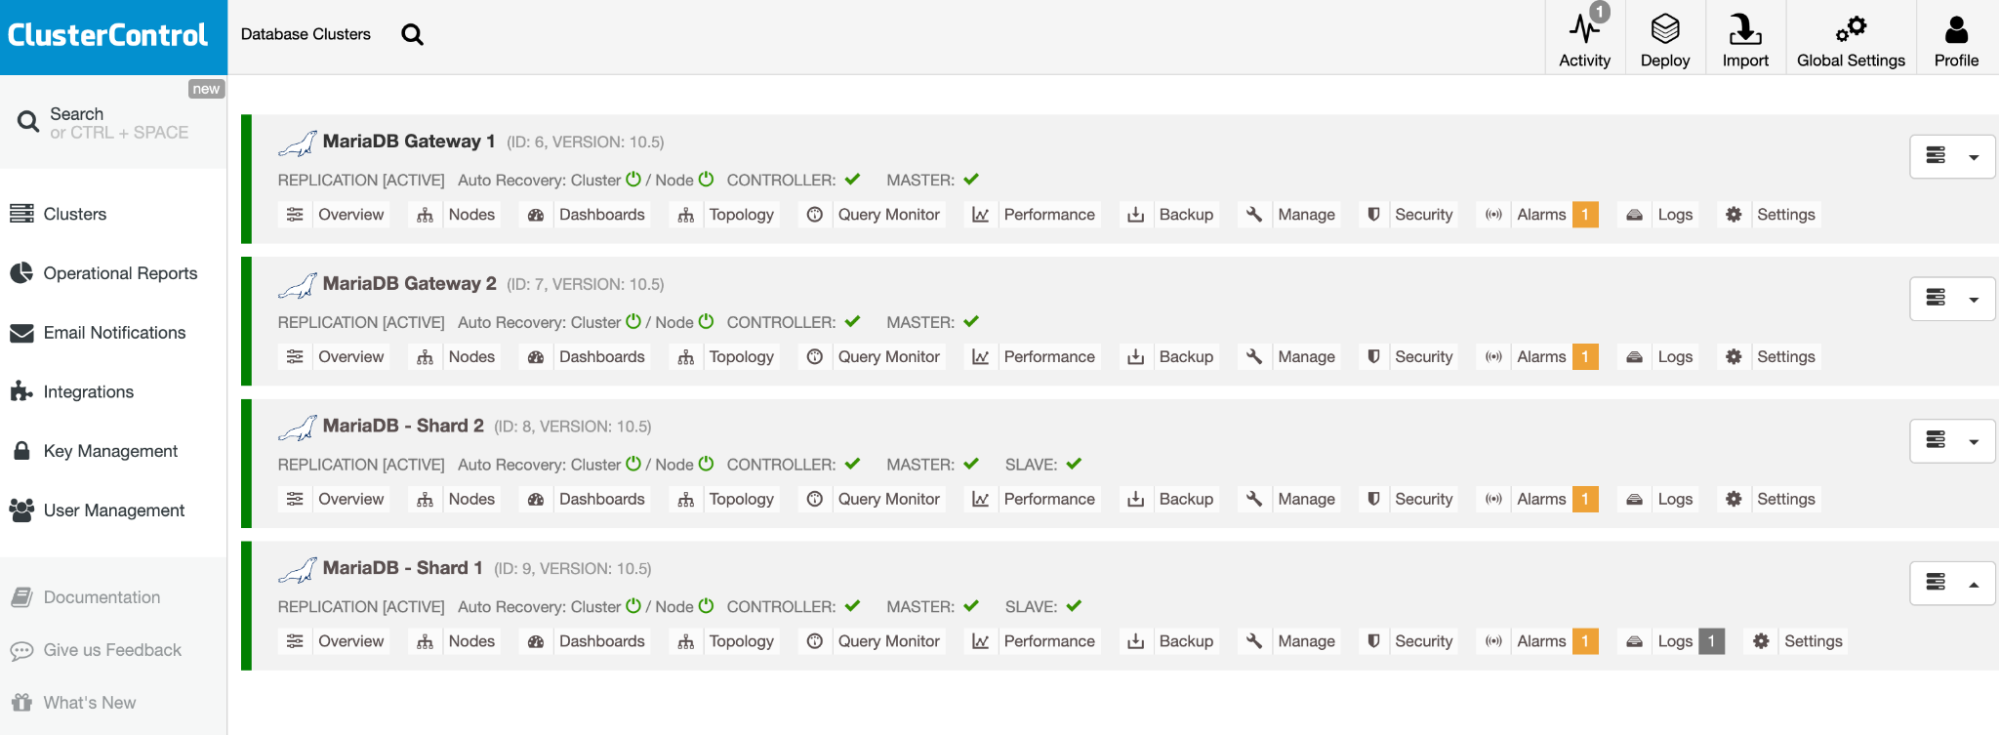
Our clusters are now deployed and running the latest MariaDB 10.5. Next, we need to configure HAProxy to provide a single endpoint to the MariaDB shards.
Configure HAProxy
HAProxy is necessary as a single-endpoint to the shard’s master-slave replication. Otherwise, if a master goes down, one has to update Spider’s server list using the CREATE OR REPLACE SERVER statement in the gateway servers, and the perform ALTER TABLE and pass a new connection parameter. With HAProxy, we can configure it to listen on the local host of the gateway server and monitor different MariaDB shards with different ports. We will configure HAProxy on both gateway servers as the following:
-
127.0.0.1:3307 -> Shard1 (backend servers are mariadb-shard-1a and mariadb-shard-1b)
-
127.0.0.1:3308 -> Shard2 (backend servers are mariadb-shard-2a and mariadb-shard-2b)
In case of the shard’s master goes down, ClusterControl will failover the shard’s slave as the new master and HAProxy will reroute the connections to the new master accordingly. We are going to install HAProxy on the gateway servers (mariadb-gw-1 and mariadb-gw-2) using ClusterControl since it will automatically configure the backend servers (mysqlchk setup, user grants, xinetd installation) with some tricks as shown below.
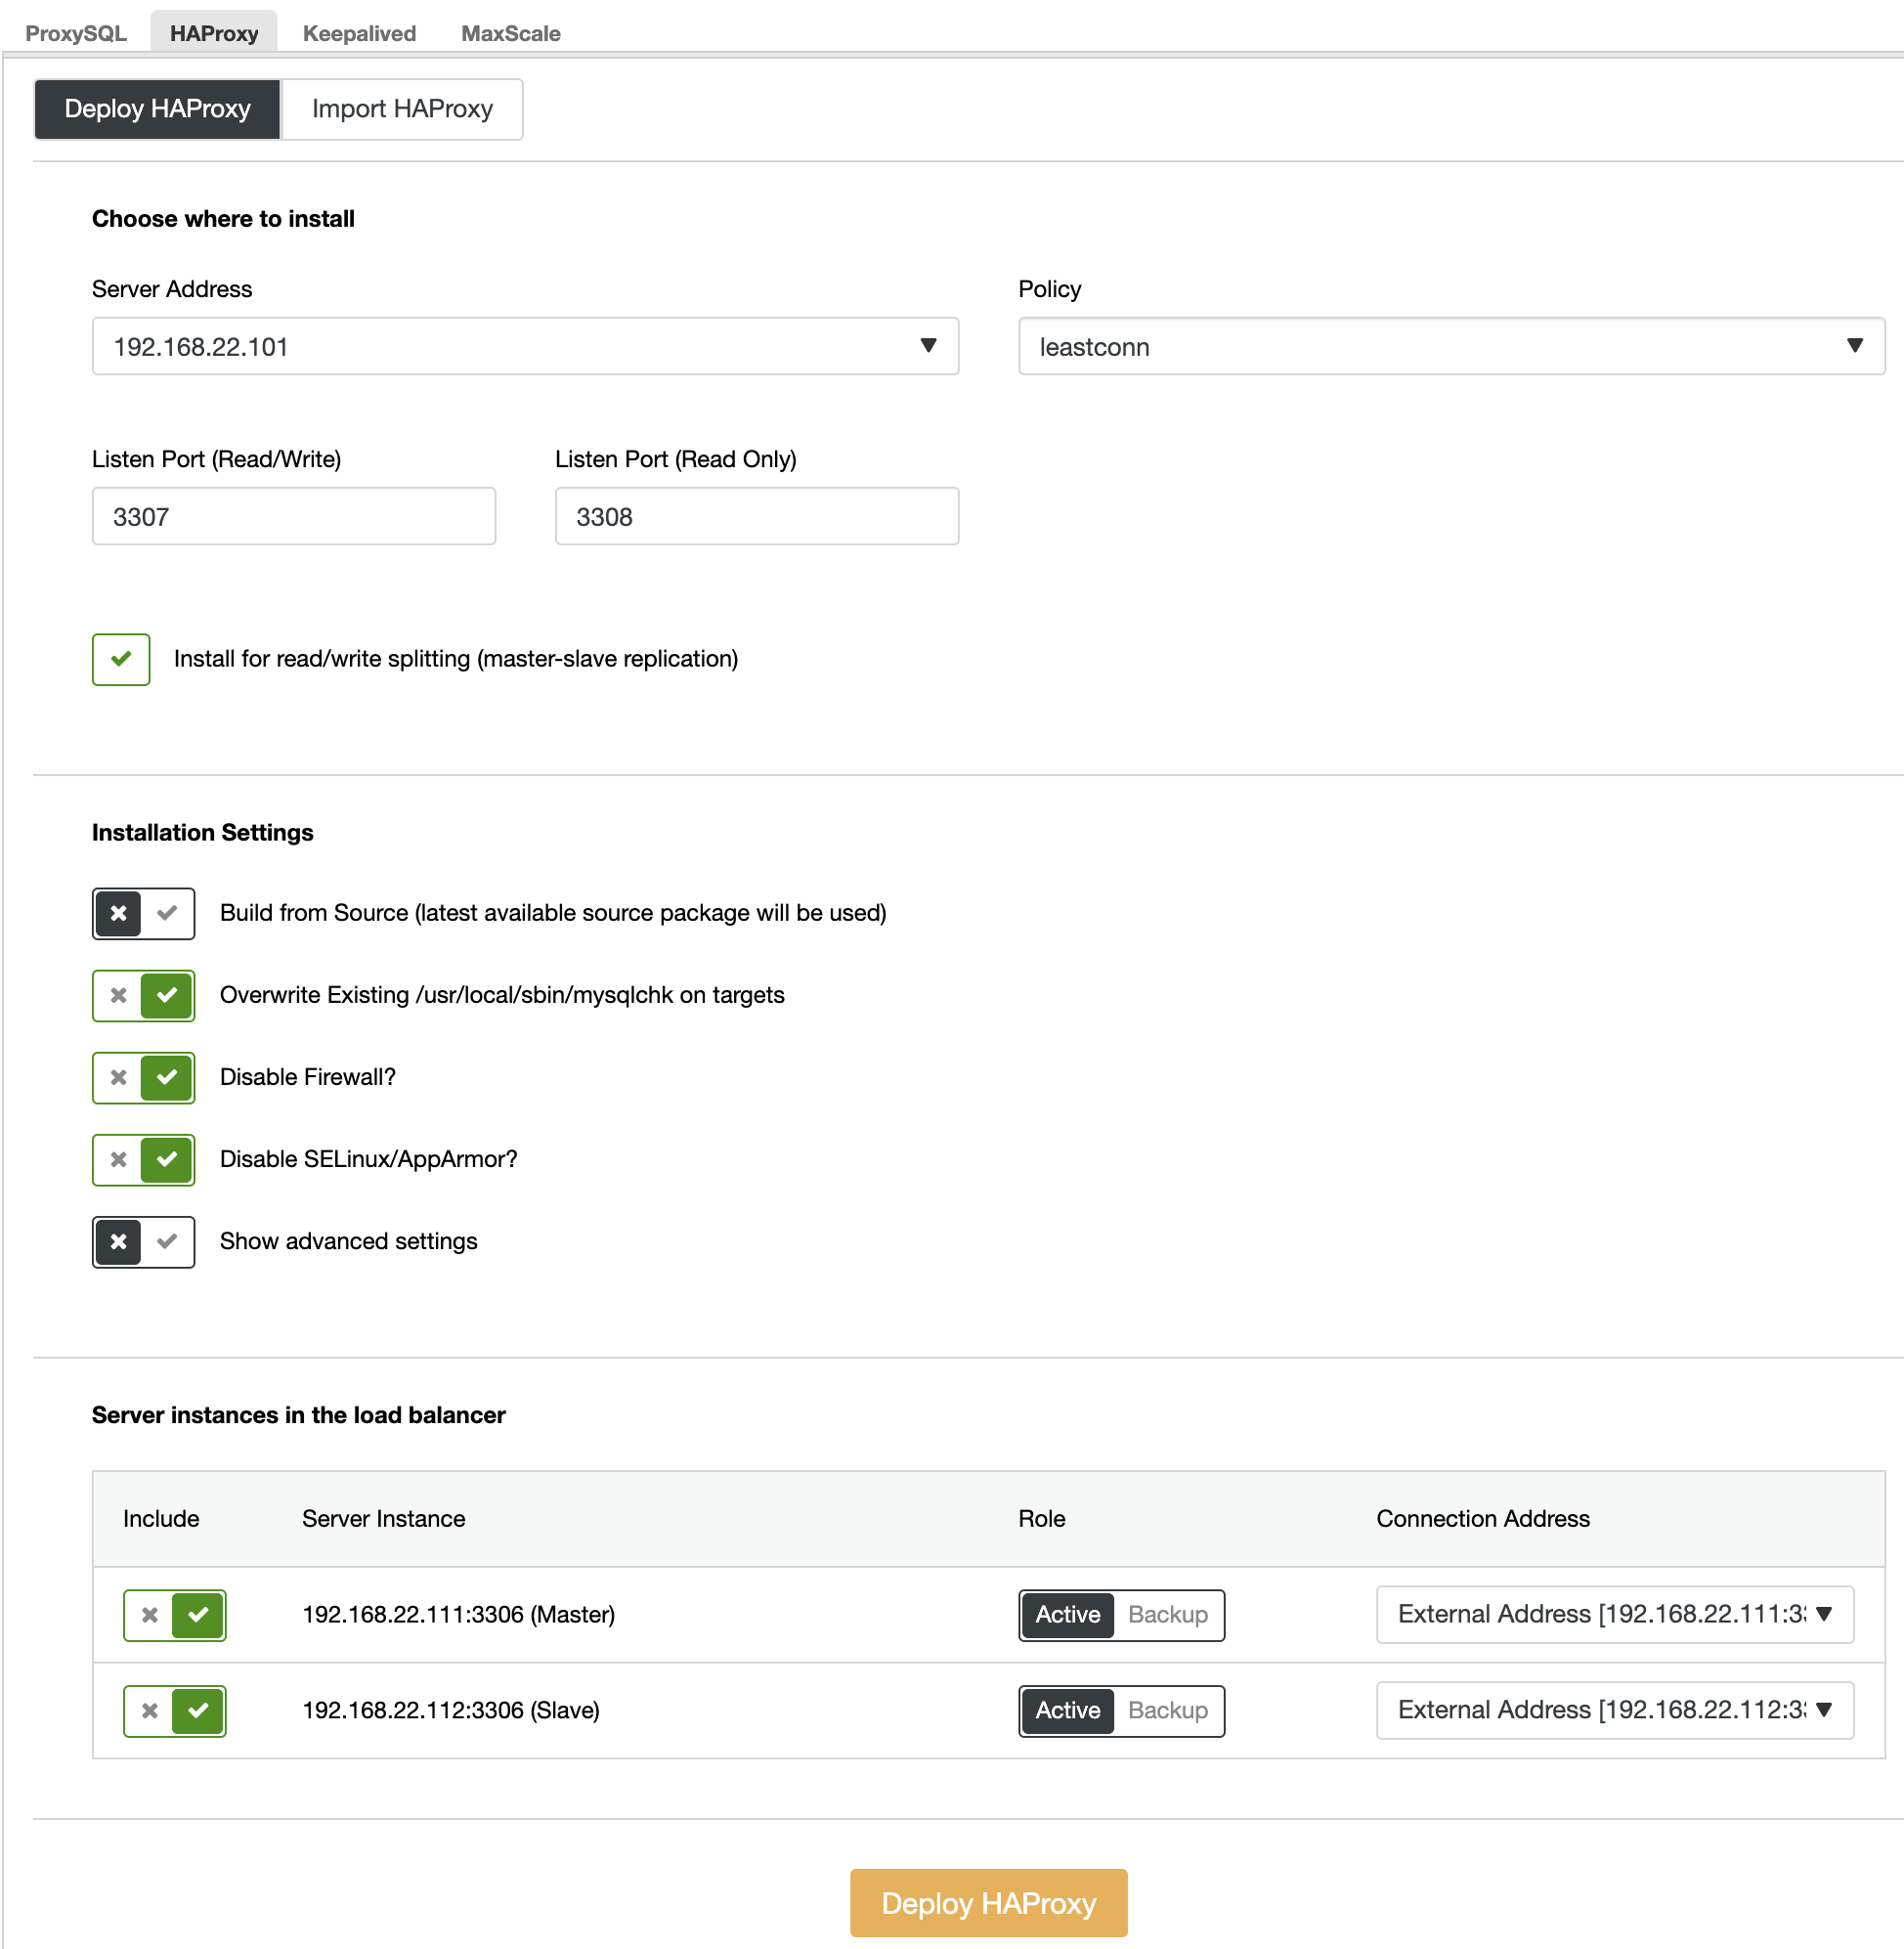
First of all, on the ClusterControl UI, choose the first shard, MariaDB – Shard 1 -> Manage -> Load Balancers -> HAProxy -> Deploy HAProxy and specify the Server Address as 192.168.22.101 (mariadb-gw-1), similar to the following screenshot:
Similarly, but this one for shard 2, go to MariaDB – Shard 2 -> Manage -> Load Balancers -> HAProxy -> Deploy HAProxy and specify the Server Address as 192.168.22.102 (mariadb-gw-2). Wait until the deployment finishes for both HAProxy nodes.
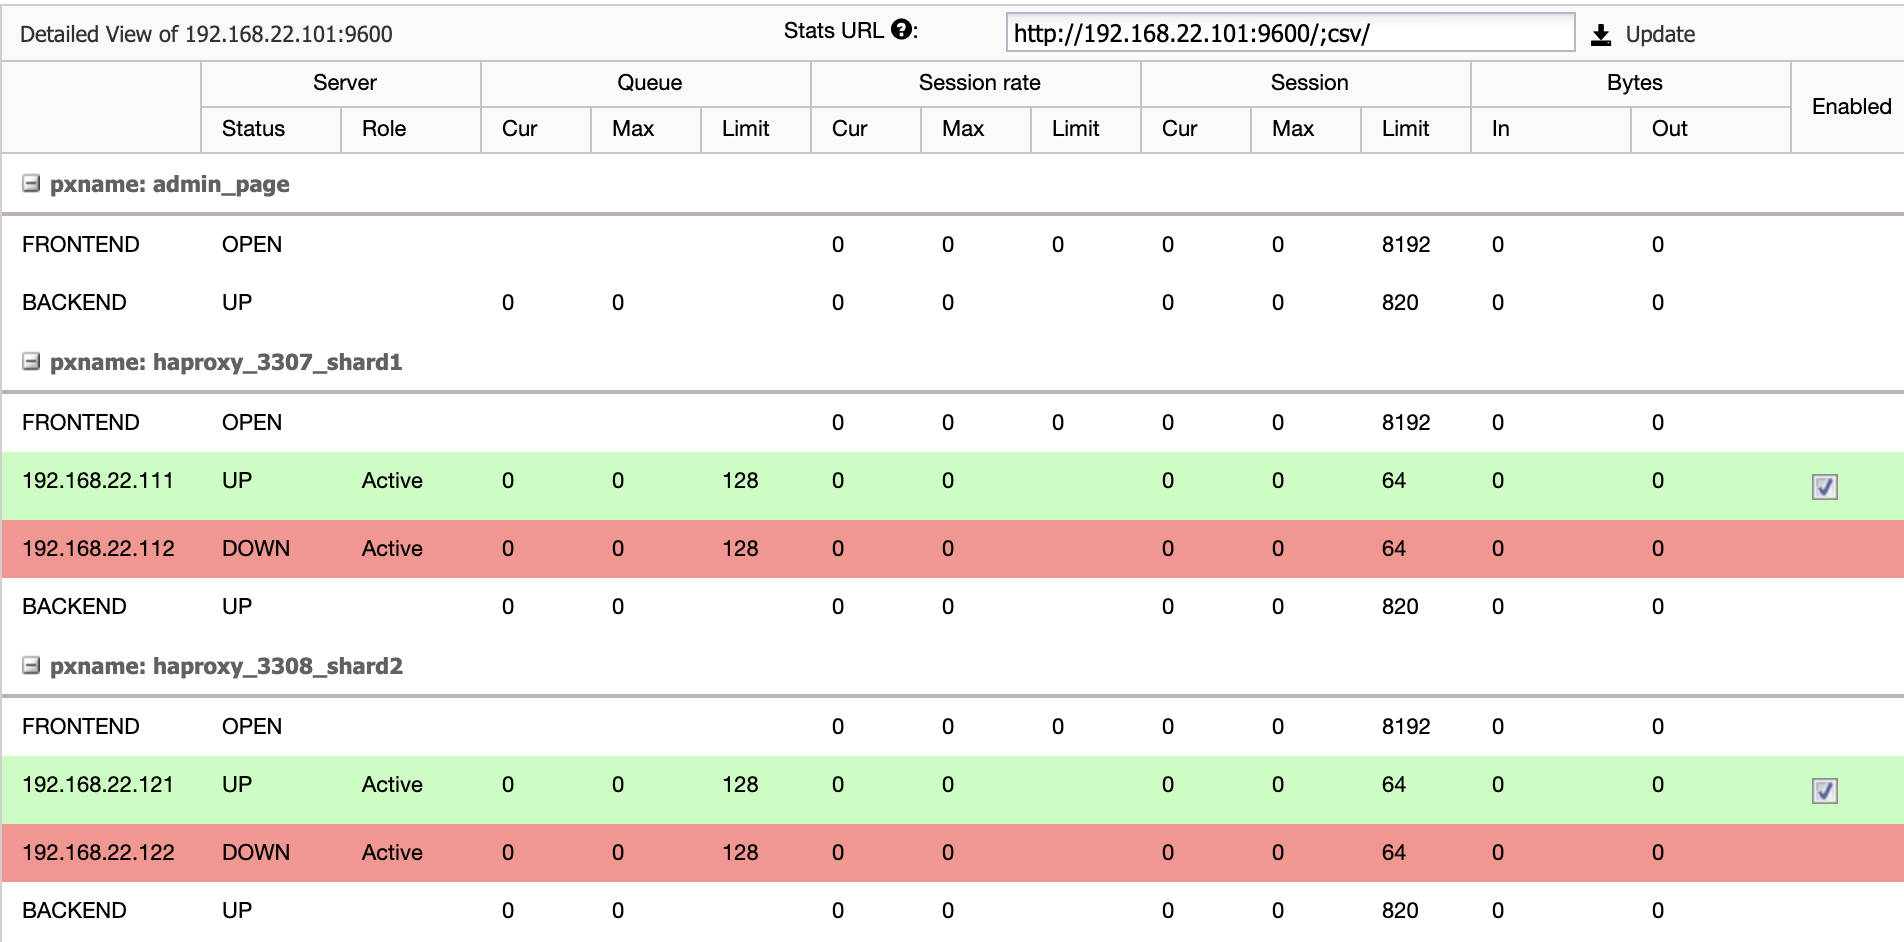
Now we need to configure the HAProxy service on mariadb-gw-1 and mariadb-gw-2 to load balance all shards at once. Using text editor (or ClusterControl UI -> Manage -> Configurations), edit the last 2 “listen” directives of the /etc/haproxy/haproxy.cfg to look like this:
listen  haproxy_3307_shard1
        bind *:3307
        mode tcp
        timeout client  10800s
        timeout server  10800s
        tcp-check connect port 9200
        tcp-check expect string master is running
        balance leastconn
        option tcp-check
        default-server port 9200 inter 2s downinter 5s rise 3 fall 2 slowstart 60s maxconn 64 maxqueue 128 weight 100
        server 192.168.22.111 192.168.22.111:3306 check # mariadb-shard-1a-master
        server 192.168.22.112 192.168.22.112:3306 check # mariadb-shard-1b-slave

listen  haproxy_3308_shard2
        bind *:3308
        mode tcp
        timeout client  10800s
        timeout server  10800s
        tcp-check connect port 9200
        tcp-check expect string master is running
        balance leastconn
        option tcp-check
        default-server port 9200 inter 2s downinter 5s rise 3 fall 2 slowstart 60s maxconn 64 maxqueue 128 weight 100
        server 192.168.22.121 192.168.22.121:3306 check # mariadb-shard-2a-master
        server 192.168.22.122 192.168.22.122:3306 check # mariadb-shard-2b-slave
Restart the HAProxy service to load the changes (or use ClusterControl -> Nodes -> HAProxy -> Restart Node):
$ systemctl restart haproxyFrom ClusterControl UI, we can verify that only one backend server is active per shard (indicated by the green lines), as shown below:
At this point, our database cluster deployment is now complete. We can proceed to configure the MariaDB sharding using the Spider storage engine.
Preparing MariaDB Gateway Servers
On both MariaDB Gateway servers (mariadb-gw-1 and mariadb-gw-2), perform the following tasks:
Install Spider plugin:
MariaDB> INSTALL PLUGIN spider SONAME 'ha_spider.so';Verify if the storage engine is supported:
MariaDB> SELECT engine,support FROM information_schema.engines WHERE engine = 'spider';
+--------+---------+
| engine | support |
+--------+---------+
| SPIDER | YES     |
+--------+---------+
Optionally, we can also verify if the plugin is loaded correctly from the information_schema database:
MariaDB> SELECT PLUGIN_NAME,PLUGIN_VERSION,PLUGIN_STATUS,PLUGIN_TYPE FROM information_schema.plugins WHERE plugin_name LIKE 'SPIDER%';
+--------------------------+----------------+---------------+--------------------+
| PLUGIN_NAME              | PLUGIN_VERSION | PLUGIN_STATUS | PLUGIN_TYPE        |
+--------------------------+----------------+---------------+--------------------+
| SPIDER                   | 3.3            | ACTIVE        | STORAGE ENGINE     |
| SPIDER_ALLOC_MEM         | 1.0            | ACTIVE        | INFORMATION SCHEMA |
| SPIDER_WRAPPER_PROTOCOLS | 1.0            | ACTIVE        | INFORMATION SCHEMA |
+--------------------------+----------------+---------------+--------------------+
Add the following line under the [mysqld] section inside the MariaDB configuration file:
plugin-load-add = ha_spiderCreate the first “data node” for the first shard which should be accessible via HAProxy 127.0.0.1 on port 3307:
MariaDB> CREATE OR REPLACE SERVER Shard1
FOREIGN DATA WRAPPER mysql
OPTIONS (
   HOST '127.0.0.1',
   DATABASE 'sbtest',
   USER 'spider',
   PASSWORD 'SpiderP455',
   PORT 3307);
Create the second “data node” for the second shard which should be accessible via HAProxy 127.0.0.1 on port 3308:
CREATE OR REPLACE SERVER Shard2
FOREIGN DATA WRAPPER mysql
OPTIONS (
   HOST '127.0.0.1',
   DATABASE 'sbtest',
   USER 'spider',
   PASSWORD 'SpiderP455',
   PORT 3308);
Now we can create a Spider table that needs to be partitioned. In this example, we are going to create a table called sbtest1 inside database sbtest, and partitioned by the integer value in the column ‘k’:
MariaDB> CREATE SCHEMA sbtest;
MariaDB> CREATE TABLE sbtest.sbtest1 (
  `id` int(11) NOT NULL AUTO_INCREMENT,
  `k` int(11) NOT NULL DEFAULT '0',
  `c` char(120) NOT NULL DEFAULT '',
  `pad` char(60) NOT NULL DEFAULT '',
  PRIMARY KEY (`id`, `k`)
)
  ENGINE=Spider
  COMMENT 'wrapper "mysql", table "sbtest1"'
  PARTITION BY RANGE (k) (
    PARTITION shard1 VALUES LESS THAN (499999) COMMENT = 'srv "Shard1"',
    PARTITION shard2 VALUES LESS THAN MAXVALUE COMMENT = 'srv "Shard2"'
);
Note that the COMMENT = ‘srv “ShardX”‘ clauses of the CREATE TABLE statement are critical, where we pass connection information about the remote server. The value must be identical to the server name as in the CREATE SERVER statement. We are going to fill up this table using the Sysbench load generator as shown further below.
Create the application database user to access the database, and allow it from the application servers:
MariaDB> CREATE USER sbtest@'192.168.22.%' IDENTIFIED BY 'passw0rd';
MariaDB> GRANT ALL PRIVILEGES ON sbtest.* TO sbtest@'192.168.22.%';
In this example, since this is a trusted internal network, we just use a wildcard in the statement to allow any IP address in the same range, 192.168.22.0/24.
We are now ready to configure our data nodes.
Preparing MariaDB Shard Servers
On both MariaDB Shard master servers (mariadb-shard-1a and mariadb-shard-2a), perform the following tasks:
1) Create the destination database:
MariaDB> CREATE SCHEMA sbtest;2) Create the ‘spider’ user and allow connections from the gateway servers (mariadb-gw-1 and mariadb-gw2). This user must have all privileges on the sharded table and also MySQL system database :
MariaDB> CREATE USER 'spider'@'192.168.22.%' IDENTIFIED BY 'SpiderP455';
MariaDB> GRANT ALL PRIVILEGES ON sbtest.* TO spider@'192.168.22.%';
MariaDB> GRANT ALL ON mysql.* TO spider@'192.168.22.%';
In this example, since this is a trusted internal network, we just use a wildcard in the statement to allow any IP address in the same range, 192.168.22.0/24.
3) Create the table that is going to receive the data from our gateway servers via Spider storage engine. This “receiver” table can be on any storage engine supported by MariaDB. In this example, we use InnoDB storage engine:
MariaDB> CREATE TABLE sbtest.sbtest1 (
  `id` int(11) NOT NULL AUTO_INCREMENT,
  `k` int(11) NOT NULL DEFAULT '0',
  `c` char(120) NOT NULL DEFAULT '',
  `pad` char(60) NOT NULL DEFAULT '',
  PRIMARY KEY (`id`, `k`)
) ENGINE = INNODB;
That’s it. Don’t forget to repeat the steps on the other shard.
Testing
To test using Sysbench to generate some database workloads, on the application server, we have to install Sysbench beforehand:
$ yum install -y https://repo.percona.com/yum/percona-release-latest.noarch.rpm
$ yum install -y sysbench
Generate some test workloads and send them to the first gateway server, mariadb-gw-1 (192.168.11.101):
$ sysbench
/usr/share/sysbench/oltp_insert.lua
--report-interval=2
--threads=4
--rate=20
--time=9999
--db-driver=mysql
--mysql-host=192.168.11.101
--mysql-port=3306
--mysql-user=sbtest
--mysql-db=sbtest
--mysql-password=passw0rd
--tables=1
--table-size=1000000
run
You may repeat the above test on mariadb-gw-2 (192.168.11.102) and the database connections should be routed to the right shard accordingly.
When looking at the first shard (mariadb-shard-1a or mariadb-shard-1b), we can tell that this partition only holds rows where the shard key (column k) is smaller than 500000:
MariaDB [sbtest]> SELECT MIN(k),MAX(k) FROM sbtest1;
+--------+--------+
| min(k) | max(k) |
+--------+--------+
| 200175 | 499963 |
+--------+--------+
On another shard (mariadb-shard-2a or mariadb-shard-2b), it holds data from 500000 up until 999999 as expected:
MariaDB [sbtest]> SELECT MIN(k),MAX(k) FROM sbtest1;
+--------+--------+
| min(k) | max(k) |
+--------+--------+
| 500067 | 999948 |
+--------+--------+
While for MariaDB Gateway server (mariadb-gw-1 or mariadb-gw-2), we can see all rows similar to if the table exists inside this MariaDB instance:
MariaDB [sbtest]> SELECT MIN(k),MAX(k) FROM sbtest1;
+--------+--------+
| min(k) | max(k) |
+--------+--------+
| 200175 | 999948 |
+--------+--------+
To test on the high availability aspect, when a shard master is not available, for example when the master (mariadb-shard-2a) of shard 2 goes down, ClusterControl will automatically perform the slave promotion on the slave (mariadb-shard-2b) to be a master. During this period, you could probably see this error:
ERROR 1429 (HY000) at line 1: Unable to connect to foreign data source: Shard2And while its unavailability, you will get the following subsequent error:
ERROR 1158 (08S01) at line 1: Got an error reading communication packetsIn our measurement, the failover took around 23 seconds after the failover had commenced and once the new master is promoted, you should be able to write into the table from the gateway server as usual.
Conclusion
The above setup is a proof of principle on how ClusterControl can be used to deploy a MariaDB sharded setup. It can also improve the service availability of a MariaDB sharding setup with its automatic node and cluster recovery feature, plus all of the industry-standard management and monitoring features to support your overall database infrastructure.