blog
Zero Downtime Network Migration With MySQL Galera Cluster Using Relay Node

Galera Cluster’s automatic node provisioning simplifies the complexity of scaling out a database cluster with guaranteed data consistency. SST and IST improve the usability of initial data synchronization without the need to manually backup the database and copy it to the new node. Combine this with Galera’s ability to tolerate different network setups (e.g, WAN replication), we can now migrate the database between different isolated networks with zero service disruption.
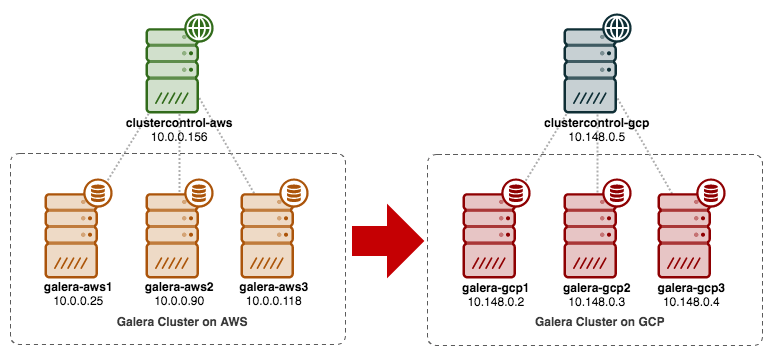
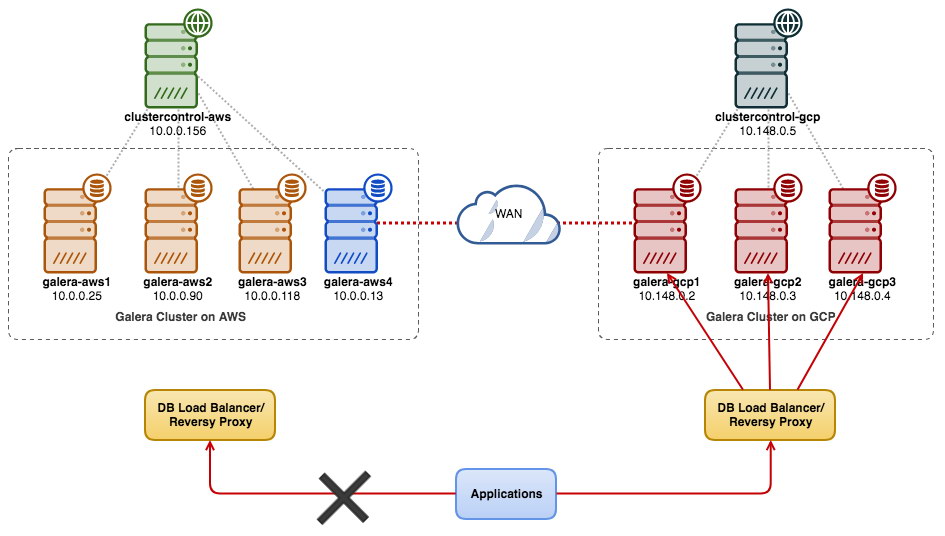
In this blog post, we are going to look into how to migrate our MySQL Galera Cluster without downtime. We will move the database from Amazon Web Service (AWS) EC2 to Google Cloud Platform (GCP) Compute Engine, with the help of a relay node. Note that we had a similar blog post in the past, but this one uses a different approach.
The following diagram simplifies our migration plan:
Old Site Preparation
Since both sites cannot communicate with each other due to security group or VPC isolation, we need to have a relay node to bridge these two sites together. This node can be located on either site, but must able to connect to one or more nodes on the other side on port 3306 (MySQL), 4444 (SST), 4567 (gcomm) and 4568 (IST). Here is what we already have, and how we will scale the old site:
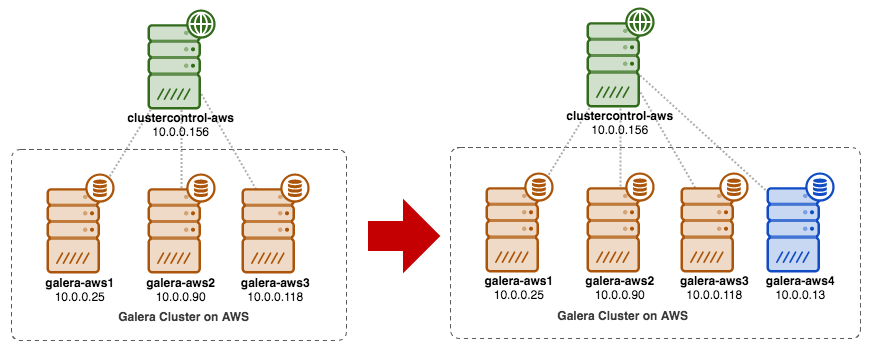
You can also use an existing Galera node (e.g, the third node) as the relay node, as long as it has connectivity to the other side. The downside is that the cluster capacity will be reduced to two, because one node will be used for SST and relaying the Galera replication stream between sites. Depending on the dataset size and connection between sites, this can introduce database reliability issues on the current cluster.
So, we are going to use a fourth node, to reduce the risk on the current production cluster when syncing to the other side. First, create a new instance in the AWS Dashboard with a public IP address (so it can talk to the outside world) and allow the required Galera communication ports (TCP 3306, 4444, 4567-4568).
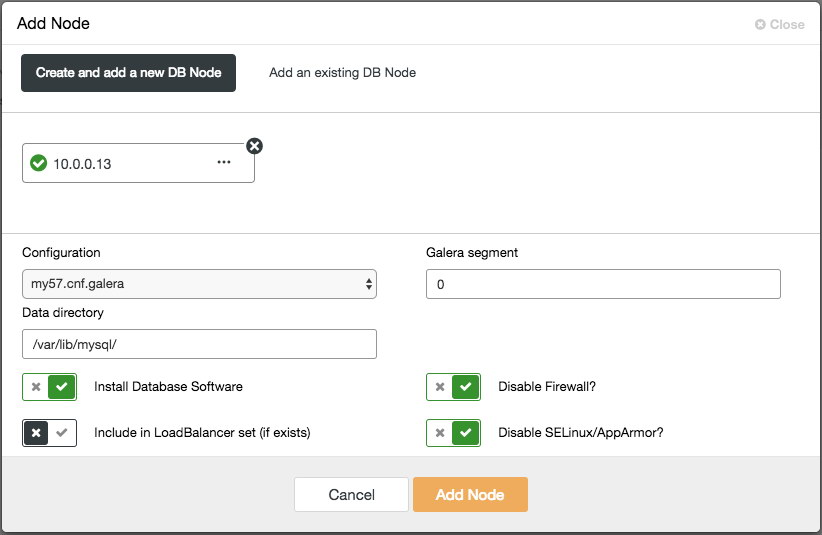
Deploy the fourth node (relay node) on the old site. If you are using ClusterControl, you can simply use “Add Node” feature to scale the cluster out (don’t forget to setup passwordless SSH from ClusterControl node to this fourth host beforehand):
Ensure the relay node is in sync with the current cluster and is able to communicate to the other side.
From the new site, we are going to connect to the relay node since this is the only node that has connectivity to the outside world.
New Site Deployment
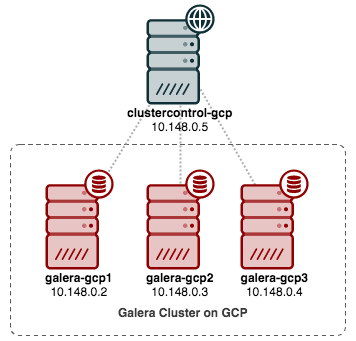
On the new site, we will deploy a similar setup with one ClusterControl node and three-node Galera Cluster. Both sites must use the same MySQL version. Here is our architecture on the new site:
With ClusterControl, the new cluster deployment is just a couple of clicks away and a free feature in the community edition. Go to ClusterControl -> Deploy Database Cluster -> MySQL Galera and follow the deployment wizard:
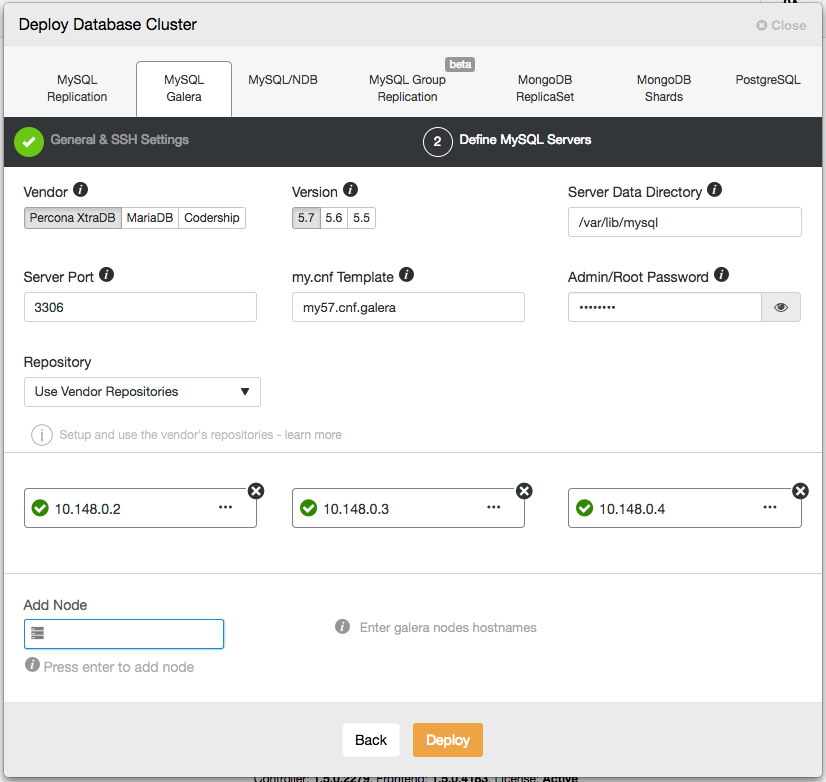
Click Deploy and monitor the progress under Activity -> Jobs -> Create Cluster. Once done, you should have the following on the dashboard:

At this point, you are having two separate Galera Clusters – 4 nodes at the old site and 3 nodes at the new site.
Connecting Both Sites
On the new site (GCP), pick one node to communicate with the relay node on the old site. We are going to pick galera-gcp1 as the connector to the relay node (galera-aws4). The following diagram illustrates our bridging plan:

The important things to configure are the following parameters:
- wsrep_sst_donor: The wsrep_node_name of the donor node. On galera-gcp1, set the donor to galera-aws4.
- wsrep_sst_auth: SST user credentials in username:password format must follow the old site (AWS).
- wsrep_sst_receive_address: The IP address that will receive SST on the joiner node. On galera-gcp1, set this to the public IP address of this node.
- wsrep_cluster_address: Galera connection string. On galera-gcp1, add the public IP address of galera-aws4.
- wsrep_provider_options:
- gmcast.segment: Default is 0. Set a different integer on all nodes in GCP.
-
On the relay node (galera-aws4), retrieve the wsrep_node_name:
$ mysql -uroot -p -e 'SELECT @@wsrep_node_name' Enter password: +-------------------+ | @@wsrep_node_name | +-------------------+ | 10.0.0.13 | +-------------------+ -
On galera-gcp1’s my.cnf, set wsrep_sst_donor value to the relay node’s wsrep_node_name and wsrep_sst_receive_address to the public IP address of galera-gcp1:
wsrep_sst_donor=10.0.0.13 wsrep_sst_receive_address=35.197.136.232 -
On all nodes on GCP, ensure the wsrep_sst_auth value is identical following the old site (AWS) and change the Galera segment to 1 (so Galera knows both sites are in different networks):
wsrep_sst_auth=backupuser:mysecretP4ssW0rd wsrep_provider_options="base_port=4567; gcache.size=512M; gmcast.segment=1" -
On galera-gcp1, set the wsrep_cluster_address to include the relay node’s public IP address:
wsrep_cluster_address=gcomm://10.148.0.2,10.148.0.3,10.148.0.4,13.229.247.149**Only modify wsrep_cluster_address on galera-gcp1. Don’t modify this parameter on galera-gcp2 and galera-gcp3.
-
Stop all nodes on GCP. If you are using ClusterControl, go to Cluster Actions dropdown -> Stop Cluster. You are also required to turn off automatic recovery at both cluster and node levels, so ClusterControl won’t try to recover the failed nodes.
-
Now the syncing part. Start galera-gcp1. You can see from the MySQL error log on the donor node that SST is initiated between the the relay node (10.0.0.13) using a public address on galera-gcp1 (35.197.136.232):
2017-12-19T13:58:04.765238Z 0 [Note] WSREP: Initiating SST/IST transfer on DONOR side (wsrep_sst_xtrabackup-v2 --role 'donor' --address '35.197.136.232:4444/xtrabackup_sst//1' --socket '/var/lib/mysql/m
ysql.sock' --datadir '/var/lib/mysql/' --defaults-file '/etc/my.cnf' --defaults-group-suffix ''   '' --gtid 'df23adb8-b567-11e7-8c50-a386c8cc7711:151181')
2017-12-19T13:58:04.765468Z 5 [Note] WSREP: DONOR thread signaled with 0
        2017-12-19T13:58:15.158757Z WSREP_SST: [INFO] Streaming the backup to joiner at 35.197.136.232 4444
2017-12-19T13:58:52.512143Z 0 [Note] WSREP: 1.0 (10.0.0.13): State transfer to 0.0 (10.148.0.2) complete.
Take note that, at this point of time, galera-gcp1 will be flooded with following lines:
2017-12-19T13:32:47.111002Z 0 [Note] WSREP: (ed66842b, 'tcp://0.0.0.0:4567') connection to peer 00000000 with addr tcp://10.0.0.118:4567 timed out, no messages seen in PT3S
2017-12-19T13:32:48.111123Z 0 [Note] WSREP: (ed66842b, 'tcp://0.0.0.0:4567') connection to peer 00000000 with addr tcp://10.0.0.90:4567 timed out, no messages seen in PT3S
2017-12-19T13:32:50.611462Z 0 [Note] WSREP: (ed66842b, 'tcp://0.0.0.0:4567') connection to peer 00000000 with addr tcp://10.0.0.25:4567 timed out, no messages seen in PT3S
You can safely ignore this warning since galera-gcp1 keeps trying to see the remaining nodes beyond the relay node on AWS.
-
Once SST on galera-gcp1 completes, ClusterControl on GCE won’t be able to connect the database nodes, due to missing GRANTs (existing GRANTs have been overridden after syncing from AWS). So here is what we need to do after SST completes on galera-gcp1:
mysql> GRANT ALL PRIVILEGES ON *.* TO cmon@'10.148.0.5' IDENTIFIED BY 'cmon' WITH GRANT OPTION;Once this is done, ClusterControl will correctly report the state of galera-gcp1 as highlighted below:

-
The last part is to start the remaining galera-gcp2 and galera-gcp3, one node at a time. Go to ClusterControl -> Nodes -> pick the node -> Start Node. Once all nodes are synced, you should get 7 as the cluster size:
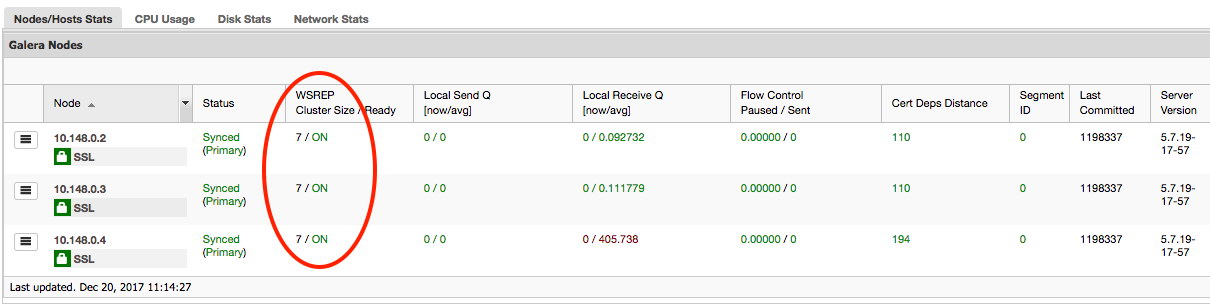
The cluster is now operating on both sites and scaling out is complete.
Decommissioning
Once the migration completes and all nodes are in synced, you can start to switch your application to the new cluster on GCP:
At this point MySQL data is replicated to all nodes until decommissioning. The replication performance will be as good as the farthest node in the cluster permits. The relay node is critical, as it broadcasts writesets to the other side. From the application standpoint, it’s recommended to write to only one site at a time, which means you will have to start redirecting reads/writes from AWS and serve them from GCP cluster instead.
To decommission the old database nodes and move to the cluster on GCP, we have to perform a graceful shutdown (one node at a time) on AWS. It is important to shut down the nodes gracefully, since the AWS site holds the majority number of nodes (4/7) for this cluster. Shutting them down all at once will cause the cluster on GCP to go into non-primary state, forcing the cluster to refuse operation. Make sure the last node to shutdown on the AWS side is the relay node.
Don’t forget to update the following parameters on galera-gcp1 accordingly:
- wsrep_cluster_address – Remove the relay node public IP address.
- wsrep_sst_donor – Comment this line. Let Galera auto pick the donor.
- wsrep_sst_receive_address – Comment this line. Let Galera auto pick the receiving interface.
Your Galera Cluster is now running on a completely new platform, hosts and network without a second of downtime to your database service during migration. How cool is that?


