blog
Simplifying database orchestration anywhere with Terraform and ClusterControl

Infrastructure as Code (IaC) has become key to modern software development. Terraform – one of the most popular IaC tools – won the hearts of DevOps teams by offering a vast ecosystem of providers that allow it to interact with various cloud platforms, services, and APIs.
Terraform hosts a wide range of providers for deploying databases. However, most of these providers offer managed services that limit you to an environment or make you give up control of your infrastructure and the database layer. This is where ClusterControl steps in.
ClusterControl (CC) offers a Terraform provider that empowers you to automate open-source and proprietary databases on-premises, in the cloud, or both without giving up control—all within your existing IaC workflows.
This blog will introduce you to the Terraform provider for ClusterControl and walk you through how to deploy and manage database clusters with it using an example MySQL replication cluster.
What is the Terraform provider for ClusterControl?
The ClusterControl Terraform Provider combines Terraform’s infrastructure management strengths with ClusterControl’s robust database orchestration capabilities. Through Infrastructure as Code (IaC), the ClusterControl Terraform provider enables you to easily create, configure, and manage database clusters, expediting deployment and improving the efficiency of managing complex database environments.
Advantages of using the ClusterControl Terraform provider
The ClusterControl Terraform provider offers several advantages that can significantly improve your database cluster management workflow. Here are some key benefits:
Support for vanilla open-source and proprietary databases
As mentioned earlier, a significant limitation of existing Terraform database providers is their focus on managed services. This can restrict your ability to choose the most suitable database solution for your project and affect your ability to automate your existing database.
ClusterControl eliminates these limitations by offering vanilla, enterprise and custom support for a wide range of open-source and proprietary databases. This grants you unparalleled flexibility and control over your database environment.
Automation and consistency
The ClusterControl Terraform Provider significantly improves the automation and consistency of database deployments by leveraging Terraform’s Infrastructure as Code (IaC) capabilities.
With Terraform, you define your database infrastructure and configurations in code files. This eliminates the need for manual configuration tasks, reducing the risk of human errors and ensuring consistency across deployments.
Also, as Terraform allows you to version control your configuration files, you can easily track changes in your database clusters, revert to previous configurations if needed, and ensure all team members are working from the same source of truth. This promotes standardized and repeatable deployments, leading to reliable and predictable database clusters.
Multi-cloud and hybrid environment support
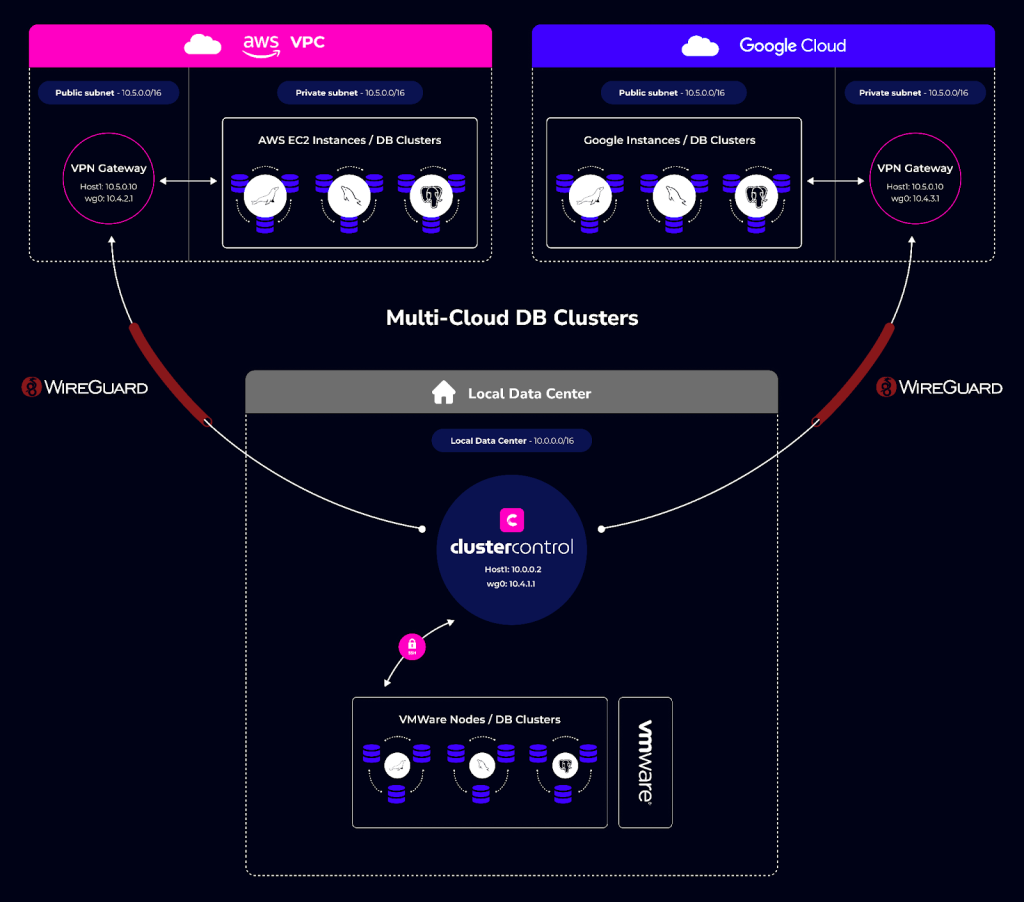
ClusterControl enables you to deploy your databases on-premises, in the cloud, or both without giving up control. You can also deploy on multiple clouds, allowing you to decide where you want each of your databases to reside, giving you control and flexibility.
For example, you can have database clusters on the cloud with Amazon Web Services (AWS), Google Cloud (GCP), and on-prem with VMware in your local data center.
Scalability and flexibility
ClusterControl lets you flexibly scale your database cluster via node actions, load balancers, etc. in any environment. Whether for resilience or scaling out for read-only alternatives, the Terraform provider for ClusterControl offers you everything you need for your database clusters.
Orchestrating database clusters using ClusterControl Terraform provider
This section will walk you through how to deploy database clusters using the ClusterControl Terraform provider. For the demo purposes, this article will deploy a 3-Node MySQL Replication cluster.
Prerequisites
To follow along with this demo, ensure you have to following prerequisites:
- 4 Linux Servers (Nodes): One of the servers will be the control plane node to host ClusterControl and Terraform, and the other three will be for the 3-node MySQL cluster.
The control plane (ClusterControl) node should have the following specifications:
x86_64 Arch
>2 GB RAM
>2 cores CPU
>40 GB disk space
- ClusterControl and Terraform installed on the control plane node: There are several ways to install ClusterControl – with Helm, Docker etc. – head over to the get started page to choose your desired method. To download Terraform, visit its installation guide to see the installation method for your Linux OS.
- Passwordless SSH setup from the ClusterControl node to other nodes: ClusterControl requires passwordless SSH (key authentication) to deploy and manage the database cluster automatically. If you are using cloud infrastructure, since all nodes you create may be configured with a key pair (private key) you may skip the step below. You only need to upload the key pair on your ClusterControl node – for example to
/root/.ssh/id_rsa/clustercontrol.pem.
Otherwise, to set up passwordless SSH to other nodes, create an SSH key on
the ClusterControl node with the following command:
$ ssh-keygen -t rsa
The above command will generate SSH RSA private and public keys under the user’s home directory, /root/.ssh/. The private key, id_rsa has to be kept secure on the node. The public key, id_rsa.pub should be copied over to all nodes that you want to be accessed by ClusterControl passwordlessly. You may use the ssh-copy-id command to achieve this if the destination node supports password authentication:
# repeat this to all target database nodes
$ ssh-copy-id <other_node_ip_address> # specify the root password of the IP if prompted.NB: If you have any issues installing ClusterControl or need any help setting up passwordless SSH, contact the ClusterControl support team. The average response time is 4mins.
For this demo, I have the following server nodes:
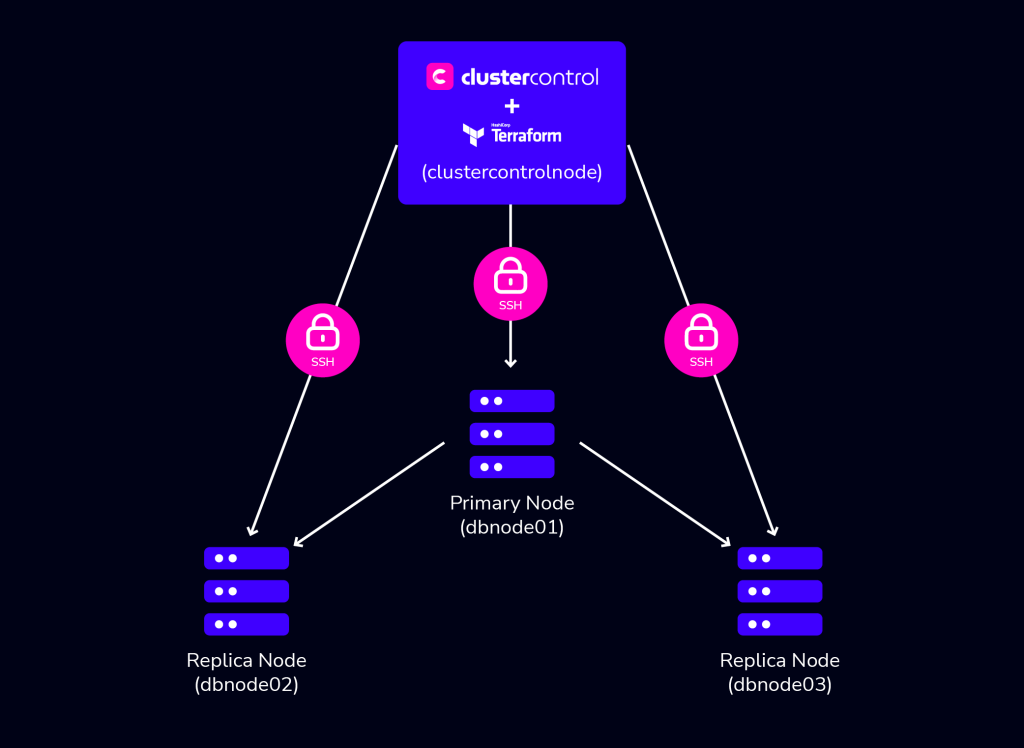
- 1st node: 192.168.40.170 (clustercontrolnode)
- 2nd node: 192.168.40.171 (dbnode01)
- 3rd node: 192.168.40.172 (dbnode02)
- 4th node: 192.168.40.174 (dbnode03)
Configuring ClusterControl for API access
To get started using the Terraform provider for ClusterControl, you need to first configure your ClusterControl installation for API access. To do that, in your ClusterControl node edit the /etc/default/cmon and set the RPC_BIND_ADDRESSES as shown below:
RPC_BIND_ADDRESSES="<cc-node-private_ip>,127.0.0.1"Substitute <cc-node_private_ip> with your ClusterControl node private IP. Restart the ClusterControl service to apply the changes:
$ sudo systemctl restart cmonRun a quick test to make sure you can access ClusterControl via its REST API (using curl or Postman):
curl -k 'https://<cc-node_private_ip>:9501/v2/clusters' -XPOST -d '{"operation": "getAllClusterInfo", "authenticate": {"username": "CHANGE-ME","password": "CHANGE-ME"}}'Where username and password are valid login credentials for ClusterControl you set during installation. The output should be a load of JSON text returned with details of the clusters managed by ClusterControl. This will be empty seeing we have no cluster in our environment yet.
{
    "controller_id": "cec25ce5-0d12-4151-adfc-243ec7e04877",
    "is_superuser": true,
    "request_processed": "2024-05-05T16:46:37.401Z",
    "request_status": "Ok",
    "total": 0,
    "clusters":
    [
        "RPC V2 authenticated user is 'dodazie'."
    ],
    "user":
    {
        "class_name": "CmonUser",
        "cdt_path": "/",
        "acl": "user::rwx,group::r--,other::r--",
        "disabled": false,
        "email_address": "[email protected]",
        "last_failed_login": "",
        "last_login": "2024-05-05T16:46:37.397Z",
        "n_failed_logins": 0,
        "origin": "CmonDb",
        "suspended": false,
        "user_id": 5,
        "user_name": "dodazie",
        "groups":
        [
            {
                "class_name": "CmonGroup",
                "cdt_path": "/groups",
                "owner_user_id": 1,
                "owner_user_name": "system",
                "owner_group_id": 1,
                "owner_group_name": "admins",
                "acl": "user::rwx,group::rwx,other::---",
                "created": "2024-04-30T22:53:43.079Z",
                "group_id": 1,
                "group_name": "admins"
            }
        ],
        "timezone":
        {
            "class_name": "CmonTimeZone",
            "name": "UTC",
            "abbreviation": "UTC",
            "offset": 0,
            "use_dst": false
        }
    }
}
Setting up the Terraform provider for ClusterControl
On your ClusterControl node, in any directory of your choice, create a terraform.tfvars to store your ClusterControl secrets. In the file, add the following secrets:
cc_api_url="https://<cc-node-private_ip>:9501/v2"
cc_api_user="CHANGE-ME"
cc_api_user_password="CHANGE-ME"
Still in your CC node, create a new Terraform file called main.tf. For this demo, the main.tf file will store the ClusterControl Terraform provider configuration and resources.
To install the ClusterControl Terraform provider, copy and paste the following in the main.tf.
terraform {
  required_providers {
    clustercontrol = {
      source = "severalnines/clustercontrol"
      version = "0.2.15"
    }
  }
}

variable "cc_api_url" {
  type = string
}

variable "cc_api_user" {
  type = string
}

variable "cc_api_user_password" {
  type = string
}


provider "clustercontrol" {
  cc_api_url = var.cc_api_url
  cc_api_user= var.cc_api_user
  cc_api_user_password= var.cc_api_user_password
}
The above Terraform code will install the Terraform Provider for ClusterControl, import the secrets from the terraform.tfvars and configure the provider for use across the environment.
Run terraform init to initialize the directory and install the provider. You should see an out similar to below:
Initializing the backend...

Initializing provider plugins...
- Finding severalnines/clustercontrol versions matching "0.2.15"...
- Installing severalnines/clustercontrol v0.2.15...
- Installed severalnines/clustercontrol v0.2.15 (self-signed, key ID AC426DD502816469)
You can also verify the correctness of the configuration with terraform validate command:
Success! The configuration is valid.With your ClusterControl Terraform provider configuration validated, you can now deploy database clusters.
Deploying a 3-node MySQL Replication cluster using Terraform
To deploy a database cluster with the ClusterControl Terraform provider, you use the ` clustercontrol_db_cluster resource. The clustercontrol_db_cluster resource schema below deploys a MySQL Primary/Replica Replication cluster of vendor MariaDB.
resource "clustercontrol_db_cluster" "mariadb-1" {

    db_cluster_name = "MariaDB Replication"

    db_cluster_type = "mysql-replication"

    db_cluster_create = true

    db_version = "10.11"

    db_vendor = "mariadb"

    db_admin_user_password = var.cc_api_user_password

    db_host {
        hostname = "dbnode01"
    }

    db_host {
        hostname = "dbnode02"
    }

    db_host {
        hostname = "dbnode03"
    }

    db_topology {
      primary = "dbnode01"
      replica = "dbnode02"
    }

    db_topology {
      primary = "dbnode01"
      replica = "dbnode03"
    }

    ssh_key_file = "/root/.ssh/id_rsa"

    ssh_user = "root"

    db_deploy_agents = true

    disable_firewall = true

    disable_selinux = true

    db_install_software = true


}
In the above resource:
- The
db_cluster_type, db_vendoranddb_versionattributes define the type of cluster, vendor and version respectively. db_cluster_createtells the provider to create a new cluster. If you are importing an already existing cluster, you will use thedb_cluster_importattribute.
- The
db_hostblocks are the list of nodes in the cluster, and thedb_topologyblock specifies the Primary → Replica replication topology, wheredbnode01is the primary node, anddbnode02anddbnode03are the replication nodes. The hostname of the DB node can also be its IP address as well.
- As mentioned earlier, ClusterControl uses passwordless SSH to deploy and manage the database cluster automatically. The
ssh_userattribute holds the SSH user ClusterControl will use to SSH to the DB nodes from the ClusterControl node, andssh_key_filethe path to the private key file for the Sudo user on the ClusterControl node.
- The
db_deploy_agentsattribute set to “true”, automatically deploys prometheus and other relevant agents for observability after setting up the initial database cluster.
- As these linux nodes are new without any database package pre-installed, this resource has the
db_install_softwareattribute set to “true”. This informs ClusterControl to install all the database packages it needs from their respective repos, anddisable_firewallanddisable_selinuxattributes disables security configurations on the node OS to enable ClusterControl download and installs the DB packages.
In your main.tf file, add the code provided above and edit with your specific SSH credentials if different, and run the following commands:
$ terraform plan // to preview the configuration changes
$ terraform apply // to apply the configuration
After a few minutes, the cluster creation will complete and you should see a final output as below.
clustercontrol_db_cluster.mariadb-1: Creation complete after 9m20s [id=2]

Apply complete! Resources: 1 added, 0 changed, 0 destroyed.
You can verify that the cluster is using the ClusterControl GUI or the ClusterControl CLI (s9s-tools) which both come with your ClusterControl installation. Using the s9s-tools, with the commands below, you would see your cluster running as in the image below.

Scaling a database cluster with the Terraform provider for ClusterControl
You can scale a database cluster horizontally using the Terraform provider for cluster by adding or removing a node.
By adding an additional db_host block inside the clustercontrol_db_cluster resource you can add a replication node to the cluster.
resource "clustercontrol_db_cluster" "mariadb-1" {
    ...
    db_host {
        hostname = "dbnode04”
    }
    ...

}
The above block will add dbnode04 as a replication node to the existing cluster. After running terraform apply, your cluster will be modified with the new node added.
clustercontrol_db_cluster.mariadb-1: Modifications complete after 5m40s [id=2]

Apply complete! Resources: 0 added, 1 changed, 0 destroyed.
By removing the db_host block from inside the above clustercontrol_db_cluster resource you can remove an existing node from a cluster.
(Current State)
resource "clustercontrol_db_cluster" "mariadb-1" {
    ...
    db_host {
        hostname = "dbnode04"
    }
    ...
}
(End State)
resource "clustercontrol_db_cluster" "mariadb-1" {
    ...
    ...
}
In the above, the end state has removed the db_host block for node dbnode04. The result will be the removal of the node from the cluster.
Creating backups with the with Terraform provider for ClusterControl
With the Terraform provider for ClusterControl, you can create on-demand backups of your database nodes, and also schedule backups for future purposes.
Backup on demand
You can take on-demand backups (full or incremental) of the cluster using the clustercontrol_db_cluster_backup resource. The resource below creates a full backup using the mariabackupfull backup method for MariaDB. There are other backup methods you can use, refer to the documentation to learn about them.
resource "clustercontrol_db_cluster_backup" "mariadb-full-1" {
  depends_on                   = [clustercontrol_db_cluster.mariadb-1]
  db_cluster_id                = clustercontrol_db_cluster.this.id
  db_backup_method             = "mariabackupfull"
  db_backup_dir                = var.db_backup_dir
  db_backup_subdir             = var.db_backup_subdir
  db_backup_encrypt            = var.db_backup_encrypt
  db_backup_host               = var.db_backup_host
  db_backup_storage_controller = var.db_backup_storage_controller
  db_backup_compression        = var.db_backup_compression
  db_backup_compression_level  = var.db_backup_compression_level
  db_backup_retention          = var.db_backup_retention
}
In the above resource:
- The
depends_onanddb_cluster_idattributes tell Terraform that this backup is for themariadb-1cluster resource. db_backup_dir(String) is the base directory where backups will be stored.db_backup_subdir(String) is the sub-dir for backups – default: “BACKUP-%I”.db_backup_encrypt(Boolean) defines whether to encrypt the backup or notdb_backup_host(String) Where there are multiple hosts, which host to choose to create backup from.db_backup_storage_controller(Boolean) Whether to store the backup on CMON controller host (ClusterControl node) or not.db_backup_compression(Boolean) Whether to compress backups or not.db_backup_compression_level(Number), where 1 is the fastest compression (least compression) and 9 indicates the slowest compression (best compression).db_backup_retention(Number) Backup retention period in days
Schedule a backup
To schedule a backup, you use the clustercontrol_db_cluster_backup_schedule resource. The backup schedule resource is very similar to the on-demand backup resource as the difference is the addition of db_backup_sched_time and db_backup_sched_title attributes to set the time for the backup and name respectively.
resource "clustercontrol_db_cluster_backup_schedule" "daily-full" {
  depends_on                   = [clustercontrol_db_cluster.mariadb-1]
  db_backup_sched_title        = "Daily full backup"
  db_backup_sched_time         = "TZ=UTC 0 0 * * *"
  db_cluster_id                = clustercontrol_db_cluster.mariadb-1.id
  db_backup_method             = "mariabackupfull"
  db_backup_dir                = var.db_backup_dir
  db_backup_subdir             = var.db_backup_subdir
  db_backup_encrypt            = var.db_backup_encrypt
  db_backup_host               = var.db_backup_host
  db_backup_storage_controller = var.db_backup_storage_controller
  db_backup_compression        = var.db_backup_compression
  db_backup_compression_level  = var.db_backup_compression_level
  db_backup_retention          = var.db_backup_retention
}
Scheduling database maintenance
Maintenance is key to ensuring smooth operations. Servers have to keep up with the latest software, hardware and technology to ensure systems are stable and running with the lowest risk possible. With the clustercontrol_db_cluster_maintenance resource, you can schedule maintenance of your cluster.
resource "clustercontrol_db_cluster_maintenance" "server-upgrade-05312024" {
   depends_on = [clustercontrol_db_cluster.mariadb-1]
   db_cluster_id       = clustercontrol_db_cluster.this.id
   db_maint_start_time = "May-31-2024T00:00"
   db_maint_stop_time  = "May-31-2024T23:30"
   db_maint_reason     = "Hardware refresh May 31, 2024"
 }
You should specify the db_maint_start_time and db_maint_stop_time in your local time (without the timezone).
Conclusion
In this blog post, you learned about the Terraform provider for ClusterControl and how it can help you deploy and manage database clusters with Terraform. Beyond the features covered in this blog, the Terraform provider for ClusterControl also supports deploying a load balancer and other exciting features.
To learn more about the ClusterControl Terraform provider and see examples of other supported databases – MySQL, PostgreSQL, TimescaleDB, MongoDB, SQL Server for Linux, Redis, and Elasticsearch – refer to the GitHub repository with concrete examples.
ClusterControl simplifies the process of setting up pgvector, and you can explore its functionality with a free 30 day trial.
Follow us on LinkedIn and Twitter for more great content in the coming weeks. Stay tuned!