blog
An Overview of the Percona XtraDB Cluster Kubernetes Operator

If you have been around in the container world, you would know that it is pretty challenging to adopt a full Kubernetes automation for a clustered database system, which commonly adds a level of complexity to the container-based architecture for these stateful applications. That’s where a Kubernetes Operator can help us to address this problem. A Kubernetes Operator is a special type of controller introduced to simplify complex deployments which basically extends the Kubernetes API with custom resources. It builds upon the basic Kubernetes resource and controller concepts but includes domain or application-specific knowledge to automate the entire life cycle of the software it manages.
Percona XtraDB Cluster Operator is a neat way to automate the specific tasks of Percona XtraDB Cluster like deployment, scaling, backups and upgrades within Kubernetes, built and maintained by Percona. It deploys the cluster in a StatefulSet with a Persistent Volume, which allows us to maintain a consistent identity for each Pod in the cluster and our data to be maintained.
In this blog post, we are going to test out the deployment of Percona XtraDB Cluster 8.0 in a containerized environment, orchestrated by Percona XtraDB Cluster Kubernetes Operator on Google Cloud Platform.
Creating a Kubernetes Cluster on Google Cloud
In this walkthrough, we are going to use the Kubernetes cluster on Google Cloud because it is relatively simple and easy to get Kubernetes up and running. Login to your Google Cloud Platform dashboard -> Compute -> Kubernetes Engine -> Create Cluster, and you will be presented with the following dialog:
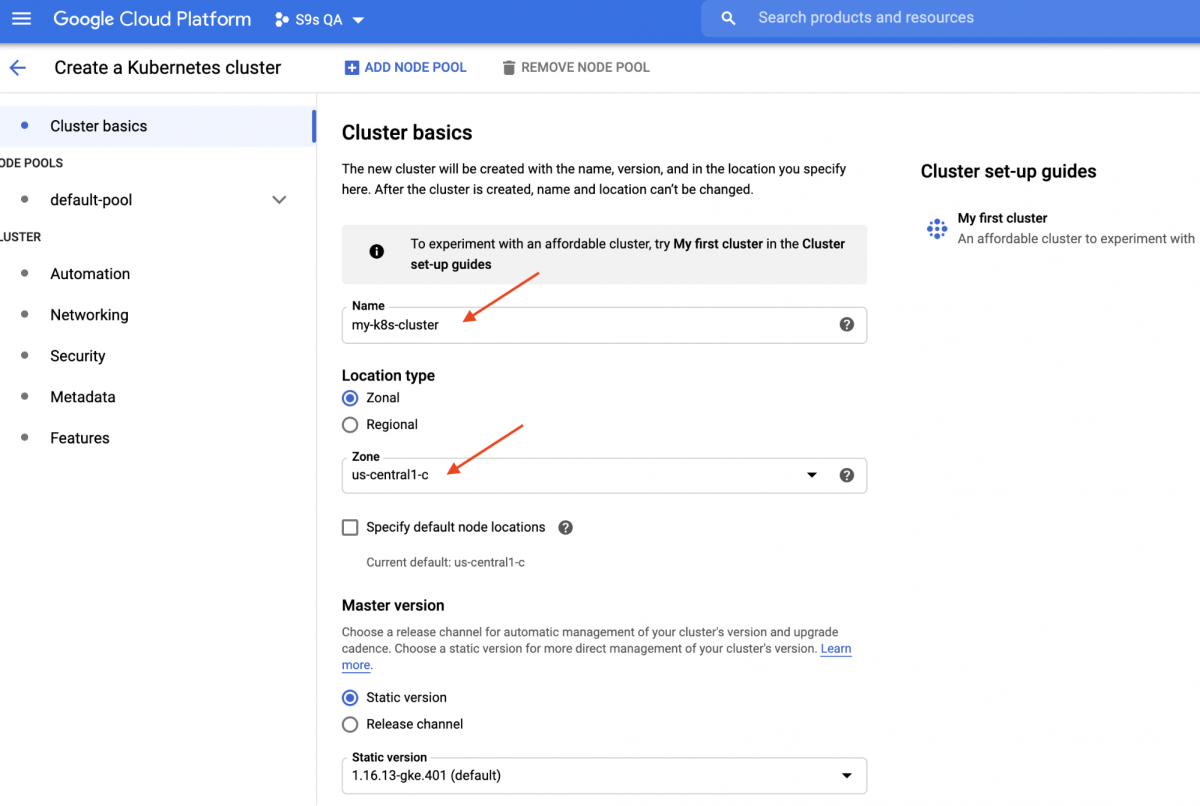
Just enter the Kubernetes Cluster name, pick your preferred zone and click “CREATE” (at the bottom of the page). In 5 minutes, a 3-node Kubernetes cluster will be ready. Now, on your workstation, install the gcloud SDK as shown in this guide and then pull the Kubernetes configuration into your workstation:
$ gcloud container clusters get-credentials my-k8s-cluster --zone asia-northeast1-a --project s9s-qa
Fetching cluster endpoint and auth data.
kubeconfig entry generated for my-k8s-cluster.
You should be able to connect to the Kubernetes cluster at this point. Run the following command to verify:
$ kubectl get nodes
NAME                                            STATUS   ROLES    AGE    VERSION
gke-my-k8s-cluster-default-pool-b80902cd-gp09   Ready       139m   v1.16.13-gke.401
gke-my-k8s-cluster-default-pool-b80902cd-jdc3   Ready       139m   v1.16.13-gke.401
gke-my-k8s-cluster-default-pool-b80902cd-rdv8   Ready       139m   v1.16.13-gke.401
The above output means that we are able to connect to the Kubernetes master and retrieve the Kubernetes cluster nodes. Now, we are ready to run the Kubernetes workloads.
Deploying a Percona XtraDB Cluster on Kubernetes
For workload deployment, we are going to follow the instructions as stated in the Percona XtraDB Cluster Operator documentation. Basically, we run the following command on our workstation to create the custom resources, namespace, role-based access control and also the Kubernetes operator itself:
$ git clone -b v1.6.0 https://github.com/percona/percona-xtradb-cluster-operator
$ cd percona-xtradb-cluster-operator/
$ kubectl apply -f deploy/crd.yaml
$ kubectl create namespace pxc
$ kubectl config set-context $(kubectl config current-context) --namespace=pxc
$ kubectl create clusterrolebinding cluster-admin-binding --clusterrole=cluster-admin --user=$(gcloud config get-value core/account)
$ kubectl apply -f deploy/rbac.yaml
$ kubectl apply -f deploy/operator.yaml
Next, we have to prepare our passwords (it’s called Secrets in Kubernetes term) by updating the values inside deploy/secrets.yaml in a base64 encoded format. You can use online tools like https://www.base64encode.org/ to create one or using a command-line tool like the following:
$ echo -n 'mypassword' | base64
bXlwYXNzd29yZA==
Then, update the deploy/secrets.yaml, as shown below:
apiVersion: v1
kind: Secret
metadata:
  name: my-cluster-secrets
type: Opaque
data:
  root: bXlwYXNzd29yZA==
  xtrabackup: bXlwYXNzd29yZA==
  monitor: bXlwYXNzd29yZA==
  clustercheck: bXlwYXNzd29yZA==
  proxyadmin: bXlwYXNzd29yZA==
  pmmserver: bXlwYXNzd29yZA==
  operator: bXlwYXNzd29yZA==
The above is a super simplification of secret management, where we set all passwords to be the same for all users. In production, please use a more complex password and specify a different password for every user.
Now, we can push the secret configuration to Kubernetes:
$ kubectl apply -f deploy/secrets.yamlBefore we move forward to deploy a Percona XtraDB Cluster, we need to revisit the default deployment definition inside deploy/cr.yaml for the cluster. There are a lot of Kubernetes objects that are defined here but most of them are commented out. For our workload, we would make the modification as below:
$ cat deploy/cr.yaml
apiVersion: pxc.percona.com/v1-6-0
kind: PerconaXtraDBCluster
metadata:
  name: cluster1
  finalizers:
    - delete-pxc-pods-in-order
spec:
  crVersion: 1.6.0
  secretsName: my-cluster-secrets
  vaultSecretName: keyring-secret-vault
  sslSecretName: my-cluster-ssl
  sslInternalSecretName: my-cluster-ssl-internal
  allowUnsafeConfigurations: false
  updateStrategy: SmartUpdate
  upgradeOptions:
    versionServiceEndpoint: https://check.percona.com
    apply: recommended
    schedule: "0 4 * * *"
  pxc:
    size: 3
    image: percona/percona-xtradb-cluster:8.0.20-11.1
    configuration: |
      [client]
      default-character-set=utf8

      [mysql]
      default-character-set=utf8

      [mysqld]
      collation-server = utf8_unicode_ci
      character-set-server = utf8
      default_authentication_plugin = mysql_native_password
    resources:
      requests:
        memory: 1G
    affinity:
      antiAffinityTopologyKey: "kubernetes.io/hostname"
    podDisruptionBudget:
      maxUnavailable: 1
    volumeSpec:
      persistentVolumeClaim:
        resources:
          requests:
            storage: 6Gi
    gracePeriod: 600
  haproxy:
    enabled: true
    size: 3
    image: percona/percona-xtradb-cluster-operator:1.6.0-haproxy
    resources:
      requests:
        memory: 1G
    affinity:
      antiAffinityTopologyKey: "kubernetes.io/hostname"
    podDisruptionBudget:
      maxUnavailable: 1
    gracePeriod: 30
  backup:
    image: percona/percona-xtradb-cluster-operator:1.6.0-pxc8.0-backup
    storages:
      fs-pvc:
        type: filesystem
        volume:
          persistentVolumeClaim:
            accessModes: [ "ReadWriteOnce" ]
            resources:
              requests:
                storage: 6Gi
    schedule:
      - name: "daily-backup"
        schedule: "0 0 * * *"
        keep: 5
        storageName: fs-pvc
We have made some modifications to the provided cr.yaml to make it work with our application, as shown above. First of all, we have to comment out (or remove) all CPU related lines, for example [*].resources.requests.cpu: 600m, to make sure Kubernetes is able to schedule the pod creation correctly on nodes with limited CPU. Then we need to add some compatibility options for Percona XtraDB Cluster 8.0 which is based on MySQL 8.0, to work smoothly with our WordPress application that we are going to deploy later on, as shown in the following excerpt:
   configuration: |
      [client]
      default-character-set=utf8

      [mysql]
      default-character-set=utf8

      [mysqld]
      collation-server = utf8_unicode_ci
      character-set-server = utf8
      default_authentication_plugin = mysql_native_password
The above will match the MySQL server’s default character set with the MySQLi PHP driver in our WordPress container. The next section is the HAProxy deployment where it is set to “enabled: true”. There is also a ProxySQL section with “enabled: false” – commonly one would pick either of the reverse proxies for every cluster. The last section is the backup configuration, where we would like to have a daily backup scheduled at 12:00 AM every day and keep that last 5 backups.
We can now start to deploy our 3-node Percona XtraDB Cluster:
$ kubectl apply -f deploy/cr.yamlThe creation process will take some time. The operator will deploy the Percona XtraDB Cluster pods as a Stateful Set, which means one pod creation at a time and each Pod in the StatefulSet will be assigned an integer ordinal, from 0 up through N-1, that is unique over the set. The process is over when both operator and the Pods have reached their Running status:
$ kubectl get pods
NAME                                               READY   STATUS    RESTARTS   AGE
cluster1-haproxy-0                                 2/2     Running   0          71m
cluster1-haproxy-1                                 2/2     Running   0          70m
cluster1-haproxy-2                                 2/2     Running   0          70m
cluster1-pxc-0                                     1/1     Running   0          71m
cluster1-pxc-1                                     1/1     Running   0          70m
cluster1-pxc-2                                     1/1     Running   0          69m
percona-xtradb-cluster-operator-79d786dcfb-6clld   1/1     Running   0          121m
Since this operator is a custom resource, we can manipulate the perconaxtradbcluster resource to like the standard Kubernetes resource:
$ kubectl get perconaxtradbcluster
NAME       ENDPOINT               STATUS   PXC   PROXYSQL   HAPROXY   AGE
cluster1   cluster1-haproxy.pxc   ready    3                3         27h
You can also use the shorter resource name, “pxc”, and try with the following commands:
$ kubectl describe pxc
$ kubectl edit pxc
When looking at the workload set, we can tell that the operator has created two StatefulSets:
$ kubectl get statefulsets -o wide
NAME               READY   AGE   CONTAINERS          IMAGES
cluster1-haproxy   3/3     26h   haproxy,pxc-monit   percona/percona-xtradb-cluster-operator:1.6.0-haproxy,percona/percona-xtradb-cluster-operator:1.6.0-haproxy
cluster1-pxc       3/3     26h   pxc                 percona/percona-xtradb-cluster:8.0.20-11.2
The operator will also create the corresponding services that will load-balanced connections to the respective pods:
$ kubectl get service
NAME                        TYPE           CLUSTER-IP     EXTERNAL-IP     PORT(S)                       AGE
cluster1-haproxy            ClusterIP      10.40.9.177              3306/TCP,3309/TCP,33062/TCP   3h27m
cluster1-haproxy-replicas   ClusterIP      10.40.0.236              3306/TCP                      3h27m
cluster1-pxc                ClusterIP      None                     3306/TCP,33062/TCP            3h27m
cluster1-pxc-unready        ClusterIP      None                     3306/TCP,33062/TCP            3h27m
The above output shows that the operator has created 4 services:
- cluster1-haproxy – The service for a load-balanced MySQL single-master (3306), Proxy protocol (3309) and MySQL Admin (33062) – A new administrative port introduced in MySQL 8.0.14 and later. This is the service name or cluster IP address that the applications need to connect to have a single-master connection to the Galera cluster.
- cluster1-haproxy-replicas – The service for a load-balanced MySQL multi-master (3306). This is the service name or cluster IP address that the applications need to connect to have a multi-master connection to the Galera cluster with round-robin balancing algorithm.
- cluster1-pxc – The service for load-balanced PXC pods, bypassing HAProxy. By connecting directly to this service, Kubernetes will route the connection in round-robin fashion to all PXC pods, similar to what cluster-haproxy-replicase provides. The service has no public IP address assigned and is unavailable outside the cluster.
- cluster1-pxc-unready – The ‘unready’ service is needed for pod address discovery during the application startup regardless of the Pod state. Proxysql and pxc pods should know about each other before the database becomes fully operational. The unready service has no public IP address assigned and is unavailable outside the cluster.
To connect via a MySQL client, simply run the following command:
$ kubectl run -i --rm --tty percona-client --image=percona:8.0 --restart=Never -- bash -ilThis will create a transient Pod and immediately enter the container environment. Then, run the standard mysql client command with a proper credential:
bash-4.2$ mysql -uroot -pmypassword -h cluster1-haproxy -P3306 -e 'SELECT @@hostname'
mysql: [Warning] Using a password on the command line interface can be insecure.
+----------------+
| @@hostname     |
+----------------+
| cluster1-pxc-0 |
+----------------+
When we look at the Pod placement, all Percona XtraDB Cluster pods are located on a different Kubernetes host:
$ kubectl get pods -o wide --selector=app.kubernetes.io/component=pxc
NAME             READY   STATUS    RESTARTS   AGE   IP           NODE                                            NOMINATED NODE   READINESS GATES
cluster1-pxc-0   1/1     Running   0          67m   10.36.2.5    gke-my-k8s-cluster-default-pool-b80902cd-gp09
cluster1-pxc-1   1/1     Running   0          66m   10.36.1.10   gke-my-k8s-cluster-default-pool-b80902cd-rdv8
cluster1-pxc-2   1/1     Running   0          65m   10.36.0.11   gke-my-k8s-cluster-default-pool-b80902cd-jdc3
This will definitely improve the availability of the service, in case one of the Kubernetes hosts goes down.
To scale up to 5 pods, we need to prepare another 2 new Kubernetes nodes beforehand to respect the pod affinity configuration (default to affinity.antiAffinityTopologyKey.topologyKey=”kubernetes.io/hostname”). Then, run the following patch command to scale the Percona XtraDB Cluster to 5 nodes:
$ kubectl patch pxc cluster1
--type='json' -p='[{"op": "replace", "path": "/spec/pxc/size", "value": 5 }]'
Monitor the pod’s creation by using kubectl get pods command:
$ kubectl get pods -o wide
NAME               READY   STATUS      RESTARTS   AGE   IP           NODE                                            NOMINATED NODE   READINESS GATES
cluster1-pxc-0     1/1     Running     0          27h   10.36.2.5    gke-my-k8s-cluster-default-pool-b80902cd-gp09
cluster1-pxc-1     1/1     Running     0          27h   10.36.1.10   gke-my-k8s-cluster-default-pool-b80902cd-rdv8
cluster1-pxc-2     1/1     Running     0          27h   10.36.0.11   gke-my-k8s-cluster-default-pool-b80902cd-jdc3
cluster1-pxc-3     1/1     Running     0          30m   10.36.7.2    gke-my-k8s-cluster-pool-1-ab14a45e-h1pf
cluster1-pxc-4     1/1     Running     0          13m   10.36.5.3    gke-my-k8s-cluster-pool-1-ab14a45e-01qn
Another 2 new Pods (cluster1-pxc-3 and cluster1-pxc-4) have been created on another 2 new Kubernetes nodes (gke-my-k8s-cluster-pool-1-ab14a45e-h1pf and gke-my-k8s-cluster-pool-1-ab14a45e-01qn). To scale down, simply change the value back to 3 in the above patch command. Note that Percona XtraDB Cluster should be running with an odd number of nodes to prevent split-brain.
Deploying an Application (WordPress)
In this example, we are going to deploy a WordPress application on top of our Percona XtraDB Cluster and HAProxy. Let’s first prepare the YAML definition file like the following:
$ cat wordpress-deployment.yaml
apiVersion: v1
kind: Service
metadata:
  name: wordpress
  labels:
    app: wordpress
spec:
  ports:
    - port: 80
  selector:
    app: wordpress
    tier: frontend
  type: LoadBalancer
---
apiVersion: v1
kind: PersistentVolumeClaim
metadata:
  name: wp-pv-claim
  labels:
    app: wordpress
spec:
  accessModes:
    - ReadWriteOnce
  resources:
    requests:
      storage: 2Gi
---
apiVersion: apps/v1 # for versions before 1.9.0 use apps/v1beta2
kind: Deployment
metadata:
  name: wordpress
  labels:
    app: wordpress
spec:
  selector:
    matchLabels:
      app: wordpress
      tier: frontend
  strategy:
    type: Recreate
  template:
    metadata:
      labels:
        app: wordpress
        tier: frontend
    spec:
      containers:
      - image: wordpress:4.8-apache
        name: wordpress
        env:
        - name: WORDPRESS_DB_HOST
          value: cluster1-haproxy
        - name: WORDPRESS_DB_PASSWORD
          valueFrom:
            secretKeyRef:
              name: my-cluster-secrets
              key: root
        ports:
        - containerPort: 80
          name: wordpress
        volumeMounts:
        - name: wordpress-persistent-storage
          mountPath: /var/www/html
      volumes:
      - name: wordpress-persistent-storage
        persistentVolumeClaim:
          claimName: wp-pv-claim
Pay attention to the WORDPRESS_DB_HOST and WORDPRESS_DB_PASSWORD environment variables. The former variable where we defined “cluster1-haproxy” as the database host, instead of an individual database node and for the latter we specified the root password by instructing Kubernetes to read it from my-cluster-secrets object under key “root”, which is equivalent to “mypassword” (after the base64 value was decoded). We skip defining the WORDPRESS_DB_USER environment variable since the default value is “root”.
Now we can create our application:
$ kubectl apply -f wordpress-deployment.yamlCheck the service:
$ kubectl get service
NAME                        TYPE           CLUSTER-IP     EXTERNAL-IP     PORT(S)                       AGE
cluster1-haproxy            ClusterIP      10.40.9.177              3306/TCP,3309/TCP,33062/TCP   4h42m
cluster1-haproxy-replicas   ClusterIP      10.40.0.236              3306/TCP                      4h42m
cluster1-pxc                ClusterIP      None                     3306/TCP,33062/TCP            4h42m
cluster1-pxc-unready        ClusterIP      None                     3306/TCP,33062/TCP            4h42m
wordpress                   LoadBalancer   10.40.13.205   35.200.78.195   80:32087/TCP                  4h39m
At this point, we can connect to our WordPress application at http://35.200.78.195/ (the external IP address) and start configuring the WordPress application. At this point, our WordPress application is connected to one of the Percona XtraDB Cluster (single-master connection) via one of the HAProxy pods.
That’s it for now. For more information, check out the Percona Kubernetes Operator for Percona XtraDB Cluster documentation. Happy containerizing!


