blog
Migrating Google Cloud SQL for MySQL to an On-Prem Server

Google Cloud SQL for MySQL is a fully-managed database service that helps you set up, maintain, manage, and administer your MySQL relational databases on Google Cloud Platform. However, there are differences between Cloud SQL and standard MySQL functionality like limited control, restricted resources, data locality, budget and security, which may influence your final decision to move out from the Google Cloud SQL instances and host the database service in the on-premises infrastructure instead.
This blog post will walk you through how to perform online migration from Google Cloud SQL to an on-premises server. Our target database on the on-premises server is a Debian server, but the steps and procedures shall apply on other versions of Linux as well as long as packages are properly installed.
Our Google Cloud MySQL instance is running on MySQL 5.7 and what we need is:
- A replication slave user created on the master.
- The slave must be installed with the same major version as the master.
- SSL must be enabled for geographical replication for security reasons.
Since Google Cloud by default enabled GTID replication for MySQL, we are going to do a migration based on this replication scheme. Hence, the instructions described in this post should also work in MySQL 8.0 instances.
Creating a Replication Slave User
First of all, we have to create a replication slave user on our Google Cloud SQL instance. Log in to the Google Cloud Platform -> Databases -> SQL -> pick the MySQL instance -> Users -> Add User Account and enter the required details:
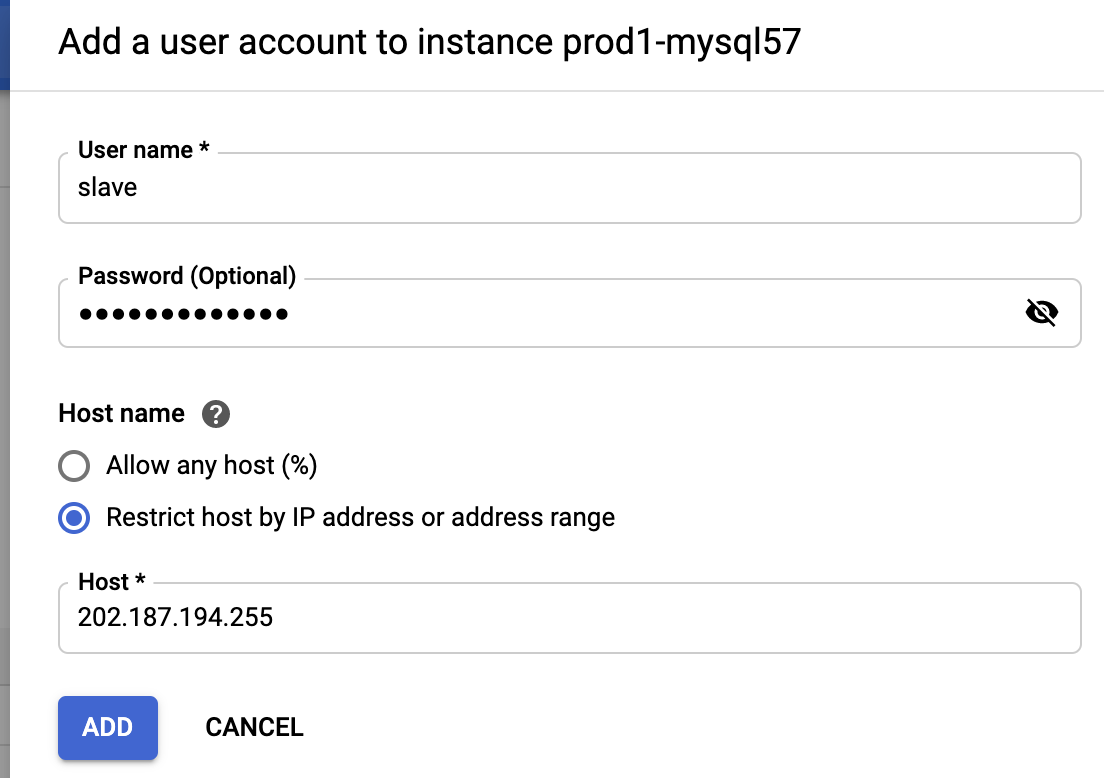
The 202.187.194.255 is the slave public IP address located in our on-premises that is going to replicate from this instance. As you can see, there is no privileges configuration since users created from this interface will have the highest privileges Google Cloud SQL can offer (almost everything except SUPER and FILE). To verify the privileges, we can use the following command:
mysql> SHOW GRANTS FOR [email protected]
*************************** 1. row ***************************
Grants for [email protected]: GRANT SELECT, INSERT, UPDATE, DELETE, CREATE,
DROP, RELOAD, SHUTDOWN, PROCESS, REFERENCES, INDEX, ALTER, SHOW DATABASES,
CREATE TEMPORARY TABLES, LOCK TABLES, EXECUTE, REPLICATION SLAVE, REPLICATION CLIENT,
CREATE VIEW, SHOW VIEW, CREATE ROUTINE, ALTER ROUTINE, CREATE USER, EVENT, TRIGGER,
CREATE TABLESPACE ON *.* TO 'slave'@'202.187.194.255' WITH GRANT OPTION
It looks like our slave user has the required permission to run as a slave (REPLICATION SLAVE).
Taking a mysqldump Backup
Before we create an external mysqldump backup, we need to configure the client’s SSL certificates because of the risk of connecting the instance via a public network. To do this, go to Connections -> Configure SSL client certificates -> Create a client certificate:
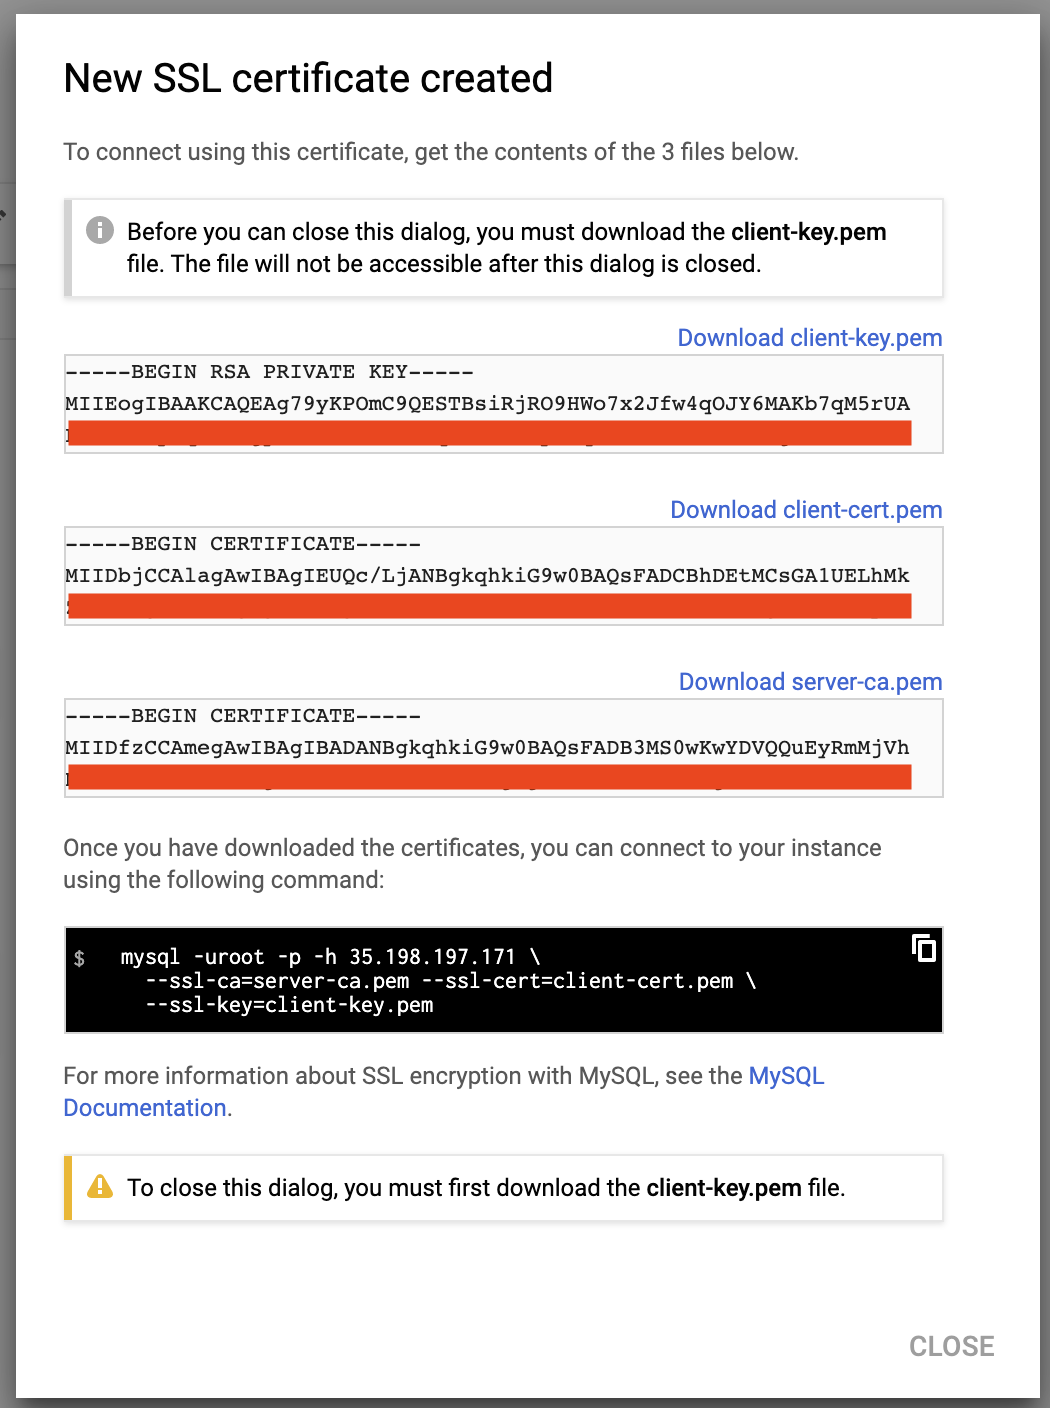
Download the above files (server-ca.pem, client-cert.pem and client-key.pem) and store them inside the slave server. We are going to use these certificates to connect to the master securely from the slave serve. To simplify the process, all of the above certificates and key file will be put under a directory called “gcloud-certs”:
$ mkdir -p /root/gcloud-certs # put the certs/key hereMake sure the permissions are correct, especially the private key file, client-key.pem:
$ chmod 600 /root/gcloud-certs/client-key.pemNow we are ready to take a mysqldump backup from our Google Cloud SQL MySQL 5.7 instance securely:
$ mysqldump -uroot -p
-h 35.198.197.171
--ssl-ca=/root/gcloud-certs/server-ca.pem
--ssl-cert=/root/gcloud-certs/client-cert.pem
--ssl-key=/root/gcloud-certs/client-key.pem
--single-transaction
--all-databases
--triggers
--routines > fullbackup.sql
You should get the following warning:
“Warning: A partial dump from a server that has GTIDs will by default include the GTIDs of all transactions, even those that changed suppressed parts of the database. If you don’t want to restore GTIDs, pass –set-gtid-purged=OFF. To make a complete dump, pass –all-databases –triggers –routines –events.”
The above warning occurs because we skipped defining the –events flag which requires the SUPER privilege. The root user created for every Google Cloud SQL instance does not come with FILE and SUPER privileges. This is one of the drawbacks of using this method, that MySQL Events can’t be imported from Google Cloud SQL.
Configuring the Slave Server
On the slave server, install MySQL 5.7 for Debian 10:
$ echo 'deb http://repo.mysql.com/apt/debian/ buster mysql-5.7' > /etc/apt/sources.list.d/mysql.list
$ apt-key adv --keyserver pgp.mit.edu --recv-keys 5072E1F5
$ apt update
$ apt -y install mysql-community-server
Then, add the following lines under the [mysqld] section inside /etc/mysql/my.cnf (or any other relevant MySQL configuration file):
server-id = 1111 # different value than the master
log_bin = binlog
log_slave_updates = 1
expire_logs_days = 7
binlog_format = ROW
gtid_mode = ON
enforce_gtid_consistency = 1
sync_binlog = 1
report_host = 202.187.194.255 # IP address of this slave
Restart the MySQL server to apply the above changes:
$ systemctl restart mysqlRestore the mysqldump backup on this server:
$ mysql -uroot -p < fullbackup.sqlAt this point, the MySQL root password of the slave server should be identical to the one in Google Cloud SQL. You should log in with a different root password from now on.
Take note that the root user in Google Cloud doesn't have full privileges. We need to make some modifications on the slave side, by allowing the root user to have all the privileges inside MySQL, since we have more control over this server. To do this, we need to update MySQL's user table. Login to the slave's MySQL server as MySQL root user and run the following statement:
mysql> UPDATE mysql.user SET Super_priv = 'Y', File_priv = 'Y' WHERE User = 'root';
Query OK, 1 row affected (0.00 sec)
Rows matched: 1  Changed: 1  Warnings: 0
Flush the privileges table:
mysql> FLUSH PRIVILEGES;
Query OK, 0 rows affected (0.00 sec)
Exit the current terminal and re-login again. Run the following command to verify that the root user now has the highest level of privileges:
mysql> SHOW GRANTS FOR root@localhost;
+---------------------------------------------------------------------+
| Grants for root@localhost                                           |
+---------------------------------------------------------------------+
| GRANT ALL PRIVILEGES ON *.* TO 'root'@'localhost' WITH GRANT OPTION |
+---------------------------------------------------------------------+
Setting up the Replication Link
For security reasons, the replication slave user has to connect to the master host (Google Cloud instance) via an SSL encrypted channel. Therefore, we have to prepare the SSL key and certificate with correct permission and accessible by the mysql user. Copy the gcloud directory into /etc/mysql and assign the correct permission and ownership:
$ mkdir -p /etc/mysql
$ cp /root/gcloud-certs /etc/mysql
$ chown -Rf mysql:mysql /etc/mysql/gcloud-certs
On the slave server, configure the replication link as below:
mysql> CHANGE MASTER TO MASTER_HOST = '35.198.197.171',
MASTER_USER = 'slave',
MASTER_PASSWORD = 'slavepassword',
MASTER_AUTO_POSITION = 1,
MASTER_SSL = 1,
MASTER_SSL_CERT = '/etc/mysql/gcloud-certs/client-cert.pem',
MASTER_SSL_CA = '/etc/mysql/gcloud-certs/server-ca.pem',
MASTER_SSL_KEY = '/etc/mysql/gcloud-certs/client-key.pem';
Then, start the replication slave:
mysql> START SLAVE;Verify the output as the following:
mysql> SHOW SLAVE STATUSG
*************************** 1. row ***************************
               Slave_IO_State: Waiting for master to send event
                  Master_Host: 35.198.197.171
                  Master_User: slave
                  Master_Port: 3306
                Connect_Retry: 60
              Master_Log_File: mysql-bin.000003
          Read_Master_Log_Pos: 1120160
               Relay_Log_File: puppet-master-relay-bin.000002
                Relay_Log_Pos: 15900
        Relay_Master_Log_File: mysql-bin.000003
             Slave_IO_Running: Yes
            Slave_SQL_Running: Yes
              Replicate_Do_DB:
          Replicate_Ignore_DB:
           Replicate_Do_Table:
       Replicate_Ignore_Table:
      Replicate_Wild_Do_Table:
  Replicate_Wild_Ignore_Table:
                   Last_Errno: 0
                   Last_Error:
                 Skip_Counter: 0
          Exec_Master_Log_Pos: 1120160
              Relay_Log_Space: 16115
              Until_Condition: None
               Until_Log_File:
                Until_Log_Pos: 0
           Master_SSL_Allowed: Yes
           Master_SSL_CA_File: /etc/mysql/gcloud-certs/server-ca.pem
           Master_SSL_CA_Path:
              Master_SSL_Cert: /etc/mysql/gcloud-certs/client-cert.pem
            Master_SSL_Cipher:
               Master_SSL_Key: /etc/mysql/gcloud-certs/client-key.pem
        Seconds_Behind_Master: 0
Master_SSL_Verify_Server_Cert: No
                Last_IO_Errno: 0
                Last_IO_Error:
               Last_SQL_Errno: 0
               Last_SQL_Error:
  Replicate_Ignore_Server_Ids:
             Master_Server_Id: 2272712871
                  Master_UUID: 8539637e-14d1-11eb-ae3c-42010a94001a
             Master_Info_File: /var/lib/mysql/master.info
                    SQL_Delay: 0
          SQL_Remaining_Delay: NULL
      Slave_SQL_Running_State: Slave has read all relay log; waiting for more updates
           Master_Retry_Count: 86400
                  Master_Bind:
      Last_IO_Error_Timestamp:
     Last_SQL_Error_Timestamp:
               Master_SSL_Crl:
           Master_SSL_Crlpath:
           Retrieved_Gtid_Set: 8539637e-14d1-11eb-ae3c-42010a94001a:5611-5664
            Executed_Gtid_Set: 8539637e-14d1-11eb-ae3c-42010a94001a:1-5664,
b1dabe58-14e6-11eb-840f-0800278dc04d:1-2
                Auto_Position: 1
         Replicate_Rewrite_DB:
                 Channel_Name:
           Master_TLS_Version:
Make sure the Slave_IO_Running and Slave_SQL_Running values are 'Yes', as well as Seconds_Behind_Master should be 0, which means the slave has caught up with the master. Notice the Executed_Gtid_Set has two GTIDs:
- 8539637e-14d1-11eb-ae3c-42010a94001a:1-5664
- b1dabe58-14e6-11eb-840f-0800278dc04d:1-2
The first GTID represents the changes coming from the current master (Google Cloud SQL instance), while the second GTID represents the changes that we have made when we modified the privileges for the MySQL root user on the slave host. Pay attention to the first GTID to see if the database is replicating correctly (the integer part should be incrementing while replicating).
Verify if our slave host is part of the replication from the master's point-of-view. Login to the SQL Cloud instance as root:
$ mysql -uroot -p
-h 35.198.197.171
--ssl-ca=/root/gcloud-certs/server-ca.pem
--ssl-cert=/root/gcloud-certs/client-cert.pem
--ssl-key=/root/gcloud-certs/client-key.pem
And run the following statement:
mysql> SHOW SLAVE HOSTS;
*************************** 1. row ***************************
 Server_id: 1111
      Host: 202.187.194.255
      Port: 3306
 Master_id: 2272712871
Slave_UUID: b1dabe58-14e6-11eb-840f-0800278dc04d
At this point, you may plan your next move to redirect the database workload from the applications to this slave server as the new master and decommission the old master in Google Cloud.
Final Thoughts
You can perform an online migration from Google Cloud SQL for MySQL to an on-premises server without much hassle. This gives you the possibility to move your database outside of the cloud vendors for privacy and control when the right time has come.


