blog
How to rapidly deploy databases on bare metal, VMs, and containers
What happens when your new application needs a production-ready database cluster in hours, not days? If you’re relying on traditional deployment methods that involve manual provisioning, tedious configuration, and complex integrations, then good luck.
But what if you could achieve cloud-like deployment speeds for your database infrastructure, whether it’s on bare metal, virtual machines, or containers? By integrating popular DevOps tools with ClusterControl, you can automate and accelerate the entire process, getting your database clusters from zero to production rapidly and reliably. This post will show you how.
The rapid deployment blueprint
Before deploying, ensure your environment is adequately prepared. This involves foundational steps that set the stage for a smooth, automated rollout.
Pre-deployment checklist
- Networking: Verify network connectivity between all prospective database nodes and your ClusterControl instance. Ensure necessary ports are open for communication, e.g., SSH, database-specific ports.
- Hardware capacity: Confirm your chosen servers (physical, virtual, or containers) meet the minimum hardware requirements for your chosen database and expected workload — consider CPU, RAM, and disk I/O.
- Environment selection: Determine your deployment target, choosing between bare metal, virtual machines (VMs), or containers; each has its nuances in the provisioning phase.
Bare metal
To prepare bare metal servers for deployment with ClusterControl, prepare one ClusterControl server and a number of database servers according to your target topology. In this example, let’s deploy a 3-node MongoDB replica set. The basic steps are as follows:
- Install ClusterControl.
- Configure SSH key-based authentication from the ClusterControl server to all database servers.
- Deploy the database cluster using ClusterControl CLI.
Yes, you see it right. Only 3 steps to deploy a production-grade 3-node MongoDB replica set. Details on every step are shown below.
1. Install ClusterControl
On the ClusterControl server, install ClusterControl by following the instructions as shown on the Get Started page.
2. Configure SSH key-based authentication
To enable passwordless SSH access, you’ll need to generate SSH keys and distribute the public key to your database servers.
- On the ClusterControl host, generate an SSH key pair:
ssh-keygen -t rsa -b 4096 -C "[email protected]"- Press Enter to accept the default file location (`~/.ssh/id_rsa`).
- Optionally, enter a passphrase for added security (press Enter to skip the passphrase).
- Copy the generated public key to database servers:
ssh-copy-id root@your_database_server1_ip
ssh-copy-id root@your_database_server2_ip
ssh-copy-id root@your_database_server3_ip- Replace `user` with the username you’ll use to log in (e.g., `dbadmin` or `root`).
- Replace `your_database_server_ip` with the IP address or hostname of each database node accordingly.
- You will be prompted for the password of `user` on the remote server for the first time.
- After copying the key, you should be able to SSH into the database server without a password:
ssh root@your_database_server_ipYou are now ready to deploy the database cluster.
3. Deploy the database cluster
On the ClusterControl node, run the following command to start creating a 3-node MongoDB replica set cluster called “MongoDB ReplicaSet 7.0” and use the root user’s SSH key we configured earlier to manage the cluster:
s9s cluster --create \
    --cluster-type=mongodb \
    --nodes="192.168.99.11;192.168.99.12;192.168.99.13" \
    --vendor=mongodb \
    --provider-version='7.0' \
    --os-user=root \
    --os-key-file=/root/.ssh/id_rsa \
    --db-admin='admin' \
    --db-admin-passwd='MyS3cr3tPass' \
    --cluster-name='MongoDB ReplicaSet 7.0' \
    --wait
Wait for about 30 minutes and your database cluster shall be ready, manageable via ClusterControl GUI accessible at https://<ClusterControl_host>/. That’s it.
Virtual machines
To rapidly deploy a 3-node MariaDB Galera Cluster (or other database clusters supported by ClusterControl) on virtual machines, follow these steps:
- Provision four new VM instances using Terraform.
- Configure SSH key-based authentication from the ClusterControl server to all database nodes using configuration management tools such as Ansible, Puppet, or Chef.
- Install ClusterControl.
- Deploy the database cluster using the ClusterControl CLI.
1. Provision new VMs
For provisioning VMs in a cloud environment or on-prem virtualization platform, Terraform can automate the creation of instances. The following is an example to create 4 instances on AWS (1 ClusterControl + 3 database nodes) and install Ansible and git altogether:
provider "aws" {
  region     = "eu-west-1"
  access_key = var.aws_access_key
  secret_key = var.aws_secret_key
}

resource "aws_instance" "db_nodes" {
  count         = 4
  ami           = var.ami_id
  instance_type = "t2.micro"
  key_name      = var.key_name

  tags = {
    Name = "mongodb-db-node-${count.index + 1}"
  }

  connection {
    type        = "ssh"
    user        = "ubuntu"
    private_key = file(var.private_key_path)
    host        = self.public_ip
  }

  provisioner "remote-exec" {
    inline = [
      "sudo apt update",
      "sudo apt install -y software-properties-common",
      "sudo apt-add-repository --yes --update ppa:ansible/ansible",
      "sudo apt install -y ansible git",
    ]
  }
}
Terraform also supports many other cloud providers, including Google Cloud Platform, Azure, and Oracle Cloud Infrastructure (see here for full list), as well as hypervisors such as VMware, KVM (libvirt), and XenServer. The following is an example of creating 3 instances on VMware ESXi:
terraform {
  required_providers {
    esxi = {
      source  = "josenk/esxi"
      version = ">= 1.6.0"
    }
  }
}

provider "esxi" {
  esxi_hostname = var.esxi_host
  esxi_username = var.esxi_user
  esxi_password = var.esxi_pass
  allow_unverified_ssl = true
}

resource "esxi_guest" "mongodb" {
  count       = 3
  guest_name  = "mongodb-${count.index + 1}"
  disk_store  = var.datastore
  guest_os    = "debian10_64Guest"
  iso_path    = var.iso_path
  memsize     = 2048
  numvcpus    = 2
  scsi_type   = "lsilogic"
  disk_size   = 20

  network_interfaces {
    virtual_network = var.network
  }

  boot_command = [
    "<enter><wait10><f2><wait><esc><wait><enter>",
  ]
}
2. Configure SSH key-based authentication
Once the VMs are provisioned, use Ansible on the ClusterControl node with the following playbook to configure SSH key-based authentication:
---
- name: Configure passwordless SSH from ClusterControl to DB nodes
  hosts: all
  gather_facts: false
  become: true

  vars:
    ssh_key_path: "~/.ssh/id_rsa.pub"

  tasks:
    - name: Check if SSH public key exists on ClusterControl
      delegate_to: localhost
      ansible.builtin.stat:
        path: "{{ ssh_key_path }}"
      register: ssh_key_status

    - name: Generate SSH key pair if it does not exist
      delegate_to: localhost
      ansible.builtin.command: >
        ssh-keygen -t rsa -b 4096 -f "{{ ssh_key_path | regex_replace('.pub$', '') }}" -N ""
      when: not ssh_key_status.stat.exists

    - name: Read SSH public key
      delegate_to: localhost
      ansible.builtin.slurp:
        src: "{{ ssh_key_path }}"
      register: ssh_pub_key

    - name: Install SSH public key on DB node
      ansible.builtin.authorized_key:
        user: "{{ ansible_user }}"
        key: "{{ ssh_pub_key.content | b64decode }}"
        state: present
Inside inventory.ini, define the following target database node IP addresses:
[all]
db1 ansible_host=192.168.1.101
db2 ansible_host=192.168.1.102
db3 ansible_host=192.168.1.103

[all:vars]
ansible_user=root
Run the playbook to start configuring SSH key-based authentication:
ansible-playbook -i inventory.ini playbook.yml --ask-pass3. Install ClusterControl
Run the following command to install ClusterControl:
wget https://severalnines.com/downloads/cmon/install-cc
chmod 755 install-cc
sudo ./install-cc
4. Deploy the database cluster
On the ClusterControl node, run the following command to start creating a 3-node MariaDB Galera Cluster called “System A – MariaDB Galera 11” and use the root user’s SSH key we configured earlier to manage the cluster:
s9s cluster --create \
    --cluster-type=galera \
    --nodes="192.168.5.11;192.168.5.12;192.168.5.13" \
    --vendor=mariadb \
    --provider-version=11.4 \
    --db-admin-passwd='Str0ngpa$$w0rd' \
    --os-user=root \
    --os-key-file=/root/.ssh/id_rsa \
    --cluster-name='System A - MariaDB Galera 11' \
    --wait
Wait for about 30 minutes and your database cluster shall be ready, manageable via ClusterControl GUI accessible at https://<ClusterControl_host>/. That’s it.
ClusterControl will then automate the entire database installation, configuration, and cluster setup process, including:
- Installing database binaries and dependencies.
- Configuring database parameters based on best practices.
- Setting up replication or high-availability mechanisms.
- Establishing monitoring and management agents on each node.
The output of this pipeline is a fully functional, production-ready database cluster, deployed with consistency and speed, ready to serve your applications.
Containers
ClusterControl 2.3.2 introduces a technical preview feature that enables the deployment of various database clusters on Docker containers using Kubernetes operators. This highlights ClusterControl’s versatility in managing database clusters across diverse environments.
To deploy database clusters on containers, the basic steps are as follows:
- Prepare a Kubernetes cluster.
- Install ClusterControl on a virtual machine.
- Add the Kubernetes control plane to ClusterControl.
- Deploy the selected cluster type from the supported Kubernetes operators.
1. Prepare a Kubernetes cluster
We’ll demonstrate this using DigitalOcean’s 1-click Kubernetes deployment feature. From your DigitalOcean dashboard, navigate to Create > Kubernetes, select your preferred region, and then click “Create Kubernetes cluster.”
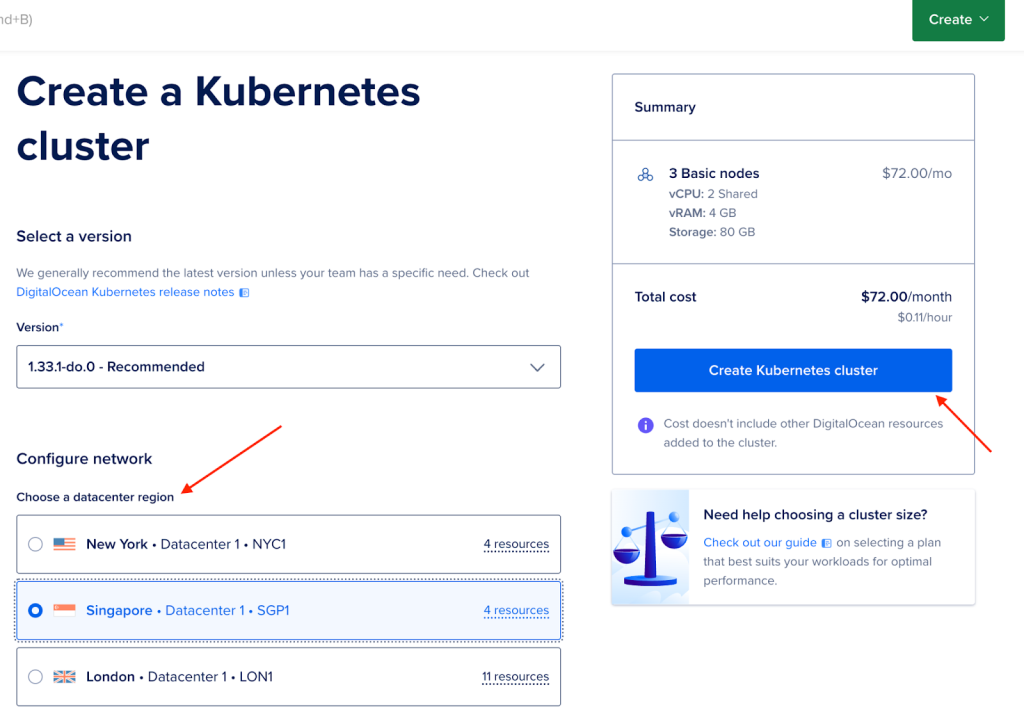
Wait a few minutes until the provisioning section displays “Ready” with 3/3 nodes provisioned. These are the Kubernetes worker nodes where our database containers will reside. Afterward, proceed to the “Getting Started with Kubernetes” section to establish a connection between your local workstation and the remote Kubernetes cluster.
2. Install ClusterControl on a virtual machine
An existing or new ClusterControl server can be used for deployment on a virtual machine. This host will connect to the Kubernetes cluster via the clustercontrol-kuber-proxy agent. Install ClusterControl on the designated host by following the instructions on the Get Started page.
3. Add the Kubernetes control plane to ClusterControl.
From ClusterControl GUI, go to Kubernetes -> Environments -> Connect Environment and copy the helm command provided in the page:

Execute the command within your workstation terminal, ensuring prior connection to the Kubernetes cluster as demonstrated in step 1. The expected output is displayed below:
NAME: kuber-agent
LAST DEPLOYED: Tue Jul  8 12:23:29 2025
NAMESPACE: severalnines-system
STATUS: deployed
REVISION: 1
TEST SUITE: None
Once the Kubernetes agent proxy is confirmed to be running and reachable, click “Continue” on the ClusterControl GUI. This will complete the installation, and the Kubernetes environment will be integrated into ClusterControl.
4. Deploy the database cluster.
Under the Clusters tab, click on “Deploy database cluster” and specify the database specification that you want, as shown in the following screenshot:
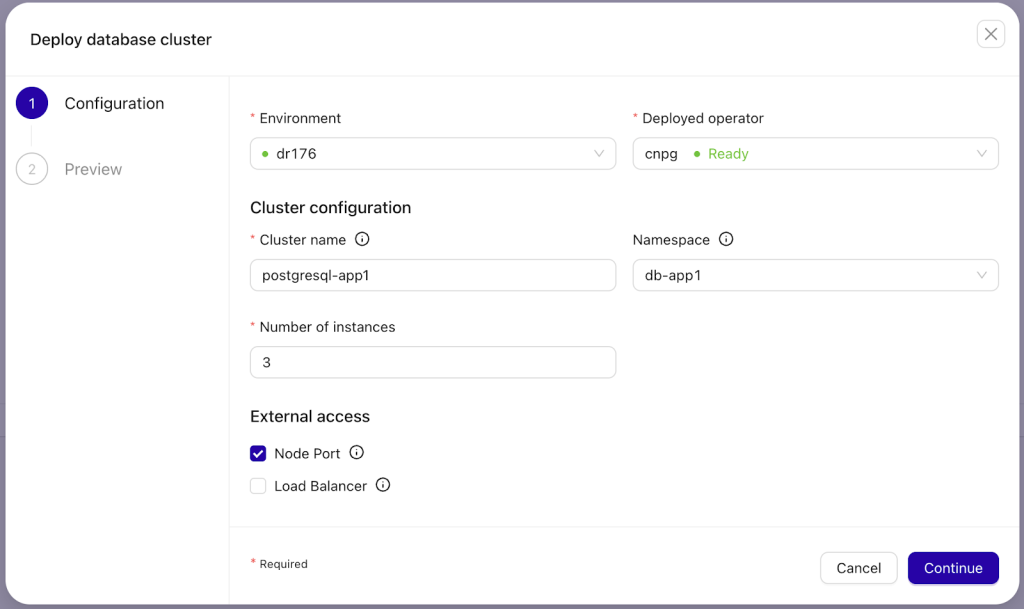
Once the deployment is complete and the cluster status shows “Operational” in green, your 3-node PostgreSQL streaming replication cluster, running in a container environment managed by Kubernetes, will be ready for access.
To access the cluster, navigate to the cluster list. ClusterControl will then present the connection details and admin user credentials:
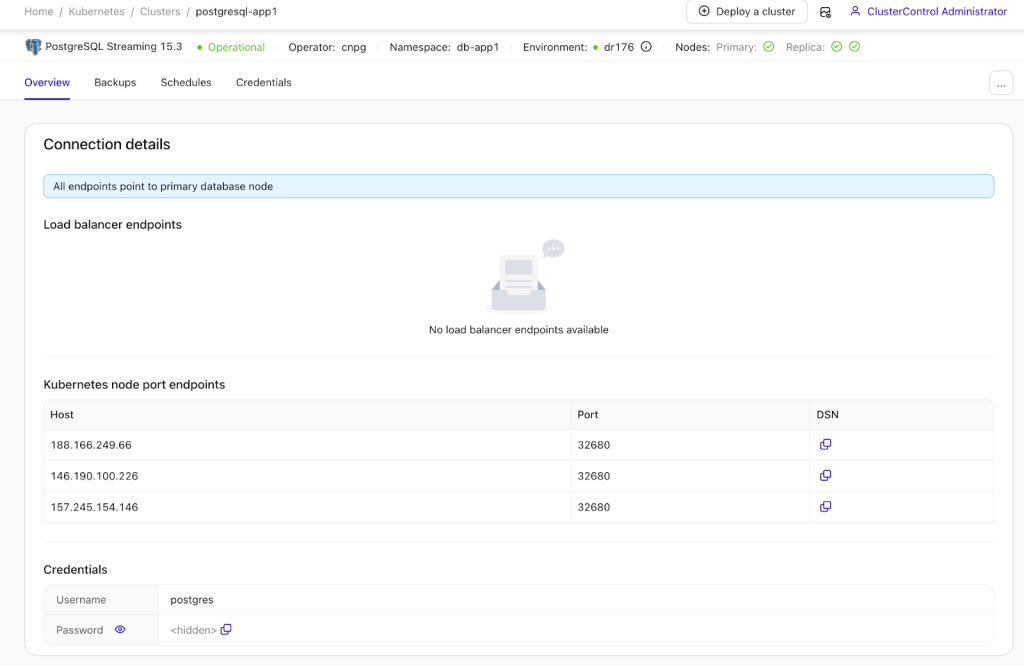
Database clusters are now fully operational on containers, managed by a Kubernetes operator. This includes high availability, backups, scheduling, and user management.
Wrapping up
The integration of powerful DevOps tools like Terraform and Ansible with a specialized database management system like ClusterControl transforms the traditional, time-consuming process of database deployment into a rapid, automated workflow. You can indeed replicate the speed and agility of cloud deployments within your on-premise or hybrid environments. This blueprint empowers you to consistently spin up production-grade database clusters within hours, not days, significantly reducing your time to market and improving operational efficiency.
Try this out yourself by downloading ClusterControl for free using the instructions below.
Install ClusterControl in 10-minutes. Free 30-day Enterprise trial included!
Script Installation Instructions
The installer script is the simplest way to get ClusterControl up and running. Run it on your chosen host, and it will take care of installing all required packages and dependencies.
Offline environments are supported as well. See the Offline Installation guide for more details.
On the ClusterControl server, run the following commands:
wget https://severalnines.com/downloads/cmon/install-cc
chmod +x install-cc
With your install script ready, run the command below. Replace S9S_CMON_PASSWORD and S9S_ROOT_PASSWORD placeholders with your choice password, or remove the environment variables from the command to interactively set the passwords. If you have multiple network interface cards, assign one IP address for the HOST variable in the command using HOST=<ip_address>.
S9S_CMON_PASSWORD=<your_password> S9S_ROOT_PASSWORD=<your_password> HOST=<ip_address> ./install-cc # as root or sudo userAfter the installation is complete, open a web browser, navigate to https://<ClusterControl_host>/, and create the first admin user by entering a username (note that “admin” is reserved) and a password on the welcome page. Once you’re in, you can deploy a new database cluster or import an existing one.
The installer script supports a range of environment variables for advanced setup. You can define them using export or by prefixing the install command.
See the list of supported variables and example use cases to tailor your installation.
Other Installation Options
Helm Chart
Deploy ClusterControl on Kubernetes using our official Helm chart.
Ansible Role
Automate installation and configuration using our Ansible playbooks.
Puppet Module
Manage your ClusterControl deployment with the Puppet module.
ClusterControl on Marketplaces
Prefer to launch ClusterControl directly from the cloud? It’s available on these platforms: