blog
How to Secure MongoDB From Ransomware – Ten Tips

What is Ransomware?
According to the definition, ransomware is malware that secretly installs on your computer, encrypts your files and then demands a ransom to be paid to unlock your files or not publish them publicly. The ransomware that hit MongoDB users in various forms over the past weeks applies mostly to this definition. However it is not malware that hits the MongoDB instances, but it is a scripted attack from outside.
Once the attackers have taken control over your MongoDB instance, most of them hijack your data by copying it onto their own storage. After making a copy they will erase the data on your server, and leave a database with a single collection demanding ransom for your data. In addition, some also threaten to erase the backup that they hold hostage if you don’t pay within 3 days. Some victims, who allegedly paid, in the end never received their backup.
Why is This Happening
The attackers are currently scanning for MongoDB instances that are publicly available, meaning anyone can connect to these servers by a simple MongoDB connect. If the server instance does not have authentication enabled, anyone can connect without providing a username and password. Also, the lack of authentication implies there is no authorization in place, and anyone connecting will be treated as an administrator of the system. This is very dangerous as now, anyone can perform administrative tasks like changing data, creating users or dropping databases.
By default MongoDB doesn’t enable authentication in its configuration, it is assumed that limiting the MongoDB server to only listen on localhost is sufficient protection. This may be true in some use cases, but anyone using MongoDB in a multi-tenant software stack will immediately enable the MongoDB server to also listen on other network devices. If these hosts can also be accessed from the internet, this poses a big threat. This is a big shortcoming of the default installation of the MongoDB installation process.
MongoDB itself can’t be fully blamed for this, as they encourage to enable authentication and do provide a tutorial on how to enable authentication and authorization. It is the user that doesn’t apply this on their publicly accessible MongoDB servers. But what if the user never knew the server was publicly available?
Ten Tips on How to Secure Your MongoDB Deployments
Tip 1: Enable Authentication
This is the easiest solution to keep unwanted people outside: simply enable authentication in MongoDB. To explicitly do this, you will need to put the following lines in the mongod.conf:
security:
    Authentication: on
If you have set the replication keyfile in the mongod.conf, you will also implicitly enable authentication.
As most current attackers are after easy-to-hijack instances, they will not attempt to break into a password protected MongoDB instance.
Tip 2: Don’t use Weak Passwords
Enabling authentication will not give you 100% protection against any attack. Trying weak passwords may be the next weapon of choice for the attackers. Currently MongoDB does not feature a (host) lockout for too many wrong user/password attempts. Automated attacks may be able to crack weak passwords in minutes.
Setup passwords according to good and proven password guidelines, or make use of a strong password generator.
Tip 3: Authorize Users by Roles
Even if you have enabled authentication, don’t just give every user an administrative role. This would be very convenient from the user perspective as they can literally perform every task thinkable, and don’t require to wait for a DBA to execute this task. But for any attacker, this is just as convenient: as soon as they have entry to one single account, they also immediately have the administrative role.
MongoDB has a very strong diversification of roles, and for any type of task an applicable role is present. Ensure that the user carrying the administrative role is a user that isn’t part of the application stack. This should slim down the chances of an account breach to result into disaster.
When provisioning MongoDB from ClusterControl, we deploy new MongoDB replicaSets and sharded clusters with a separate admin and backup user.
Tip 4: Add a Replication Keyfile
As mentioned before in Tip #1, enabling the replication keyfile will implicitly enable authentication in MongoDB. But there is a much more important reason to add a replication keyfile: once added, only hosts with the file installed are able to join the replicaSet.
Why is this important? Adding new secondaries to a replicaSet normally requires the clusterManager role in MongoDB. Without authentication, any user can add a new host to the cluster and replicate your data over the internet. This way the attacker can silently and continuously tap into your data.
With the keyfile enabled, the authentication of the replication stream will be encrypted. This ensures nobody can spoof the ip of an existing host, and pretend to be another secondary that isn’t supposed to be part of the cluster. In ClusterControl, we deploy all MongoDB replicaSets and sharded clusters with a replication keyfile.
Tip 5: Make Backups Regularly
Schedule backups, to ensure you always have a recent copy of your data. Even if the attacker is able to remove your databases, they don’t have access to your oplog. So if your oplog is large enough to contain all transactions since the last backup, you can still make a point in time recovery with a backup and replay the oplog till the moment the attacker started to remove data.
ClusterControl has a very easy interface to schedule (shard consistent) backups, and restoring your data is only one click away.
Tip 6: Run MongoDB on a Non-Standard Port
As most attackers are only scanning for the standard MongoDB ports, you could reconfigure MongoDB to run on a different port. This would not stop attackers who perform a full port scan, they will still discover an open MongoDB instance.
Standard ports are:
- 27017 (mongod / mongos)
- 27018 (mongod in sharded environments)
- 27019 (configservers)
- 2700x (some MongoDB tutorials)
This requires the following line to be added/changed in the mongod.conf and a restart is required:
net:
   port: 17027
In ClusterControl, you can deploy new MongoDB replicaSets and sharded clusters with custom port numbers.
Tip 7: Does Your Application Require Public Access?
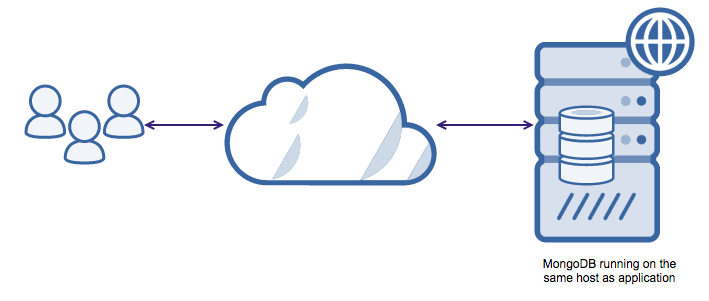
If you have enabled MongoDB to be bound on all interfaces, you may want to review if your application actually needs external access to the datastore. If your application is a single hosted solution and resides on the same host as the MongoDB server, it can suffice by binding MongoDB to localhost.
This requires the following line to be added/changed in the mongod.conf and a restart is required:
net:
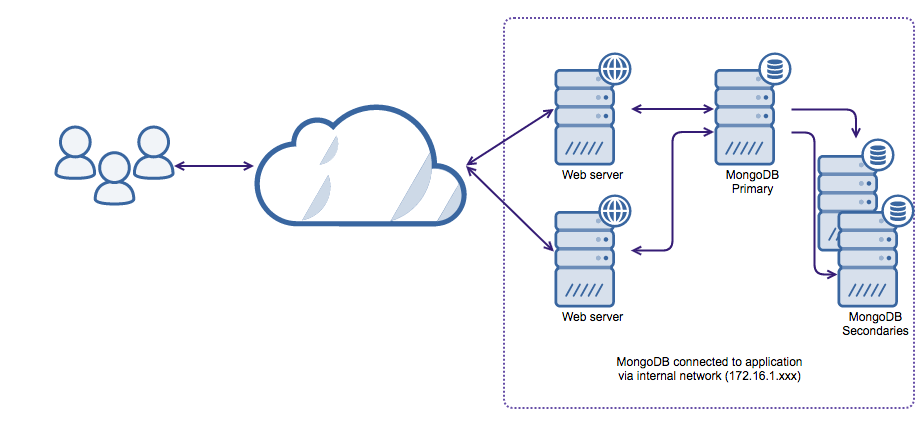
bindIp: 127.0.0.1In many hosting and cloud environments with multi-tenant architectures, applications are put on different hosts than where the datastore resides. The application then connects to the datastore via the private (internal) network. If this applies to your environment, you need to ensure to bind MongoDB only to the private network.
This requires the following line to be added/changed in the mongod.conf and a restart is required:
net:
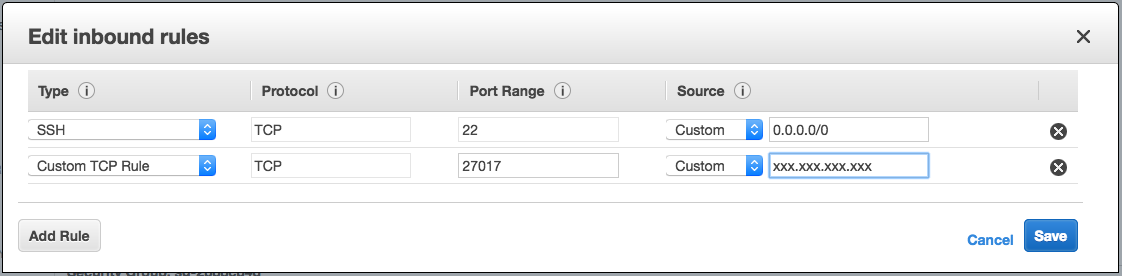
bindIp: 127.0.0.1,172.16.1.234Tip 8: Enable Firewall Rules or Security groups
It is a good practice to enable firewall rules on your hosts, or security groups with cloud hosting. Simply disallowing the MongoDB port ranges from outside will keep most attackers outside.
There would still be another way to get in: from the inside. If the attacker would gain access to another host in your private (internal) network, they still could access your datastore. A good example would be proxying tcp/ip requests via a http server. Add firewall rules to the MongoDB instance and deny any other host except the hosts that you know for sure need access. This should, at least, limit the number of hosts that could potentially be used to get your data. And as indicated in Tip 1: enable authentication, even if someone proxies into your private network they can’t steal your data.
Also, if your application does require MongoDB to be available on the public interface, you can limit the hosts accessing the database by simply adding similar firewall rules.
Tip 9: Go Hack Yourself ! Check for External Connectivity
To guarantee that you have followed all previous tips, simply test if anything is exposed from external. If you don’t have a host that is outside your hosting environment, a cloud box at any hosting provider would suffice for this check.
From external, check if you can connect to your host via telnet on the command line.
In case you did change the port number of MongoDB, use the appropriate port here.
telnet your.host.com 27017If this command returns something similar to this, the port is open:
Trying your.host.com...
Connected to your.host.com.
Escape character is '^]'.
Another method of testing would be installing nmap on the host and testing it against your host:
[you@host ~]$ sudo yum install nmap
[you@host ~]$ nmap -p 27017 --script mongodb-databases your.host.com
If nmap is able to connect, you will see something similar to this:
PORT      STATE SERVICE REASON
27017/tcp open  unknown syn-ack
| mongodb-databases:
|   ok = 1
|   databases
|     1
|       empty = false
|       sizeOnDisk = 83886080
|       name = test
|     0
|       empty = false
|       sizeOnDisk = 83886080
|       name = yourdatabase
|     2
|       empty = true
|       sizeOnDisk = 1
|       name = local
|     2
|       empty = true
|       sizeOnDisk = 1
|       name = admin
|_  totalSize = 167772160
If you only enabled authentication, nmap is able to open the open port but not list the databases:
Starting Nmap 6.40 ( http://nmap.org ) at 2017-01-16 14:36 UTC
Nmap scan report for 10.10.22.17
Host is up (0.00031s latency).
PORT      STATE SERVICE
27017/tcp open  mongodb
| mongodb-databases:
|   code = 13
|   ok = 0
|_  errmsg = not authorized on admin to execute command { listDatabases: 1.0 }
And if you managed to secure everything from external, the output would look similar to this:
Starting Nmap 6.40 ( http://nmap.org ) at 2017-01-16 14:37 UTC
Nmap scan report for 10.10.22.17
Host is up (0.00013s latency).
PORT      STATE  SERVICE
27017/tcp closed unknown
If nmap is able to connect to MongoDB, with or without authentication enabled, it can identify which MongoDB version you are running with the mongodb-info flag:
[you@host ~]$ nmap -p 27017 --script mongodb-info 10.10.22.17

Starting Nmap 6.40 ( http://nmap.org ) at 2017-01-16 14:37 UTC
Nmap scan report for 10.10.22.17
Host is up (0.00078s latency).
PORT      STATE SERVICE
27017/tcp open  mongodb
| mongodb-info:
|   MongoDB Build info
|     javascriptEngine = mozjs
|     buildEnvironment
|       distmod =
|       target_arch = x86_64
…
|     openssl
|       running = OpenSSL 1.0.1e-fips 11 Feb 2013
|       compiled = OpenSSL 1.0.1e-fips 11 Feb 2013
|     versionArray
|       1 = 2
|       2 = 11
|       3 = -100
|       0 = 3
|     version = 3.2.10-3.0
…
|   Server status
|     errmsg = not authorized on test to execute command { serverStatus: 1.0 }
|     code = 13
|_    ok = 0
As you can see, the attacker can identify your version, build environment and even the OpenSSL libraries it is compiled against. This enables attackers to even go beyond simple authentication breaches, and exploit vulnerabilities for your specific MongoDB build. This is why it is essential to not expose MongoDB to outside your private network, and also why you need to update/patch your MongoDB servers on a regular basis.
Tip 10: Check for Excessive Privileges
Even if you have implemented all tips above, it wouldn’t hurt to go through all databases in MongoDB and check if any user has excessive privileges. As MongoDB authenticates your user against the database that you connect to, it could be the case that the user also has been granted additional rights to other databases.
For example:
use mydatastore
db.createUser(
  {
    user: "user",
    pwd: "password",
    roles: [ { role: "readWrite", db: "mysdatastore" },
             { role: "readWrite", db: "admin" } ]
  }
);
In addition to a weak password and the readWrite privileges on the mydatastore database, this user also has readWrite privileges on the admin database. Connecting to mydatastore and switching the database to the admin database will not issue re-authentication. In contrary: this user is allowed to read and write to the admin database.
This is a good reason to review the privileges of your users on a regular basis. You can do this by the following command:
my_mongodb_0:PRIMARY> use mydatastore
switched to db mydatastore
my_mongodb_0:PRIMARY> db.getUsers();
[
    {
        "_id" : "mysdatastore.user",
        "user" : "user",
        "db" : "mysdatastore",
        "roles" : [
            {
                "role" : "readWrite",
                "db" : "mysdatastore"
            },
            {
                "role" : "readWrite",
                "db" : "admin"
            }
        ]
    }
]
As you need to repeat this process per database, this can be a lengthy and cumbersome exercise. In ClusterControl, we have an advisor that performs this check on a daily basis. ClusterControl advisors are open source, and these advisors are part of the free version of ClusterControl.
That’s all folks! Do not hesitate to get in touch if you have any questions on how to secure your database environment.