blog
How to Migrate Your Application to Amazon Virtual Private Cloud Without Downtime

With datacenters being stretched by resource-intensive applications, more and more businesses are outgrowing their existing in-house capacity and having to reconfigure their IT operations. But how do you migrate a busy application to a totally new data center without downtime? How will the application scale in a virtualized cloud environment? And how do you guard against cloud server failures and keep a high level of uptime?

In this example, we will show you how to migrate a Web application (WordPress) from a local data center to a AWS VPC. Without downtime even!
Main steps:
- Setup the cloud servers (for web server + database)
- Install Galera Cluster and ClusterControl
- Setup MySQL replication between the single instance MySQL (local) to Galera Cluster (remote)
- Sync your application to the cloud site
- Switch the DNS to the new site
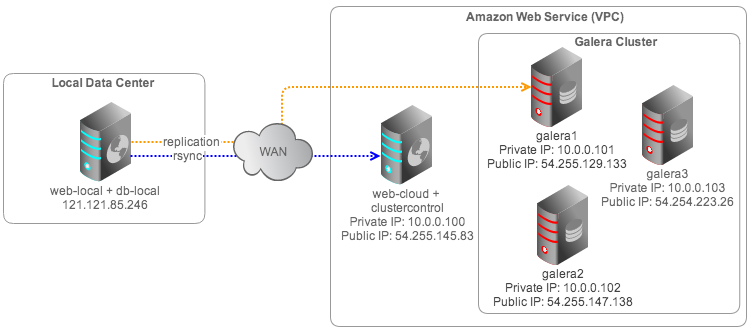
Note that we will cluster the database using Galera Cluster. This will make sure the database is load balanced on multiple servers, and failure handling and recovery is all managed by the cluster software. In our test scenario, we will deploy one web server with WordPress, but it is of course possible to add more web server instances and replicate the filesystem. See this blog for more info.
The high-level architecture can be illustrated as follows:
Setup Cloud Servers
1. We will deploy a Virtual Private Cloud (VPC) in AWS so we can assign a static private IP address on each node. Login to the AWS management console and choose “VPC with a Single Public Subnet”. Configure the VPC name and subnet as follows:
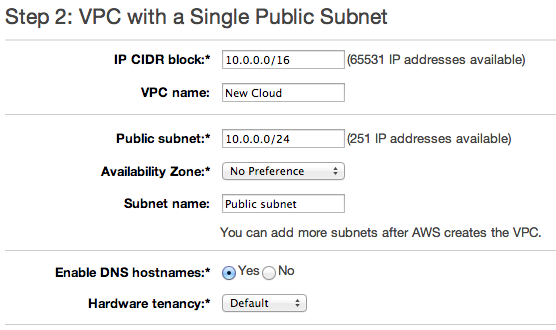
And click “Create VPC” to start creating your private cloud.
2. Next, launch a EC2 instance of your choice and make sure you assign a static IP address at following stage:
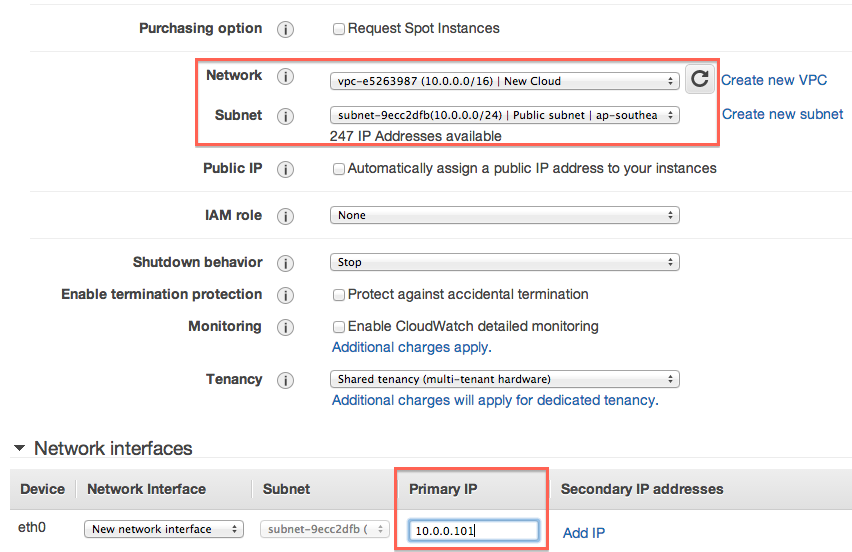
Repeat the same step to launch another three nodes for Galera.
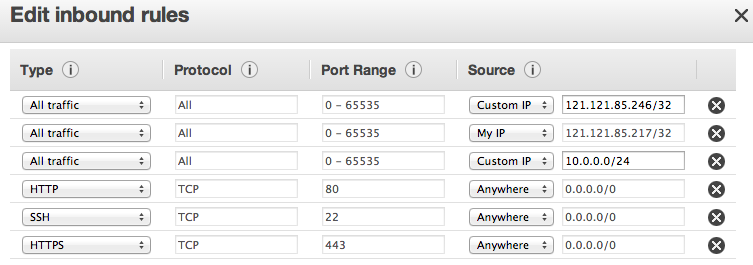
3. Configure the Security Group for the VPC to allow inbound connections from your IP, local data center IP, internal IP and also several ports related to the web service:
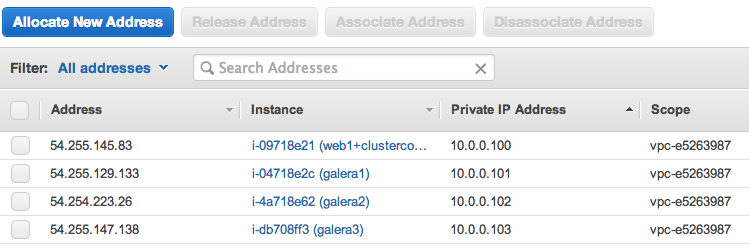
4. Then, assign public IP addresses to all nodes. We will use these IP addresses to communicate with the remote server in our local data center. Go to Elastic IP > Allocate New Address > choose VPC > click “Yes, Allocate”. Once done, you should get something like this:
Your cloud infrastructure is now ready for deployment.
Deploy Galera Cluster and HAproxy
1. Use the Galera Configurator to deploy a three-node Galera Cluster. Use galera1, galera2 and galera3 for the MySQL nodes, and web-cloud (10.0.0.100) for the ClusterControl node.
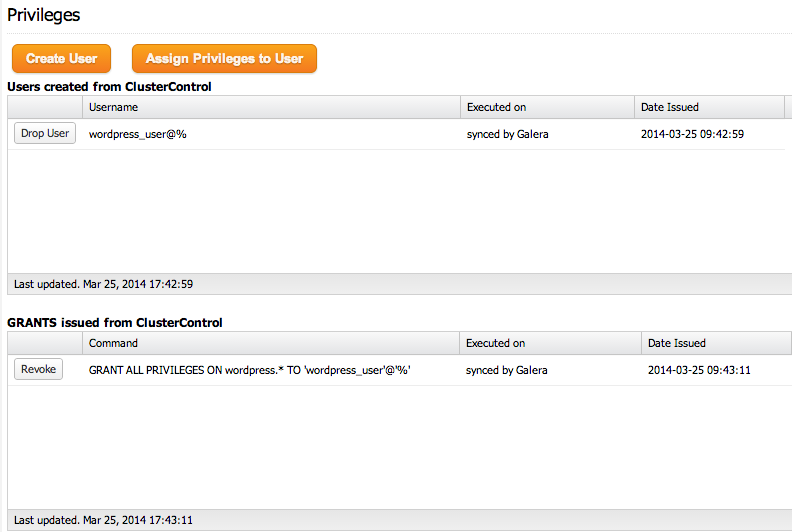
2. From the ClusterControl UI, create a schema called “wordpress” for the application by going to Manage >> Schema. Then create a user “wordpress_user” and assign all privileges to the schema with a wildcard host (‘%’), as per the screenshot below:
3. Add a load balancer on web-cloud by using the Add Load Balancer wizard, similar to the following screenshot:
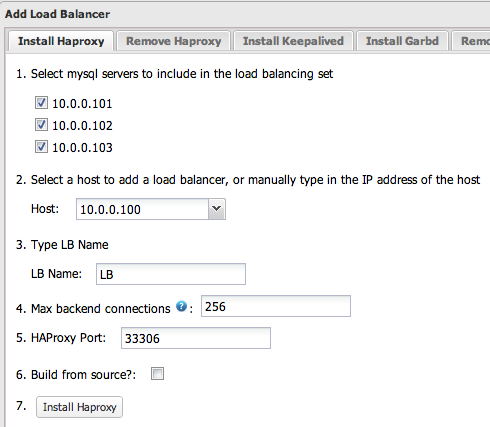
From now on, your WordPress application running on web-cloud should connect to the database through HAproxy IP, 54.255.145.83 on port 33306. Take note that this port is publicly accessible only from the local data center IP, as configured in the Security Group.
Setup MySQL Replication
1. To allow data to be synced between the local data center and the private cloud on AWS, we will replicate from the local MySQL instance to the remote Galera Cluster. Log into your local mysql instance, db-local and configure it as a master. Ensure the following lines exist in my.cnf:
[MYSQLD]
binlog-format=ROW
log-bin=binlog
expire-logs-days=7
server-id=1
Restart MySQL server to apply the change:
$ service mysql restart
2. Create a slave replication user from galera1 on db-local:
> GRANT REPLICATION SLAVE ON *.* TO 'slave'@'54.255.129.133' IDENTIFIED BY 'slavepassword'<span>;< span="">
> FLUSH PRIVILEGES<span>;< span=""></span>;<></span>;<>
3. We will configure galera1 to act as a slave chain, where it propagates the incoming replication stream to the rest of the Galera nodes:
[MYSQLD]
log-slave-updates=1
log-bin=binlog
expire-logs-days=7
server-id=2
Restart galera1 to apply the change. For ClusterControl users, just click the “Restart” button for that node under Manage > Configurations.
4. Log into db-local and dump out the schema and data:
$ mysqldump -uroot -p --no-data ---routines --triggers --databases wordpress > wordpress_schema.sql
$ mysqldump -uroot -p --no-create-info --master-data=1 wordpress > wordpress_data.sql
5. Log into galera1 and copy the dump file. Make sure you convert your tables to InnoDB to suit the Galera environment. Once done, proceed to restore the dump files:
$ scp [email protected]:~/wordpress_schema.sql .
$ scp [email protected]:~/wordpress_data.sql .
$ sed -i 's|MyISAM|InnoDB|g' ~/wordpress_schema.sql
$ mysql -uroot -p wordpress < ~/wordpress_schema.sql
$ mysql -uroot -p wordpress < ~/wordpress_data.sql
6. Start the replication slave replication from galera1:
> STOP SLAVE<span>;< span="">
> CHANGE MASTER TO MASTER_HOST='121.121.85.246', MASTER_USER='slave', MASTER_PASSWORD='slavepassword'<span>;< span="">
> START SLAVE<span>;< span=""></span>;<></span>;<></span>;<>
Monitor your slave output and verify the slave is running correctly:
...
	Slave_IO_Running: Yes
	Slave_SQL_Running: Yes
...
At this point, you should see some database activity in the ClusterControl dashboard.
Sync your Application
Following steps should be performed on web-cloud and web-local unless specified.
1. We will use BitTorrent Sync (btsync) to sync our application files to the external cloud server. We will setup btsync as described in this blog post through the btsync GUI. Both web-local and web-cloud are having identical application root directories located at /var/www/html/wordpress. The reason is that during the DNS propagation period, some users might still connected to the local site. We want to make sure that our external cloud setup gets all file changes during this propagation time. After the DNS propagation is complete, we will then shut down the local site.
Download btsync and extract it into /usr/bin:
$ wget --content-disposition http://download-lb.utorrent.com/endpoint/btsync/os/linux-x64/track/stable
$ tar -xzf btsync_x64.tar.gz -C /usr/bin/
2. Run btsync:
$ btsync
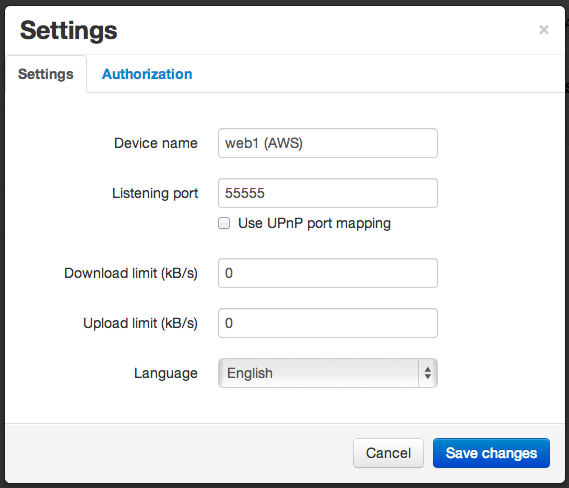
3. Access the btsync web GUI on port 8888, configure the device name and disable uPNP port mapping:
4. On web-local, go to “Add Folder” and generate a secret for the directory:
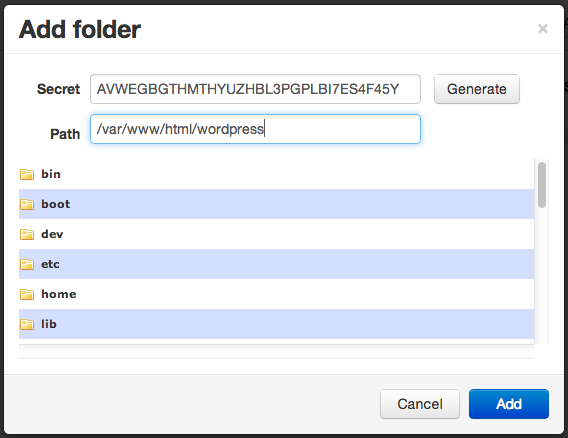
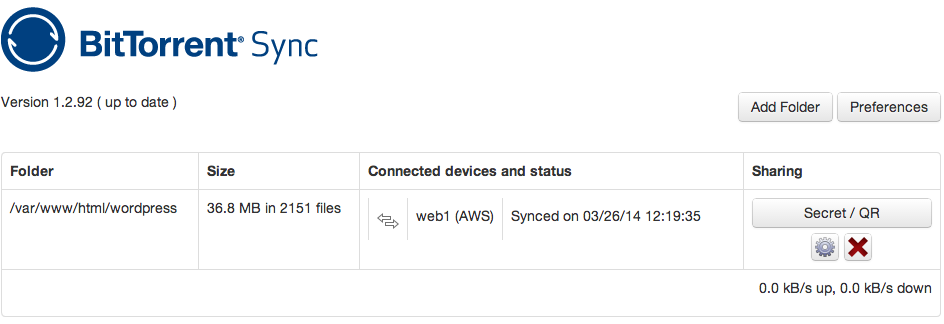
5. On web-cloud, go to “Add Folder” and add the same secret and path. Do not generate the secret again. You need to use the exact same secret so btsync can determine the connected sync devices. Once configured, btsync will start to sync:
6. Once synced, configure our WordPress site on AWS to use the Galera Cluster. Modify following values inside wp-config.php in web-cloud:
define('DB_NAME', 'wordpress')<span>;< span="">

/** MySQL database username */
define('DB_USER', 'wordpress_user')<span>;< span="">

/** MySQL database password */
define('DB_PASSWORD', 'password')<span>;< span="">

/** MySQL hostname */
define('DB_HOST', '54.255.145.83:33306')<span>;< span=""></span>;<></span>;<></span>;<></span>;<>
Both sites are now synced.
Note that the change above will be replicated to web-local, so the local WordPress instance will also access Galera cluster. From this point, the database on db-local will not be accessed anymore. During the DNS propagation which could take days to complete, users will be redirected to both the local web server and the cloud instance. Writes performed on the Galera Cluster are not replicated back to db-local.
You can proceed to update the DNS entry for your application.
Switch the DNS
Once everything is synced, we can now simply change the DNS to point to the Amazon VPC instance. Log into the name server provider and change the A record pointing to the new IP of the application. It also a good practice to reduce the TTL value beforehand to reduce the refresh time of the DNS entry.
Once the DNS propagation is complete, you can shutdown the site on the local data center. Congratulations, you have just migrated your application to a private cloud without downtime!


