blog
How to Backup and Restore ClusterControl

ClusterControl 1.7.1 introduced a new feature which allows you to backup your ClusterControl server and restore it (together with metadata about your managed databases) onto another server. It backs up the ClusterControl application as well as all its configuration data. Migrating ClusterControl to a new server used to be a pain, but not any more.
This blog post walks you through this new feature.
We will migrate ClusterControl from one server to another, preserving all the configurations and settings.
We will also show you how to transfer the management of a cluster from one ClusterControl instance to another.
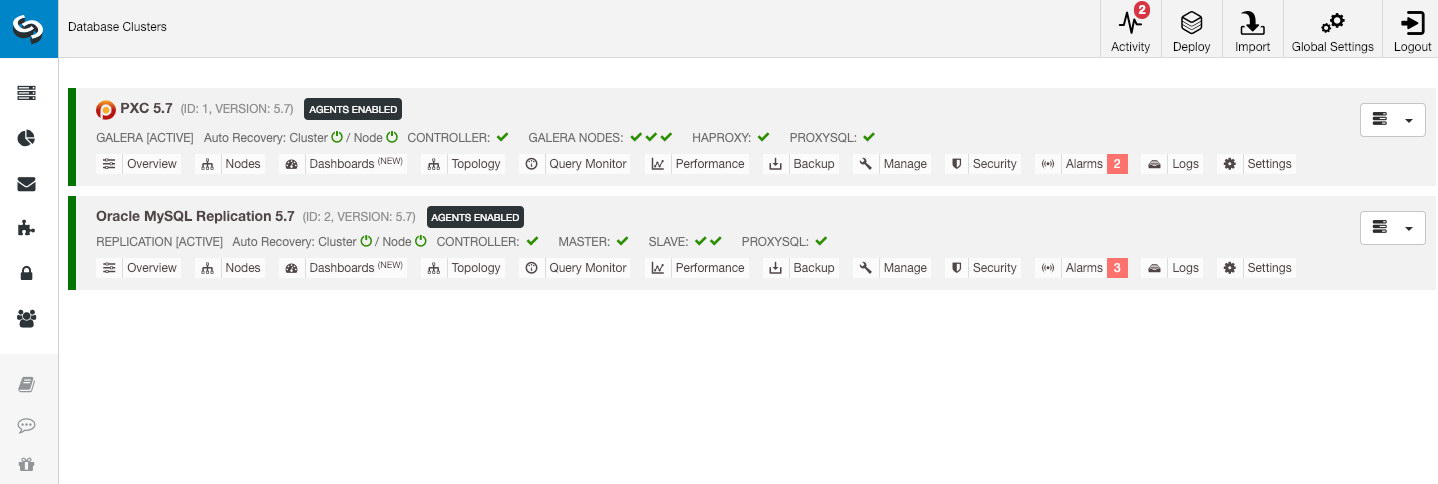
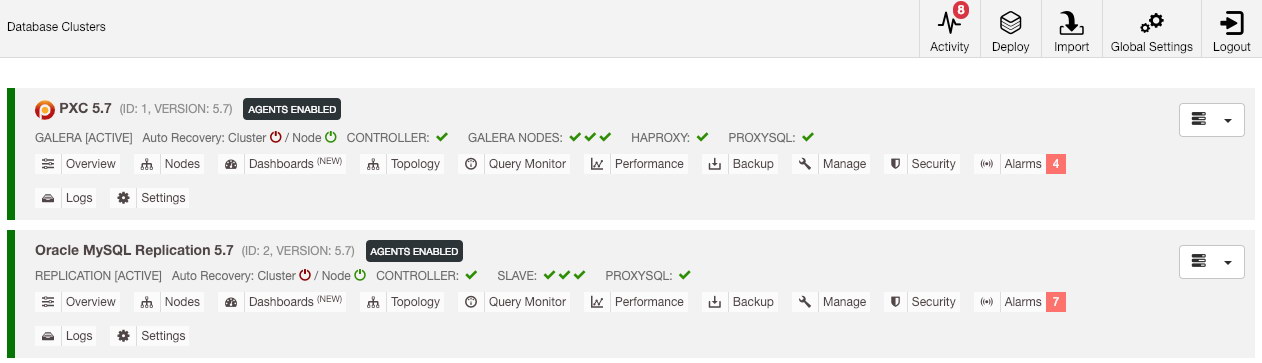
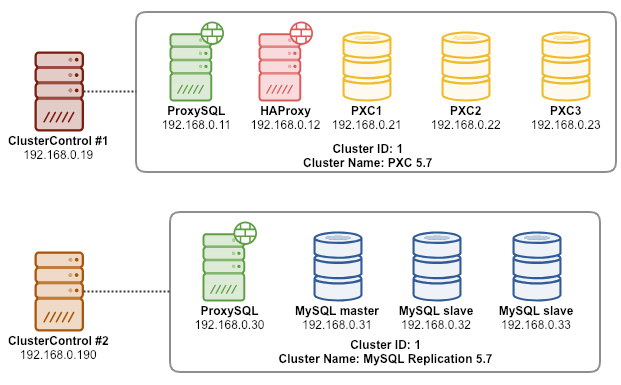
Our example architecture started with two production clusters (shown in the screenshot below):
- Cluster ID 1: 3 Galera nodes (PXC) + 1 HAProxy + 1 ProxySQL (5 nodes)
- Cluster ID 2: 1 MySQL master + 2 MySQL slaves + 1 ProxySQL (4 nodes)
Introduction
ClusterControl CLI (s9s) is a command line interface tool to interact, control and manage database clusters using the ClusterControl Platform. Starting from version 1.4.1, the installer script will automatically install this package on the ClusterControl node.
There are basically 4 new options introduced under “s9s backup” command, which can be used to achieve our objective:
| Flag | Description |
|---|---|
| –save-controller | Saves the state of the controller into a tarball. |
| –restore-controller | Restores the entire controller from a previously created tarball (created by using the –save-controller |
| –save-cluster-info | Saves the information the controller has about one cluster. |
| –restore-cluster-info | Restores the information the controller has about a cluster from a previously created archive file. |
This blog post will cover example use cases on how to utilize those options. At the moment, they are in release candidate stage and only available via ClusterControl CLI tool.
Backing Up ClusterControl
In order to do this, the ClusterControl server must be at least on v1.7.1 and later. To backup ClusterControl controller, simply run the following command on the ClusterControl node as root user (or with sudo):
$ s9s backup
--save-controller
--backup-directory=$HOME/ccbackup
--output-file=controller.tar.gz
--log
The –output-file must be a filename or physical path (if you want to omit –backup-directory flag), and the file must not exist beforehand. ClusterControl won’t replace the output file if it already exists. By specifying –log, it will wait until the job is executed and the job logs will be shown in the terminal. The same logs can be accessed via ClusterControl UI under Activity -> Jobs -> Save Controller:
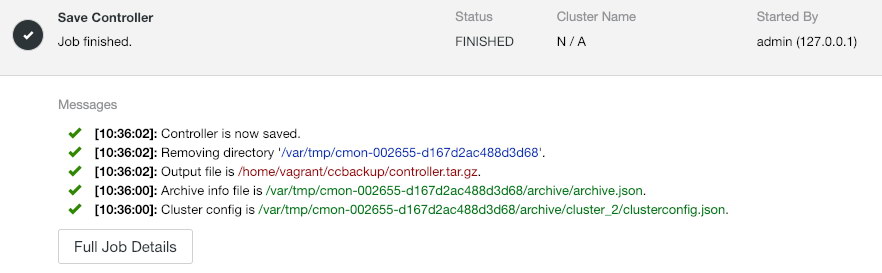
The ‘Save Controller’ job basically performs the following procedures:
- Retrieve the controller configuration and export it to JSON
- Export CMON database as MySQL dump file
- For every database cluster:
- Retrieve the cluster configuration and export it to JSON
In the output, you may notice the job found is N + 1 cluster, for example “Found 3 cluster(s) to save” even though we only have two database clusters. This includes cluster ID 0, which carries special meaning in ClusterControl as the global initialized cluster. However, it does not belong to CmonCluster component, which is the database cluster under ClusterControl management.
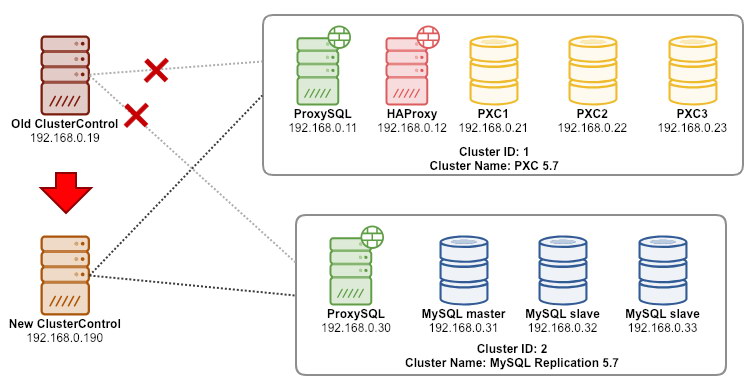
Restoring ClusterControl to a new ClusterControl Server
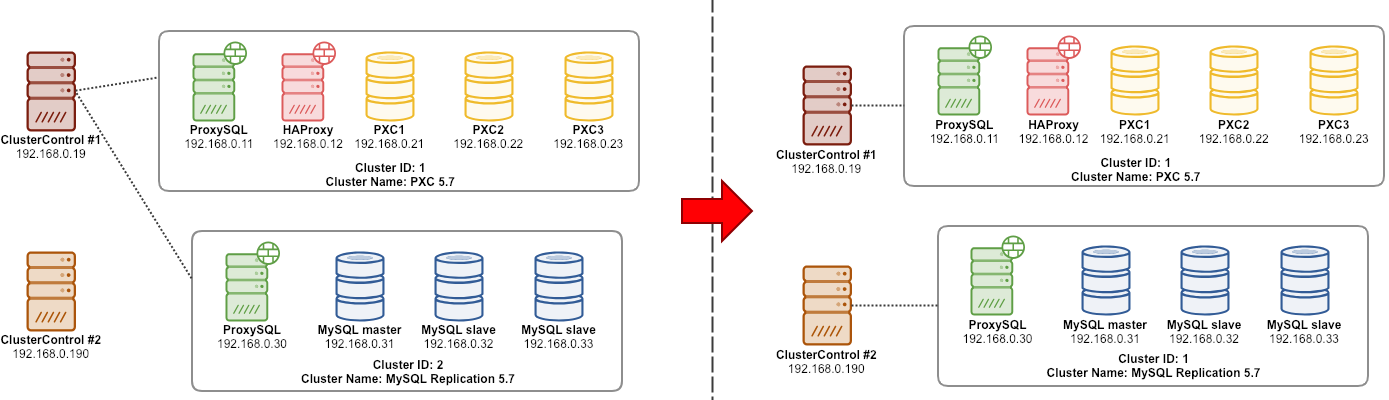
Supposed ClusterControl is already installed on the new server, we would like to migrate the database clusters to be managed by the new server. The following diagram illustrates our migration exercise:
Firstly, transfer the backup from the old server into the new server:
$ scp $HOME/ccbackup/controller.tar.gz 192.168.0.190:~Before we perform the restoration, we have to set up passwordless SSH to all nodes from the new ClusterControl server:
$ ssh-copy-id 192.168.0.11 #proxysql cluster 1
$ ssh-copy-id 192.168.0.12 #proxysql cluster 1
$ ssh-copy-id 192.168.0.21 #pxc cluster 1
$ ssh-copy-id 192.168.0.22 #pxc cluster 1
$ ssh-copy-id 192.168.0.23 #pxc cluster 1
$ ssh-copy-id 192.168.0.30 #proxysql cluster 2
$ ssh-copy-id 192.168.0.31 #mysql cluster 2
$ ssh-copy-id 192.168.0.32 #mysql cluster 2
$ ssh-copy-id 192.168.0.33 #mysql cluster 2
Then, on the new server, perform the restoration:
$ s9s backup
--restore-controller
--input-file=$HOME/controller.tar.gz
--debug
--log
Then we have to sync the cluster in the UI by going to Global Settings -> Cluster Registrations -> Synchronize Cluster. Then if you go back to the ClusterControl main dashboard, you would see the following:
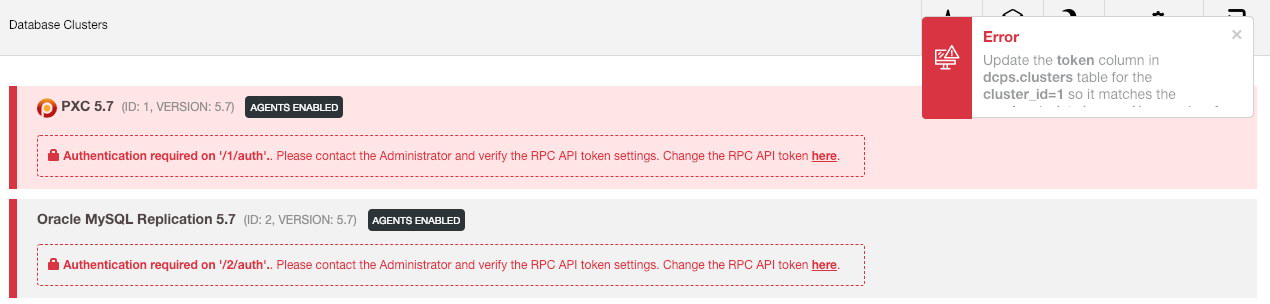
Don’t panic. The new ClusterControl UI is not able to retrieve the monitoring and management data because of incorrect RPC API token. We just need to update it accordingly. First, retrieve the rpc_key value for the respective clusters:
$ cat /etc/cmon.d/cmon_*.cnf | egrep 'cluster_id|rpc_key'
cluster_id=1
rpc_key=8fgkzdW8gAm2pL4L
cluster_id=2
rpc_key=tAnvKME53N1n8vCC
In the UI, click the link “here” at the then of the “Change the RPC API token here” line. It will pop up the following dialog:
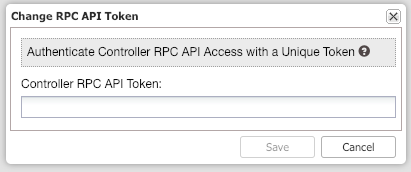
Paste the respective rpc_key value in the text field and click Save. Repeat for the next cluster. Wait for a moment and the cluster list should be refreshed automatically.
The last step is to fix the MySQL cmon user privileges for the new ClusterControl IP address changes, 192.168.0.190. Login to one of the PXC node and run the following:
$ mysql -uroot -p -e 'GRANT ALL PRIVILEGES ON *.* TO cmon@"192.168.0.190" IDENTIFIED BY "" WITH GRANT OPTION'; ** Replace
Once the privilege is set up, you should see the cluster list is in green, similar to the old one:
It’s worth to mention that by default, ClusterControl will disable the cluster automatic recovery (as you can see the red icon next to the word ‘Cluster’) to avoid race condition with another ClusterControl instance. It’s recommended to enable this feature (by clicking the icon to green) once the old server has been decommissioned.
Our migration is now completed. All the configurations and settings from the old server are preserved and transferred to the new server.
Migrating the Management of a Cluster to Another ClusterControl Server
Backing Up Cluster Information
This is about backing up cluster metadata and information so we can transfer it to another ClusterControl server, also known as partial backup. Otherwise, we have to perform “Import Existing Server/Cluster” to re-import them into the new ClusterControl which means you would lose the monitoring data from the old server. If you have load balancers or asynchronous slave instances, this would have to be imported once the cluster is imported, one node at a time. So it is a bit hassle if you have a complete set of production setup.
The cluster “manager” migration exercise is illustrated in the following diagram:
Basically, we want to migrate out our MySQL Replication (cluster ID: 2) to be managed by another ClusterControl instance. We are going to use –save-cluster-info and –restore-cluster-info options for this one. The –save-cluster-info option will export the corresponding cluster information to be saved somewhere else. Let’s export our MySQL Replication Cluster (cluster ID: 2). On the current ClusterControl server, do:
$ s9s backup
--save-cluster-info
--cluster-id=2
--backup-directory=$HOME/ccbackup
--output-file=cc-replication-2.tar.gz
--log
You will see a bunch of new lines printed in the terminal, indicating the backup job is running (the output is also accessible via ClusterControl -> Activity -> Jobs):
If you look at the job logs closely, you would notice the job was trying to export all the related information and metadata for cluster ID 2. The output is stored as a compressed file and located under path that we have specified under using –backup-directory flag. If this flag is ignored, ClusterControl will save the output to the default backup directory which is the home directory of the SSH user, under $HOME/backups.
Restoring Cluster Information
The steps explained here are similar with the restoration steps for ClusterControl full backup. Transfer the backup from the current server to the other ClusterControl server:
$ scp $HOME/ccbackup/cc-replication-2.tar.gz 192.168.0.190:~Before we perform the restoration, we have to set up passwordless SSH to all nodes from the new ClusterControl server:
$ ssh-copy-id 192.168.0.30 #proxysql cluster 2
$ ssh-copy-id 192.168.0.31 #mysql cluster 2
$ ssh-copy-id 192.168.0.32 #mysql cluster 2
$ ssh-copy-id 192.168.0.33 #mysql cluster 2
$ ssh-copy-id 192.168.0.19 #prometheus cluster 2
Then, on the new server, perform the cluster information restoration for our MySQL Replication:
$ s9s backup
--restore-cluster-info
--input-file=$HOME/cc-replication-2.tar.gz
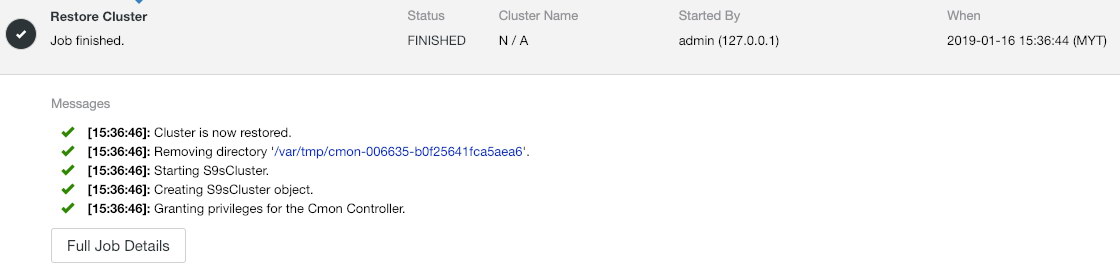
--logYou can verify the progress under Activity -> Jobs -> Restore Cluster:
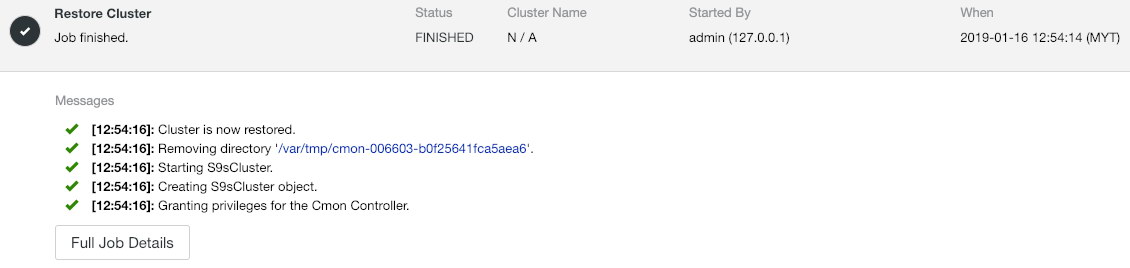
If you look at the job messages closely, you can see that ClusterControl automatically re-assigns cluster ID to 1 on this new instance (it was cluster ID 2 on the old instance).
Then sync the cluster in the UI by going to Global Settings -> Cluster Registrations -> Synchronize Cluster. If you go back to the ClusterControl main dashboard, you would see the following:

The error means the new ClusterControl UI is not able to retrieve the monitoring and management data because of incorrect RPC API token. We just need to update it accordingly. Firstly, retrieve the rpc_key value for our cluster ID 1:
$ cat /etc/cmon.d/cmon_1.cnf | egrep 'cluster_id|rpc_key'
cluster_id=1
rpc_key=tAnvKME53N1n8vCC
In the UI, click the link “here” at the then of the “Change the RPC API token here” line. It will pop up the following dialog:
Paste the respective rpc_key value in the text field and click Save. Wait for a moment and the cluster list should be refreshed automatically.
The last step is to fix the MySQL cmon user privileges for the new ClusterControl IP address changes, 192.168.0.190. Login to the master node (192.168.0.31) and run the following statement:
$ mysql -uroot -p -e 'GRANT ALL PRIVILEGES ON *.* TO cmon@"192.168.0.190" IDENTIFIED BY "" WITH GRANT OPTION'; ** Replace
You may also revoke the old user privileges (revoke won’t delete the user) or simply drop the old user:
$ mysql -uroot -p -e 'DROP USER cmon@"192.168.0.19"'Once the privilege is set up, you should see everything is green:

At this point, our architecture is looking something like this:
Our migration exercise is now complete.
Final Thoughts
It’s now possible to perform full and partial backup of your ClusterControl instances and the clusters they manage, allowing you to move them freely between hosts with little efforts. Suggestions and feedback are welcome.


