blog
High-Availability Openstack on a Shoestring Budget: Deploying a Minimal 3-Node Cluster

As OpenStack deployments mature from evaluation/development to production environments supporting apps and services, high-availability becomes a key requirement. In a previous post, we showed you how to cluster the database backend – which is central to the operation of OpenStack. In that setup, you would have two controllers, while placing a 3-node Galera cluster on separate hosts. Now, it can be quite a leap to go from one VM with all services running on it, to a fully distributed setup with 5 VMs. The good news is that you can have a highly available setup starting with just 3 VMs.
In this post, we are going to show you how to cluster OpenStack Havana in a minimal node setup with 2 controllers and one compute node. Our controllers will be running all OpenStack services, as well as clustered RabbitMQ and MySQL. A third node will have a mandatory Galera Arbitrator (garbd) colocated with a ClusterControl server. The third node can also serve as an OpenStack compute node.
Prerequisites
We will be using Ubuntu 12.04 LTS 64bit codename Precise on all of our hosts. The installation will be performed as root user, so we expect invocation of “sudo -i” command on each SSH session. Make sure to install NTP service on all hosts and use ntpdate to sync from the controller node NTP daemon. IPtables is turned off by default. All hosts should have two network interfaces, one for external network while the other one is for OpenStack’s internal usage. Only the controller node has a static IP assigned on eth1 while others will remain unconfigured.
Our setup can be illustrated as follows:
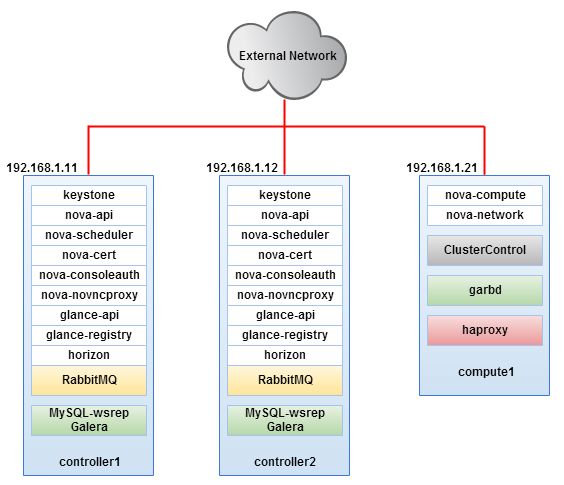
Hosts definition configured in /etc/hosts for every node will be as below:
192.168.1.11		controller1
192.168.1.12		controller2
192.168.1.21		compute1 clustercontrol controller mysql
Installing our Clustered Setup
Install Galera Cluster for MySQL
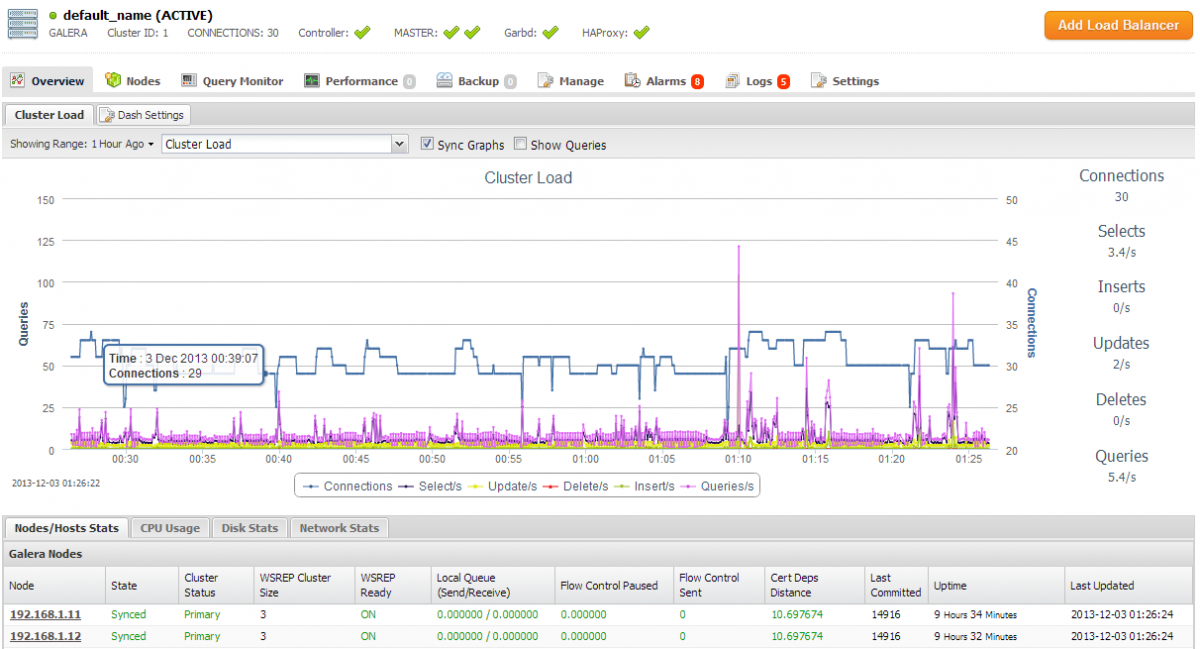
1. Follow the steps described in this blog post to deploy MySQL Galera Cluster on controller1 and controller2 from compute1. Once done, make sure two masters with a garbd node appear in the ClusterControl summary bar:

Install HAproxy
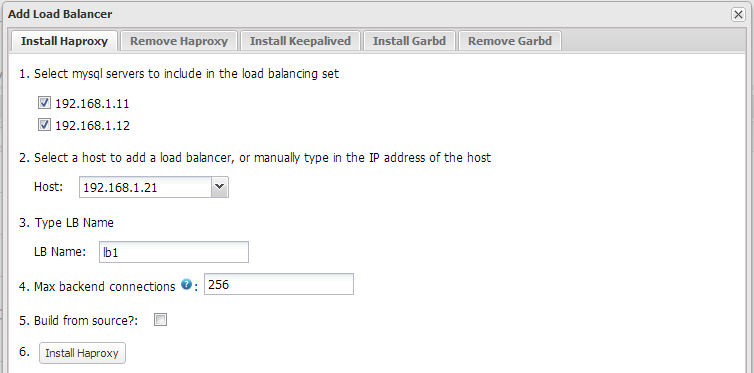
1. We will setup HAproxy to load balance MySQL Galera Cluster and other OpenStack services. From the ClusterControl UI click “Add Load Balancer” button and setup the compute1 host as the load balancer, similar to screenshot below:
Make sure HAPROXY appears with a green tick on the summary bar:

At the moment, HAproxy loadbalances MySQL requests on port 33306 on the ClusterControl node.
2. Add following lines into /etc/haproxy/haproxy.cfg:
listen glance_api_cluster
	bind *:9292
	balance  source
	option  tcpka
	option  httpchk
	option  tcplog
	server controller1 192.168.1.11:9292 check inter 2000 rise 2 fall 5
	server controller2 192.168.1.12:9292 check inter 2000 rise 2 fall 5

listen glance_registry_cluster
	bind *:9191
	balance  source
	option  tcpka
	option  tcplog
	server controller1 192.168.1.11:9191 check inter 2000 rise 2 fall 5
	server controller2 192.168.1.12:9191 check inter 2000 rise 2 fall 5

listen keystone_admin_cluster
	bind *:35357
	balance  source
	option  tcpka
	option  httpchk
	option  tcplog
	server controller1 192.168.1.11:35357 check inter 2000 rise 2 fall 5
	server controller2 192.168.1.12:35357 check inter 2000 rise 2 fall 5

listen keystone_public_internal_cluster
	bind *:5000
	balance  source
	option  tcpka
	option  httpchk
	option  tcplog
	server controller1 192.168.1.11:5000 check inter 2000 rise 2 fall 5
	server controller2 192.168.1.12:5000 check inter 2000 rise 2 fall 5

listen nova_ec2_api_cluster
	bind *:8773
	balance  source
	option  tcpka
	option  tcplog
	server controller1 192.168.1.11:8773 check inter 2000 rise 2 fall 5
	server controller2 192.168.1.12:8773 check inter 2000 rise 2 fall 5

listen nova_compute_api_cluster
	bind *:8774
	balance  source
	option  tcpka
	option  httpchk
	option  tcplog
	server controller1 192.168.1.11:8774 check inter 2000 rise 2 fall 5
	server controller2 192.168.1.12:8774 check inter 2000 rise 2 fall 5

listen nova_metadata_api_cluster
	bind *:8775
	balance  source
	option  tcpka
	option  tcplog
	server controller1 192.168.1.11:8775 check inter 2000 rise 2 fall 5
	server controller2 192.168.1.12:8775 check inter 2000 rise 2 fall 5
3. Restart HAproxy to apply the new changes:
$ /etc/init.d/haproxy restart
Add OpenStack Repository
The following steps should be performed on all nodes.
1. Get the latest Openstack release and perform upgrade before performing service installation:
$ apt-get install python-software-properties
$ add-apt-repository cloud-archive:havana
$ apt-get update
Install RabbitMQ Cluster
The following steps should be performed on controller nodes.
1. Install RabbitMQ (messaging server) packages:
$ apt-get install rabbitmq-server
2. Stop RabbitMQ service on controller1 and controller2:
$ service rabbitmq-server stop
3. RabbitMQ cluster requires the same cookie hash on all RabbitMQ nodes. On controller1, copy the cookie file to controller2:
$ scp /var/lib/rabbitmq/.erlang.cookie root@controller2:/var/lib/rabbitmq/.erlang.cookie
4. Start RabbitMQ on controller1 and controller2:
$ service rabbitmq-server start
5. Do not proceed with the next step if rabbitmq-server failed to start. On controller1, reset RabbitMQ to its virgin state:
$ rabbitmqctl stop_app
$ rabbitmqctl reset
$ rabbitmqctl start_app
6. Start the RabbitMQ clustering service by running following commands on controller2:
$ rabbitmqctl stop_app
$ rabbitmqctl reset
$ rabbitmqctl cluster rabbit@controller1
$ rabbitmqctl start_app
7. Verify the status of the RabbitMQ cluster:
$ rabbitmqctl cluster_status
Cluster status of node rabbit@controller2 ...
[{nodes,[{disc,[rabbit@controller1]},{ram,[rabbit@controller2]}]},
 {running_nodes,[rabbit@controller1,rabbit@controller2]}]
...done.
We can now proceed to install OpenStack services.
Install OpenStack Services
All steps under this section should be performed on both controller1 and controller2 unless specified.
1. We are going to install most of the OpenStack’s services as shown in the above diagram on the controllers node:
$ apt-get install keystone glance memcached libapache2-mod-wsgi openstack-dashboard node-less novnc nova-api nova-novncproxy nova-ajax-console-proxy nova-scheduler nova-conductor nova-consoleauth nova-doc nova-cert sheepdog
2. Update or add the database connection string for the following services:
Keystone – /etc/keystone/keystone.conf
[sql]
...
connection = mysql://keystone:keystonepassword@mysql:33306/keystone
...
Glance – /etc/glance/glance-api.conf and /etc/glance/glance-registry.conf
[DEFAULT]
...
sql_connection = mysql://glance:glancepassword@mysql:33306/glance
...
Nova – /etc/nova/nova.conf
[database]
connection = mysql://nova:novapassword@mysql:33306/nova
3. On controller1, create respective schema and MySQL user for Keystone, Nova, Glance and assign correct privileges. For Debian based OS, ClusterControl installs mysql client under /usr/local/mysql/bin. To connect to mysql server, use:
$ /usr/local/mysql/bin/mysql -uroot -p -h127.0.0.1
Run following queries:
mysql> CREATE SCHEMA keystone<span>;< span="">
mysql> GRANT ALL PRIVILEGES ON keystone.* TO 'keystone'@'%' IDENTIFIED BY 'keystonepassword'<span>;< span="">
mysql> CREATE SCHEMA glance<span>;< span="">
mysql> GRANT ALL PRIVILEGES ON glance.* TO 'glance'@'%' IDENTIFIED BY 'glancepassword'<span>;< span="">
mysql> CREATE SCHEMA nova<span>;< span="">
mysql> GRANT ALL PRIVILEGES ON nova.* TO 'nova'@'%' IDENTIFIED BY 'novapassword'<span>;< span="">
mysql> FLUSH PRIVILEGES<span>;< span=""></span>;<></span>;<></span>;<></span>;<></span>;<></span>;<></span>;<>
Keystone (Identity Service)
All steps should be performed on both controller1 and controller2 unless specified.
1. On controller1, generate a shared secret between Identity service and other OpenStack services:
$ openssl rand -hex 10
83f6ec04e6ec1652fc9f
2. Replace the ADMIN value under [DEFAULT] section in /etc/keystone/keystone.conf:
admin_token = 83f6ec04e6ec1652fc9f
3. Running through HAproxy requires Keystone to use following values in /etc/keystone/keystone.conf:
[ssl]
enable = False

[signing]
token_format = UUID
4. Restart Keystone:
$ service keystone restart
5. On controller1, initialize schema structure for Keystone:
$ keystone-manage db_sync
6. Export token and authorization URL to create a default user and service:
$ export OS_SERVICE_TOKEN=83f6ec04e6ec1652fc9f
$ export OS_SERVICE_ENDPOINT=http://controller:35357/v2.0
7. On controller1, create tenant for administrative user (admin) and OpenStack service (service). Create admin user, roles and assign the user with a tenant:
$ keystone tenant-create --name=admin --description="Admin Tenant"
$ keystone tenant-create --name=service --description="Service Tenant"
$ keystone user-create --name=admin --pass=adminpassword [email protected]
$ keystone role-create --name=admin
$ keystone user-role-add --user=admin --tenant=admin --role=admin
8. On controller 1, define identity service and API endpoints for Keystone. Note the id generated after the service creation and use it with the –service-id option for the next command:
$ keystone service-create --name=keystone --type=identity --description="Keystone Identity Service"
$ keystone endpoint-create
  --service-id=7691594b5b5746b38cdb1f82431fbf00
  --publicurl=http://controller:5000/v2.0
  --internalurl=http://controller:5000/v2.0
  --adminurl=http://controller:35357/v2.0
9. Create a Keystone runtime configuration so we can automate the authentication process when performing service installation:
$ vim ~/.keystonerc
And add following lines:
export OS_USERNAME=admin
export OS_PASSWORD=adminpassword
export OS_TENANT_NAME=admin
export OS_AUTH_URL=http://controller:35357/v2.0
10. Source the file to read in the environment:
$ source ~/.keystonerc
11. It is now safe to unset both OS_SERVICE_TOKEN and OS_SERVICE_ENDPOINT variables:
$ unset OS_SERVICE_TOKEN && unset OS_SERVICE_ENDPOINT
Glance (Image Service)
1. On controller1, create a user for glance and assign admin roles so that it can authenticate with Keystone:
$ keystone user-create --name=glance --pass=glancepassword [email protected]
$ keystone user-role-add --user=glance --tenant=service --role=admin
3. Edit /etc/glance/glance-api.conf and /etc/glance/glance-registry.conf and change the [keystone_authtoken] section as below:
[keystone_authtoken]
auth_host = controller
auth_port = 35357
auth_protocol = http
admin_tenant_name = service
admin_user = glance
admin_password = glancepassword
4. Edit /etc/glance/glance-api-paste.ini and /etc/glance/glance-registry-paste.ini and change the [filter:authtoken] section as below:
[filter:authtoken]
paste.filter_factory = keystoneclient.middleware.auth_token:filter_factory
auth_host = controller
admin_tenant_name = service
admin_user = glance
admin_password = glancepassword
5. On controller1, register Glance service with Keystone. Take note of the id value generated for this service and use it as –service-id for the next command:
$ keystone service-create --name=glance --type=image --description="Glance Image Service"
$ keystone endpoint-create
  --service-id=a685abec5ad84579a6189d6e19e4d9b1
  --publicurl=http://controller:9292
  --internalurl=http://controller:9292
  --adminurl=http://controller:9292
6. Restart Glance services:
$ service glance-registry restart
$ service glance-api restart
7. On controller1, initialize schema structure for Keystone:
$ glance-manage db_sync
8. To verify if the Glance installation is working, download CirrOS image and upload it to the Image service:
$ mkdir images
$ cd images
$ wget http://cdn.download.cirros-cloud.net/0.3.1/cirros-0.3.1-x86_64-disk.img
$ glance image-create --name="CirrOS 0.3.1" --disk-format=qcow2   --container-format=bare --is-public=true < cirros-0.3.1-x86_64-disk.img
Nova (Compute Service)
1. Add the following lines in /etc/nova/nova.conf on controller1, change the authentication to use Keystone and use RabbitMQ message broker under [DEFAULT] section:
[DEFAULT]
...
my_ip = 192.168.1.11
vncserver_listen = 192.168.1.11
vncserver_proxyclient_address = 192.168.1.11
auth_strategy = keystone
rpc_backend = nova.rpc.impl_kombu
rabbit_hosts = controller1:5672,controller2:5672
rabbit_retry_interval = 1
rabbit_retry_backoff = 2
rabbit_max_retries = 0
rabbit_durable_queues = false
rabbit_ha_queues = true
[database]
connection = mysql://nova:novapassword@mysql:33306/nova
2. Add the following lines in /etc/nova/nova.conf with IP address of controller2, change the authentication to use Keystone and use RabbitMQ message broker under [DEFAULT] section:
[DEFAULT]
...
my_ip = 192.168.1.12
vncserver_listen = 192.168.1.12
vncserver_proxyclient_address = 192.168.1.12
auth_strategy = keystone
rpc_backend = nova.rpc.impl_kombu
rabbit_hosts = controller1:5672,controller2:5672
rabbit_retry_interval = 1
rabbit_retry_backoff = 2
rabbit_max_retries = 0
rabbit_durable_queues = False
rabbit_ha_queues = True
[database]
connection = mysql://nova:novapassword@mysql:33306/nova
3. On controller1, create a user for nova and assign admin roles so that it can authenticate with Keystone:
$ keystone user-create --name=nova --pass=novapassword [email protected]
$ keystone user-role-add --user=nova --tenant=service --role=admin
4. Edit /etc/nova/api-paste.ini and change the [filter:authtoken] section as below:
[filter:authtoken]
paste.filter_factory = keystoneclient.middleware.auth_token:filter_factory
auth_host = controller
auth_port = 35357
auth_protocol = http
admin_tenant_name = service
admin_user = nova
admin_password = novapassword
5. Register Nova compute service with Keystone. Note the id generated for this service and use it as –service-id for the next command:
$ keystone service-create --name=nova --type=compute --description="Nova Compute Service"
$ keystone endpoint-create
  --service-id=4ffd7c4e034b4e75ab3dd2b2e4c77283
  --publicurl=http://controller:8774/v2/%(tenant_id)s
  --internalurl=http://controller:8774/v2/%(tenant_id)s
  --adminurl=http://controller:8774/v2/%(tenant_id)s
6. Restart Nova services:
$ service nova-api restart
$ service nova-cert restart
$ service nova-consoleauth restart
$ service nova-scheduler restart
$ service nova-conductor restart
$ service nova-novncproxy restart
7. On controller1, initialize schema structure for Nova:
$ nova-manage db sync
Horizon (Dashboard)
1. Remove ubuntu-theme which can cause problems with Horizon:
$ apt-get remove --purge openstack-dashboard-ubuntu-theme
2. Edit /etc/openstack-dashboard/local_settings.py and change OPENSTACK_HOST to HAproxy node:
OPENSTACK_HOST = controller
3. Restart Apache service:
$ service apache2 restart
4. Open the Horizon page on controller1 (http://192.168.1.11/horizon) and controller2 (http://192.168.1.12/horizon) so Horizon can generate secret key. Do not log into it yet.
5. Change the ownership of default generated secret key to user horizon:
$ chown horizon.horizon /var/lib/openstack-dashboard/secret_key
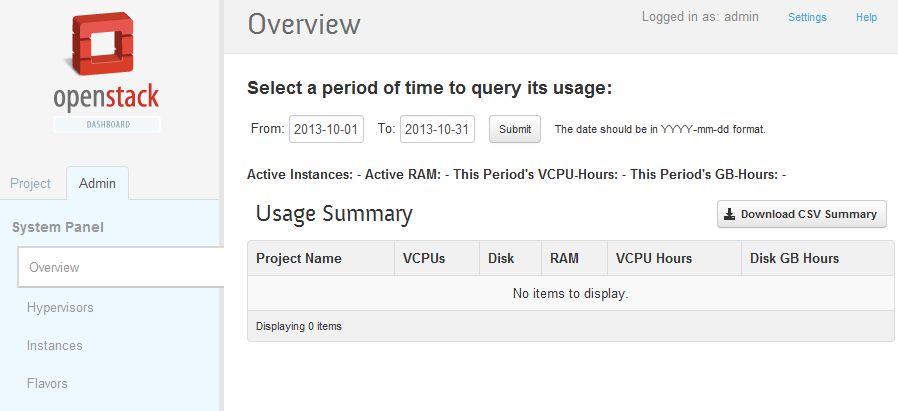
6. Now, log into the OpenStack dashboard page at http://192.168.1.11/horizon and login as user admin with password “adminpassword”. You should able to see following screenshot on Overview page:
Install Nova Node on compute1
1. Our compute1 does not support KVM so we will install nova-compute-qemu instead:
$ apt-get install nova-compute-qemu nova-network python-guestfs
(Select “Yes” when asked to create a supermin appliance during install)
2. Change the permission of guestfs and remove the default SQLite database created by Nova:
$ chmod 644 /boot/vmlinuz*
$ chmod 777 /var/lib/nova/nova.sqlite
$ rm -Rf /var/lib/nova/nova.sqlite
3. Add following lines into /etc/nova/nova.conf. We are defining the compute node IP, glance_host, nova-network configuration and connection string for nova schema:
[DEFAULT]
...
my_ip=192.168.197.21
vncserver_listen=0.0.0.0
vncserver_proxyclient_address=192.168.1.21
glance_host=controller
network_manager=nova.network.manager.FlatDHCPManager
firewall_driver=nova.virt.libvirt.firewall.IptablesFirewallDriver
network_size=254
allow_same_net_traffic=False
multi_host=True
send_arp_for_ha=True
share_dhcp_address=True
force_dhcp_release=True
flat_network_bridge=br100
flat_interface=eth1
public_interface=eth1
rabbit_hosts = controller1:5672,controller2:5672
rabbit_retry_interval = 1
rabbit_retry_backoff = 2
rabbit_max_retries = 0
rabbit_durable_queues = False
rabbit_ha_queues = True
rabbit_password = guest
auth_strategy = keystone
irpc_backend = nova.rpc.impl_kombu
[database]
connection = mysql://nova:novapassword@mysql:33306/nova
4. Go back to controller1 node to create the network for instances and restart nova-api:
$ nova network-create vmnet --fixed-range-v4=10.0.0.0/24 --bridge-interface=br100 --multi-host=T
$ service nova-api restart
5. Restart nova-compute and nova-network to apply the changes:
$ service nova-compute restart && service nova-network restart
Your OpenStack cluster setup is now ready. You can start to upload VM images through Horizon and create your first instance. Once created, the Overview page will report the usage summary similar to the screenshot below:

Log into ClusterControl at http://192.168.1.21/clustercontrol to view your Galera Cluster, see screenshot of the dashboard below.
That’s it. Mission accomplished 🙂
**Note: This setup does not covered the high availability of Glance backend storage to store images. You may use other better solution like Swift as the storage backend.
Reference
- OpenStack Installation Guide for Ubuntu 12.04 (LTS) – http://docs.openstack.org/havana/install-guide/install/apt/content/
- OpenStack Configuration Reference – http://docs.openstack.org/havana/config-reference/content/


