blog
MySQL Docker Containers: Understanding the Basics


Docker is quickly becoming mainstream, as a method to package and deploy self-sufficient applications in primarily stateless Linux containers. But for a stateful service like a database, this might be bit of a headache. How do we best configure MySQL in a container environment? What can go wrong? Should we even run our databases in a container environment? How does performance compare with e.g. running on virtual machines or bare-metal servers? How do we manage replicated or clustered setups, where multiple containers need to be created, upgraded and made highly available?
So, welcome to our new blog series – “MySQL on Docker”. We will touch upon swarms, shared volumes, data-only-containers, security and configuration management, multi-host networking, service discovery and implications on monitoring when we move from host-centric to role-centric services with shorter life cycles.
In our first blog post, we are going to cover some basics around running MySQL in a container. We are going to use the term ‘Docker’ as the container platform throughout the blog series.
MySQL Docker Containers
Think about a container as a “lightweight virtual machine”. Unlike virtual machines though, containers do not require an entire operating system, all required ibraries and the actual application binaries. The same Linux kernel and libraries can be shared between multiple containers running on the host. Docker makes it easy to package Linux software in self-contained images, where all software dependencies are bundled and deployed in a repeatable manner. An image will have exactly the same software installed, whether we run it on a laptop or on a server. The key benefit of Docker is that it allows users to package an application with all of its dependencies into a standardized unit (container). Running many containers allows each one to focus on a specific task; multiple containers then work in concert to implement a distributed system.
The traditional way to run a MySQL database is to install the MySQL packages on a host (bare-metal, virtual machine, cloud instance), and applications would just have to connect to the listening port. Most of the management tasks, for example, configuration tuning, backup, restore, database upgrade, performance tweaking, troubleshooting and so on have to be executed on the database host itself. You would expect to have several ports accessible for connection, for example port TCP 22 for SSH, TCP 3306 for MySQL or UDP 514 for syslog.
In a container, think of MySQL as one single unit that only serve MySQL related stuff on port 3306. Most of the operation should be performed under this single channel. Docker works great in packaging your application/software into one single unit, which you can then deploy anywhere as long as Docker engine is installed. It expects the package, or image to be run as a single process per container. With Docker, the flow would be you (or someone) build a MySQL image using a specific version and vendor, package the image and distribute to anybody who wants to quickly fire a MySQL instance.
Let’s get it running
Let’s familiarize ourselves with a MySQL container running on Docker. We’ll take a ‘break/fix’ approach, so expect to see some errors pop up here and there. We’ll look at the errors and see why they happen. We are going to use the official MySQL image created and maintained by Docker.
To begin with, we must have a host. It can be any type of hosts (physical or virtual) running on Linux, Mac OS X or Windows. Please refer to Docker’s installation guide for details. You can also use docker-machine to provision hosts on a supported cloud provider like DigitalOcean and AWS EC2 Container Service, but we will cover that in another blog post. Here, we are going to use Ubuntu 14.04 as our machine host and use standard command line for deployment and management.
Next, find a container image that you want from the Docker registry. It can be a public registry like Docker Hub or a private registry, where you host the containers’ image on-premises, within your own network. If you can’t find the image that fits you, you can build your own.
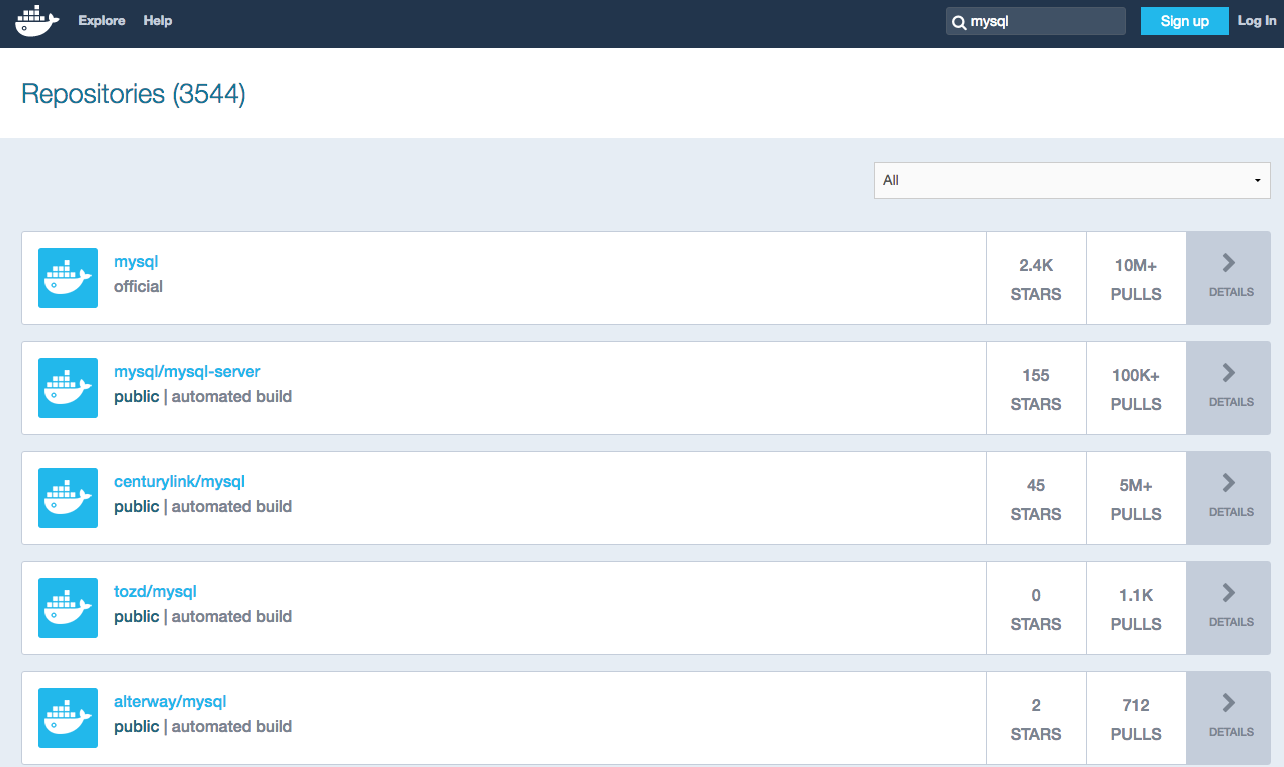
There are many MySQL container images available in the Docker Hub registry. The following screenshot shows some examples:
Firing up a MySQL container
First, you have to install Docker. In the Linux box:
$ sudo apt-get install docker.io #Ubuntu/Debian
$ yum install docker # RedHat/CentOS
Then, use the following basic command to run a MySQL container:
$ docker run --name=test-mysql mysqlYeap, that’s it. Just two steps. Here is what the second command line does:
- run – Run a command in a new container.
- –name – Give a name to the container. If you don’t specify this, Docker will generate a random name.
- mysql – The image name as stated on the Docker Hub page. This is the simplest image name. The standard is “username/image_name:tag”, for example “severalnines/mysql:5.6”. In this case, we specified “mysql”, which means it has no username (the image is built and maintained by Docker, therefore no username), the image name is “mysql” and the tag is latest (default). If the image does not exist, it will pull it first from Docker Hub into the host, and then run the container.
You should then see the following lines:
Status: Downloaded newer image for mysql:latest
error: database is uninitialized and password option is not specified
  You need to specify one of MYSQL_ROOT_PASSWORD, MYSQL_ALLOW_EMPTY_PASSWORD and MYSQL_RANDOM_ROOT_PASSWORD
It looks like the container deployment failed. Let’s verify with the following command if there is any running container:
$ docker psThere is no running container. Let’s show all containers (including the non-running ones):
$ docker ps -a
CONTAINER ID        IMAGE                                     COMMAND                CREATED             STATUS                     PORTS               NAMES
80b4914976a2        mysql:latest                              "docker-entrypoint.s   6 minutes ago       Exited (1) 6 minutes ago                       test-mysql
Under the ‘STATUS’ column, you can see the status was “Exited (1) 6 minutes ago”. If a program ended while returning a non-zero value, it means that the program was terminated with some kind of error. So, what happened? The MySQL image was successfully downloaded but Docker failed to run it as container because the environment is not properly set up. This is stated in the error lines.
Let’s try to fix this by specifying one of the environment variables:
$ docker run --name=test-mysql --env="MYSQL_ROOT_PASSWORD=mypassword" mysql
FATA[0000] Error response from daemon: Conflict. The name "test-mysql" is already in use by container 80b4914976a2. You have to delete (or rename) that container to be able to reuse that name.
Oops, another error occurred. We were trying to run a new container with the same name as an existing container. Let’s remove the created container and run the command again:
$ docker rm test-mysql
$ docker run --name=test-mysql --env="MYSQL_ROOT_PASSWORD=mypassword" mysql
You should see lots of lines appear. That’s MySQL initialization when starting up as newly installed software. You should see MySQL is ready to accept connections:
2016-06-01T12:06:59.543352Z 0 [Note] mysqld: ready for connections.
Version: '5.7.12'  socket: '/var/run/mysqld/mysqld.sock'  port: 3306  MySQL Community Server (GPL)
Looks good. Our MySQL container is now running. However, you are now stuck in the terminal and can’t do anything because the container is running in attach mode (running in foreground). This is so inconvenient. We would expect MySQL to run as a service instead. Let’s consider this as a failed deployment and stop the current container. In another terminal, stop the running container and run it again in detach mode (running as background):
$ docker stop test-mysql
$ docker rm test-mysql
$ docker run --detach --name=test-mysql --env="MYSQL_ROOT_PASSWORD=mypassword" mysql
a6b09a8d332a16e008cb3035ffd36bcd664886b79c9d2533c3dc1d47026a33a0
You will get an output of the container ID, indicating the container is successfully running in the background. Let’s verify the status of the container:
$ docker ps
CONTAINER ID        IMAGE               COMMAND                CREATED             STATUS              PORTS               NAMES
83285aa548ba        mysql:latest        "docker-entrypoint.s   4 minutes ago       Up 4 minutes        3306/tcp            test-mysql
MySQL container is now running and accessible on port 3306 of that container. Since it was running in the background, we could not see what was happening during the MySQL startup. Use the following command to see what happened during the container startup:
$ docker logs test-mysqlConnecting to the Container
Next, we retrieve the IP address of that container in order to access it. Run the inspect command:
$ docker inspect test-mysqlWe can see lots of low-level information of that container. Lookup the “IPAddress” line:
"IPAddress": "172.17.0.20",From the physical host, we can now access the MySQL server. Ensure the MySQL client package is installed beforehand:
$ apt-get install mysql-client
$ mysql -uroot -pmypassword -h 172.17.0.20 -P 3306
Welcome to the MySQL monitor. Commands end with ; or g.
Your MySQL connection id is 2
Server version: 5.7.12 MySQL Community Server (GPL)
Copyright (c) 2000, 2016, Oracle and/or its affiliates. All rights reserved.
Oracle is a registered trademark of Oracle Corporation and/or its
affiliates. Other names may be trademarks of their respective
owners.
Type 'help;' or 'h' for help. Type 'c' to clear the current input statement.
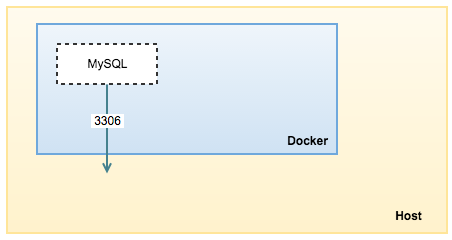
mysql>Voila! We now have a MySQL instance running in a container. However, this port is only accessible within the Docker network. If you have another Docker container for your application, you can connect with them directly via IP address 172.17.0.20 on port 3306, as illustrated in the following diagram:
Docker allocates a dynamic IP address on every running container. Whenever a container is restarted, you will get a new IP address. You can get the IP address range from the Docker network interface in the Linux box. Run the following command to see Docker’s network range:
$ ip a | grep docker | grep inet
    inet 172.17.42.1/16 scope global docker0
Our container’s IP address is 172.17.0.20 which is in the range of 172.17.42.1/16. Let’s restart the container, and you should get a new IP address being assigned by Docker:
$ docker stop test-mysql
$ docker start test-mysql
$ docker inspect test-mysql | grep IPAddress
        "IPAddress": "172.17.0.21",
Our IP address just changed to 172.17.0.21. If you had an application that connects to this container via the old IP address, the application would not get connected anymore. Docker introduces another way to link your container with another container, to ensure whatever IP address assigned to it will get updated in the linked container. Let’s say we deploy a WordPress application (which has no MySQL installed on that image), and want to link with our existing MySQL container, test-mysql. Here is what you should do:
$ docker run --detach --name test-wordpress --link test-mysql:mysql wordpressIn a couple of minutes, the container “test-wordpress” will be up and running and linked to our test-mysql container:
$ docker ps
CONTAINER ID        IMAGE               COMMAND                CREATED             STATUS              PORTS               NAMES
0cb9f4152022        wordpress:latest    "/entrypoint.sh apac   15 seconds ago      Up 15 seconds       80/tcp              test-wordpress
0a7aa1cf196e        mysql:latest        "docker-entrypoint.s   16 minutes ago      Up 16 minutes       3306/tcp            test-mysql
To verify if it’s linked correctly, enter the test-wordpress container and look at the content of /etc/hosts:
$ docker exec -it test-wordpress bash
root@0cb9f4152022:/var/www/html# cat /etc/hosts
172.17.0.22    0cb9f4152022
127.0.0.1    localhost
::1    localhost ip6-localhost ip6-loopback
fe00::0    ip6-localnet
ff00::0    ip6-mcastprefix
ff02::1    ip6-allnodes
ff02::2    ip6-allrouters
172.17.0.21    mysql 0a7aa1cf196e test-mysql
The application can now see an entry with IP address and hostname related to the linked MySQL container. If you restart the MySQL container and get another IP address, the entry will be updated by Docker accordingly.
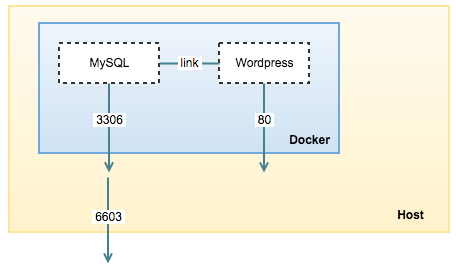
You can also expose the MySQL container to the outside world by mapping the container’s MySQL port to the host machine port using the publish flag (as illustrated in the above diagram). Let’s re-initiate our container and run it again with an exposed port:
$ docker rm -f test-mysql
$ docker run --detach --name=test-mysql --env="MYSQL_ROOT_PASSWORD=mypassword" --publish 6603:3306 mysql
Verify if the container is correctly mapped:
CONTAINER ID        IMAGE               COMMAND                CREATED             STATUS              PORTS                    NAMES
8d97b70658a9        mysql:latest        "docker-entrypoint.s   3 seconds ago       Up 3 seconds        0.0.0.0:6603->3306/tcp   test-mysql
0cb9f4152022        wordpress:latest    "/entrypoint.sh apac   15 minutes ago      Up 15 minutes       80/tcp                   test-wordpress
At this point, we can now access the MySQL container directly from the machine’s port 6603.
Configuration management
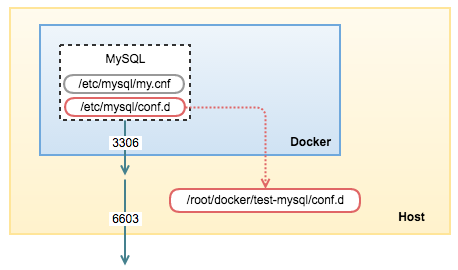
The container comes with a standard MySQL 5.7 configuration options inside /etc/mysql/my.cnf. Let’s say our application that connects to this MySQL server requires more max_connections (default is 151) during startup, so we need to update the MySQL configuration file. The best way to do this in a container is to create alternative configuration files in a directory on the host machine and then mount that directory location as /etc/mysql/conf.d inside the mysql container.
On the host machine, create a directory and a custom MySQL configuration file:
$ mkdir -p /root/container/test-mysql/conf.d
$ vim /root/container/test-mysql/conf.d/my-custom.cnf
And add the following lines:
[mysqld]
max_connections=200
Then, we have to re-initiate the MySQL container (remove and run) by mapping the volume path as shown in the following command (the long command is trimmed to make it more readable):
$ docker run
--detach
--name=test-mysql
--env="MYSQL_ROOT_PASSWORD=mypassword"
--publish 6603:3306
--volume=/root/docker/test-mysql/conf.d:/etc/mysql/conf.d
mysql
This will start a new container test-mysql where the MySQL instance uses the combined startup settings from the default /etc/mysql/my.cnf and /etc/mysql/conf.d/my-custom.cnf, with settings from the latter taking precedence.
Verify the new setting is loaded from the machine host:
$ mysql -uroot -pmypassword -h127.0.0.1 -P6603 -e 'show global variables like "max_connections"';
+-----------------+-------+
| Variable_name   | Value |
+-----------------+-------+
| max_connections | 200   |
+-----------------+-------+
Many configuration options can also be passed as flags to mysqld. This will give you the flexibility to customize the container without needing a custom .cnf file. For example, if you want to change the max connections similar to the above and collation for all tables to use UTF-8 (utf8mb4), just run the following:
$ docker run
--detach
--name=test-mysql
--env="MYSQL_ROOT_PASSWORD=mypassword"
--publish 6603:3306
mysql
--max-connections=200
--character-set-server=utf8mb4
--collation-server=utf8mb4_unicode_ci
Data Storage
There are several ways to store data used by MySQL that run in Docker containers. Docker can manage the storage of your database’s data by writing the database files to disk on the host system, using its own internal volume management. If you run the inspect command, look at the “Volumes” directive and you should notice by default MySQL data directory (/var/lib/mysql) is mounted into Docker’s internal volume:
$ docker inspect test-mysql
    ...
    "Volumes": {
        "/etc/mysql/conf.d": "/root/docker/test-mysql/conf.d",
        "/var/lib/mysql": "/var/lib/docker/vfs/dir/4d437e2fe5ab2f71ffeea2590d72a417a9ca88607c130b46f5ad819d0a5b68cd"
    }
This is the easiest way and fairly transparent to the user. The downside is that the files may be hard to locate for tools and applications that run directly on the host system, i.e. outside containers.
The other way is to create a data directory on the host system (outside the container) and mount this to a directory visible from inside the container. This places the database files in a known location on the host system, and makes it easy for tools and applications on the host system to access the files. The downside is that the user needs to make sure that the directory exists, and that e.g. directory permissions and other security mechanisms on the host system are correctly set up.
Create a data directory on a suitable volume on your host system, e.g. /storage/docker/mysql-datadir:
$ mkdir -p /storage/docker/mysql-datadirStart your mysql container like this:
$ docker run
--detach
--name=test-mysql
--env="MYSQL_ROOT_PASSWORD=mypassword"
--publish 6603:3306
--volume=/root/docker/test-mysql/conf.d:/etc/mysql/conf.d
--volume=/storage/docker/mysql-datadir:/var/lib/mysql
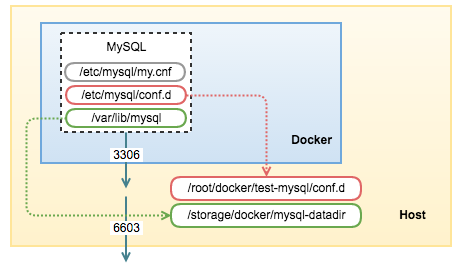
mysqlThe ”–volume=/storage/docker/mysql-datadir:/var/lib/mysql“ part of the command mounts the /storage/docker/mysql-datadir directory from the underlying host system as /var/lib/mysql inside the container, where MySQL by default will write its data files, as illustrated in the following diagram:
When inspecting the container, you should see the following lines:
$ docker inspect test-mysql
    ...
    "Volumes": {
        "/etc/mysql/conf.d": "/root/docker/test-mysql/conf.d",
        "/var/lib/mysql": "/storage/docker/mysql-datadir"
    }
Which is now clearer for you to see the directory and files on the machine host created by this container:
$ ls -al /storage/docker/mysql-datadir/
total 188452
drwxr-xr-x 5  999  999     4096 Jun  3 10:13 .
drwxr-xr-x 3 root root     4096 Jun  3 10:06 ..
-rw-r----- 1  999  999       56 Jun  3 10:13 auto.cnf
-rw-r----- 1  999  999     1329 Jun  3 10:13 ib_buffer_pool
-rw-r----- 1  999  999 79691776 Jun  3 10:13 ibdata1
-rw-r----- 1  999  999 50331648 Jun  3 10:13 ib_logfile0
-rw-r----- 1  999  999 50331648 Jun  3 10:13 ib_logfile1
-rw-r----- 1  999  999 12582912 Jun  3 10:13 ibtmp1
drwxr-x--- 2  999  999     4096 Jun  3 10:13 mysql
drwxr-x--- 2  999  999     4096 Jun  3 10:13 performance_schema
drwxr-x--- 2  999  999    12288 Jun  3 10:13 sys
Note that restarting or removing the container does not remove the MySQL data directory. When you restart a MySQL container by using “stop” and “start” command, it would be similar to restarting the MySQL service in a standard installation:
$ docker stop test-mysql
$ docker start test-mysql
If you remove the MySQL container, the data in the mounted volumes will still be intact and you can run a new instance, mounting the same volume as data directory:
$ docker rm -f test-mysql
$ docker run -d --name=new-mysql -p 6604:3306 -v /storage/docker/mysql-datadir:/var/lib/mysql mysql
*If a MySQL container runs on top of an existing MySQL datadir, the $MYSQL_ROOT_PASSWORD variable should be omitted from the “run” command line; it will in any case be ignored, and the pre-existing database will not be changed in any way.
However, only one running (active) container is allowed to access the MySQL data directory at a time. Running another container mounting the same datadir volume will cause MySQL startup error on the later container:
$ docker run -d --name=another-new-mysql -p 6605:3306 -v /storage/docker/mysql-datadir:/var/lib/mysql mysql
$ docker logs another-new-mysql
2016-06-10T07:16:59.538635Z 0 [Note] InnoDB: Completed initialization of buffer pool
2016-06-10T07:16:59.540373Z 0 [Note] InnoDB: If the mysqld execution user is authorized, page cleaner thread priority can be changed. See the man page of setpriority().
2016-06-10T07:16:59.551646Z 0 [ERROR] InnoDB: Unable to lock ./ibdata1 error: 11
2016-06-10T07:16:59.551656Z 0 [Note] InnoDB: Check that you do not already have another mysqld process using the same InnoDB data or log files.
2016-06-10T07:16:59.551659Z 0 [Note] InnoDB: Retrying to lock the first data file
2016-06-10T07:17:00.552294Z 0 [ERROR] InnoDB: Unable to lock ./ibdata1 error: 11
2016-06-10T07:17:00.552364Z 0 [Note] InnoDB: Check that you do not already have another mysqld process using the same InnoDB data or log files.
This is expected since a MySQL process must exclusively own the MySQL data directory to avoid any potential conflicts. Having more than one mysqld process connecting to the same data directory is just not feasible. That’s why MySQL horizontal scaling can only be achieved via replication.
That concludes this blog. Do share your experience in managing MySQL containers in the comments section below.


