blog
How to Cluster Liferay with MySQL Galera and Ceph for High Availability and Performance

Liferay is an open-source content management system written in Java. It is used by a number of high traffic sites, as this survey suggests.
![]()
Clustering Liferay and other components such as the database and the file system is a good way to handle the performance requirements of a high traffic site. The latest Liferay version has introduced features that simplify clustering, such as built-in support for Ehcache clustering, Lucene replication, read/write splitting capabilities for database (in case if you run on master-slave architecture) and support for various file systems for the portal repository.
In this post, we are going to show you how to cluster Liferay in a multi-node load-balanced setup. The database backend will be based on Galera Cluster for MySQL, and the file system clustered using Ceph FS.
Architecture
We will have a three-node database cluster, with two of the MySQL instances co-located with Liferay portal. The third MySQL instance is co-located with ceph-admin. Another two nodes, ceph-osd0 and ceph-osd1 will be used as a storage pool for Liferay repository using CephFS. ClusterControl will be hosted on ceph-osd1. We will be using Liferay Portal 6.2 Community Edition GA1 and all hosts are running on CentOS 6.4 64bit. All commands shown below are executed in root environment. SElinux and iptables are turned off.

Our hosts definition in all nodes:
192.168.197.111		liferay1 galera1
192.168.197.112		lifeary2 galera2
192.168.197.113		ceph-mds ceph-admin ceph-mon1 galera3
192.168.197.114		ceph-osd0 ceph-mon2 haproxy1
192.168.197.115		ceph-osd1 ceph-mon3 haproxy2 clustercontrol
Deploying MySQL Galera Cluster
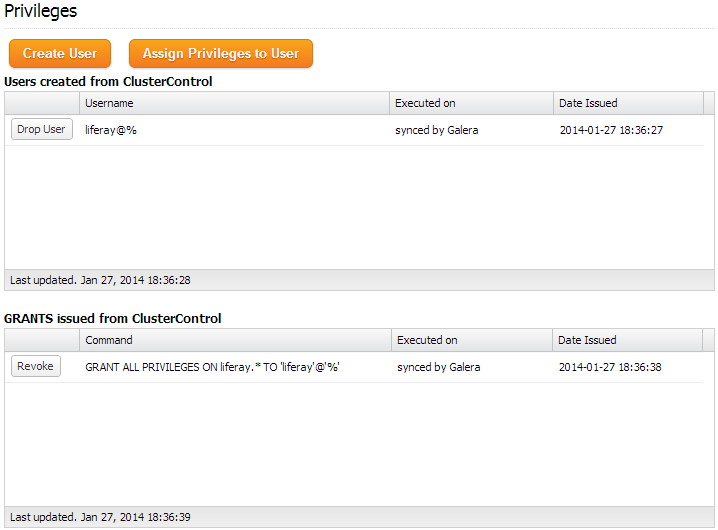
1. Use the Galera Configurator to deploy a three-node Galera Cluster. Use galera1, galera2 and galera3 for the MySQL nodes, and ceph-osd1 (192.168.197.115) for the ClusterControl node. Once deployed, create a schema for Liferay by using Manage >> Schema and Users >> Create a database called “liferay”. Then assign all privileges to the schema with a wildcard host (‘%’).
We will use the MySQL JDBC connector for load balancing and failover of database requests.
Installing Ceph Storage Cluster
Ceph is a free clustered storage platform that provides unified object, block and file storage. It requires at least three nodes, one for the admin/monitor node and the rest for the storage cluster nodes (OSD). We’ll also add a monitor role to the storage nodes, for resiliency in case the admin node goes down.
Please note that Ceph FS is relatively new and not yet production ready. If you’re considering this for production, you may instead want to look at another clustered file system. We covered the following in previous blog posts; GlusterFS, OCFS2, or GFS2.
Our distributed storage layer is illustrated below:
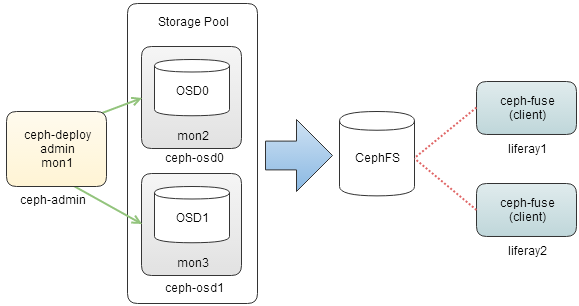
We’ll use a nice helper script to simplify the Ceph deployment called ceph-deploy. This script requires passwordless SSH setup between the admin node and OSD nodes. Then, we will mount it using the FUSE method on clients.
The following steps should be performed on ceph-admin node.
1. SSH into ceph-admin and generate SSH key:
$ ssh-keygen -t rsa # press Enter for all questions
2. Copy the SSH key to OSDs to allow passwordless SSH:
$ ssh-copy-id -i ~/.ssh/id_rsa ceph-osd0
$ ssh-copy-id -i ~/.ssh/id_rsa ceph-osd1
3. Install ceph-deploy dependencies, install ceph-deploy package and create a directory for Ceph deployment:
$ yum install python-argparse python-distribute -y
$ rpm -Uhv http://ceph.com/rpm/el6/noarch/ceph-deploy-1.3.4-0.noarch.rpm
$ mkdir ~/ceph-deploy
$ cd ~/ceph-deploy
4. Start the Ceph deployment:
$ ceph-deploy new ceph-admin ceph-osd0 ceph-osd1
$ ceph-deploy install ceph-admin ceph-osd0 ceph-osd1
$ ceph-deploy mon create-initial
5. Define the public network for Ceph communication on ~/ceph-deploy/ceph.conf:
$ cat “public_network = 192.168.197.0/24” >> ceph.conf
Then, push the configuration file to all Ceph nodes:
$ ceph-deploy --overwrite-conf config push ceph-admin
$ ceph-deploy --overwrite-conf config push ceph-osd0
$ ceph-deploy --overwrite-conf config push ceph-osd1
6. Create the Ceph monitor daemons:
$ ceph-deploy mon create ceph-admin ceph-osd0 ceph-osd1
$ ceph-deploy gatherkeys ceph-admin
7. On each OSD node, create a directory for OSD daemons:
$ ssh ceph-osd0 "mkdir /var/local/osd0"
$ ssh ceph-osd1 "mkdir /var/local/osd1"
8. Prepare the directory for OSDs and activate it:
$ ceph-deploy osd prepare ceph-osd0:/var/local/osd0 ceph-osd1:/var/local/osd1
$ ceph-deploy osd activate ceph-osd0:/var/local/osd0 ceph-osd1:/var/local/osd1
9. Copy the configuration file and admin key to all Ceph nodes so we can manage it without specifying keyring:
$ ceph-deploy admin ceph-osd0 ceph-osd1 ceph-admin
10. Check the ceph deployment status. Make sure you achieve active+clean state which indicates that it has finished peering:
$ ceph -s
    cluster 8d8f1f38-ddb4-4d7b-a219-c4a886101788
     health HEALTH_WARN clock skew detected on mon.ceph-osd0, mon.ceph-osd1
     monmap e3: 3 mons at {ceph-admin=192.168.197.113:6789/0,ceph-osd0=192.168.197.114:6789/0,ceph-osd1=192.168.197.115:6789/0}, election epoch 8, quorum 0,1,2 ceph-admin,ceph-osd0,ceph-osd1
     osdmap e9: 2 osds: 2 up, 2 in
      pgmap v26: 192 pgs, 3 pools, 0 bytes data, 0 objects
            14792 MB used, 9260 MB / 25339 MB avail
                 192 active+clean
11. Create the metadata server on ceph-admin:
$ ceph-deploy mds create ceph-admin
Creating CephFS
Following steps should be performed on ceph-admin.
1. Create a separate pool for ceph client to mount for CephFS:
$ rados mkpool cephfs
$ ceph osd pool set cephfs size 2
2. Create and associate keyring and assign client privilege for the CephFS:
$ ceph auth get-or-create client.cephfs mon 'allow r' osd 'allow rwx pool=cephfs' -o ~/ceph-deploy/client.cephfs.keyring
$ ceph-authtool -p -n client.cephfs ~/ceph-deploy/client.cephfs.keyring > ~/ceph-deploy/client.cephfs
3. Copy the CephFS configuration file and keyring to liferay1 and liferay2:
$ scp ceph.conf client.cephfs client.cephfs.keyring liferay1:/etc/ceph/
$ scp ceph.conf client.cephfs client.cephfs.keyring liferay2:/etc/ceph/
Mounting Ceph
Following steps should be performed on liferay1 and liferay2.
1. Install ceph-fuse package:
$ yum install ceph-fuse -y
2. Create the mount point for CephFS and mount using FUSE:
$ mkdir /storage
$ ceph-fuse --keyring /etc/ceph/client.cephfs.keyring --name client.cephfs /storage
3. Verify if CephFS is mounted correctly:
$ mount | grep ceph
ceph-fuse on /storage type fuse.ceph-fuse (rw,nosuid,nodev,allow_other,default_permissions)
4. Add the following line into /etc/rc.local to allow automount on system startup:
cat “/usr/bin/ceph-fuse --keyring /etc/ceph/client.cephfs.keyring --name client.cephfs /storage” >> /etc/rc.local
Installing Liferay
Following steps should be performed on liferay1 and liferay2 unless specified.
1. Liferay requires the latest Java from Oracle JDK (not OpenJDK available in yum repository). Download it by using following command:
$ wget --no-cookies --header "Cookie: gpw_e24=http%3A%2F%2Fwww.oracle.com" "http://download.oracle.com/otn-pub/java/jdk/7u51-b13/jdk-7u51-linux-x64.rpm" --no-check-certificate -O jdk-7u51-linux-x64.rpm
2. Install Oracle JDK:
$ rpm -Uhv jdk-7u51-linux-x64.rpm
3. Check the Java version. Make sure it installs correctly:
$ java -version
java version "1.7.0_51"
Java(TM) SE Runtime Environment (build 1.7.0_51-b13)
Java HotSpot(TM) 64-Bit Server VM (build 24.51-b03, mixed mode)
4. Download Liferay Portal Community Edition (bundled with Tomcat), install Liferay dependencies and extract the downloaded file into /home directory:
$ yum install -y unzip ImageMagick
$ wget http://downloads.sourceforge.net/project/lportal/Liferay%20Portal/6.2.0%20GA1/liferay-portal-tomcat-6.2.0-ce-ga1-20131101192857659.zip?r=http%3A%2F%2Fwww.liferay.com%2Fdownloads%2Fliferay-portal%2Favailable-releases&ts=1390908800&use_mirror=jaist
$ unzip liferay-portal-tomcat-6.2.0-ce-ga1-20131101192857659.zip -d /home
5. Create a symbolic link to simplify the Liferay path:
$ ln -sf /home/liferay-portal-6.2.0-ce-ga1/ /home/liferay
6. On liferay1, create a directory for Liferay clustered storage:
$ mkdir /storage/liferay
7. Create a file called portal-ext.properties to replace some default parameters in Liferay:
$ vim /home/liferay/tomcat-7.0.42/webapps/ROOT/WEB-INF/classes/portal-ext.properties
And add the following lines:
dl.store.file.system.root.dir=/storage/liferay/document_library
cluster.link.enabled=true
ehcache.cluster.link.replication=true
lucene.replicate.write=true
jdbc.default.driverClassName=com.mysql.jdbc.Driver
jdbc.default.url=jdbc:mysql:loadbalance://liferay1:3306,liferay2:3306,ceph-admin:3306/liferay?useUnicode=true&characterEncoding=UTF-8&useFastDateParsing=false&loadBalanceBlacklistTimeout=5000
jdbc.default.username=liferay
jdbc.default.password=liferaypassword
8. On liferay1, start Liferay:
$ /home/liferay/tomcat-7.0.42/bin/startup.sh
You can monitor the Liferay bootstrap process at /home/liferay/tomcat-7.0.42/logs/catalina.out. You will see “INFO: Server startup in 130336 ms” indicates the Liferay Portal has started.
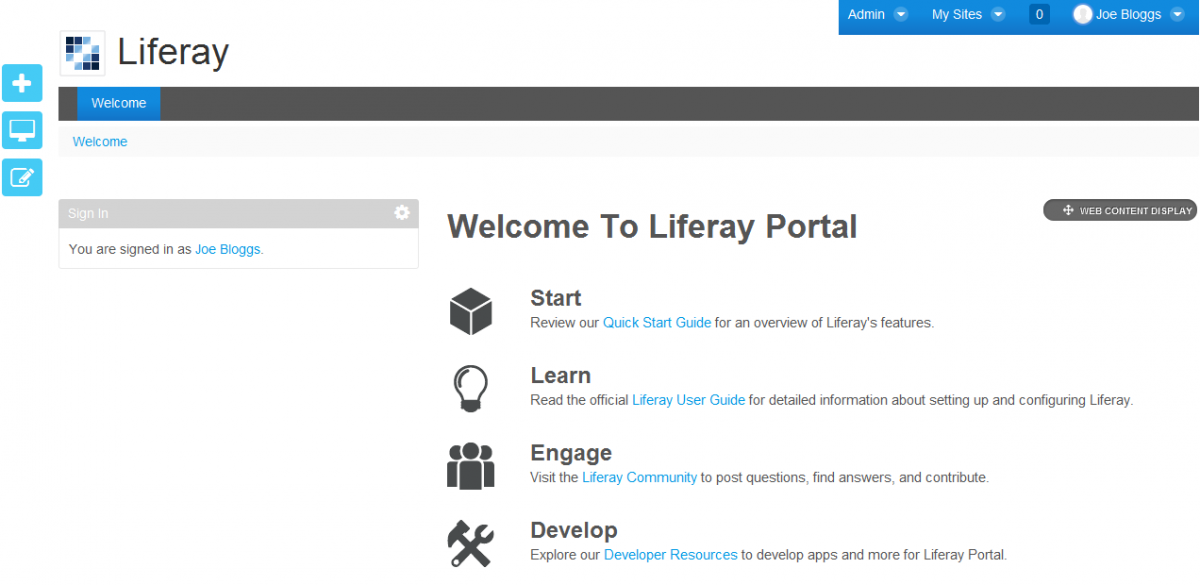
9. Connect to liferay1 Tomcat server at http://192.168.197.111:8080/ and perform the initial setup. Once done, you will be redirected to a welcome page, similar to screenshot below:
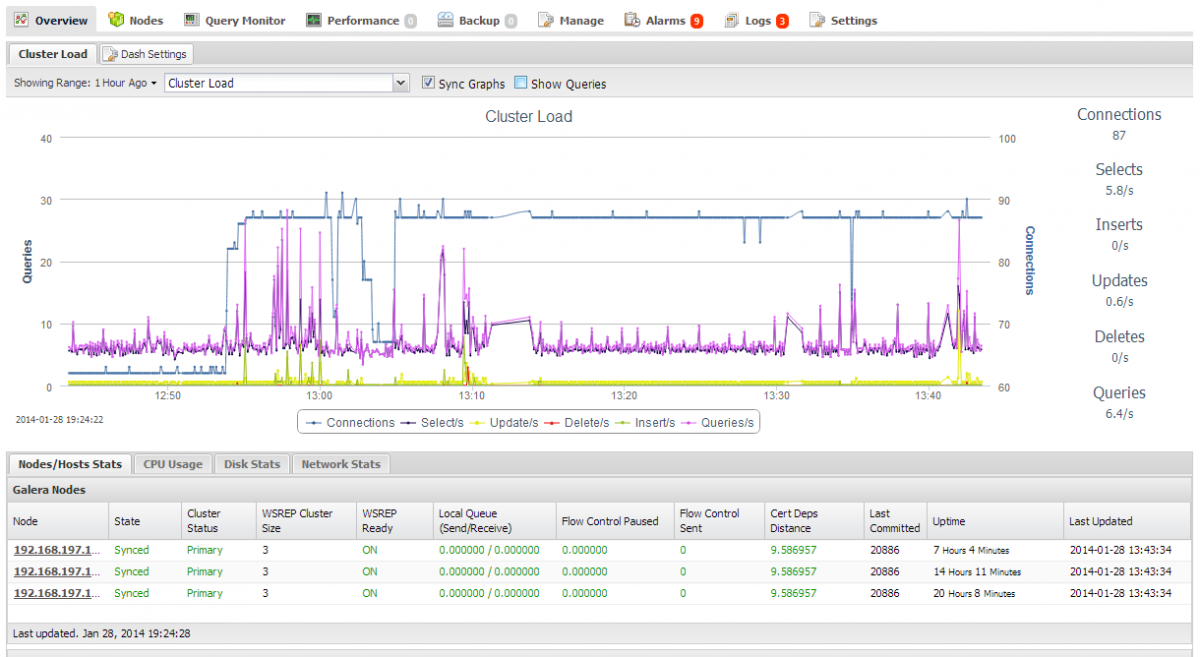
10. Once completed, repeat step 8 for the other Liferay node (liferay2). If the bootstrapping completed successfully, both Liferay portals should run in active-active clustered mode now. You should see some activities on your database cluster, as seen from the ClusterControl dashboard:
Finally, you may add load balancers in front of the Liferay web apps such as HAproxy, Apache (with mod_jk, mod_rewrite and mod_proxy) or load balancing appliances.
References
- Liferay Clustering – http://www.liferay.com/documentation/liferay-portal/6.2/user-guide/-/ai/liferay-clustering-liferay-portal-6-2-user-guide-20-en
- Liferay Portal Properties – http://docs.liferay.com/portal/6.2/propertiesdoc/portal.properties.html
- Ceph Storage Cluster Quick Start – http://ceph.com/docs/master/start/quick-ceph-deploy


