blog
Deploying an asynchronous slave to MySQL Galera Cluster

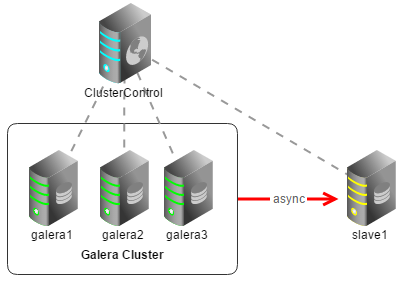
Due to its synchronous nature, Galera performance can be limited by the slowest node in the cluster. So running heavy reporting queries or making frequent backups on one node, or putting a node across a slow WAN link to a remote data center might indirectly affect cluster performance. Combining Galera and asynchronous MySQL replication in the same setup, aka Hybrid Replication, can help. A slave is loosely coupled to the cluster, and will be able to handle a heavy load without affecting the performance of the cluster. The slave can also be a live copy of the Galera cluster for disaster recovery purposes.
![]()
We had explained the different steps to set this up in a previous post. With ClusterControl 1.2.9 though, this can be automated via the web interface. A slave can be bootstrapped with a Percona XtraBackup stream from a chosen Galera master node. In case of master failure, the slave can be failed over to replicate from another Galera node. Note that master failover is available if you are using Percona XtraDB Cluster or the Codership build of Galera Cluster with GTID. If you are using MariaDB, ClusterControl supports adding a slave but not performing master failover.
Preparing the master node (Galera Cluster)
MySQL replication slave requires at least a master with GTID enabled on the Galera nodes. However, we would recommend users to configure all Galera nodes as master for better failover. GTID is required as it is used to do master failover. If you are running on MySQL 5.5, you might need to upgrade to MySQL 5.6
The following must be true for the masters:
- At least one master among the Galera nodes
- MySQL GTID must be enabled
- log_slave_updates must be enabled
- Master’s MySQL port is accessible by ClusterControl and slaves
To configure a Galera node as master, change the MySQL configuration file for that node as per below:
server_id=
binlog_format=ROW
log_slave_updates=1
log_bin=binlog
gtid_mode=ON
enforce_gtid_consistency=1
Preparing the slave node
For the slave, you would need a separate host or VM, with or without MySQL installed. If you do not have a MySQL installed, and choose ClusterControl to install the MySQL on the slave, ClusterControl will perform the necessary actions to prepare the slave, for example, configure root password (based on monitored_mysql_root_password), create slave user (based on repl_user, repl_password), configure MySQL, start the server and also start replication. The MySQL package used will be based on the Galera vendor used, for example, if you are running Percona XtraDB Cluster, ClusterControl will prepare the slave using Percona Server.
In short, we must perform following actions beforehand:
- The slave node must be accessible using passwordless SSH from the ClusterControl server
- MySQL port (default 3306) and netcat port 9999 on the slave are open for connections.
- You must configure the following options in the ClusterControl configuration file for the respective cluster ID under /etc/cmon.cnf or /etc/cmon.d/cmon_.cnf:
- repl_user=
- repl_password=
- monitored_mysql_root_password=
- The slave configuration template file must be configured beforehand, and must have at least the following variables defined in the MySQL configuration template:
- server_id
- basedir
- datadir
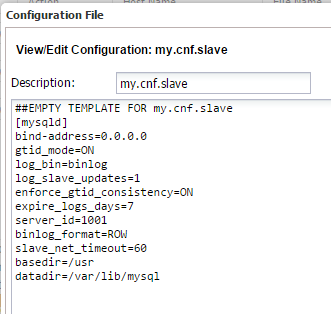
To prepare the MySQL configuration file for the slave, go to ClusterControl > Manage > Configurations > Template Configuration files > edit my.cnf.slave and add the following lines:
[mysqld]
bind-address=0.0.0.0
gtid_mode=ON
log_bin=binlog
log_slave_updates=1
enforce_gtid_consistency=ON
expire_logs_days=7
server_id=1001
binlog_format=ROW
slave_net_timeout=60
basedir=/usr
datadir=/var/lib/mysql
Attaching a slave node via ClusterControl
Let’s now add our slave using ClusterControl. The architecture looks like this:
Our example cluster is running MySQL Galera Cluster (Codership). The same steps apply for Percona XtraDB Cluster, although MariaDB 10 has minor differences in step #1 and #6.
1. Configure Galera nodes as master. Go to ClusterControl > Manage > Configurations, and click Edit/View on each configuration files and append the following lines under mysqld directive:
galera1:
server_id=101
binlog_format=ROW
log_slave_updates=1
log_bin=binlog
expire_logs_days=7
gtid_mode=ON
enforce_gtid_consistency=1
galera2:
server_id=102
binlog_format=ROW
log_slave_updates=1
log_bin=binlog
expire_logs_days=7
gtid_mode=ON
enforce_gtid_consistency=1
galera3:
server_id=103
binlog_format=ROW
log_slave_updates=1
log_bin=binlog
expire_logs_days=7
gtid_mode=ON
enforce_gtid_consistency=1
2. Perform a rolling restart from ClusterControl > Manage > Upgrades > Rolling Restart. Optionally, you can restart one node at a time under ClusterControl > Nodes > select the corresponding node > Shutdown > Execute, and then start it again.
3. You should see that ClusterControl detects the newly configured master nodes, as per the screenshot below:

4. On the ClusterControl node, setup passwordless SSH to the slave node:
$ ssh-copy-id -i ~/.ssh/id_rsa 192.168.50.1115. Then, ensure the following lines exist in the corresponding cmon.cnf or cmon_.cnf:
repl_user=slave
repl_password=slavepassword123
monitored_mysql_root_password=myr00tP4ssword
Restart CMON daemon to apply the changes:
$ service cmon restart6. Go to ClusterControl > Manage > Configurations > Create New Template or Edit/View existing template, and the add following lines:
7. Now, we are ready to add the slave. Go to ClusterControl > Cluster Actions > Add Replication Slave. Choose a master and the configuration file as per the example below:
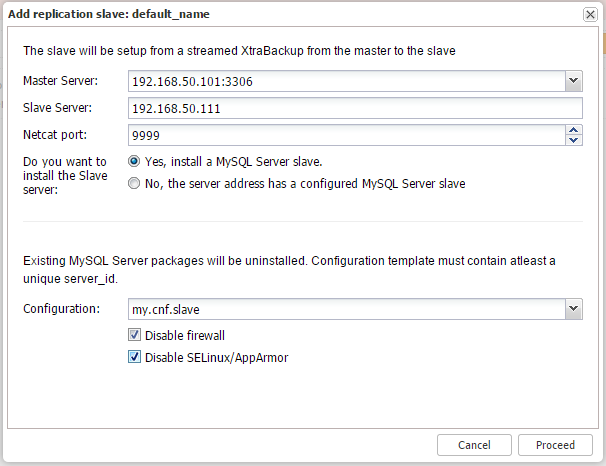
Click on Proceed. A job will be triggered and you can monitor the progress at ClusterControl > Logs > Jobs. Once the process is complete, the slave will show up in your Overview page as highlighted in the following screenshot:
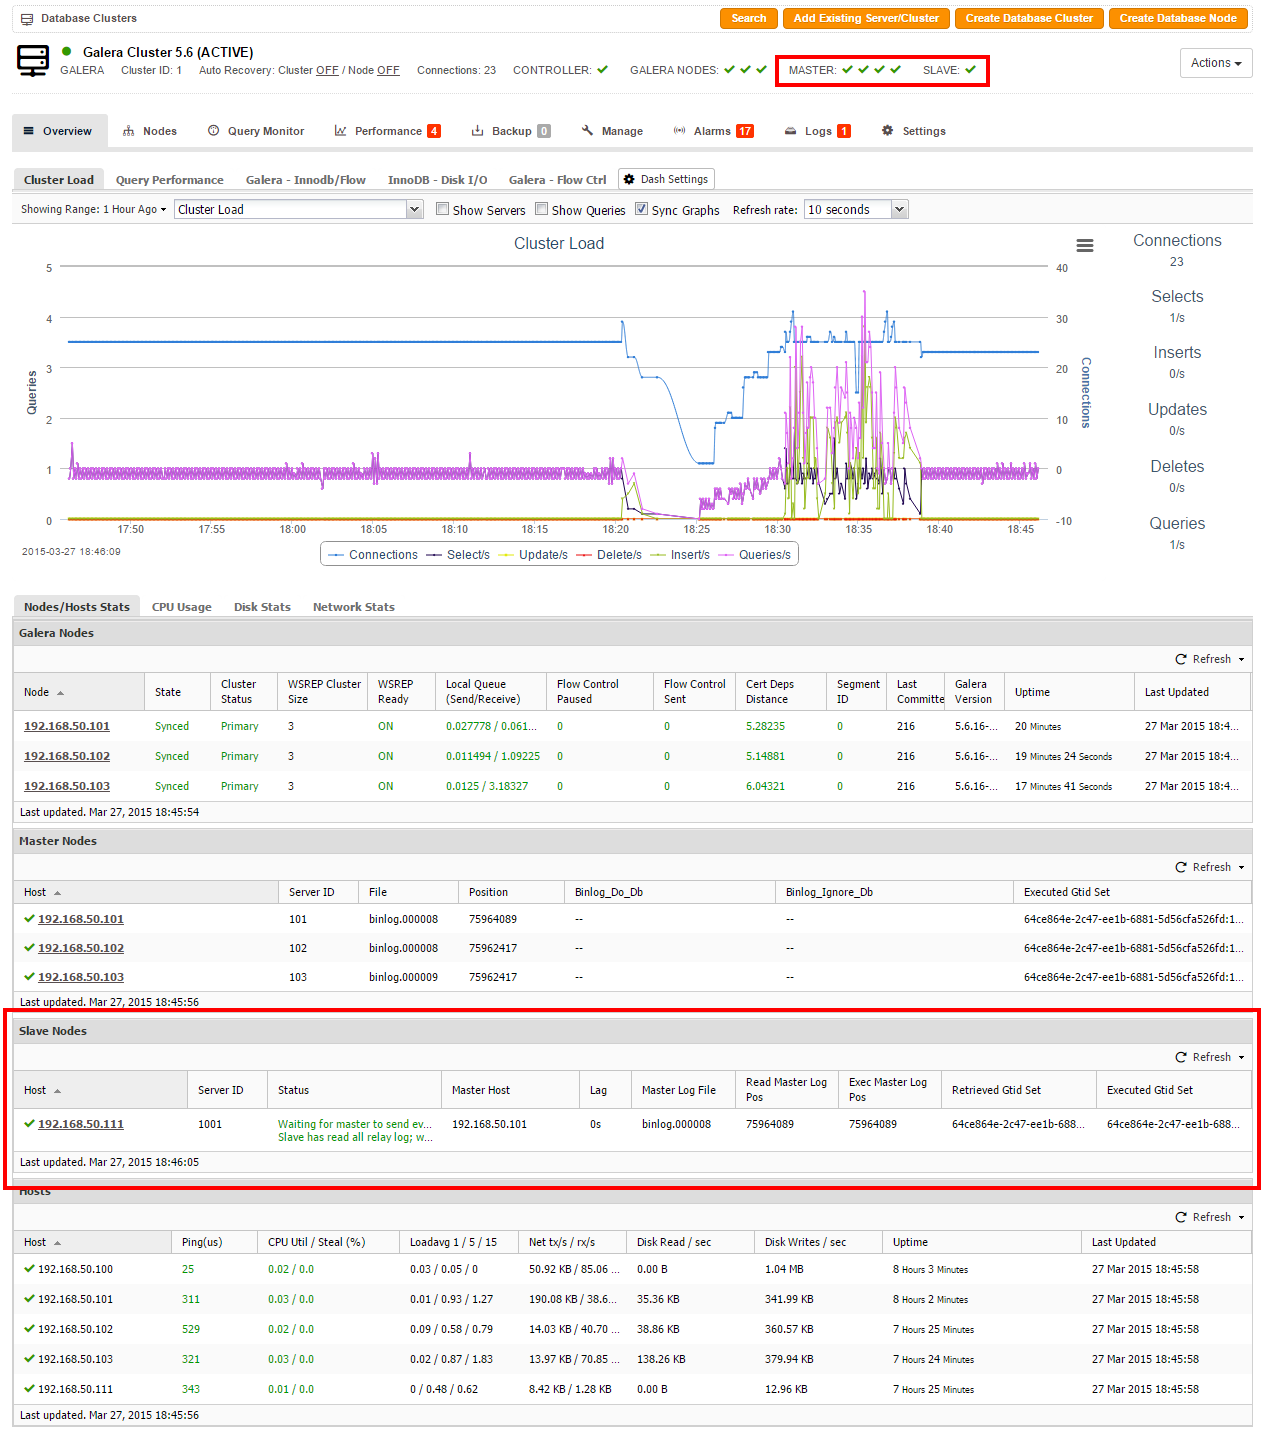
You would notice there are 4 green tick icons for master. This is because we have configured our slave to produce a binlog, which is required for GTID. Thus, the node is capable to become a master for another slave.
Failover and recovery
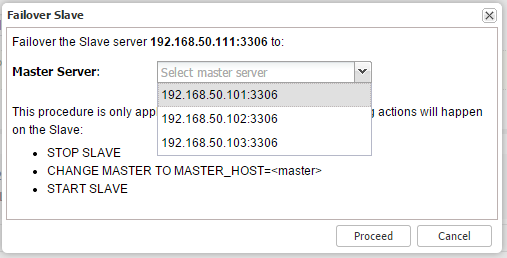
To perform failover in case the designated master goes down, just go to Nodes > select the slave node > Failover Replication Slave > Execute and choose a new master similar to the screenshot below:
You can also stage the slave with data from the master by going to Nodes > select the slave node > Stage Replication Slave > Execute to re-initialize the slave:
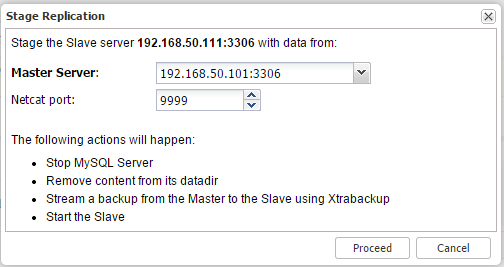
This process will stop the slave instance, remove the datadir content, stream a backup from the master using Percona Xtrabackup, and then restart the slave. This can take some time depending on your database size, network and IO. And that’s it folks!
Wrapping up
Attaching an asynchronous slave to your MySQL Galera cluster helps maintain your cluster’s performance profile while increasing its resilience. Even better, it’s a pretty easy, straightforward process, made even easier by using ClusterControl.
Hybrid replication is one of a handful of schemes MySQL supports. Read this MySQL Replication for High Availability white paper for a deeper dive into MySQL replication and follow us on Twitter or LinkedIn, or sign up to our newsletter below to stay current!